The Fresh Loaf

A Community of Amateur Bakers and Artisan Bread Enthusiasts.

Recent Blog Entries

wally's picture
wally

One of the things I love about baguettes is that with just a little manipulation once they are proofed, you can take the "stick" and create an array of dinner rolls that are barely linked: the épi de blé is the obvious example.  But recently, after watching a video series called Formes de pains that a TFL member posted (and I can't recall who, so please shout out if you're reading this), I became fascinated with another forme using a baguette shape as the starting point: la margueritte.

So I decided to have a little fun, and instead of just creating my usual two or three baguettes, to play with them a bit.

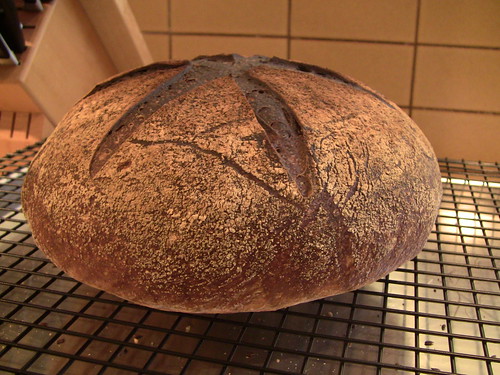
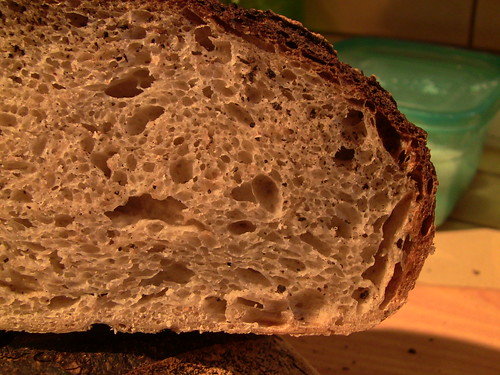
The impetus was my attempt to arrive at a dough weight that I am happy with for the home baguette; something, in my case, that is maximum 16 - 17 inches long.  I've always made 10oz (283.5 g) baguettes, but I'm not altogether pleased.  Their girth is more appropriate to a sub roll than a classic baguette.  So I decided to go with 8oz (227.8 g) dough weight to see if that produced a slightly more lithe baguette - a ficelle, actually.

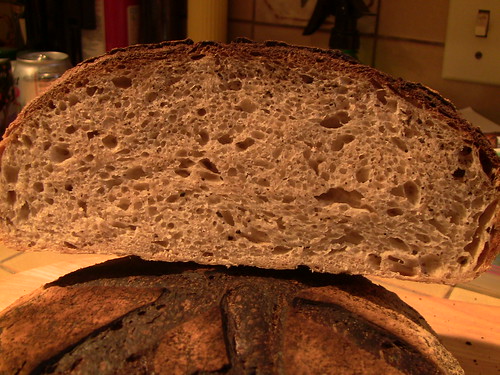
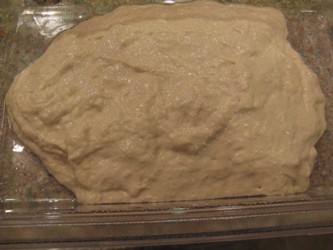
Because I wanted to play with the dough more than anything else, I decided to make a straight baguette, essentially using Hamelman's French Bread recipe, but decreasing the hydration to 69% and doing a hand, rather than machine, mix.  Bulk fermentation was a little over 3 hours, and folding was done in the container though sets of 8 folds at a time.  The initial fold was done 10 minutes after mixing, and then 2 additional folds were made at hour intervals.  The dough was divided and preshaped into 3 pieces with a 25 minute bench rest.

When it came time to roll out the baguettes, it was evident that the amount of folding had really increased the elasticity of the dough, even though I had done nothing more than a quick minute-and-a-half mix of the ingredients by hand.  So it was necessary to roll them out partially, let them stand another 5 minutes and then finish the shaping.

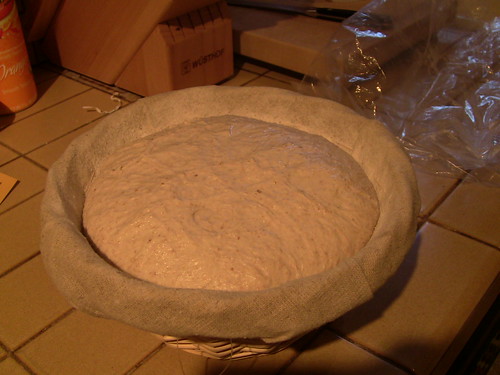
They were couched for 1 1/2 hours while I preheated the oven to 500 F.

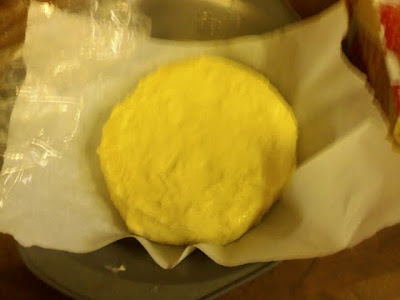
I decided to place them on parchment paper on my peel to make loading more easy, and to construct la margueritte right on the parchment.

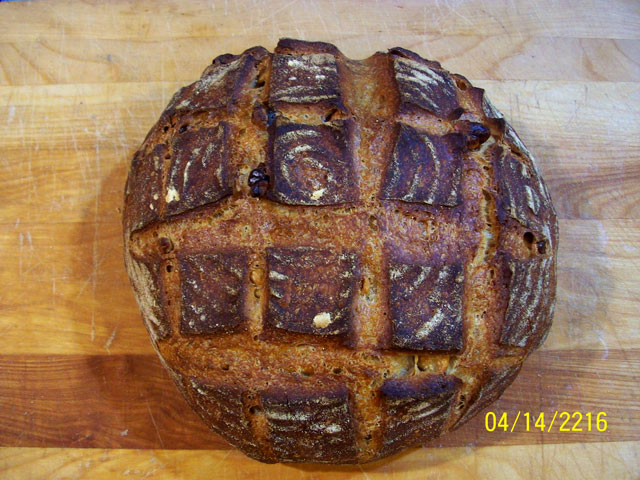
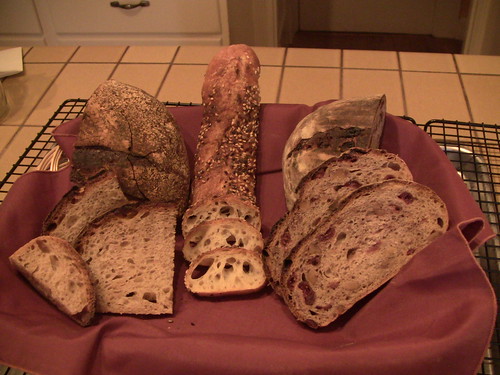
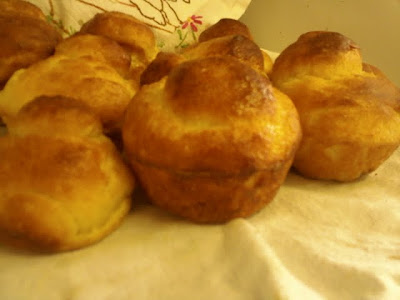
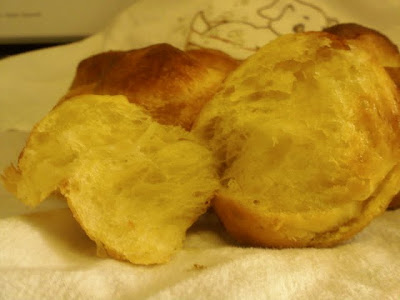
As you can see from the picture below, it is essentially a baguette with the tips of each end cut off (they are used to make the little dough ball in the middle which acts like a glue for the structure).  It is then cut diagonally into 6 more or less equal pieces, and they are place in a circle with the dough ball in the center.  The video for this can be found here.  It's quite easy to make and once formed the top is lightly dusted with flour and then each 'ear' is lightly slashed.


The epi, below, is of course simply the baguette shape cut diagonally with scissors with pieces then turned right and then left (or left and then right) and also dusted with flour.  


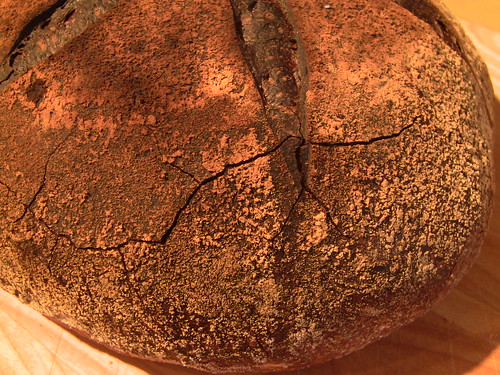
The oven was presteamed using SylviaH's method, and hot water was added to my lava rocks when I loaded the bread and then twice more in the initial 2 minutes.  The bake was at 475 F for 21 minutes, and I rotated the breads after 10 minutes to get even browning (made easier by the parchment paper they baked on).

Both la margueritte and the epi create, in effect, separate dinner rolls that are lightly conjoined.  It just seems such a unique and conversation-generating way to present rolls that otherwise would be placed in a basket and just passed around a table.  The videos present several other interesting ways of manipulating baguettes to create new formes de pains.

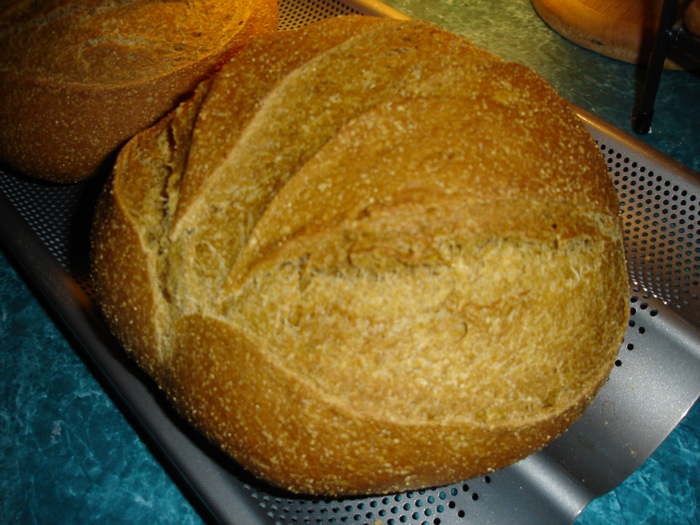
The ficelle turned out nicely as well, with its grignes opening up well.  Crumb shots below as well.


Methinks a tomato-basil bisque would be a wonderful sop for these!

Larry


Franko's picture
Franko

This bread took a few weeks from first concept to final bake but I'm glad I hung in there to get what I think is a good bread with a savory flavour and aroma. I'd been wanting to make a sour onion rye bread for a while but couldn't find any recipes that really appealed to me. As I was leafing through Jan Hed's 'Swedish Breads and Pastries one day I found a recipe for a Pain Dijonnaise that included mustard in the formula, something I hadn't considered using till this point but thought that adding some mustard along with caramelized onions in a sour rye would be an excellent flavour combination. I had a bake planned for the following day of a Pain de Campagne using a wheat levain so I decided to split the mix and use the onion mustard combination in one loaf to see how the flavours worked in a finished loaf. While it turned out OK it didn't have quite the punch I was looking for, lacking the intensity of overall flavour I was after, but promising nonetheless.

If I was going to make this properly I needed to start a new rye sour from scratch since the one I had wasn't a pure rye sour anymore from letting wheat based sours gradually creep into it over the last year. It took a few tries to finally get an active starter going, but that eventually worked out by keeping it wrapped in towels on top of the hot water tank, the one consistently warm spot in our house during the day while we're away at work.

When I got home from work this past Saturday I mixed the levain/sour for the next days mix leaving it to ripen over 17hours, and then getting the caramelized onions prepared as well as roasting some mustard seeds to include in the mix. The formula I'd worked out would use a dark rye sour, combined with medium rye and bread flour in the final mix, not wanting to overpower the final flavour with any more dark rye and hopefully allow the onion mustard combination to have it's say. Once I had everything in the mixer and started mixing I realized right off that I'd have to add more bread flour to get any sort of a workable mix, using an additional 100 grams to achieve a wet but manageable dough. The rest of the mix went fine after that resulting in a soft but developed dough. Formula, mixing notes, and bake profile to follow.

Once I had the bread out of the oven I had some serious doubt as to whether it was fully baked since it just didn't sound right when I tapped the bottom of the loaf. I don't normally check the internal temperature, but because of the size of this one I thought it would be wise. The reading showed 209.5F from the center so I put my trust in that and hoped for the best. When I sliced it this morning I found that it was fully baked except for one very small area in the bottom center that's barely noticeable. The crumb is chewy and moist, with a solid flavour of sweet onion, a bit of sharp from the mustard, and a pronounced sour character overall. The onion itself seems to have almost completely dissolved into the dough, but now and again you hit a pocket of lovely roasted onion flavour ...which I wish there was more of. Next time I bake this I'll increase both the onion and the mustard percentage, but for now I'm fairly satisfied with the result.

Franko

If anyone was wondering what this bread might be used for, the photos below show what I had in mind for it right from the beginning.

Montreal smoked brisket sandwich

Vancouver Island smoked sockeye salmon on toasted onion rye with onion and capers....and yes, no cream cheese!

PROCEDURE:

  1. Mix the levain/sour and let sit for 16-18 hours at 70F

  2. Add all the ingredients of the final dough *except the levain/sour to a stand mixer bowl and mix on 1st speed for 2-3 minutes until combined, then add the levain/sour and continue mixing for 2-3 minutes longer, scraping the bowl down as needed. The dough will be sticky, and show little development.

  3. Transfer the dough to a large mixing bowl and begin folding the dough over itself, rotating it a 1/4 turn for each fold and continue till the dough is cohesive and moderately developed. The dough should be soft and supple.

  4. Turn the dough out onto the counter, and using a minimum of dusting flour continue working the dough, kneading it for 3-4 minutes until the dough can hold a shape without slumping.

  5. Place the dough in a lightly dusted bowl and cover. Bulk ferment at room temp of 68-70F for 2 ½ hrs. Stretch and fold twice in the first two hours.

  6. Gently preshape in a ball, cover and let rest for 15 minutes.

  7. Shape as desired , cover, and final proof for approx. 1 ½ hrs at room temperature.

  8. Preheat oven and baking stone to 485F and have steaming system prepared in advance of loading the bread.

  9. Slash as desired, *note: if making a batard, a chevron style of slash will help give the loaf a higher, rounder, finished profile.

  10. With steaming system in place, load the bread onto the preheated baking stone and bake for 20minutes at 485F. Remove the steam system and lower the temperature to 440F and continue baking for 20 minutes, then lower the temperature to 400F for an additional 15-20 minutes. Check for an internal temperature of 210F. Turn off the heat and leave the bread in the cooling oven for 15 minutes. Remove and cool on a wire rack for 8-9 hours or overnight before slicing.

Notes:

Caramelized Onion

Two large sweet onions, coarsely sliced and mixed with the olive oil, then baked in a covered pan at 250F for 30 minutes. Remove the lid, stir the onions and continue baking for 30 or more minutes until the onions are a medium brown colour. For a future bake of this bread I would increase the ratio of onion to 35% and the mustard to 10% of the overall flour in the mix for a more pronounced flavour effect.


Sour Rye with Caramelized Onion & Mustard


Ingredients

%

Kg


Levain/Sour


Dark Rye Flour

100

140

Water

83

115

Mature rye starter-100%

10

13.9

Total


268.9


Final Dough


Medium Rye flour

18.75

150

Bread flour

81.25

750

Levain

29.8

268.9

Sliced sweet onion-cooked

25

270

Olive oil

2.1

22.8

Sea salt

1.8

19

Honey

4.9

52

Grainy mustard

6.2

65

Mustard seeds-toasted

1.4

15

Water

65

590

DDT- 72-74F


Total kg


2202.7

Total flour weight

100

1046.9

Total Hydration

67

705

highmtnpam's picture
highmtnpam

My husband and I were involved in a terrible car accident January 9. Among other injuries, he has a broken neck and i have a very badly broken right arm. God was there and we will mend and be good as new.  I got my computer after three days in the hospital. in between surgeries, etc I read TFL.  It was the best medicine available. I have enjoyed every picture and all the comments. It was so nice to follow the experiments and experiences of all the loafers. I will say, some pictures were better than others depending on the amount of morphine I had on board. I can now attest that bread and conversation about bread is good for everything!

Pam

Floydm's picture
Floydm

I baked a couple of things this weekend.  The first was the Sourdough Carrot Cake recipe from King Arthur that someone (TXFarmer?) posted about a couple of months back.

Carrot Cake Muffins

I halved the recipe and baked them as cupcakes rather than a cake.  It is quite good and a useful way of disposing of ripe starter.

I thought I also baked a walnut levain today, but judging by the timestamp* this is a loaf that I'll bake 205 years from now.

Walnet Levain

It looks like it'll be good.  I'm looking forward to trying it someday!


* I suspect the fact that my 8 year old son has been borrowing my camera to make stop action movies with Lego figures recently has something to do with the timestamp getting changed.  

mdunham21's picture
mdunham21

In my quest to make better bread I have gathered information from almost any resource.  Peter Reinhart's Bread Baker's Apprentice has become a go-to book when I want to bake.  One day I was perusing random websites and I happened upon a blog called "Pinch My Salt".  This blog included a number of amateur bakers making each recipe in The Bread Baker's Apprentice in order.  I thought this might be a cheaper alternative to making beer considering I do not currently have the funds.

Yesterday afternoon I mixed together the cornmeal and water and let it sit out overnight.  The bowl on the bottom of the picture is about 2 cups of flour, the cornmeal mixture, and yeast.  The other two bowls are pizza dough and a poolish.

I let the soaker/sponge sit out for a couple hours until it was gurgling CO2 at me.  I mixed the sponge with the remaining 2.5 cups flour, 1.5 tsp salt, 1oz shortening and 4oz of molasses .  When I stirred everything together it still seemed too wet, so I mixed in some more flour during the kneading.  the dough was lightly oiled in a bowl and set to ferment for a few hours.  I removed the dough, knocked it down, and formed a couple boules.

I didn't want to make sandwich loaves because I really like free form loaves and the shape of boules.  The final proofing lasted for about an hour before taking them to be scored and baked.  The loaves scored nicely but I lack a peel, as a result I accidently deflated some of the loaf during transfer to the oven.  Thankfully I had a decent amount of oven spring.  

The loaves turned out fine, I can only imagine how they would have looked if I hadn't deflated them, I guess it's time to look into making a peel.  I look forward to the next stage in the BBA challenge and as always look for improvement.


Cheers and Happy Baking


-Matthew

GSnyde's picture
GSnyde

Foodies (myself included) can be really annoying.  Especially the obsession with details of the provenance of ingredients.  I don’t need to know what species of leaves are in the mulch that fed the grass that fed the lamb that I eat.

One foodie principle that I endorse, though, is the locavore concept, the idea that it is beneficial to use local ingredients and to celebrate local cuisine.  Well, we don’t grow wheat here in the Bay Area, but my bake today is decidedly local to the Bay Area.  

The recipe for this miche was developed at San Francisco Baking Institute in South San Francisco; the flours are produced to the specifications of, and distributed by, Central Milling Company in Petaluma; and the whole shebang was put together right here, just a mile from the Golden Gate, by a middling local baker in a worse-than-middling local oven.

The SFBI miche formula has been much touted in the last few weeks, and can be found in Brother David’s recent blog post (http://www.thefreshloaf.com/node/21644/miche-hit).  Many of you have baked this formula, and have been pleased with it.   I followed the formula, except I used 50% Central Milling Organic Type 85 flour and 50% Central Milling Organic Artisan Baker’s Craft flour (a white flour, enriched with malt, that I’ve been happily using for a range of breads).  I used Bob’s Red Mill Wheat Germ (ok, that’s from way up in Oregon).

The dough behaved nicely in mixing.  I found it very slack and sticky, like a high-hydration baguette dough.  Indeed, it was pretty difficult to form the boule as my floured hands kept sticking to the dough.  I either succeeded or failed to properly form a tight boule; I gave up trying at a certain point, and plopped it in a genuine SFBI linen-lined proofing basket.

After 15 hours in the fridge, and 90 minutes on the kitchen counter, the dough ball was very nicely risen, and the poke test indicated proper proofing.

IMG_2073

The loaf sprung up nicely in the steamed portion of the bake.  I baked at 450 F for 65 minutes total, and the internal temperature got to 210 F.  The crust is near burnt in places.  My oven is considerably hotter at its top and this loaf was close to the top (no room to use a lower shelf).   Next time I’ll try a slightly lower temperature.  Still, not a bad looking bread, and nicely crackled.

IMG_2077

IMG_2078

The crumb texture and flavor are awesome—very tender and airy, and complex, sour and toasty-wheaty taste.  I can’t say I notice the wheat germ, compared to the last miche I made using 100% Type 85 flour.  The flavor of the crust is just a tad past “bold”, verging on burnt.  But, this is a really yummy bread.

IMG_2079

IMG_2080

So this was the last of a three-bake weekend, producing also a nice Cranberry-Walnut bread and some tasty “Bearguettes”, all described in my previous blog post (http://www.thefreshloaf.com/node/21860/when-cat’s-away-mouse-bakes…-lot)

IMG_2084

Happy Baking, all!

Glenn


Jo_Jo_'s picture
Jo_Jo_

This might just say it all. I made a very small amount of Peter Reinharts Rich Man's Brioche, actually only a third of the recipe. It still called for 1 1/2 sticks of butter in it, by weight is was almost the same amount as it called for flour! The recipe said this was the hardest to make of the three formula's. I took that as a challenge. Here's the end result, the "Money Shots".

From Brioche


It really has an incredible crumb on it, soft and tender, literally you can see the gluten feathering out as you pull one apart. The trouble is that it is almost dripping in butter. I was brought up on using real butter on my breads, so I can't believe I am going to say this. I ate one of these and it almost made me sick there was so much butter in it. It has been a couple hours since I ate it, and my body is still saying, "I am so glad you froze those things!" Really, with my love for breads and using real butter on them, you would think these would taste awesome to me. Even putting sugar free strawberry jam on them didn't help the situation, so I hope that my husband likes them or I might have to feed them to the chickens or something. Here is how I made them, although I really don't recommend them and won't be making them again.

Everything all measured out and ready to be made into Brioche.

My sponge was really small in that huge 6 quart bowl.

Added the other liquid ingredients. At this point I realized that such a small amount was not going to be easy to make in

my mixer.

Flour is mixed in and getting ready to start putting the butter in.

My ball of dough after mixing with the paddle. It had difficulty producing gluten, because it was small and sticky with butter. I actually did some stretch and folds on it for about an hour, trying to get it developed more.

Flattened out and ready for fridge, sorry for the blurry pictures. My cell phone was used for these and it sometimes is hard to tell if the picture is good or not.

Shaped and ready for proofing. They rose about twice this size in two hours, and then I cooked them and they really shot up.

wassisname's picture
wassisname

There have been some inspiring and mouthwatering nutty breads posted lately, so how could I resist.  I had to have some.  It's been a long time, and I forgot how good a few walnuts in a loaf of bread could be. 

The bread is a basic sourdough, mostly bolted wheat, a bit of  whole white wheat, and a small amount of WW from my starter.  Hydration was around 75%.  To this I added a handful of walnuts and a spoonful of honey.  Precision was not the priority this particular day, clearly.  I don't usually use sweetner in my sourdoughs so I lowered the oven temp to compensate for the honey, but the crust still went a little dark, darker than the photos make it look.  No complaints about the flavor, though!  I made a batch of cranberry sauce to go with it and now everything is right with the world... until the bread runs out anyway!

Marcus

Moots's picture
Moots

I stumbled upon bwraith's 2007 blog entry on this sourdough ciabatta. It combines my two favorite breads in a way that enhances the best of both! I have learned so much from others on this forum and thought others might like to be reminded of this great bread.

sourdough ciabatta


The link to bwraith's formula is here.

I didn't change a thing, but the discussion that followed the original posting was very helpful in monitoring the process.


Cheers,

Tracy

breadsong's picture
breadsong

Hello, I was poking around the pastryna.com website, where they make available back issues of their magazine.
I was delighted to find an article written by my SFBI Weekend Baguette class instructor, Frank Sally, on baking with Teff (in a WFO):
http://www.pastryna.com/DigitalEdition/Digital_NA_10_1.html (The SFBI Teff Miche article starts on page 26).
(David, if you're out there, this one's for you!)

I wrote Frank and asked permission to post the formula here, and he agreed and kindly offered a modified version which I tried baking this weekend.
With so many thanks to Frank Sally and SFBI!!!

I used Bob's Red Mill Whole-Grain Teff flour; that website notes "Whole Grain Teff (Tef, T'ef) an ancient North African cereal grass, is a nutritional powerhouse. It is the smallest grain in the world (about 100 grains are the size of a kernel of wheat!). The germ and bran, where the nutrients are concentrated, account for a larger volume of the seed compared to more familiar grains."

I tried to create "cereal grass" with the scoring:


*Added to post: As a result of Larry's question below, I went back to the pastryna.com article to re-check the baker's percentages.
In the article, in the formula for the Teff levain, the baker's percentages for Starter and Teff flour were switched.
I am embarassed to say I failed to notice this as I blithely went along, entering the information for calculation in my spreadsheet.
Here is the bread as I made it (and the formula restated below, as it was intended to be made!):

SFBI Teff Miche       1500 Desired Dough Weight in grams       <----      
                 
  From pastryna.com 2010.1          
  Baker's Percentages Weights Baker's
Ingredients Dough Starter Teff Levain Dough Starter Teff Levain Total %
                 
Bread flour 1 1   688 76   764 98%
Teff flour     0.1     18 18 2%
Water, boiling (65%)     0.52     94 94  
Water, 70F (35%) 0.65 1 0.28 448 76 51 575 85.55%
Salt 0.027     18.6     18.6 2.38%
Sourdough Starter   0.4     30   30 3.84%
Starter     1     182    
Teff Levain 0.5     345        


Total 2.177 2.4 1.9 1500 182 345 1500  
    (1) (2)          

Restated formula (1500g loaf):


Starter

Teff Levain

Dough

Total

Bread flour

7.5


688

696

Teff flour


182


182

Water, boiling


94


94

Water

7.5

51

488

507

Salt


18.6

18.6

Sourdough Starter

3

18


21

Starter


Teff Levain


345


Total

18

345

1500

1500


(1) Starter: Mix to 70F, ferment 12 hours.

(2) Teff Levain: Pour 65% of water, as boiling water, over teff flour & mix to make mash.
Cool to 70F. Add remaining 35% 70F water.

When mixture is at 70F, mix in Starter. Ferment at 65-70F for 12 hours. (My Teff levain was starting to recede after 7.5 hours; I carried on with the mix at that point).


(3) Dough: Place flour, water, salt in bowl. Mix to very strong improved mix, medium soft consistency.

Mix in teff levain until incorporated.

Bulk ferment 1.5 hours with 2 evenly-spaced SF's. (I let the dough ferment for an extra ½ hour).

At end of BF, dough will be very sticky and full of gas.

Divide into 1.5kg pieces. Bench rest 20-30 minutes. The dough will become loose and flat.

Flour proofing basket with rice flour. Shape and retard 12-15 hours.

Brush off rice flour, score for even expansion, bake with steam 500F 25 minutes, then additional 35 min. (I found in my oven, that I had to bake in a reducing oven to so the loaf wouldn't get too dark. After 20 minutes, I reduced to 460F, then to 440F after another 20 minutes for the remainder of the bake).


This was a very wet, sticky dough and the stretch and folds did wonders (dough just after mixing, then just after the final shape):


The scored loaf, then the result in the oven:


The loaf is cooling now, and crackles are starting to appear. The most wonderful aroma has filled the kitchen. I want to let the loaf cool a good long while, but I can't wait to taste it & see how the crumb turned out!!!
from breadsong

Submitted to Yeastspotting!

Pages

Subscribe to Recent Blog Entries