The Fresh Loaf

A Community of Amateur Bakers and Artisan Bread Enthusiasts.

Recent Blog Entries

Ryan Sandler's picture
Ryan Sandler

Well, dear readers, despite my recent silence on the subject I have not given up on my baguette quest!  For the last few weeks, however, I'd gotten a little sick of blogging about it.  This week was fairly successful, however, and so I want to share, and request some feedback.

The main change from previous bakes is that a little over a week ago I got a shipment of baking toys, I mean, equipment from TMB/San Francisco Baking Institute.  I got 2 yards of 18-inch linen couche, a lame/blade holder with razor blades, a proofing board (which I've been using as an all-purpose bench board), and a flipping board.  With these, I was certain, many of my problems would be resolved (specifically, excess degassing when shaping and transfering, and ragged scoring).  The first bake with the new equipment (last week) was a little rough, but this week I had things sorted out.

Exterior

Crumb - First Half

Crumb - Second Half

I'm getting there!  The slashing wasn't perfect, but it went much smoother with the new blade, resulting in at least two ears per baguette big enough to lift the loaf with.  Crust was decent if not exceptional, flavor was good.  Profile was nice and round, a nice change from some recent flatter bakes.  Crumb varied within the baguette I sliced (the one in the middle, up top) from good to great.

Here's where I'm looking for feedback: I'm still having problems with the crust bursting between cuts -- is this the result of under-proofing?  Or something else?  I could swear this batch was fully proofed, but I'm not necessarily a good judget of these things.

Happy baking, everyone,

-Ryan

pmccool's picture
pmccool

We were invited to a Cajun-themed dinner party last evening at a friend's house here in Pretoria.  Not the easiest thing to pull off in South Africa but it turned out pretty well, considering the limitations.

Knowing that there would be gumbo and jambalaya and etouffe, I wanted to take some bread that would be good all by itself and as a sop for all those wonderful broths and gravies.  Preferably, it would resemble something one might find in Louisiana; maybe in a poboy sandwich.  I came across Eric's (ehanner) post about utilizing Bernard Clayton's Blue Ribbon French Bread and figured that might be a good starting point.  Since I have the book (The Complete Book of Breads), it was easy to reference the recipe.

Clayton's approach is a fairly quick, straight dough method.  Wanting to build more flavor, I chose to build a sponge from 4 cups of water, 6 cups of flour and about a tablespoon of my approximately 50% hydration starter that would have been discarded as part of a refresh.  (Note that I doubled the recipe.)  That was assembled around 11:00 p.m.  This is what it looked like around 10:00 a.m. the following day:

Sponge for Blue Ribbon French Bread

Overnight temperature in the house was around 72ºF.  I'd estimate that the sponge had expanded by at least 25%.  The butter, by the way, has absolutely nothing to do with the sponge.  It was just convenient to leave it in the same bowl while it came to room temperature.  (No, this is not a classic French bread; more of an Indiana interpretation of a French bread.)

The only other alterations that I made were to omit the powdered milk, simply because I didn't have any on hand, and to reduce the yeast to 1 teaspoon.  I elected to use some yeast just to ensure that the rest of the fermentation went at a steady pace even though the sponge was more aerated than I had anticipated, given the small inoculation.  The rest of the ingredients and process were by the book.

Even though I used AP flour, the gluten in the sponge was well-developed after nearly 12 hours of hydrating.  Because of the high percentage of pre-fermented flour (approximately 60%), the dough was quite extensible.  Having made a lot of whole-grain breads in recent months, including quite a few ryes, this white-flour dough was a big change.  It was much smoother, less sticky, and felt more "pillowy" while it was being kneaded.

I steamed the oven as much as I could, hoping for a thin, crisp crust.  The loaves expanded beautifully, producing big ears and grignes on  the loaves, as below:

Blue Ribbon French Bread 

The crust turned out to be thicker and harder than I had hoped, more crunchy than crisp, so I didn't quite hit my target for this bake.  The crumb, which won't be pictured since none came home with us, was much less open than a classic baguette but more open than one would expect for a dough that had been kneaded 10 minutes.  The flavor was rich and only mildly sour.  Our resident Cajun was overjoyed with it and wanted to know how I was able to produce this kind of bread with a home oven.  He loaded up most of what hadn't been eaten and went home with visions of pain perdu in his head.  We'll be scheduling a play date in the kitchen one of these weekends.

And for my Northern Hemisphere friends, one last picture as a reminder that winter isn't forever:

Blue Ribbon French Bread

Warm regards,

Paul

breadsong's picture
breadsong

Hello everyone,
Farine featured Luminita Cirstea in a 'Meet the Baker' post on her website.
Ms. Cirstea's courage, hard work, commitment and talent are so inspiring!
I so wanted to try making Ms. Cirstea's delicious-looking (and prize-winning!) Raisin-Rye bread.
With thanks to Farine for writing about Ms. Cirstea, and thanks to Ms. Cirstea for her efforts to develop this formula!

(Rye bread is new territory for me - I found lots of helpful information here on TFL posted by Andy, breadbakingbassplayer, dmsnyder, Elagins & Mini (thanks! to all)).

Here's a picture of the raisins (so pretty!):


After baking, my bread resembles a Mexican Chocolate Crackle cookie I recently baked: 

                               Raisin-rye bread                             ... or...                               Cookie?  :^)    
  

Crumb shot (I love the flavor, and the golden raisins that light up the crumb; a lovely reminder of Luminita and her beautiful first name!):


For one 1000g loaf (my interpretation of Ms. Cirstea's formula):


Liquid Levain

Levain

Dough

Total

Baker's
%

Bread flour

59


59

16%

Rye flour, whole

3

149

150

302

84%

Rye meal, coarse


50

50

14%

Water

62

100

179

341

83%

Salt


2

7.3

9.3

2.3%

Starter

25


25


Liquid Levain


149


Levain


400


Dark Raisins


107

107


Golden Raisins


107

107


Total

149

400

1000

1000


(1) Raise Liquid Levain, 12 hours at room temperature.

Cover raisins with cold water, soak 10 minutes, drain, keep overnight in covered container.

(2) Mix Levain, speed 1 for 4 minutes. Bulk Ferment 90 minutes.

(3) Add all dough ingredients. Mix 5 minutes medium speed.

Add soaked raisins, mix low speed just until incorporated.

Bulk ferment 90 minutes.

Dust baskets heavily with rye flour.

Scale by dipping your hands in warm water. This dough is very wet.

Allow to proof, room temperature, 30-40 minutes.

No scoring.

Steam heavily; vent after 5 minutes.

Bake 480F for 45 minutes.


I'm including some pictures taken during fermentation (not sure if I did a proper job or not!).

The second Levain was to bulk ferment for 90 minutes.
Here is what it looked like at that point (I was unsure if it showed evidence of enough fermentation):
 

I proceeded with mixing by hand after the 90-minute bulk ferment, substituting an equal weight of whole-rye flour for the rye meal.
After the mix, the dough temperature was 73F:


I thought the dough was on the cool side heading into bulk fermentation (Mr. Hamelman recommends in the low 80's for a dough of this type).
The dough was to bulk ferment for 90 minutes but I let it go two hours, and tried to warm the dough by raising the temperature in the proof box.
After 1 hour of bulk fermentation, the dough's temperature had increased to 78F; after the second hour of bulk fermentation, the dough's temperature had increased to 88F).
Through the plastic container, I could see little air bubbles forming. The appearance of the dough after bulk fermentation:
 

The dough was quite sticky, so I didn't take a picture of the shaped loaf (my hands at that point were absolutely covered in rye paste!).
The dough after 40 minutes of proofing (some cracks starting to appear):


I baked at 480F for the full 45 minutes and left the loaf in for 10 more minutes with the oven off and door ajar. 

The loaf sat for 16 hours before slicing. It's a really crusty loaf but the crumb is moist and tender.
We enjoyed a beautiful breakfast this morning, thanks to this bread - the flavor is wonderful!

Happy Baking everyone! from breadsong


louie brown's picture
louie brown

Thanks are due at the top to Farine-MC for her charming blog and its marvelous, useful content, and also to breadsong, scoring master and exemplary baker.

In brief, I neglected to take account of the very low humidity in New York City right now. My maple oatmeal was both too stiff and underproofed. Yes, I made the same mistake two weeks ago with another loaf. Now I have two striked against me, so I hope that atleast it will be something different that I overlook next time. The effects of the underproofing are clear on the batard.

I didn't dare try to duplicate breadsong's perfect scoring on her loaf, so I opted to try chevron scoring for the first time. Not bad, although I think there should be a clearer "spine" down the center of the loaf, the scores beginning closer to the center line, in other words.

The bread itself is rich, fairly light in texture, all things considered, and, as breadsong has said, with a sweet background that isn't specifically identifiable as maple. It went very well with blue cheeses and goat cheeses.

I'm glad I made this bread for the lessons it provided.

Following that, baguettes based on Pat's 65% formula. This time, I did adjust for the humidity with some extra water. However, it seems that at some point in the bake, I brushed the touch panel of the oven and turned it off without hearing the little beep because the opera was on. So when I returned to the oven, it showed 227F, and a couple of very pale baguettes. With no choice but to carry on, I cranked up the oven and finished the bake. Again, no beauty contest winners, but quite serviceable and tasty.

I include another side by side shot of the two loaves sliced, as well as a repeat of last week's side by side, so you can see the very wet baguette from txfarmer again. These baguettes are more than 15 points apart in hydration.

and last week again:

Apologies for the ongoing green cast photos. My little cybershot can't decide if it wants to white balance for fluorescent or incandescent light.


mdunham21's picture
mdunham21

I have undertaken the BBA challenge for 2011 but I am not one to follow directions.  I am making the recipes in the order that they appeal to me or what I have a desire to bake.  This does however mean that I will be on my own during the challenge without a number of supporters.  My family decided they wanted some cinnamon rolls, so i pulled out the bba and went to work 

The recipe called for whole milk, powdered milk, or buttermilk, so I made my own buttermilk by adding about a tablespoon of fresh lemon juice to 1 and 1/4 cup 2% milk.  I creamed the sugar, salt and butter together, mixed the egg, lemon extract and added the flour, yeast, and warmed buttermilk.  I didn't have any almond extract so I just left it out.  The dough was a little wet so i worked in some extra flour and the dough became pliable and tacky. The dough was allowed to rise for a couple hours and then rolled out.  I coated dough with brown sugar and cinnamon then cut up a stick of butter and distributed it evenly throughout.  I rolled the dough and cut them about 1 and 3/4 inches apart.  The dough went for a final proof and then baked, I roughly time my baked goods and use color and temperature as my cues.  While the rolls baked I made a frosting out of powdered sugar, vanilla extract and warm milk.  


The rolls tasted even better than they look and I'm officially off my eating plan.


-M

Mebake's picture
Mebake

This is a Whole Wheat Barley Bread I baked yesterday. The recipe was made to include my barley flour.

Procedure:

Day 1:

Mix the Soaker contents in a Bowl until you form a ball. Put the dough in a an oiled container and leave at room temp. for 24 hours.

Mix the Biga contents in a Bowl until you form a ball. Put the dough in a a large oiled container and into a fridge for 24 hours.

Day 2:

Take the BIGA out to warm 2 hours prior to final mixing. Chop the Biga and Soaker into pieces and combine them. Distribute salt and yeast on top, and start mixing, resting 5 minutes after every knead. The Dough is wet, so you'll have to knead with wet hands. Form a Tight ball, and put the dough in a large bowl for 45 minutes fermentation.

Scrape the dough out, and divide it into two, three or four pieces. Preshape, rest for 5 minutes and then shape. Lay loaves in a floured basket for 45 minutes. Preheat Oven with two racks, and a steaming device to 470 F.

Cover the Oven glass, Load the doughs into the oven, and pour a cup of boiling water into a steaming device. seal the vent. 15 minutes later, remove the steaming devise and unseal the vent, and bake for 20 more minutes at 390F.

Cool on Rack for 2 hours befor slicing.

The flavor of this Bread is Nutty Wholesome, with a hint of barly sweetness in it. I think some honey would have enhanced the flavor more. i'll tweak this recipe in the future, God willing.


GSnyde's picture
GSnyde

I wanted to make a sandwich roll that had some substance both for chew and to hold up under moist sandwich ingredients, but something tender enough to be compressible.  I’d been meaning to try a bread with some potatoes in it, as I’d heard that potatoes add some tenderness to the crumb (and every crumb needs a little tenderness).

I looked in several baking books and all over TFL.  I settled on the Sourdough Potato Bread that Prairie19 posted about back in 2007 (http://www.thefreshloaf.com/node/3886/sourdough-potato-bread), which was described as a sourdough version of Hamelman’s Roasted Potato Bread.

I mostly followed Prairie19’s formula, except I didn’t have the extra night to retard the dough. And instead of bread flour, I used Central Milling’s Organic Artisan Baker’s Craft flour, along with some fine ground organic whole wheat flour from my market’s bulk bins.

I found the formula very straightforward.  The dough was easy to work with.  Somewhat loose, but trainable with appropriate discipline.  Since these rolls were made to surround Salmon Teriyaki, I sprinkled them with sesame seeds when they were shaped, since every one knows that sesames are Salmon Teriyaki’s favorite seeds.  

The rolls came out very nicely.  The crumb and crust are tenderer than lean sourdough bread, but by no means wonderbread soft.  I was hoping for a slightly softer roll. Maybe I’ll try this formula but with a bit of milk in place of some of the water.  The potato flavor is scarcely noticeable.  The flavor is nice, a bit sour, but unremarkable (ok, I’ve been eating great miche, so what can you expect?).


IMG_2090

IMG_2093

Though the rolls were not perfect, the Salmon Teriyaki was pretty close.  And the sandwiches (with garlic-lemon sauce and cukes) went down good with a nice pale ale.

IMG_2094

This is a very nice sourdough roll.  I’d enjoy a full sized loaf, too.

The formula is on the page linked above.  I used the same quantities for 6 rolls.

Enjoy!

Glenn


OldWoodenSpoon's picture
OldWoodenSpoon

This does not quite match the discussions I have read, and I am hoping someone might recognize what is going on here and point me in the right direction.

I recently spun off an all white flour sibling of my 18 month old whole wheat 100% hydration starter. The original starter has been fed 95% home ground hard white whole wheat flour, and 5% BRM Dark Rye flour at 100% hydration (50gm:50gm:50gm s:w:f) with excellent results since this forum rescued me and my starter back when I first joined. The sibling is about 6 weeks old and is fed on Pendleton Mills Mor-Bread (AP flour) at the same 100% hydration (50gm:50gm:50gm s:w:f) as it's older sibling. I have baked with it successfully twice before, both as the foundation for pate fermente, as well as for a poolish, in variants of Peter Reinhart's Pain Ordinaire and French Bread with Pate Fermente (old dough) from “Crust and Crumb”.

This all-white flour starter is a new experience for me, so I do not have reasonable expectations by which to measure it. It seems to me, though, to be a bit “odd”. At feeding time it has a consistency that is very fluffy, rather like well whipped egg white, and yet thick, much like pudding but with lots of gas bubbles in it. It reminds me of mareshmallow crème, and it is, of course, tenaciously sticky, clinging to anything and everything it touches, but it has a very pleasant fruity, healthy aroma. My whole wheat starter is pretty easy to break up and mix into the water at feeding, but this white starter is quite resistant to this action. It takes considerable effort to blend the water and starter at feeding, before adding the flour. It triples in volume easily in 4-5 hours, so the overnight delay befor morning feeding is a stretch at 8-9 hours.

This past Thursday morning I began the elaborations for a sourdough using 5% BRM Dark Rye, 5% Pendleton Mills Power (bread flour) flour and 90% Pendleton Mills Mor-Bread (AP flour), to provide a 30% prefermented flour inoculation to a final dough targeted for 72% hydration. The starter had been in the refrigerator for four days so I pulled it out the night before (Wednesday night), and fed it just before bed. The elaborations began first thing in the morning and I built the final dough that night (late), all from the same composition, ending up with 1500 grams of dough for two 750 gram boules.

For clarity, although it is not my point in all this, here are the essentials:

Total Preferment:

259 gm water

259 gm Flour    composed of the following:

            15 gm BRM Dark Rye flour
            15 gm Pendleton Mills Power flour
          229 gm Pendleton MorBread flour


Final Dough:

363 gm water

604 gm flour  composed of the following

            30 gm BRM Dark Rye
            30 gm Pendleton Mills Power flour
          544 gm Pendleton MorBread flour

15 gm Kosher Sea Salt (Coarse)


For the main build I combined the preferment, flour and water, but withheld the salt, and let it rest (autolyse) for 40 minutes. I added the salt and did two sets of 30 stretch and folds in the bowl at 30 minute intervals. After this second set of s&f's the gluten was beginning to shape up and the dough had come together nicely.

At this point things started to get interesting, but not in any good way.

After another 30 minute rest I came back to do another set of stretch and folds. To my surprise I felt the dough break down right under my hands as I worked on it. It literally fell apart, and the more I tried to stretch and fold it the looser it got. I finished the 30 strokes, gathered it in the bowl to rest, and tried to figure out what to do next.

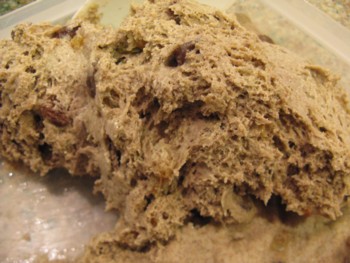
I sensed that this was not a hydration issue, as the hydration seemed to be about right, but the dough was very stretchy and more sticky than any I have ever worked with. After 30 minutes I pulled the dough out onto my marble work board that I had wet down with cool water. I decided not to try to work in more flour, but this dough was so stretchy and sticky I could not be so stingy with water. Using wet hands and a wet bench scraper and the wet marble I tried to bring the dough together using Bertinet's wet dough technique. It did a little bit of good, but the dough remained essentially like highly congealed cottage cheese, and as sticky as any dough I have ever come up against. It was ugly sticky. I did probably 30 to 40 strokes of slap/stretch/fold/gather/repeat. It was after midnight and Friday was a work day so I had to put it to bed, and me too. I oiled up a dough bucket and managed to get the dough in. It puddled into the bottom of the bucket, and self-leveled. There was little evidence of gas in the dough. I thought it was dead. I put it into the fridge for the night, on the bottom, coldest shelf, cleaned up and went to bed.

On Friday morning I looked at the dough and it was still just a puddle in the bottom of the bucket. I left it in the fridge till afternoon when I could leave my desk to work on it. I pulled it out early and let it sit on the kitchen counter (between 66F and 68F all day) to warm up, and to see if it would come alive. After 90 minutes or so of letting the chill warm up, I could see at least a few nice gas pockets in the dough, but it still appeared very slack and loose. I heavily floured my bench and poured the dough from the bucket. I had to scrape it out to get it to let go of the oiled bucket, and remnants clung tenaciously to the bucket even then.

Even on a heavily floured board this dough stuck to everything, and by the time I finished my hands, bench scraper, board, apron, everything had dough stuck to it. I divided the dough in half, and succeeded in herding each portion into somewhat of a roundish blob, but it wanted nothing to do with holding any shape at all. I used both well floured hands cup-like to gather the blobs and drop them into heavily floured linens in some small plastic colanders I bought at the Dollar Store for just this purpose. I set them to rise, stuck my La Cloche in the oven and set it to preheat to 525F, to let the oven warm the kitchen up and hopefully prod the “loaves” to rise some.

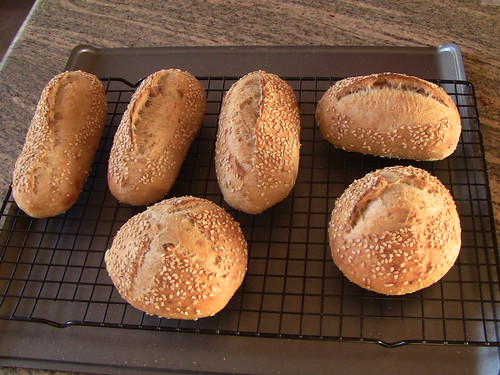
One loaf actually passed the poke test after 90 minutes or so without clinging permanently to my finger, so I started my baking. The first loaf held some shape, although it did flatten noticeably when I turned it onto parchment on the peel. I should not have slashed it so deeply, and that spoiled what shape it had. It behaved as if over-proofed, but I don't believe that to be true. The second loaf I scored only very lightly and with short cuts that did not go all the way across the top of the loaf. This loaf held shape somewhat better, and exhibited somewhat better spring in the oven, but neither loaf performed even marginally well.

I baked both loaves in succession, with the preheated dome on for 12 minutes, turning the oven down to 475F after 7 minutes and removing the dome at 12 minutes. I baked each for an additional 18-20 minutes after removing the La Cloche dome. Neither crust shows a very markedly bold bake, although both loaves finished with internal temperatures up in the 208F-209F range.

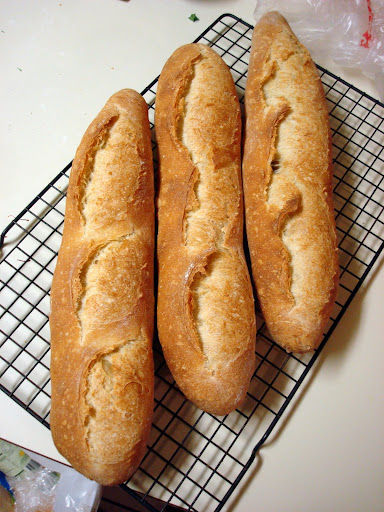
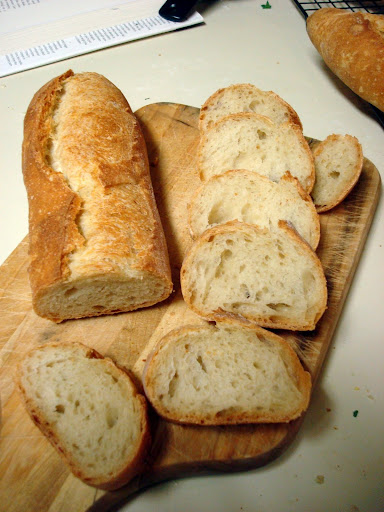
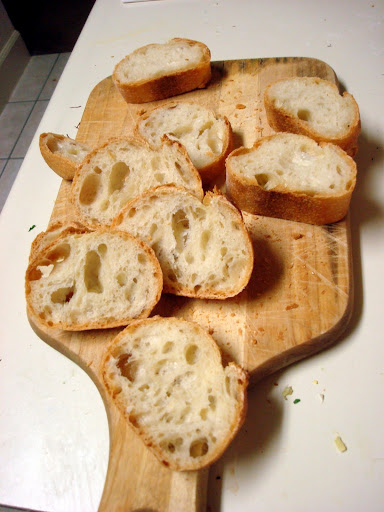
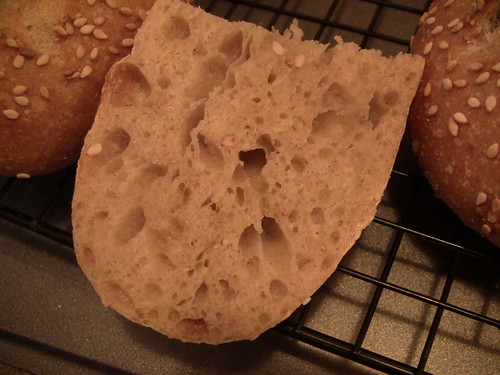
Here is a picture that will help visualizing the results.

The light coloration is, I believe, due to all the flour on the surface.  The crumb has good appearance, and shows some variation of hole size, but if you look closely you will see some darker areas of the crumb.  Those are quite gummy/chewey, and the whole loaf is quite heavy, even after cooling over night.  The loaves, under "normal" circumstances should be nearly twice as tall as this had they taken/held any shape, but they lacked any structural integrity.  Hence the very flattened profile.  The whole loaf on the bottom of the stack is the second loaf, which "sprung" about 1/2 inch higher than the other.

I have read Debra Wink's excellent and informative posts on Thiol degradation here. I have read the thread originated by foolispoolish with contributions by Debra Wink and Eric Hanner and others regarding transition of firm starters to white flour here, and the trials of many with super elastic dough.  My evidence does not seem to fit these cases very well, but I don't have the experience or expertise to judge it myself. It is a transitioned starter (whole wheat and rye to white flour), but not a brand new one. It is performing well between feedings, and appears to have made the adjustment to white flour satisfactorily, in the storage jar at least. It seemed to be okay in the first couple of bakes as mentioned above, and not until now, some 6 weeks or so later, has a dough from it just disintegrated.  I really don't know what is going on here.

So, I'm left trying to determine a course of action without any real knowledge of what I am fighting. Until I get better advice I am going to try Debra's recommendation to “feed through it”, in the hope that it is some kind of contamination or invasion and that in time it will be worked out as hers was.  I've started that regimen by reducing quantites to 10 gm:20 gm:20 gm (s:w:f) and will stay as close to three evenly spaced feedings a day, and see how it goes for 10-12 days.

Has anyone else been through this recently, or have any other thoughts, observations, suggestions, reccomended reading?

Thanks for stopping by
OldWoodenSpoon


Note: a follow up thread can be found here:  Follow Up to "Never saw a dough break down like this before"


cubfan4ever's picture
cubfan4ever

Hi - Long time lurker, first time poster!  I love everything that you do here.  It has been such an inspiration!

I am giving the 36 Hour SD Baguette recipe a shot.  The only difference in our recipes is that I have Bob's Red Mill AP flour on hand and used it.  Yesterday went well, I made it through step 3 (all the S&F and putting up for the 24 hours). 

TXFarmer - this dough is WET!  I mean WET!  I took her out of the fridge about an hour ago and it is resting in my oven with the oven light on.  There is no way I can see beginning to shape this without it falling flat.  Any suggestions?  Do I do a quick knead with a touch more flour?

hansjoakim's picture
hansjoakim

Yeast-less. Again??

To tell you the truth, I've been a bit low on the breadbaking front recently. My love of food and cooking have never been greater, however, and I don't think I've ever spent more time in the kitchen than I have during the last couple of months. The downtime in breadbaking means that I get the chance to broaden my other culinary horizons, and I thought I should put together some photos of what I've been up to this weekend.

After the heart-attack-but-in-a-good-way of last week's duck confit, I wanted to focus on "lighter" things this week. "Lighter" being savoury puff pastry stuff, huh? Eh, it's all relative though...

First thing I wanted to share is a nice potato blini, photo of mise en place below. Cook, peel and rice about 300 gr. potatoes. To that, add 2 Tbsp bread flour, 2 egg yolks and enough milk to make a thick cream. Add salt+pepper+herbs+spices as you wish. Freshly grated nutmeg works great. Whip 2 egg whites to max volume on medium-high speed, and gently fold into the potato cream. Spoon small cakes into a hot pan and cook both sides in butter.

Potato blinis

The potato blinis are very versatile and a great weeknight snack or appetizer; I had them with some sardines, sour cream and caviar.

Potato blinis


Also this week, I wanted to put together some savoury dishes using puff pastry. Just as with confited food, I don't find puff to be at all greasy or "heavy". On the contrary, light, delicious tarts or flans can be quickly put together if there's some puff in your fridge. Puff is one of those things that might appear hard to make, but comes together quite effortlessly if you've done it once or twice before. And it's easier to make than croissants. I've made quite a few batches of puff, and I thought I could put up some of my own thoughts and recommendations regarding the process in this post. For the dough:

  • Put flour and salt in a mixing bowl. Add cold water and melted butter, and mix with a fork until the dough starts to come together. Turn it out on your work surface and knead it a few times until it's a coherent, shaggy mass. It should be just a bit sticky, like pasta dough, but not smooth. Put in the fridge for at least an hour to relax the gluten and chill. Remember that you want the dough and butter block to be at the same temperature/consistency throughout the process.

For the lamination:

  • The butter should be "plastic" at all times - it should not be melting between the layers or seeping out of the dough, and it should not be rock hard and fracture into pieces as you roll the dough.
  • Don't press down too hard on the rolling pin, that'll distort/destroy the layers. Try to maintain an even pressure on the dough, so that the thickness is the same over the entire length of the dough.
  • Flour your work surface, but not excessively. You don't want the dough to stick and rip, but you want just a slight "friction" between the dough and your work surface. That way it's easier to roll it thin enough.
  • Roll the dough to approx. 1 cm thickness each time before folding in three. That way you'll get nice, even layers throughout your dough.
  • Wrap the dough tight in plastic wrap and chill in the fridge for 45 - 60 mins. between folds.
  • Ideally, do the lamination the day before you actually need the pastry. That way the dough gets to relax and chill sufficiently first.

For the make-up:

  • Cut off a sufficiently large piece of your pastry, flour it well but brush off excess flour, and roll to desired thickness, commonly 2 - 3 mm thin. Work quickly when the pastry is this thin, as the butter will quickly heat up and become soft.
  • Roll sheeted pastry up on your rolling pin and transfer to a lined baking sheet, cover with plastic wrap and place in the fridge for 15 mins. Do this before you cut out the shapes you want, otherwise the dough will shrink and distort after you cut it.
  • After cutting and shaping, egg wash and return to the fridge for a good 20 - 30 mins before baking. This will reduce shrinking during baking.

If you've never made puff before, I recommend starting out with a small batch, with say 500 gr. dough and 250 gr. butter block. A small batch like this is easy and quick to roll out during lamination, and this is a practical size to start out with in order to gain some experience and "understand the pastry". Below is a photo of my pastry with these measurements during the 5th fold.

Puff pastry

My first application was some simple tomato flans, and, to tell you the truth, they don't come much simpler than this. Simply cut out rectangles, egg wash, dock with a fork and put tomato slices on top. Finish with salt, pepper, olive oil and herbs/spices of your choice.

Tomato flan

Bake in a hot oven, approx. 200dC for 20 mins or until done, and serve with a green salad and a delicious slice of salt cod (Morue et flan de tomates?):

Tomato flan with salt cod


Puff pastry diamonds are also very versatile and simple to make - below I've filled one with some green leaves and served with salmon carpaccio:

Puff pastry diamond and salmon carpaccio

Next on my list of things to try out, was an oxtail and duck liver terrine. I love any old-fashioned oxtail soup, and I'm also a fan of liver as an "exotic" ingredient bringing unexpected flavour and texture to the table. I've previously used it to good effect in salads, with pasta or as the main ingredient, and I find most livers go well with sweet flavours of honey, orange liqueurs and juices, figs and dates. I wanted to serve this terrine with a nice piece of pastry, but get those oxtails tender first! Bring to a boil and keep boiling over low heat for 3 hours or until the meat is easy to pick off the bone.

Oxtail and duck liver terrine


Oxtail and duck liver terrine

Save that broth!

From here on in, it's simply a matter of rolling slow-baked duck liver slices around oxtail meat to make a tight log, and chill for at least 2 hours. To serve with the terrine, I baked a sheet of puff pastry with weights on top to make a thin, crispy layer. I then sliced it into slim rectangles crosswise, and slathered each with a carrot-chevre cream (soft chevre puréed with boiled carrots, olive oil and lemon zest) and topped it with small carrots that were poached in orange juice infused with toasted caraway seeds. Absolutely scrumptious:

Oxtail and duck liver terrine


Pages

Subscribe to Recent Blog Entries