
Oven Door
This forum has been a bit slow lately, and since I've been meaning to post this for a while now, here's something for the cause. While I was firing for this week's batch (a small batch of basic baguettes and some roasted poblano peppers this week), I took a few pics of my oven door. The question of how to make a door comes up pretty often, and this is how I solved it for my own oven.
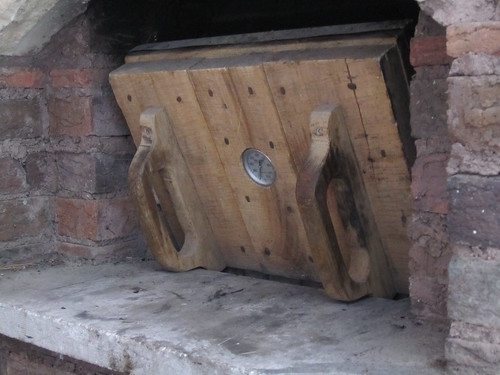
I made this door from white pine from a tree that was cut down in my yard. I milled a bunch of the wood up to use for furniture, etc, but I used one piece for this door. It's two layers of 1-1/2" pine, layed up in alternating directions -- the outer boards run vertical, the inner ones run horizontal. The two layers are held together with some cut nails, just 'cause I like the way they look -- kinda rustic. The handles are cut from 5/4" white oak and screwed on with 3" stainless steel deck screws. Note that the bottoms of the handles rest on the deck for added stability. These also do double duty -- they just fit in the ash dump, allowing me to prop the door open at an angle like a kitchen oven door. (I'd like to say I planned that, but it was purely fortuitous.) In the center, I countersunk a Big Green Egg accessory thermometer -- it registers from 200 -1,000 degrees. It's probe is about 6" long, so it extends well into the oven on the back side of the door. It's about 3 years old now, and not showing any signs of heat damage.
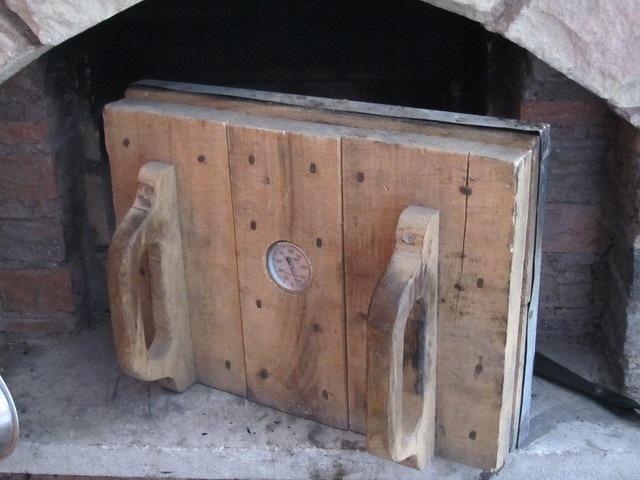
Here's how it looks when it's tilted. I sometimes use this "feature" when I want to allow some extra air into the oven when I have a smoking fire going. You can see here how the bottoms of the handles fit into the ash dump slot to hold the door at this angle.
Here's a shot of the business side of the door. The oven side is clad with galvanized steel left over from some HVAC work, bent to fit the door snugly and fastened along all sides with copper nails (roofing job leftovers). After using it this way a few times, I noticed that the wood was still getting too hot, so I added another layer of galvanized sheet, just exactly the same size as the inner door opening. (The door itself overlaps the masonry by about 3/4" at each side, and about 2" at the top, for a pretty tight seal.) With this cladding and shielding, I don't have to worry about keeping the wood wet like some do. I can use the door even when there's a small fire working off to one side, but not a big one (tho' I don't know why I'd want to use the door with a big fire anyway.) I often keep a bit of a fire going with the door on, cracked open just a bit, when I want to smoke a chicken, turkey or pork butt.
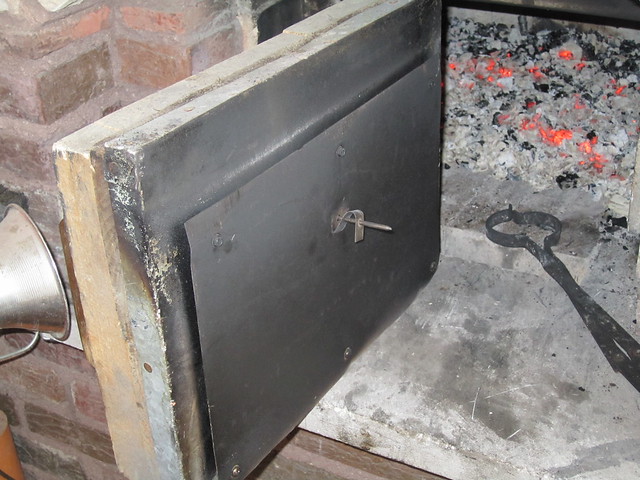
The inner heat sheild is held away from the door about 3/4" by some short lengths of 1/2" copper pipe (more leftovers) and is held on by more stainess steel deck screws driven through the heat shield, through the center of the pipe standoffs, through the door cladding and into the wood. I used stainless because it's a relatively poor conductor of heat and it helps keep the hot screws from scorching the wood where they enter it. You can also see the thermometer probe where it penetrates throught the door, the cladding and heat shield.
I don't use the thermometer much for bread baking -- I use masonry temps for that. But it does come in handy for other roasting and baking. Helps a bit with gauging timing of things that take a while to bake (e.g., turkeys) since the oven temps are continually falling if the fire's out. It also helps making sure the temps aren't rising too much if there's a smokinig fire going.
I'm planning some day to see if I can't add a gasket from a wood stove door to the perimeter just to improve the seal a bit.
ClimbHi
Pittsburgh, PA