Jim's Neo-NY Pie Recipe \ updated
Jim's Neo-NY Grilled Pizza
 [1]
[1]
Without question, if you try this recipe, do not take any shortcuts, this will be one of the best pies you will ever have and is similar to a Neapolitan Pizza. Really about the only thing besides not using Italian flour that is different, is that we are not cooking in a 900-degree oven, rather a 700+ degree grill (735). The reason for our choice of flour is:
 [2]1) The King Arthur Sir Lancelot Flour we use has a high Protein content, higher than that of Caputo 00. More protein, less carbs, helps to make for a light airy, chewy crust. Keep in mind that even with the best flour, improper kneading technique will still yield poor results.
2) The flavor of the Sir Lancelot is my favorite. You will know what I mean when you first just open the bag and sniff. Because we are using American flour and a grill, this means ours can't be called a "True" Neapolitan Pie. So that is why we call this recipe, Neo-New York. This will keep the folks with 1000-degree brick ovens and Italian flour from sending me nasty e-mails.
The following is a list of things you will need in order to prepare this pie. For one, and you better get used to this, you are going to have to purchase some things on the internet because they are not really available on the retail market. Here is the list and where you can get the items. Some of these things you will probably already have.
Things you will need
* Eight bricks (ones with holes called "frogs") \ Lowes, Home Depot, or maybe your basement or back yard
* A good pizza stone that is as thick as you can buy \ Internet or Bed Bath and Beyond
* Smoker box \ Lowes
* Gas Grill, four burner \ Lowes, Home Depot, Etc
* Cherry and apple wood chips \ Bass Pro, Internet, ACE Hardware, or maybe your back yard
* GOOD Pizza Peel \ Internet or Bed Bath and Beyond
* Stand Mixer like a KitchenAid or DLX \ Internet & department stores
* Pizza trays \ Wall Mart- Cheap!! (like $3)
* Sir Lancelot High Gluten Flour \ Internet, King Arthur web site
* San Marzano Certified Tomatoes \ Internet. May be able to buy locally, however to expensive.
* Two 1\2 gallon Ball jars
* Pizza Peel \ On line, or Bed Bath & Beyond
Ingredients you will need for Dough
* Two cups sourdough starter
* One pack of instant yeast (optional-I use the instant yeast for an extra kick, just a pinch but not always)
* 3 cups Sir Lancelot High Gluten Flour
* 1 cup King Arthur Bread Flour
* 1 1/2 cups warm, filtered spring water
* 1 teaspoon sea salt (add last)
NOTE: For a healthier crust, substitute King Arthur Whole Wheat Flour for the bread flour. Makes an excellent crust! Also if you like a little bit more of a New York style crust, work in about 1\4 cup olive oil and 1\2 cup of corn meal into your dough, and use 1\2 cup bread flour. I make it both ways, both awesome!
Ingredients you will need for sauce (do not cook the sauce)
* Two cans San Marzano tomatoes
* 1\4 cup of red wine vinegar
* teaspoon crushed red pepper
* Fresh oregano to taste
* 1\2 cup fresh basil, chopped
* 1 teaspoon of sea salt
* Fresh cracked pepper to taste
* 1 teaspoon of sugar
* 4 cloves of crushed fresh garlic
* 1\4 cup fresh Ramono Cheese
(Note: Purists will only use San Marzano tomatoes, crushed by hand, with a little sea salt and pepper with some fresh basil. This IS a good way to go; however, I like to kick it up a little, with the recipe included here)
Cheese Topping
Use only fresh Mozzarella cheese, NOT the pre-shredded type. Shred your own fresh Motz or better yet, slice it, and put "Chunks" on your pie. Try not to use a watery fresh Mozzarella - the more solid the better!
Fresh grated Romano and Parmesan cheese, on top of the Mozzarella.
TIP: For a twist on the New York Style, try fresh smoked provolone cheese, then the Motz, then a few splashes of fresh grated extra sharp Cheddar Cheese. The purists would consider it quite unconventional, but I LOVE IT!!!
Sauce "101"
 [3]
[3]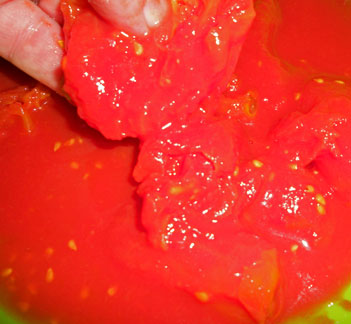 [4]
[4]
Mix the ingredients and put in a covered 1\2 gallon ball jar and place in the fridge the day before you bake. Don't store your sauce in a plastic container; a glass jar is best. On pizza day, take it out and bring it to room temperature.
Be sure NOT to cook this sauce. The tomatoes have already been cooked in the can, they do not need to be cooked three times. I have taken San Marzano tomatoes right out of the can, crushed them by hand, and it was a GREAT pizza sauce, without adding any other ingredients. It is a matter of preference, try both and see what you like. You can also use a hand mixer with the tomatoes, just do not over blend. If your sauce gets too watery, you can strain it, but usually this has not been a problem for us. My preference is to hand crush the tomatoes, add all ingredients and then chill in the fridge. After a few hours I will hit it with the hand mixer to smooth out the sauce a little bit, then taste to see if it needs anything. Ends up with a great sauce!!
Lets Get "Started"
Probably the two best-kept secrets in the pie world are these:
1 Yeast culture starter. "Wild" or other.
2 High-Gluten Protein Flour.
You can purchase a sourdough starter, like the King Arthur brand, that comes from a 250-year-old strain. There are cultures out there that are even many centuries older!
For the purpose of the "Do it Yourself, Perfect Pie"- make your own wild sourdough starter, which is what I do. It may sound hard and a bit crazy to some, but it is so simple!
Time to catch some fresh, wild yeast to get your own culture started!
 [5]
[5]
In a Ball jar, combine 1 cup of flour with 1 cup of bottled spring/filtered water. I set mine outside in mild weather, with the lid loose for several hours to catch the tastiest of wild yeast! Yes, I set my starter out on the deck to catch the salty Chesapeake Bay breezes, all to help enhance what we affectionately call "Jim's Starter by the Sea".
After several hours, I set the jar in the oven with the interior light on, and the oven OFF, overnight. In the morning, I found a nice grayish fluid, which is alcohol, sitting on top of the flour. I stirred the liquid back in and removed ½ cup, before "re-feeding" the starter with 1cup flour, and ¾ cup water. By bedtime, I stirred the starter again, and on the third day, I stirred in the accumulated alcohol, removed ½" of discard, and fed again. Then let sit. Do this everyday for 3-6 days. My starter was ready to roll in three days, although it usually will take longer. Depending on the amount of yeast, and the temperature of the environment, it will take 3 days to a month for the starter to be ready to use.
Store your starter in the fridge and feed it once a week by taking some out, using it, or give some to a friend. Re-feed the "Mother Jar" of starter with flour and water and let sit for a few hours, then put back in the fridge. (At this point, use equal parts flour and water to feed.)
You ALWAYS when using your starter want it to be at room temp and be at its peak of activity. Do this by taking out what you need in the morning (or night before) and re-feed it with some flour and water and let it sit out all day, then use it in the afternoon \ evening and it will work great.
When you store your starter in a fridge, the best thing to do is not use the top of the ball jar, use cellophane wrap and a rubber band around the top of the jar. Punch a very small hole in the cellophane to let the gas escape. I also have drilled some holes in the top of my starter jars and that works as well. Another tip is that once your starter is where you like it's flavor and aroma, you don't have to keep stirring in all the alcohol, you can pour some of it off, but I would not take 100% of it out. Leave a little to stir back in.
One other thing about your starter, never, never, never add anything to it except flour and water. No packet yeast, sugar, nothing. I mean NOTHING!!!! Keep your culture as pure as you can. When not in use, feed it once a week and back in the fridge ya go!
Break out the Dough
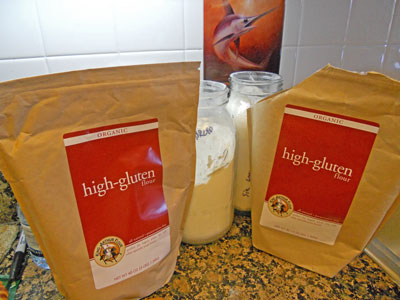
About Flour.
 [6]
[6]
True, you can make a great pie with AP and bread flour. However, using the high gluten flour does make a difference in the dough. When you go out for a pie at your local NY style family Pizzeria, they most likely are using a high gluten flour product. Great pizza is a combination of many, many, many little things, that will make a HUGE difference in your final product. The right high gluten flour is just one of those many things.
Don't waste your time looking for high gluten flour at your local grocery store, you won't find it. Order it on line and be done with it. King Arthur has probably the best flour you can get for making pies, "Sir Lancelot High Gluten Flour". This product can be ordered on line from their web site, no prob. Just order a case of it and don't worry about it. Once you use this flour, you probably will use nothing else for pizza dough. It is that good! The high gluten flour won't burn, even at the high temps we are cooking our pies!
First, take your starter out of the fridge Wed morning and re feed it (the discard that you will bake with) as well as your "Mother Jar". Once your starter (discard) is ready later that day,(make your poolish) then start to prepare by adding in your mixer bowl the poolish and two cups of high gluten flour into your mixer along with one cup warm spring water. (I use Dasani). And one cup of bread flour. Save the last cup of flour to add slowly during the end of kneading.
I like to kick up my dough a bit so I will hit it with some instant yeast, this goes right into the mix with everything else above. Do not put salt in yet. The reason why I use one cup of bread flour instead of all high gluten is because the bread flour will give the dough some extra strength. When you are ready to pat out your pie, you won't get any holes in your dough. Bread flour also is a high gluten product as well.
TIP-IF YOU HAVE THE TIME, AUTOLYSE!!
If you have got the time, Autolyse your dough. DO this by mixing your poolish with the flour to be used for the dough, and add one cup of warm spring water. Let sit in warm place for 30 minutes to up to four-five hours. Then continue with recipe.
Kneading
Making the Dough- A wet mix
 [7]
[7]
Add your poolish \ and four if did not Autolyse- to the mixer. Add one half cup warm water. This will be a very wet batter, will look almost like a pancake batter at this point, and that is what you want for now.
|
|
|
Should look like a batter during most of the kneading |

Continue to mix for 13 minutes on low, then start adding in the remaining flour-SLOWLY (bout a cup) over the next seven minutes. The dough should now start to form a soft ball. Increase the mixer speed during this last few minutes of kneading. Last-add your salt and a little olive oil if you like. Total kneading time in the mixer can be 18 to 25 minutes.
If the dough is too wet at the end, just add some more flour, but don't overdo. You still want a fairly wet \ soft batter. You do NOT want, at the end of your knead, a somewhat thick hard ball of dough, you want it soft, high moisture content. It will be a little sticky on your fingers once you put it on the granite. Once you hit it with a little bench flour and hand knead it will not stick at all. It will be a VERY soft moist ball of dough.
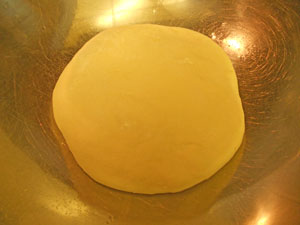
 [9]
[9]
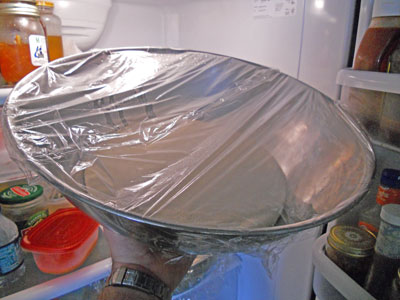
Then, pour dough ball on to a cool granite surface dusted with light flour. Try to use as little bench flour as possible. Hand knead lightly only for a couple of minutes. Form into a ball and place in a big bowl coated lightly with a little olive oil.
Let stand in covered bowl at room temp 1-2 hours or until it has increased by over a third in size, then cover with cellophane and place in fridge until Saturday morning. Day of pizza day, Saturday, take the dough out maybe two or three hours before your ready to make pizza. This last couple hours will bring the dough to room temp and rise a bit more. Don't look for double bulk, that sort of thing. This dough recipe is about six to seven cups of flour, of which can make several pies easily.
Prep the grill
Place six bricks (the ones with holes in them called Frogs) in the center of your grill and place the pizza stone on top of the bricks. Take your soaked Cherry and Apple wood chips and place them in your smoker box.
 [10]
[10]
This is a BIG factor in flavor and what separates this pie from most. The fruitwoods that are smoke on the grill while the pie is cooking. You will not believe how good this is, and it is what they do in Naples. The difference is I like the flavors of apple and cherry smoke as opposed to oak, and, I am cooking at 700+ degrees, not 900+ degrees.
Smoooooookin!
 [11]
[11]
The pie is only on the grill for 7-9 minutes, and it is a good idea to rotate the pie just once half way through the cooking time. Not as important here as it is in a brick oven. The gas grill has the benefit of even heat distribution. Moisture is not really a problem inside the grill. In a 100% enclosed brick oven, I can see where gas fed fire could have possibly a moisture issue. Don't think for a minute the pie will taste like smoke either, it does not. The pie is not on the grill long enough. But it is just long enough to have just a hint of the flavor.
Turn on your grill, all four burners, and set to "high". It is important that the bottom of your grill is clean and free of a lot of grease build up. If you have been smoking pork buts the previous weekend, you will need to clean your grill prior to pizza day. You will be cooking at high temps, and you don't want any flame-ups from old grease and food trash that is in your grill. CLEAN YOU GRILL!
 [12]
[12]
The reason for the Frog bricks is two-fold.
1) To elevate the pizza stone higher in the grill to take advantage of the higher temps.
2) The bricks hold a TON of heat and will help your pizza stone get even hotter, and maintain the same heat level while you open and close the grill.
It is important to let your grill come up to temp, prob. around 45 minutes before putting your pie on the stone.
The grill is now reaching the 700+ degree mark, the wood chunks have a nice smoke going and soon you are about to have one of the best pizzas you can have in the world, and it only takes about 7+ minutes on the grill. Remember that at the time of assembly, you want everything at room temp. The dough, ingredients, sauce, pretty much everything except the cheese, which should be kept cool right up until the time of prep.
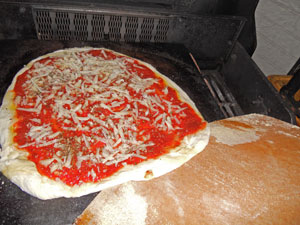
Lets go for a stretch
To prepare your pie, put your dough on your floured granite surface and pat out to the size you want. STRETCH the dough by hand. Go for a thin layer, but don't overwork it. It does not really 'Knead" that. Use as little bench flour as you can get away with. Do not use a rolling pin.
Put corn meal on your pizza Peel and transfer your dough onto your peel. ALWAYS test your dough on the peel to make sure it does not stick. Work very fast once you put the dough on the peel. Add sauce to your dough, then the motz cheese and toppings. Don't overdo with the toppings, go light. Add fresh herbs, I like basil and some chives from your herb garden-very good! Also, top off the pie with a light once-over of olive oil.
ToppingsIf you are going to be using veggie toppings, sausage, etc, PRECOOK them before it hits the grill. Try your first pie with just the Motz and one other item at first. You will find that the dough and sauce is so good, you don't really need a lot of other stuff on the pie. I am a pepperoni freak, so yeah, I cut my own fresh and it makes a great pie. The pre-sliced pepperoni can't compare.
 [13]
[13]
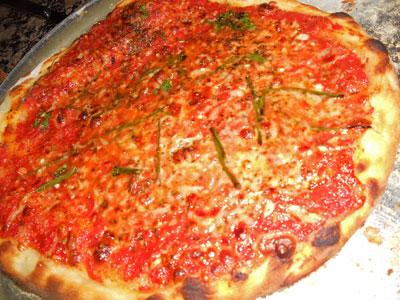
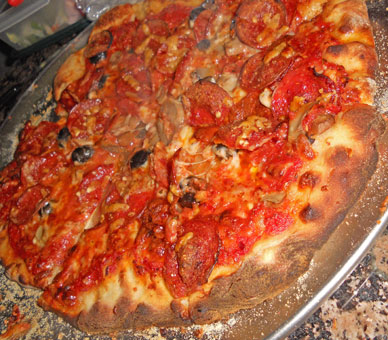
Transfer your pizza from the peel to the grill; cook for only 7-9 minutes.
After the pie is done, transfer it to a pizza tray and serve. That is about it.
I leave freshly shaved cheese on the table in case folks want to add more.
It's Ready!! You will find that it is much harder to go out for pizza when you know that you can easily, and very much afford to cook some of the best pies in the world at home. That is what is so amazing; the cost of cooking these pies is very, very little. Do make the investment in the Sir Lancelot Flour, that is worth it for sure, as well are the San Marzano tomatoes. However the fact is, you can splurge on a couple of ingredients and have the best pizza in the world, at a third the cost of a mediocre, local conveyer belt-cooked pie, with ketchup for sauce!
 [14]
[14]
Lastly I would like to thank King Arthur Flour for making such a fantastic flour product. I have been using their bread flour for a long time, and the Sir Lancelot for Pizza Dough is just a dream come true. Thank you folks!!
 [15]
[15]
"May your future be filled with gourmet pizza for years to come!!!!"
NOTE: GRILL UPDATE!
Since we published this recipe, we have moved on to a new grill that is better suited for grilling pies. It is a Infrared gas grill. This is a great grill for pies because the heat is more evenly distrubited across the grill and the heat stays hotter at the grill level because of the grates and plates above the burners. It also has a temp gauge right at grate level so you know exactly what your cooking temp is even at the crust level. This grill is getting 700+ degrees very quickly!
I also bought a seperate smoker \ electric for doing our butts, ribs and chicken. Works great. The reason I went to a smoker is because I wanted to keep this new infrared grill ALWAYS extremely clean. At temps of 600+, flair ups happen EASY!!! You dont want any pork fat in your grill at all.
So for the most part, I only use the new Infrared for pies, steaks, grilling veggies, that sort of thing. And keep it clean and always coat the interior with a cooking spray. If your going to be grilling a lot of pies,
keep your buts on a smoker!!
Jim Baugh
Jim Baugh Outdoors TV
Acknowledgements:
King Arthur Flour, Norwich Vermont.
Suzanne Cote
http://www.kingarthurflour.com/ [16]
Ruth Gurganus, Editor.
Sourdough Baking, John Ross
Chowhound
Captain Bill Parkenson
And "Mimi"
|
|
|
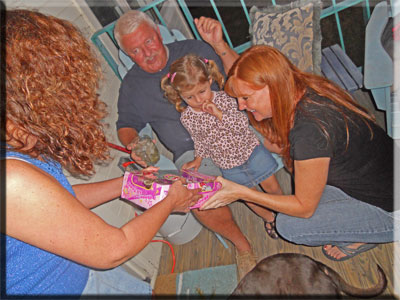
Ruth suprised little Marina with a present for the Pizza Party, A new Doll!!! She loved it. Thanks Ruthie!!!! Very Sweet. |