
Joy and Sorrow, Disaster and Rebuilding Amid New Hope
Well, my last post was all about my new WFO, and I said I would keep everyone posted on how things go as I complete the oven and learn to bake in it. Some of the lessons have been hard to learn. Having finally recovered (mostly) from the internet connectivity disaster my ISP wrought a couple of weeks ago, I'm now able to post some progress.
I did bake in the oven, on September 29th. I got three very nice loaves of Beth Hensperger's Pain Ordinaire, from her book "The Bread Bible". I chose this recipe because it is a straight dough that can be completed start to finish in about 2-2 1/2 hours so it made my timing very simple for my first wfo bake.

This bread was very exciting, if only because it came out of the WFO and confirmed all of my hopes for how the concept of a wood fired oven would perform. I was pleased with how well I was able to coordinate the dough and the oven, having both ready at nearly the same time. Truth is I rushed the bread. It could have used another 20-30 minutes to rise, but I wanted to bake! The results were not at all bad, and the bread came out very well. (I took and processed these shots myself, so blame me not my photographer-wife!)

We ate two loaves, and I gave one to the neighbor that helped me so much in finishing off the dome build a couple of weeks earlier.
That, though, is the end of the good news. In fact, it was the end of the oven (sob). I said the first bake was on Sept. 29th, and on October 2nd we pulled the oven down.

The above is a shot from inside the dome of one of several through-cracks in the dome. And here is the outside.

They were not originally this wide, but I was expanding them so I could patch them, then I found the through-cracks, and the roof fell in, almost literally.

These pictures speak pretty well for themselves, and I have not much to add...

And finally...

What can I say, but that it was my fault. We did a good job of building the dome, and I ruined it by over-firing it in one of the very first "small drying fires" (see my earlier blog post for the original admission of this sad truth). I called my neighbor that helped me put it up and he came over and helped me pull it down. His words of greeting were, "So, when do we do it again?". My answer was "Soon!" and my wife's was "Start today!". We did, but the starting was in cleaning up the mess and hauling away the first try. I have a huge pile of busted up oven dome in a ditch behind the woodpile. The winter rains will melt it down and I'll add it gradually to the garden where clay and sand will be welcome additions to the complete lack of topsoil around here (It seems like everything growing around here is in hauled-in soil).
So, I began again. I learned from my first oven that this time I want a chimmney because I am tired already of getting covered with soot just by going near the oven door. I also learned that my clay-sand mix was way too short on clay and long on sand. I learned lots of lessons about patience in waiting for natural drying (no more "drying fires" till the oven is already dry!) and about how it is not as hard as it seems to put one of these domes up. Next time I'll be better prepared, and more relaxed about it. There is much less need to hurry than I thought the first time out.
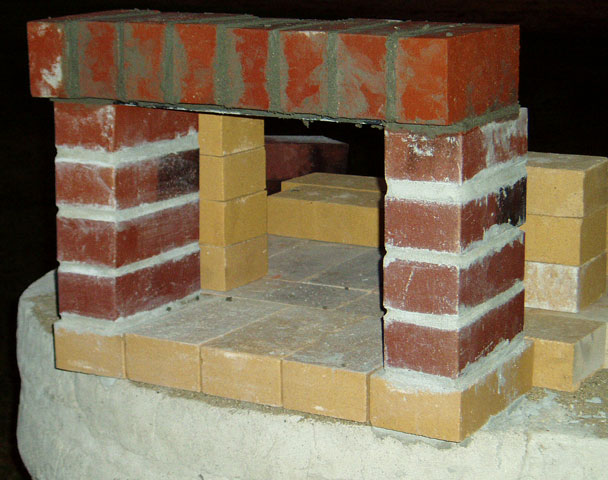
I spent a couple of weeks researching design options to add a chimmney, on materials, and on trying out mock up designs to see how they looked and how they fit my somewhat odd eliptical basic shape. And now I have started to rebuild, beginning with a new, square arch. I concluded that the square arch, while much less romantic, is (imho) more practical in form, function, and fits my skill set better. I can build a square arch that will stand. My track record for the curved arch is less sterling, to say the least. So here I go again, rebuilding my wood fired oven from (almost) scratch. I have had to partially reset the oven floor, but not entirely. I have moved everything forward toward the mouth of the oven to preserve space inside for baking. Here is what I have so far, beginning with the new arch vertical columns.

Next I added the top row of cap-bricks on the arch as you see here.
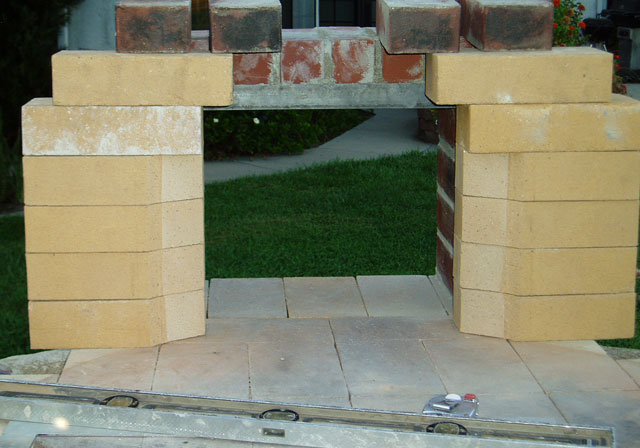
Finally, so far, I've started cutting and laying out the "inner firewall" that will be the face of the oven itself. I'll post more about this later, but for now I'll just say that when I saw the concept it made instant sense to me, and using the basic idea I was able create a plan that gives me a chimmeny, an insulated gap between the heat sensitive front arch structure, and a solid face for the dome itself. As I said, more on all that later. For now, here is what it looks like (from the back, inside-the-oven view) with the bricks cut but just laid in place for now. Mortar will come this weekend.
So out of the disappointment of my first failure I press on, with determination to be more patient this time, and to end up with an even better oven. Mean time, I'll just keep baking in the kitchen!
Still hanging in there
OldWoodenSpoon