My first sourdough article [1] generated a fair number of questions from readers and acquaintances of mine. I thought it would be a good idea to answer some of these questions in a place where everyone can read them.
I've baked with my starter a couple of times now. I've learned a few things worth passing on, some of which may be of interest to bakers of yeasted breads too.
You know the routine: click "Read More" to read the full story.
Storage
One question I got asked was how do I store my starter. I use one of these glass jars with the hinged glass lid:
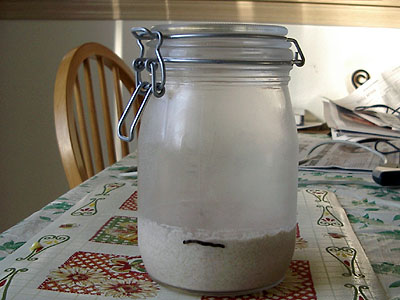
You can find one of these at any local Fred Meyer, Target, Walmart, or kitchen supply store.
The black line you can see on the side of my jar is just dry erase marker. I like to mark the level of the starter when I put it into the fridge. It wipes off easily so I can mark it again next time.
The prevailing consensus is that storing starters in metal containers is A Very Bad Thing because it'll give the starter a funky taste. I've not tried it, so I don't know for sure. A glass jar or plastic container work very well. Even an old yogurt container will work.
I like the way that John Ross [2] words how your container should be sealed: "Airtight is fine, but mostly airtight is better." A little bit of venting is good for your starter; I, for example, don't use the rubber ring that came with my jar that would allow me to seal it nearly airtight. But you also don't want your starter so exposed that it dries out or becomes a home for any strange organisms living in your refrigerator. Somewhere in between is best.
Hooch
Sometimes you'll find liquid floating on top of your starter. It may even be brownish. Not to worry, that is just hooch, an alcoholic byproduct of the fermentation process. Don't worry about it. I wouldn't suggest drinking it either. If your starter is on the dry side, mix it back in. If it is already pretty moist, pour it down the drain.
If you starter starts turning pink, however, throw it out and start over. That means something nasty has moved into your starter.
Why is Sourdough Sour?
The Exploritorium website [3] says it better than I can:
In addition to flour, water, and yeast, your starter also contains bacteria. When these bacteria feed on the sugars in flour, they produce acidic by-products. This is what gives sourdough its sour taste.
Actually, all doughs contain at least some bacteria. So why aren�t all breads sour? In doughs made with bakers� yeast (the kind you buy in the store), the yeast outnumber the bacteria. Since both compete for the same sugars, the yeast win out, and the bacteria don�t have a chance to produce their acidic by-products. In sourdough, yeast and bacteria are more closely balanced, so the bacteria have a chance to add their flavors to the bread.
Sourdoughs and other raised breads also differ from one another because of the eating habits of the yeasts that make them rise. The predominant yeast in sourdough, Saccharomyces exiguus, cannot metabolize maltose, one of the sugars present in flour. Baker's yeast, on the other hand, has no trouble feeding on this sugar. Since the bacteria that give sourdough its taste need maltose to live, they do much better in the company of sourdough�s yeast because they don�t have to compete for this sugar.
Interesting, no?
Adding More Flour or Water
With just about every recipe I've posted, I've had people tell me they had to add a bunch of extra flour, as much as an extra cup per loaf. I've also had people tell me that, with the same recipe, they had to add as much as a half a cup of extra water.
This is totally normal. Measuring cups are not a reliable way of measuring flour. For any number of reasons, such as the freshness of the flour, the fineness of the grind, how tightly it was packed in shipping, or how tightly you pack your cups, you may end up with a very different amount in one cup of your flour than I do in mine. That's OK. Adjust as you see fit.
Professional and serious bakers deal by this with what is known as baker's percentages [4]. For example, a professional baker might say that their French bread has around 65% hydration, which means that there is 65% of the water, by weight, as there is flour. So for every 1 kg flour in the recipe there would be 650 grams water.
Reliability and reproducibility are very important to professional bakers, who have to turn out consistent loaves regardless of how much moisture there is in the air on any given day or the difference between one bag of flour and the next. The baker's percentage system is the most common way of achieving this consistency.
For the home baker? Well, it is up to you. Many high-end artisan baking cookbooks include the baker's percentages. If you prefer to be exact, consider picking up a cheap kitchen scale and using the baker's percentages instead of measuring cups.
Personally, I enjoy the inexactness of bread baking. I get a lot more pleasure out of getting my hands into the dough and adjusting the quantity of flour or water as I feel is necessary than I do pulling out my scale and weighing everything. If one batch of my bread turns out a little to wet or a little too dry, I'll live. I'll just try to compensate for it in the next batch.
Shaping
I said in one of my previous pieces that I thought I was too rough on the dough when I shaped it and was losing a lot of the air pockets. The last few times I've been much gentler when shaping my loaves, really more just smoothing and stretching the dough out than punching it down and re-rolling it. This seems to have done the trick: I've been getting much nicer crumb, full of long, glutenous threads and large irregular holes.
When panning a loaf to make a sandwich bread I still punch it down and roll it fairly tight. But for these kinds of breads, the gentle touch appears to work better.
Baking Surface
I've been baking on the back side of a cookie sheet. I typically sprinkle it with a little bit of semolina flour first. Corn meal works well too.
Parchment paper is nice to put under the loaves, as it makes rotating them and handling them much easier. Sometimes I use parchment, sometimes I don't.
Baking stones are supposed to be the way to go if you want to maximize your oven spring (the amount the loaf rises once you put it in to bake), but I have a nasty habit of breaking them. I think I've gone through three already. My latest one arrived in the mail today, so we'll see if it is any more durable than the others have been.
Moisture and Crust
I've already talked about this some, but my experimentation and correspondences with other bakers has borne out the theory: steam in the oven and high temperature are the way to achieve a crusty crust.
A friend of mine's wife does not like crusty, crunchy crust. Instead of heating the oven up to 500, as I do, he keeps it down around 350 and gets a much softer crust. He also coats the outside with a wash, either egg wash, milk, or even just water, right before throwing it in the oven. Doing so results in smoother, softer crust.
My Starter
I'm now about four weeks into the life of my starter. I've baked three batches of bread with it. I do think that the flavor is getting better, but that may just be because I am finally over a series of colds and can actually smell and taste the full flavor of the bread.
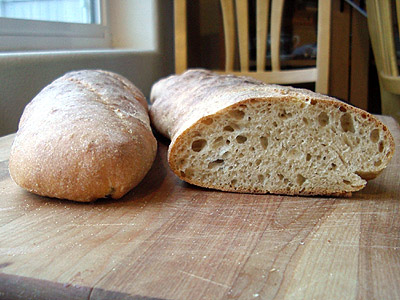
I failed to write down the exact ingredients I used the last time I baked with my starter. To make the two loaves in the photo at the top of this page I used was something along the lines of:
3 cups bread flour
2 cups whole wheat flour
1 cup starter
1 cup water
2 tablespoons olive oil
2 teaspoons salt
I gave it a three hour primary fermentation followed by a two hour shaped rise. I started it in the oven at 500 degrees, reduced it to 450 after 5 minutes, rotated it after 15 minutes, and pulled it out of the oven when the internal temperature was around 200 degrees. The total baking time was around 30 minutes.
Was any of this info useful? I hope so. Please share any tips you may have on any of these subjects by posting comments below.