
The ambitious home baker inevitably gets the urge to try baking Sourdough. It's like... like... well, I'm not sure what it is like, but it brings a whole new level of of experimentation to the baking process. It's fun. And it tastes amazing.
I've tried it once before, a few years ago, but ended up abandoning my starter when my son was born. There were only so many organisms I had the time to nurture, and, alas, my starter did not make the cut.
I tried creating another starter a few weeks ago. This time I had more luck.
I'm sharing my experience, some pictures, and a bit of background on sourdough below.
I believe this article includes enough information for even an inexperienced baker to take a crack at creating a starter. But I invite more experienced sourdough bakers to share their tips in the comments section below (or submit their favorite links or books, or even to write an advanced sourdough article to post here.). I do not pretend for a minute to be an expert on sourdoughs or to have mastered this process, but I am having fun learning.
Background
Commercial yeast is a relatively recent phenomenon. For hundreds of years bakers have had to capture the wild yeast that lives in the environment in a starter and use that to leaven their breads.
Different regions in the world have different strains of yeast in the air. Hence the famous "San Francisco Sourdough": there is a strain of wild yeast that thrives in California which produces an excellent, extremely sour bread.
Dried commercial yeast is the most important development in baking in hundreds of years: home and professional bakers today can create a loaf of bread in a fraction of the time their ancestors were able to. And commercial yeast allows the baker to assure a consistency of quality that until recently was impossible for all but the most skilled. Its importance should not be underestimated.
But there is something wonderful about getting away from even that bit of modernization and baking the way past generations had to. For one thing, the wild yeast impart an entirely different flavor to your bread. And, because it is not as concentrated as commercial yeast, wild yeast also forces you to slow down and enjoy the process. The baking experience begins to have less to do with mass production and more to do with true artisanship.
The Basic Process
The basic process of creating sourdough is pretty simple. You start by mixing together flour and water to create a medium for yeast to live in. Over a series of days, you replenish your starter. This continues until you build up enough yeast activity in your sponge that it will support baking. Then you use it by creating a larger batch of starter. A portion of this you can bake with immediately, but another portion of it should be refrigerated for later use. In fact, the starter won't really peak in flavor for a few weeks, so it is worthwhile keeping it going. As long as you feed it more water and flour once a week, the starter should stay alive indefinitely.
There are many different recipes for sourdough starters. Some of them use a bit of commercial yeast to get things started. Others use raisins, honey, or potatoes, and different flours. They all share the same goal: to produce a lively starter capable of leavening a loaf.
My Experience
To start out I decided to loosely follow Peter Reinhart's Seed Culture formula from The Bread Baker's Apprentice [1]. When my starter appeared to be suffering, I gave up on following his formula and followed my own intuition. Happily, doing so worked out well and my bread turned out excellent.
I began my starter Wednesday evening. I mixed together:
one cup rye flour
3/4 cup warm raisin water
Raisin water is just warm water that had been poured over a handful of dried raisins and allowed to sit for half an hour or so (I used the raisins in another loaf of bread I was preparing to bake). The white stuff you see in the folds of raisins is actually a yeast, so using raisin water is one method of increasing the likelihood your starter will take off.
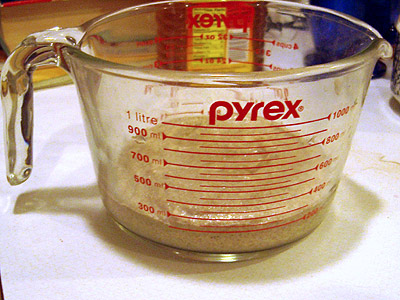
I covered tightly with plastic wrap the Pyrex container with the starter and left it in our cupboard overnight.
Thursday evening I took a look: my starter had risen to the top of the container it was in! I definitely was off to a good start. I mixed:
1 cup bread flour
1/2 cup water
1 cup of the previous day's starter
The remainder of the starter I threw out (yes, I have a hard time throwing food out too, but it is necessary).
I noticed that, although Peter says "the dough will be somewhat softer and wetter than the Day 1 sponge," mine was definitely harder and drier than day one. Perhaps my flour was packed a bit too tight. No big deal.
Once again, I covered tightly with plastic wrap the Pyrex container with the starter and left it in our cupboard overnight.
Friday evening when I checked out the starter I was disappointed with the rise. It had risen some, but considerably less than after the first day. Hm. Well, I stuck with the program and mixed up:
1 cup bread flour
1/2 cup water
1 cup of the previous day's starter
and once again covered it tightly and put it in the cupboard.
Saturday I decided something was not going right. By this point, Peter suggests, you should be getting at least a doubling of the dough, with each day the dough getting softer, wetter, and more risen. I was seeing exactly the opposite: my dough was getting denser, drier, and rising less and less each day. Time for a few changes.
I did a few things: first, I added considerably more water and switched to whole wheat flour:
1 cup whole wheat flour
1 cup water
1 cup starter
Then, instead of tightly covering the Pyrex measuring cup with plastic wrap, I covered it loosely. Many sites/books I've read have mentioned letting the starter breathe. I believe some of them even said to leave the starter totally uncovered. Well, at this point I was willing to try anything to rejuvenate this one. If it wasn't looking more lively in the morning, I was going to give up.
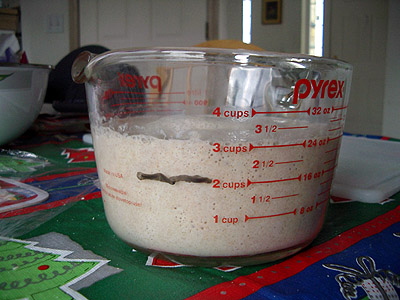
Good news when I came downstairs Sunday: my starter was moving again. It didn't double or anything, but it definitely appeared to be coming back to life, as you can see in the photo (the black mark is the level it was at the evening before). I'm not sure if it was the water, the whole wheat flour, or the air, but something worked.
It was now time to bake a loaf!
Before doing so, I removed one cup of the starter and add 1/2 cup flour and 1/2 cup water to it. This I put in a jar and stored in the fridge to bake with the following week.
At noon I mixed together:
1 cup starter
1 cup bread flour
1 cup all-purpose unbleached flour
1 teaspoon salt
1 cup water
I mixed this together for 5 minutes. It started to feel really tight, so I set the dough aside to rest and relax the gluten for five minutes. Then I poured the dough onto a heavily floured surface and kneaded it for 10 minutes. I had to add quite a bit of flour and keep my hands floured to keep from sticking, as I appear to have gone from one extreme, an extreme tough, dry dough, to the other, a very soft wet dough.
After kneading, I returned the dough to a bowl and let it rise for
around 3 hours. It takes longer to rise because we aren't spiking it with commercial yeast. The yeast in the starter needs time to eat, reproduce, and grow.
(Rising time, obviously, vary based on how lively your starter is and what the temperature is. So just keep an eye on your dough and adjust accordingly!)
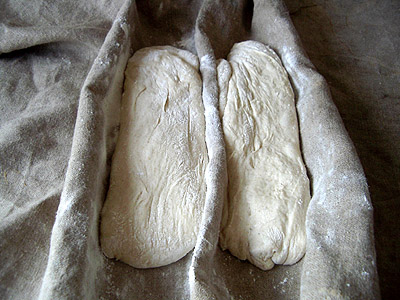
When the dough had doubled in bulk, I poured it onto a floured surface and prepared to shape it. Because it was a soft, Ciabatta-like dough, I decided to simply cut it in half and stretched them to make the loaves. I set them aside to rise for 90 minutes.
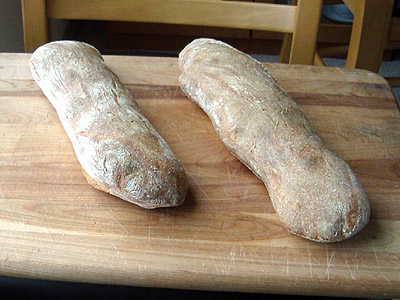
When they looked risen, I threw them in the oven, which had been preheated to 500 degrees. I also did the pan of water trick which I discussed in Lesson Three [2]: just after putting the bread in the oven I poured a cup of hot water into a brownie pan which I had placed on the lower rack of the oven. This produces a steam cloud which improves the quality of the crust.
I baked these loaves at 500 degrees for 10 minutes. I then reduced the temperature to 450 degrees, rotated the loaves, and baked them for twenty minutes more, until a probe thermometer inserted into the center read right around 200 degrees.
Results
Yum, the bread was wonderful! It had a great crust, beautiful crumb full of irregular sized holes, and nice sourdough bite.
Last weekend I baked a second batch using the starter (one cup start, one cup water, and one cup of flour is all it takes to wake it back up). I had a pretty bad cold and couldn't really taste whether the flavor had gotten any better, but the starter was definitely still going strong.
The End and The Beginning
Here ends my totally subjective first article on naturally leavened breads. As I said at the beginning, I am still learning the terminology and the process too.
If you want to try baking sourdough for the first time on your own, I urge you to take a look at some of the sourdough links [3] I'm putting together. Or read a cookbook: most bread baking books have at least one chapter on sourdoughs, and there are a number of books dedicated to them (such as Crust & Crumb [4]).
If you are experienced with sourdoughs and want to share some of your wisdom, I'd love to hear it (as would other site visitors). Please add comments below.