Submitted by dmsnyder on December 2, 2008 - 10:56pm

Ficelles made with Anis Bouabsa's baguette formula
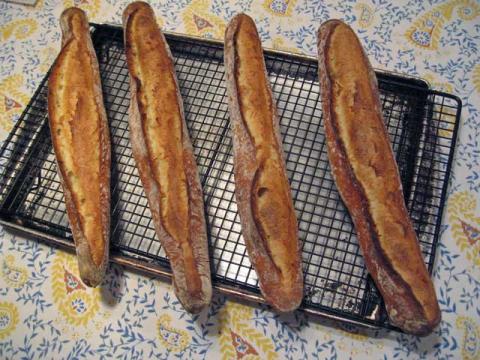


  • Flour 500 gms Giusto's Baker's Choice
  • Water 375 gms
  • Yeast 1/4 tsp Instant
  • Salt 10 gms
  1. Mix flour and water and autolyse for 20 minutes.
  2. Add yeast and mix by folding dough in the bowl.
  3. Add salt and mix by folding dough in the bowl.
  4. Mix dough by folding and stretching in the bowl for 20 strokes. Repeat this 3 more times at 20 minute intervals.
  5. Refrigerate dough, covered tightly, for 21 hours.
  6. Divide into 4 equal parts and preshape gently for baguettes.
  7. Allow preshaped pieces to rest, covered with plastic, for 1 hour.
  8. Shape into ficelles (short, thin baguettes).
  9. Proof en couche or on parchment paper dusted with semolina for 45 minutes.
  10. Pre-heat oven to 500F with baking stone in middle rack and a cast iron skillet and a metal loaf pan on the lowest rack. Preheat 45 minutes or longer before baking.
  11. 3-5 minutes before baking, place a handful of ice cubes in the loaf pan. Shut the oven door. Bring water to a boil.
  12. Transfer the ficelles to a peel and load them onto the baking stone. Pour one cup of boiling water into the skillet. Close the oven door.
  13. Turn the oven down to 480F.
  14. After 10 minutes, remove the loaf pan and the skillet from the oven.
  15. Continue baking for another 10-15 minutes until the loaves are nicely colored, the crust is hard all around and the bottom gives a hollow sound when tapped. Internal temperature should be at least 205F.
  16. Cool on a rack completely before slicing.
Anis Bouabsa is a young Parisian boulanger who won the prize for the best baguettes in Paris in 2008. He gave Janedo, a French home baker extraordinaire and a member of TFL, his formula, and Jane shared it with us. He uses a technique of a long, cold fermentation which has been used, with variations, by a number of contemporary French bakers.
In addition to producing wonderfully flavored bread, it also permits the home baker to make bread using two blocks of about 2-3 hours rather than requiring longer time blocks. For example, I mixed the dough yesterday evening after dinner. I took it out of the refrigerator at about 4:30 pm this afternoon, and we ate it with dinner at 7:30 pm.
These ficelles sang loudly coming out of the oven. I cooled them for only 20-30 minutes. The crust was very crunchy, and the crumb had a sweetness that would make one think there was sugar in the dough. Very yummy.
Variations on Bouabsa's formula, adding 100 gms of sourdough starter and substituting 10% rye or whole wheat flour for an equal amount of white flour, make a delicious pain de campagne, which has become a favorite bread of several of us.
This is described in my blog entries under "Pain de Campagne" and "San Joaquin Sourdough."
Enjoy!
David


user icon

Handsome ficelles! Great oven

Handsome ficelles!

Great oven spring too, David! Did you slash them in one stroke from end to end, or did several cuts burst open together? Lovely colour. Do you stretch them into shape, or do you roll them?

user icon

Shape and slash

Thanks, hansjoakim!

The ficelles were shaped using the traditional technique for baguettes. I slashed them with one long stroke. I thought it would work better given how thin they were.

David

ficelles

David,


Giusto's Baker's Choice is a type that I do not have access to. I primarily use any thing KA because of its accessibility in the supermarkets. I live in Indiana so certain flours do not make thier way here. Can I use a KA product that is close to the Giusto's?

Many thanks,

Chuppy

P.S. Have you ever worked in a proffessional bakery or just a home artisan?

user icon

Flour substitution

Hi, Chuppy.

Giusto's Baker's Choice has 11.0-11.5% protein. KAF AP flour is 11.7% protein. That's probably a reasonable substitute, but it's likely other brands of AP flour have lower protein/gluten.

No, I've never worked in any part of the food industry. What do you mean "JUST a home artisan?" ;-)

David

Flour substitution

David,

So your saying that I could continue to use KA on a regular basis? I do like the quality of flour that is milled by KA. Once again we are limited to what we can purchase in the grocery.

What I meant by "Just" a home artisan, is have you practiced your skills by only baking at home. By the looks of your loves, you seem to have a professional touch to what you do. The pics of the ficelles are absolutely amazing to look at. I only wish I could produce such baked goods. Hopefully, with the help of others on The Fresh Loaf, I can begin trying to replicate what others like yourself have been doing for quite some time.

From my understanding, the bakers method of measuring ingrediants by percentage is a very fluent langauge and one that is importanat to understand the basics of bread baking in general.

Thank you for your reply,

Best regards,

Chuppy


user icon

Flours

Hi, Chuppy.

You are going to find differences in how flours behave day to day depending on the batch of grain, ambient humidity and temperature, etc.

You can substitute flours, but it will have consequences in how the dough behaves and feels. With experience, you will come to connect how the dough acts with how the bread turns out. We can talk in generalities about this, but there really is no substitute for (literally) hands-on experience.

I am a home baker. I've never even taken a class. In fact, I've never even worked face-to-face with another bread baker. Yet, I can't believe how much better my breads have become since I started hanging out on TFL. I just checked. It's only been 15 months. Un-freaking-believable!

Now, I wasn't just hanging out. I was asking questions like crazy. I was seriously surfing old topics. I was venting my frustration when something wasn't working for me. I was reading lots of the recommended books. I was getting a LOT of help and encouragement from the more experienced bakers here who were producing loaves I could only dream about making some day. And - whatdoyouknow! My breads got better!

Nothing magic about it. Just plain old persistance and a pinch of perfectionism and a passion for challenges, not to mention a passion for great bread.

I've seen many others travel this road and arrive at breads that make you jump for joy when you take them out of your oven. It's a great trip! Enjoy it.

David

user icon

David, Nice to see you... and

David,

Nice to see you... and your bread! They look lovely. I don't drink café au lait anymore except on a rare occasion as a treat, but one of my very favorite breakfasts is a BIG café au lait with ficelles like yours spread with butter and jam. Absolutely heaven! Add to that sitting at an outdoor café on the edge of the beach in a town called Collioure:

http://www.collioure.com/gb/index-gb.htm

I have been playing around with baguette recipes, but these remain my favorite.

Jane


user icon

Hi, Jane!

Nice to see you, too!

Je suis d'accord! I had half a ficelle, cut end to end with butter and homemade strawberry jam for breakfast. No café au lait, though - just a pot of very delicious Kenyan coffee from Stumptown Coffee Roasters in Portland.

And no outdoor café nor beach, either. <sigh>

David

Bouabsa recipe

hi, tried your recipe to the letter, yesterday / today, except i doubled the quantity.
results dissapointing as they didn't rise, I made each baguette about 250 grammes each,
tastes ok - but flat as a pancake.
any ideas why?

Many thanks.

James

user icon

Flat baguettes @ James

Hi, James.

When you say "they didn't rise," I assume you are referring to the shaped baguettes. You describe the baguettes as "flat as a pancake." That's pretty flat! Was that before or after baking? 

Regardless, you have two issues, as I understand your questions:

Shaped baguettes not "rising" (but spreading out?) could be from any combination of the following:

1. Gluten insufficiently developed.

2. Not developing a good "skin" of gluten on the loaves when shaping them.

3. Room too cool. You may have needed to proof longer.

4. Not supporting the sides of the baguettes while proofing. (How did you proof them?)

5. Insufficiently active starter. (I assume you added the 1/4 tsp of Instant yeast).

The "flat as a pancake" issue needs your clarification regarding at what stage the loaves were flat. Even if they spread a lot during proofing or transferring, if you did everything else right, they should have had good oven spring and rounded out a lot.  If they didn't spring, you may have shaped the baguettes to roughly (popping the bubbles that form during fermentation0,  over-proofed, not heated your oven stone enough, not steamed the oven well.

These possible explanations are not mutually exclusive. Everything matters.

Hope this helps you problem solve.

David

Hi David, thanks for the

Hi David, thanks for the response.

'Flat as a pancake' was a touch of British exaggeration on my part, They were pretty flat and didn't form the roundish shape as you'd expect, (more alligators than Pythons). That was after baking; they rose a reasonable amount during  proofing.

As for shaping, I did them in the same way as always, Bertinet style - you might say.

Proofed for 21 hr's exactly in the fridge and out an hour to room temp before the first rough shaping, and after the second baguette formation, on a couche well floured, as is the custom.

As far as yeast goes I used 1/2tsp of Instant yeast as quantities were doubled.

I know it doesn't make sense, the only thing i can think of is that the yeast I used was bad? Or insufficient for the flour I'm using, I use Manitoba, or very strong canadian bread flour that whole foods here in London sell.

They just didn't spring up.. Too embarrased to attach pic's will try again with 20g of fresh yeast I think..D'you reckon that's a good idea?

many thanks.

James


user icon

Oven spring and Starter

Hi, James.

If your starter is active, you shouldn't need more yeast. I generally make these now with no added yeast. I think you need to consider the causes of poor oven spring.

If you are using high gluten flour, you may need to mix longer to develop the dough. It should lead to higher loaves, if you are doing everything correctly.

David

Nice Looking Bread!

'nuff said

user icon

Thanks, Pat!

David

user icon

Impressive!

Mini

user icon

Thanks, Mini!

David

user icon

Very nice

Very nice David. Looks like marvelous crunch with that crust.


user icon

Thanks, Eli!

It was indeed crunchy!

David

user icon

Beautiful Beautiful Beautiful

Rosalie

user icon

Thanks, Rosalie!

But only 3 "beautifuls?"

So, which of the 4 ficelles didn't you like? ;-)

David, emulating the classic Jewish mother.

user icon

Let me finish

... Beautiful, with an extra Beautiful for good measure.

Rosalie

user icon

Awwww ....

Hi, Rosalie.

Now you're exagerating! (But I do appreciate it.)

David

les ficelles belles!

Such beautiful bread! I made my first baguettes last week in my new wood-fired bread oven.  They were good, but no better than what you can buy in the shops, and not anything like the beauties here! I wonder if the ice cubes in a cast iron pan would work in a brick oven. Any ideas out there?

user icon

Thanks, mroepke!

I'd love to see photos of what's coming out of your wood-fired oven. 

I can't speak to humidification of a wood-fired oven, having no experience with them. I've wondered about that myself. It's my impression that those using them don't do anything to introduce extra moisture, but maybe we'll hear from some with personal experience.

David

wood-fired oven

Check out my blog: mybreadoven.blogspot.com

There are some pictures of focaccia and a neighbor's sourdough that came out great! I am going to try the ficelle recipe this weekend. My plan is to make enough dough ahead of time and freeze it, so I can thaw and rise at intervals. That way I can have several loads of bread. (Christmas presents!) I'll let you know how that goes. It has all the potential for a real mess!

user icon

wood-fired oven steaming

Some people have suggested using a garden hose and just give your oven a spritz inside....is you have a wooden door that can be soaked in water...if you have a large load of bread the moisture coming from the bread can create enough natural steam....using a wet/damp mop on the floor of your oven can tend to cool your oven floor temp. down and this is usually done just to clean up the ash before baking.  These are only suggestions as to what you might try if you want to put steam into your oven.

Sylvia

Mop && Water

I've heard that people with wood-fired ovens (cobs, hearths, etc...) can use a rag mop and a bucket of water to produce loads of steam before putting the loaves in.

I bake all our breads & pizza

I bake all our breads & pizza in the WFO I built over a year ago. For moisture when baking breads, after all the coals have been raked out and the temperature has settled to near baking levels, and shortly before loading the oven, I mop out the floor with a damp - not wet - mop. This will clean the hearth, of course, but it also helps reduce the temperature and adds a bit of steam/moisture to the oven. Then I load up the oven and spritz with a spray bottle I bought at the Dollar Store. The spritzing is done above the breads - not on the breads - and this will steam up. Water evaporates before hitting anything. I spray a few seconds alllowing it to steam. Then I close the oven and bake away. It gets great oven spring & crust. Also, as stated above, the moisture of the dough helps. My oven is 42" and I can put about 18 boules in there at a time. So that alone drops temps a bit before the oven regulates itself, as well as adds moisture to the oven.

I have seen wood or gas fired brick ovens with built-in methods for maintaing moisture or for adding it when needed. One oven had a valve or a spigot or somethiong that allowed the baker to add as he felt a need. I never saw it in action so I don't know how it worked, or when he applied it.

Another oven had a well built into the floor of the oven. The baker would place a small pail that fit into the hole and remain level with the hearth surface. He would cover the hole/pail with a grill type lid that allowed the steam but would not be a hole in the floor.

For a couple of years I baked for a bakery (I came in each morning to a refrigerated dough and it was my job to shape/proof/bake). We had a pair of convection ovens so the floor of the ovens was available. That's where I had a roasting pan filled with  terra cotta from old, broken flower pots. Just before loading the oven I would add a small amount of water into the pan and close the door while I was lining up the sheet pans and dusting & slashing the loaves. Then, once all the bread was loaded I would fill the roasting pans with water, close the door and not open it for about 15 minutes.

user icon

Wonderful

Wonderful ficelles!  I really appreciate the way you wrote out your directions for making them...everything very nicely done and the jam, coffee, cafe au lait....just my cup O tea!

Sylvia

user icon

Thanks, Sylvia.

David

user icon

Congrats!!!

Looks very tasty....

beautiful color, crust and crumb!!!!!

user icon

Thanks, Leandro!

David

user icon

Thanks for posting these

Thanks for posting these wonderful pictures and recipe.  I had good luck today with your recipe adapted to a room-temperature ferment -- see here.  I don't know how you managed to get such great rip on the top with this wet dough.

Scott


user icon

Thank you, Scott.

You did a good job. I posted more details in your topic.

David

moisture in wood-fired oven

Yes - we use a wood-handled mop (well wrung out) - to clean the sole of ashes and add moisture, but I was warned by Alan Scott that I should never use any free water on the firebricks. I think that I will start to mop for a longer period of time, adding more steam and also try the ice-cube in the loaf pan and the boiling water in the cast-iron pan. Thanks for you thoughts! It 's really fun to try to figure this stuff out!

-Marcia

Wonderful!

They look really super - I MUST give this method a go! Thanks for sharing !


Andrew

user icon

Thanks, Andrew!

Let us know how yours turn out.

David

Easy and very, very tasty!

As my regular baguette bake follows PR's Ancienne formula (which my kids and grandkids literally inhale), I had to try your ficelle recipe, David.

I wasn't sure of what the dough temperature was supposed to be so, I nuked the water for about 30 seconds (my well water is so cold in the winter, drinking a full glass causes brain freeze).

The next evening I removed the dough from the cooler and had to make a quick trip to YouTube to check out the baguette shaping videos.  The dough was so responsive that I missed the mark of short, thin baguettes, winding up with three long thin baguettes and one shorter one (I should have weighed the dough before cutting it).  There was no going back at that point and while my shaping skills need work, it was great fun working with the dough.

I should have slashed deeper, or vertically.  Actually, I'm surprised I was even able to get a few cuts in.

The ficelles tasted wonderful; the crumb was nice and open, and the crust was crisp and chewy. 

I will definitely practice making more of these, but am curious about the water temperature you used, and what effect using water of 40F would have.

Thanks so much for posting this formula.  These will make great Christmas gifts!

user icon

Nice job!

Hi, Lindy.

Your crumb is outstanding! Wow!

I don't obsess over water temperature, although if a recipe is specific about it I follow the instructions. 40F is pretty cold, though. When I start with cold water, I usually warm it to "tepid" - 70-85F. The main effect of colder water would be to slow down fermentation. That is good for flavor development, but it could be a problem if timing is important to you.

I''m glad you liked your results. You should try this recipe with 100 gms added sourdough starter and 10% rye flour. The flavor is even better, in my opinion. The crust is less crunchy and more chewy with the sourdough, of course.

Thanks for sharing your results.

David

user icon

Wow! Your crumbs is great! I

Wow! Your crumbs is great! I am a firm believer that baguettes really don't have to be picture perfect to be incredibly GOOD! The "proper" look will come with practice. (I still haven't managed, but don't care). You can play with the hydration depending on the flour you're using.

Tell us what you think of the sourdough version. I like it even better than these ones.

Jane

Sourdough delights

I love your philosophy, Jane...although I'm a bit late in saying so!  I tried the sourdough version but in my enthusiasm to load the oven, one baguette flew off the stone to the bottom rack.  If I ever do that again, I think I'll just let the fallen bread bake (or maybe burn) in place because I lost a lot of oven heat while fishing it out.  The baguttes that managed to stay on the stone were quite tasty, but didn't get the benefit of a sustained blast of heat and steam.

I'm going mix up two batches tomorrow after work so I can bake them the next morning for Christmas Eve dinner.

I really must thank you for getting Mr. Bouabsa to share his formula, and to you and David for working out the details and making them available here.  It is a great gift that keeps on giving each time they're baked  While I'm at it, I have to note my appreciation to Mark for his baguette shaping video.  Better shaping has led to better scoring....but still not as pretty as David's.

Joyeux Noël to you and your loved ones.


user icon

I have had some terrible oven

I have had some terrible oven bread disasters! But losing one baguette is better than a whole loaf. Oh well, perfecting baguettes is lots of fun anyway. I think I'll do some up for Christmas, too. I really have to decide what I'm going to make for the meal, though!!!

Joyeux Noël et très bonnes fêtes à vous tous aussi!

Jane

A definite

I will definitely try the sourdough and rye variation - tonight, in fact.

Thanks so much for posting the formula and for your encouragement!

Lindy


Please, David, explain

Hi David

It looks great, I want to try it. Could you please, explain more the step no. 4?

What type and size of a mixing spoon do you use, what movements make the proper stretching and folding etc.

Also do you bake it with the parchment paper?

Thank you for all the explanation. I am a newbee.

Alka


user icon

Stretch and fold in the bowl

Hi, Alka.

Here is a description I posted previously:

"It is best for slack doughs. Most use a flexible plastic scraper, but I have found a rubber spatula to work as well. Remember, we are talking about very sticky doughs. Believe me: getting the dough to stick to the spatula or scraper is not a problem. Getting it unstuck? Well that's another matter.

So, your dough is in a bowl that is large, say 3 times the dough's volume. You insert your scraper between the dough and the bowl at 12 o'clock (assuming you are at 6 o'clock) and stretch the dough your scraper contacts up and over the ball of dough and press it into the dough. If you do this fast, the dough will release the scraper. Maybe some will stick to it.

Turn the bowl 1/5 turn. (I am right-handed and rotate the bowl clockwise.) Insert your scraper between the new portion of dough now at 12 o'clock and do as described above again. Repeat this turn, insert, stretch, press, release maneuver 20 times.

Cover the bowl and set a timer for when you want to repeat this procedure. Generally, this would be between 20 and 60 minutes.

How many times you repeat it depends on the degree of gluten development you want.

I have been doing 3 sets of stretch-and-folds 20 minutes apart for a dough with 75% hydration."

David

measures

I tried this tonight but I don't have a scale (yet), so I used an online conversion to approximate.  I used 5 cups of flour when I think it should have been more like 4.  Does this sound right? 

After I realized it wasn't right I adjusted the water up at the beginning of the autolyse and tried to follow the method but the dough was very elastic, nowhere near what the video shows.  I'll still cook the bastards, no sense in wasting the flour but I don't have high hopes.  Who knows, stranger things have happened.

I'm going to try this recipe again later this week when I finally break down and buy a scale.

user icon

Extensibility

Hi, md_massimino.

Welcome to TFL!

This dough is supposed to be very extensible. If yours was very elastic, maybe you added too much flour. Did you substitute a high-gluten flour by any chance?

A scale will really help.

Let us know how your first effort turns out.

David

Restults

I baked the dough that I messed up on the measurements with. Well, it's a testament to this recipe because they didn't come out half bad.  I continue to bungle the techniques and my oven really has a difficult time getting up to and sustaining the high temperatures required to give a good crisp crust, but overall a decent baguette.

Here's the crumb.  I had to turn the flash off or you couldn't see it very well.

With my new knowledge (and a scale) I'll try again this weekend with I'm sure improved results.

user icon

Very nice!

Good work for a first attempt. Just from the appearance, I think you needed higher hydration, but there are some alternative possibilities. 

How is the flavor?

I like your attitude! Looking forward to seeing your progress.

David

First attempt

I thought the flavor was very good but not as good as others I've made using a poolish start.  Hopefully that comes around this weekend when I try again.

Of course my kids thought they were great and ate them all already.  What can I say, they're easy to please :)

user icon

hello

hi,

first, thank you for sharing!

second ive tried the directions posted but my baguettes dont seem to bloom in the oven. i suspect it must be due to my shaping skills. when shaping the baguette after the 60min rest, how 'tight' do you roll? is one to treat the dough gently or push out the air? i watched a few clips on youtube and it seems that the final shaping of the baguette is pretty tight.

user icon

Shaping

Hi, koalatree.

This should be a fairly slack (wet, sticky) dough. You should handle it very gently when shaping. You absolutely do not want to "push the air out," but you don't want to do that in any bread when you are shaping. Well, maybe popping huge bubbles in a ciabatta.

There are lots of other things that influence bloom in the oven though. You must not over-proof. You need a hot oven. You need high humidity in the oven for the first third to half of the bake.

David

user icon

hello!

good news i made progress. after rereading many times your post, i used extra water in the skillet, proofed much less, and it made such a big difference. i tried 2 diffrent flours. 1 gold medal all purpose and the second is gold medal bread. the all purpose was much better. the breads with more of a rise was the all purpose. the first batch sort of well done. also it was in the fridge for 36+ hours. thanks for the help!


user icon

It looks like you're on the right track.

Very nice crumb, koloatree.

Crust is a bit well done. Do you think you baked them too long, or was the oven too hot?

David

user icon

ahh yes, the first batch was

ahh yes, the first batch was overdone by accident. also i forgot to turn down the temperature! sometimes i get too excited watching the bread bake, i forget directions. i think that i figured since i keep opening the oven, i might as well set the temp slightly higher to compensate for heat loss. i will try again this wednesday.

First try

Hello all,

I've just recently joined the site after snooping around for awhile.  I just finished my first try at baking the ficelles using Boabsa's formula.  Everything seemed to be going well up until the preshaping step.  After the 21 hours in the fridge the dough seemed to have almost doubled (although it didn't look like a whole lot of dough I must say).  I had tons of trouble handling the dough, it was impossibly sticky.  Is this normal?  I've seen several videos of baguette shaping and mine just seemed way to soft and sticky to shape properly. 

Slashing with a razor blade was difficult as well.  Even when trying to make quick slashes the blade would stick and drag the dough.

In the end they turned out fine (a bit mishapen) but the crum was probably not as holey as it could be and the crust maybe slightly under crispy (there was a decent crispness factor but not as good as David's above).  Should it be so crispy that it's almost as if the slices have been in a toaster?

Photos:

They taste great anyways.

Liam


user icon

Nice first time Bouabsa baguettes

Hi, Liam.

I'm glad you enjoyed your baguettes. I'll try to answer your questions.

This is a somewhat slack dough and is on the sticky side. It is easier to handle if you have developed the gluten really well. I use the stretch and fold in the bowl technique. It works really well. Here is Hamelman's description:

Hamelman's “Stretch and Fold in the Bowl” no-knead technique

Mark Sinclair (mcs) has made a really fine video of this technique. It doesn't seem to be in the TFL video library, but it should be. I managed to locate it. Here's the link:

no-knead video

It is necessary to use a light, fast touch in shaping. Pressing hard on the dough will make it stick to your hands. Strive for fast moves, leaving your hands in contact with the pieces for as short a time as possible with each manipulation.

In scoring, again, fast moves. Wet your blade before each cut.

The crust should be crisp. Leaving the baguettes in the turned off oven with the door ajar for 5-7 minutes helps dry the crust after baking. It will get soft in a couple hours or three.

Your crumb looks pretty good to me.

I hope these tips help.

BTW, standard baguettes are around 65% hydration. So the videos are often misleading. This is a slacker dough than "standard."

David

user icon

David:

Trying your formula and improving my baguette scoring techniques will be the focus of my upcoming weekend baking.  Would you please give me some suggestions on what I could have done differently in terms of angle, depth and handling, etc., based on my 090525 batch? Any comments are greatly appreciated.  Thank you.

Yippee

user icon

Scoring

Hi, Yippee.

I'm not sure what your question is. Your "090525 batch" was a boule, unless there is a message I can't find. Scoring boules is quite different from scoring baguettes. Both techniques are covered in my "Scoring Tutorial." I don't have anything to add to that.

If I am misunderstanding your question, please clarify.

David

user icon

David:

Sorry for the confusion.  I meant the '090525 Baguette Make-over' entry.  Thank you.

Yippee

user icon

Baguette scoring

Hi, Yippee.

Thanks for the reference. Now I see.

Looking at your baguettes on Flickr, I can see how you need to change your scoring.

Assuming you want the "traditional" baguette scoring rather than the single cut I used for the ficelles, you need to make each cut almost parallel to the long axis of the baguette. Each cut should be about 4 to 5 inches long. Each cut should overlap the previous one by 1/4 to 1/3. The cuts should have about 1/2 inch of dough between them, where they overlap.

Please excuse my poor drawing, but I hope it helps.

Don't forget to hold the blade at a shallow angle to the loaf and to make each cut quickly and firmly, about 1/4 inch deep. You are creating a "flap" of dough that will, hopefully, open up and rise above the surface of the loaf during baking to create nice bloom and a nice ear.

Good luck, and let us see your results! 

David

user icon

David:

Here is the picture of the scored dough before it was sent in the oven:


http://www.flickr.com/photos/33569048@N05/sets/72157618981352446/


Makes a perfect illustration of your 'wrong' sample. 


I bought the following three Giusto flours on my way home: 

Ultimate - high protein whole wheat - $5.99 / 5 lbs

high protein fine whole wheat - $3.69 / 5 lbs

Baker's Choice (organic unbleached?) - loose - $1.29/lb


BTW, my Super Peel has arrived.  Hopefully this will end my frustration of loading slack baguette dough onto the stone.  Then I don't need the baguette pan anymore.

I'll keep you posted of my results.  Thank you very much.


Yippee


user icon

First Practice

David:

I've put your scoring skills to use for the first time.  The results were encouraging.  Please visit my blog entry 090602 Sourdough Rye Bread. 

Your baguettes are on the way.  Thank you very much.

Yippee 

user icon

First practice

Hi, Yippee.

I saw your rye. It looks wonderful! I'm looking forward to seeing your baguettes.

David

user icon

Over-proofed

David:

My baguettes were over proofed last night and did not have much oven spring.  Therefore, the 'ears' did not show at all.  I'll redo it and keep you posted.  Thank you.

Yippee

user icon

Failurer tastes very good

David:

I may have failed the scoring test but the taste and texture of these baguettes were phenominal.  My kids have told me that these were the best tasting baguettes I've made so far.  

Hope my next batch would be picture perfect as well.


Yippee

user icon

Thanks for the progress report, Yippee.

It will all come together for you. I have complete confidence, having seen the other beautiful breads you have made.

Positive reviews from your "customers" is always energizing, of course.

David

user icon

I've tried again.

David:

Please visit my blog to see my last attempt in making your baguettes.  Thanks again for your help!

Yippee

user icon

See my message in your blog. :-)

You are definitely making the fast progress I expected of you!

David

My Baguettes seemed perfect until..............

Thanks for all the wonderful help here. After my 5th loaf I've made some progress using

Hamelman's “Stretch and Fold in the Bowl” no-knead technique

After 21 hours my dough had more air, bubbles, and activity that I had ever seen. I wasn't really sure where to go from there hoping to not mess it up so I went back to recipe written above (and cut and pasted steps7-16 below, now numbered 1-10).

I divided the dough into 4 pieces VERY CAREFULLY as instructed but felt like I lost some of the air and bubbles. After resting for an hour I VERY CAREFULLY "shaped into ficelles" and here I felt like I lost even more air and bubbles. i DON'T THINK i EVER RECOVERED FROM THERE AS (please excuse the caps) as during the resting times I never got any more rise. Could someone please go into more detail about how to exactly proceed following the 21 hours in the fridge. I felt like I was so close only to watch it go out the window after waiting the 21 hours. The taste was good, the crumb was fair but my bread didn't "Blow" like I want it to. Any help is Greatly Appreciated. Thanks.

  1. Allow preshaped pieces to rest, covered with plastic, for 1 hour.
  2. Shape into ficelles (short, thin baguettes).
  3. Proof en couche or on parchment paper dusted with semolina for 45 minutes.
  4. Pre-heat oven to 500F with baking stone in middle rack and a cast iron skillet and a metal loaf pan on the lowest rack. Preheat 45 minutes or longer before baking.
  5. 3-5 minutes before baking, place a handful of ice cubes in the loaf pan. Shut the oven door. Bring water to a boil.
  6. Transfer the ficelles to a peel and load them onto the baking stone. Pour one cup of boiling water into the skillet. Close the oven door.
  7. Turn the oven down to 480F.
  8. After 10 minutes, remove the loaf pan and the skillet from the oven.
  9. Continue baking for another 10-15 minutes until the loaves are nicely colored, the crust is hard all around and the bottom gives a hollow sound when tapped. Internal temperature should be at least 205F.
  10. Cool on a rack completely before slicing.
user icon

Baguette technique

Hi, MISSiShrimpi.

I'm not clear as to what didn't work. You got good taste and good crumb. What wasn't good? Photos would help.

What you describe is little expansion during proofing, as I understand it. This could be just that you needed to give the baguettes more time. It might also be that your weren't gentle enough in pre-shaping and shaping them. This takes practive.

When you say they didn't "blow," are you talking about oven spring?

David

Success from a rookie

Thank you so much for sharing this recipe/technique.

Although I have only baked a few Lahey/Bittman "no knead" breads before , I took the jump/challenge with this one and I am thrilled with the results. It is doable by a rookie (with a firm but not overly hard hand).

I made this recipe exactly as written and then a few days later did it with the substitution of 200 grams of flour and water with the addition of a friend's sour dough which I then used a bowl stretch and fold x 3 with 2 stretch and fold on the counter to practice that technique but I did not do the  21 hour cool temp rest. Both turned out amazing. I have not yet graduated to putting pics of my bread and crumb on line so as to then link them to this site but trust me the results of this base can be tremendous even to those with minimal experience!

I do think however without viewing a number of Youtube videos of the stretching and folding, shaping and forming the results would have been much worse. Seeing the activity was critical I think to handling this this dough.

For those wondering just what is produced, the yield was 4 "smallish" loaves, about 15 inches long, since that was the longest dimension of my pizza stone.

Half a loaf would be just right for a large sandwich for one (but I could not limit myself to only that) or two great bases for garlic bread to accompany a meal.

Cheers!

user icon

Great news!

Thanks for letting us know about your success.

David

steam level

curious David.  Why both the skillet with boiling water and the ice cubes in the pan?  Just for the quantity of steam?

I normally steam by adding some water to a pyrex pan while the oven comes to temp, then add 2 or 3 cups to the pan at bake time for the first 10 mins.


I assume that the cast iron isn't "injured" with this use?

user icon

Steam level

As it happens, I'm not using that technique any more. However, the idea is to have the oven humid when you load it and to have a burst of steam right after loading. What you are doing probably accomplishes the same thing. However, you are not going to be getting the burst of steam with pyrex that you do with cast iron - especially with the lava rocks.

We have pretty hard water, so the cast iron skillet gets mineral deposits. I bought a new skillet to use just for oven steaming.

David

user icon

A few questions

Hi David,

Just a few questions before I try this on the weekend:

Where do you get these plastic scrapers?

Any recommendations, from you or others on shaping these sticky boogers when you have limited space? Love the stretch/fold in the bowl method while living in my RV but still figuring out where the heck I'm going to work with my doughs.

I'm going to be trying this on my outdoor gas grill so any extra suggestions regarding this would be appreciated as well. My plan is to pick up some saltillo tiles to cover the grill grates and then place these ficelles on a cookie sheet with parchment paper.

Hoping I love this recipe, can use it as my everyday practice recipe to learn how to work with stretchy rye dough without the expense of wasting so much rye.

Do you have a comprable whole grain recipe you could point me towards with the no-knead method?

Tracy


user icon

A few answers @ Tracy

Hi, Tracy.

You can get plastic scrapers through breadtopia.com, just for one place. But, if you already have a rubber or silicon spatula, that works fine.

I have no experience baking on a grill and no experience with the no-knead method with whole grains.

David

I finally did it.......

Dear David,

Since taking a Le Cordon Bleu baking class in Paris, I have been hooked on baking.  I spent countless amount of hours and butter to try to perfect the croissant in my own home oven.  Now, with a better understanding on protein content, overproofing, etc, I felt it was time to jump in and start the long road in perfecting the baguette.  I have been reading and re-reading and re-reading (can i re-iterate the re-reading part) the blogs of your journey to perfecting the baguette, that you, Mark, Janedo and others have so unselfishly been posting.  Although LCB had a different recipe for the baguette, I decided to try Anis Bouabsa's version.  This is what I did:

I followed your instrustions, BUT, used Mark's 5 second kneading with the dough hook 3x technique instead of the no-knead version you posted.  I don't know why, but after the 18 hour retardation (really wanted to have them for dinner), I inadvertantly divided them into 3.  290 grams, 290 grams, and finally 308 grams.  After I had pre-shaped them, I realized you had mentioned that you divided your dough 4x - making each pre-shaped dough appx. 220g. each.  I was off my 70 g for each pre-shaped dough.  I was really stressed.  But, I had no choice but to forge forward.

After an hour, I did shape them, but did not feel that the dough was responsive to rolling.  Is this usual???  I had to stretch them out a bit.  And I let them proof en couche for 45 min.  I put them directly on pizza stone at 500 degrees with steam for 10 of the 25 min.  I found that I could not go the entire 25 minutes since it was starting to burn.  I also realized how important scoring the ficelles correctly assists in a better baguette.  Anyways so my questions:

1.)  Why did it burn at 20 min??  Heavier dough, I would think would require more baking time.  I did forget to decrease temp to 480.  Would that have made that big of a difference?

2.) How do I know that I have scored deeply enough?  I don't want to deflate?

3.)  After the dough has been shaped into the final ficelles, did you proof under a plastic bag or leave it open?

The results:  Despite the burn, the crumb was amazing.  Big holes and it did have a sweet taste.  I was really surprised with the sweet taste.  Great crust.  I should have taken a picture, but it was all gone by the time I thought about taking them.

Thanks for the help.


user icon

Bouabsa baguettes @ Mishell

Hi, Mishell.

How the dough handles depends on its consistency and on gluten development. The same hydration level will yield different doughs depending on how your flour absorbs water. Your description of your shaping issue suggests your dough was pretty slack (wet). You sound like you dealt with it well. Note that shaping should be done on the board without flour. Now to your questions:

1. I preheat the oven to 500ºF but turn it down to 460-480ºF immediately after loading the loaves. Yes. 20ºF makes a big difference in how dark the loaves will be.

2. Slack doughs should be scored more shallowly than firmer doughs. 1/4 inch deep is about right for the Bouabsa baguettes. Scoring should be at a shallow angle for baguettes. Steam helps the cuts open up, but too much steam tends to obliterate the ears.

3. I proof baguettes on a linen couche. The couche is folded over the loaves. If it is warm, I may also dust the loaves with flour and cover them with plastic during proofing. 

It sounds like your baguettes turned out well, except for the dark crust. I'd love to see photos. Next time, eh?

David

Trying a 2nd time......

Hi David,

Thanks for your help!  I'm on my 2nd attempt at baguettes this am.  This time I've doubled the recipe.  I'm assuming keeping it at 75% hydration, using 1/2 tsp of instant yeast per kilo works.  I will definitely remember to turn it down the next time. 

The 1st time I attempted to make baguettes, I mixed the dough using my Kitchenaid artisan 325 W mixer and it was fine for 1 recipe.  Since I doubled the recipe, i am using my Kitchenaid Pro 610.  Incorporating Mark's advice, I lessened the amount of time on #2 speed to 1 minute and increased stir speed time.  The KA Pro is a new machine, and this is the 1st time I've used it, so I hope it will create same results as the 1st batch.

Thanks again, and I will definitely take pictures and post them.

Marie


Pics of Anis Bouabsa's baguettes 2nd try

Dear David,

I'm uploading the pics of my 2nd attempt of Anis Bouabsa's baguettes.  I can't seem to get the scoring right.  I feel like I've scored enough, but once in the oven, I can immediately tell I didn't score deep enough.  What do I need to do?

Also, this is my 1st attempt to upload pics.  I hope it works.

Thanks,

Marie

Pictures of Anis Bouabsa's baguette and Process - 2nd attempt

Pre-Autolyse

After 22 hr. retardation in fridge

Pre-shaped en couche

Shaped and scored.  I'm not sure if I'm scoring right.

Right out of the oven.  Appx. weight 225-230 gms.

Crumb

A little blurry but another view of the crumb.

user icon

Bouabsa baguettes @ Mishell

Hi, Marie.

The baguettes look very good. Lovely crumb!

The problem with your scoring is not that it's too shallow. For classic baguette scoring, the cuts need to be almost parallel to the long axis of the loaf and overlapping about 1/4 of their length. Like this:

I hope this helps.

David

Will try to score, but very difficult and akward.......

Hi David,

I feel like I'm degassing the dough when I score it along it's length.  But, I'll definitely try it and let you know how it goes. 

Thanks,

Misheil

Thanks for the diagram!

I will keep this in mind.  I definitely was not scoring right.  I can't wait to try--I know there's only so much you can do in a home oven but every little bit helps, eh?

user icon

Fast yeast amount

Hi David

I'm having a bash at your baguette and was interested re the amount of fast acting yeast as the one I use in the UK (Doves Farm) suggests 1tsp per 500g of flour.  Is just 1/4 tsp enough per 500g? or does the long retard make up for this......

Cheers

Steve

user icon

Yeast amount @ Steve

Hi, Steve.

I don't know if your "fast acting yeast" is the same as the SAF instant yeast I use, but 1/4 tsp. is the correct amount, and it does the job. I'm sure the long fermentation contributes.

BTW, since writing up this method, I've added two stretch and folds on the board at 45 minute intervals after the S&F in the bowl and before retardation. This has been a substantial improvement.

David

user icon

Yeast amount

Thanks David, will try that next time as it is now retarding in the fridge, I did use 'bout 1/4 tsp for half the recipe, and will let you know how that turns out, it is quite a wet dough to work with and I did give it little  stretch n fold before popping it into to the fridge. I did also add a splodge of sourdough starter (rye) for more of a pain campagne taste and as ever a little of my friends greek olive oil!, i'm also baking the Pierre Nury rustic rye tomorrow as well so hopefully plenty of good bread for the weekend cheese board and breakfasts

Cheers, Steve

Convection Oven

Good morning David,

I have a new oven.  Out with the old 24" and in with the new Thermador Professional 30" convection.  Although I'm super excited about the oven and what it can do, I'm perplexed as to how to bake my baguettes.  I normally heat a cast iron pan and boil water.  Put the pan at bottom of oven and put the baguettes on stone.  Then I pour boiling water in the pan to create steam.

How do I create steam in a convection oven?  I've read that you can really use the convection fan to your benefit.  Does that mean I preheat the oven using the convection mode, put the pan on a rack, put dough on stone, and pour water in pan?  Do I turn off the convection mode and switch to bake after I put the water in?

Thanks much in advance.......

Misheil


user icon

Convection oven

I have a KitchenAid convection oven. I pre-heat at 500/convection. I don't see a clear difference between baking with convection or conventional settings, except you do need to lower the temperature for convection. My oven seems to heat very evenly even with conventional baking.

I think different makes of ovens may differ in their difference.

David

Too slack for my fist ficelles??

So, I made the ficelles and I followed the recipe accurately.  The dough was quite slack so scoring was unsuccessful and came out more like a Pain a l'ancienne.  Crumb, taste, and crust were great but I was not happy with the looks.  Should I have added more flour as I stretched & folded to bring it to French dough consistency?  Well see picture to see what it looked like.

Nick

user icon

Bouabsa baguettes slack dough

Hi, Nick.

I use anywhere between 360 and 375 gms of water to make these. How the dough turns out depends on the flour and the weather. It also depends on how well you develop the gluten. For wetter doughs, a couple additional stretch and folds on the board can make a big difference.

I'd recommend you try making these a few more times using different hydration levels in the above range and see what pleases you the most.

BTW, many like the more rustic look you got. How was the crumb and flavor?

David

I got the rustic look...

Thanks David!

I did an additional 2 S&Fs at 45 minute intervals as per your comment a couple posts ago and I could see a very big improvement in the gluten development when I was S&Fing the dough the last 2 times. 

I used KA French Style flour and I don't think I am liking it.  I want to try with AP flour and see what the difference would be.  The crumb and flavor were great, better than any Pain a l'ancienne I have made in the past with the same flour.  I have no problem working with slack dough and I am really great at getting the rustic look but some day I would like to make some pretty baguettes, haha.

Is this the same formula you use for making regular French baguettes?

Nick

user icon

Baguettes @ Nick

Hi, Nick.

KAF French-style flour is relatively low gluten and makes an exceedingly extensible dough. This is desirable for shaping baguettes, but it works best at about 65% hydration. It doesn't absorb as much water as KAF AP, not to mention Bread Flour. You might like the flour better at lower hydration.

I've made baguettes using 6 or 8 different formulas. The ones I like best are Bouabsa's, Gosselin's and proth5's. All are good. Each is different. I have descriptions and formula's for all of these on my TFL blog. If you really like making baguettes, and If you want the most traditional baguettes, try proth5's. They are made with levain (no added yeast) and are wonderful, if you have all the techniques. For me, they had the best flavor second to the Gosselin's which are quite slack and challenging to mix but have amazing flavor. 

David

ww version

Nick

Can you recommend a recipe with 50g of ww flour?

Currently I have a bag of Pills BfB that's, I'd guess, a little lower in the protein level then is desired.  Should I substitute some KAB?

Touch of WW

metropical,

If you have BBA the Poolish Baguettes recipe is a WW French bread. I have not made it but I have heard good things about it.  Or, you can make Reinhart's Pain de Campagne.  It's 15.8% whole wheat flour, and is awesome.  I make it all the time and you can shape it any way you want.

Also, I don't see why you can't use any of these baguette recipes and substitute 50g of WW in for some of the regular flour.  I know a lot of people substitute some Rye or WW for some added flavor in their baguettes with great results.

I believe BFB is a bread flour and it is higher protein than AP flour.

Tell me how it goes and post some pictures.

Nick

my 2nd run

First step

Hi,

Some questions:

For how long do you mix flour and water at the first step?

is it important the dough gets any shape (I mean getting less sticky) during the process?

Why don't you add yeast at the first step?

Thank you!

user icon

First step @AlyaBushe

Hi, AlyaBushe.

The flour and water isn't mixed by time. It's mixed until it forms a mass incorporating all the flour and water. The dough will be very sticky at this point. The purpose of this step (the autolyse) is for the flour to absorb the water and for gluten to start forming. The dough gets less sticky as the gluten is developed with time and stretch and folds.

The yeast could be added at the first step, especially if you are using dry yeast. Traditionally, the autolyse is done before adding leavening or salt. 

David

first attempt...

well, it was fun...but I made some mistakes.  Well, maybe I could have played with the dough more....or added just a little more flour.

The taste is amazing...and everyone ate every bite within 20 minutes out of the oven.  I had to hurry and take the pic after the first one was gone!  I will continue to do over and hopefully get better!  

user icon

Oooh can't wait to try

This is so on my to do list!

user icon

from proof to peel?

These are so beautiful, the color is amazing!

Is it possible for someone to explain how to transfer the proofed dough from the baker's linen onto the peel without them deflating? When I move my dough that's been proofed it seems like it looses all its height and doesn' recover in the oven. What is the correct way to do this?


user icon

Transferring baguettes @ wren

Hi, wren.

Thanks for your kind words.

The best way to transfer baguettes from couch to peel is to use a "transfer peel," also known as a "flipping board."

The baguettes should be proofed seam side down. They are rolled onto a long and thin board, then flipped onto the peel for loading into the oven. You can also proof seam side up, but then you should roll each baguette over before putting it on the transfer peel.

SusanFNP has made a nice video of the procedure. Here's a link:

http://www.youtube.com/watch?v=Hpk0R5tR-pw&feature=channel

Hope this helps.

BTW, if you search TFL on "transfer peel" or "flipping board," you will find some ingeneous home-made peel ideas.

David

user icon

oh! brilliant! i'm glad that

oh! brilliant! i'm glad that little neuron-connection was just made in my brain. thank you for the help david!

-w

Sweeeet!

David, Your bread is always so sweeet (in teenage vernacular that means fantastic, wonderful, beautiful,etc)   I aim for that beautiful color but don't always achieve it.  What is your best suggestion for consistent color ??   

Thanks,  Pam

user icon

Crust color @ Pam

How to get crust color like mine consistently? I dunno. Follow my formula and procedures?

I could give you a general overview of factors influencing crust color, but it might be more helpful if you tell me what problem you are having with your crust.

Meanwhile, think about this: Assuming you haven't done anything bizarre with your dough like radically over-proofing it, you can control crust coloration by manipulating time and temperature. 

Let's say you are baking baguettes of 250 g for 25 minutes at 440ºF. You want a darker crust. You might raise the temperature to 460º and bake for 22 minutes.

Fiddle with it. You should be able to get your bread just as you like it.

David

Thank!

David, Frankly, it new occurred to me to raise the temperature.  Thanks for a great idea.   Pam

user icon

I had the opposite problem

My ficelles are fresh out of the oven.  When I opened the oven to pull out the steam pan, I saw that the tips of the ears were already getting very dark (this happens to me too on very sunny days with no hat, but I decided that sunscreen would not help the bread in any way).  So I turned the oven to 430 on convection for the rest of the bake and baked a few extra minutes.  My only other problems were shaping, proofing, scoring and transferring the loaves to the oven.  This is the slackest dough I've worked with, and four 13 inch ficelles did not go easily onto my improvised (parchment over towel) couche, not did they want to be slashed prettily, not did they fit well on my baking stone.

Other than that, it was a marvelous bake and they look great (if a bit dark in places). I'll report on taste (the thing that matters most) and post pix on my blog tomorrow.  

Glenn

the next day

are you letting the dough come to room temp after 21 hours or are you going right into preliminary shaping?

thanks for the help.

Hi David,   Your bread has

Hi David,


Your bread has really been working out well, but I would like to make a larger loaf as my family really likes sandwiches. I'm assuming (usually a big mistake) that I will need to lower the temp and time a bit. I would appreciate your input on this.

I will be taking a few classes with Mr. Hamelman over the next few months and will share my  experience when I return. Thanks for the help


Tad

user icon

Batard version of Bouabsa ficelles for Tad

Hi, Tad.

If you want to make a larger loaf using Boabsa's method, I suggest you look at this:

http://www.thefreshloaf.com/node/20036/san-joaquin-sourdough-updated

Baking at 460 degrees for 28-30 minutes results in the crust color I prefer. If you want a lighter crust, you could bake at 440-450 degrees for 30-32 minutes. (Assumes loaf weight of about 450-475 g.)

The San Joaquin Sourdough does not use added yeast. I assume you have an active starter. If not, you could use the Boabsa formula and just shape as boules or batards.

David

Thanks David1

Thanks David1

beautiful ficelles

loved the rye and sourdough idea!

A bread dough formula for all occasions..!

Thanks much for posting this.

I have been using your formula/recipe for a couple of weeks for all kinds of breads, rolls, regular loaves, pizza crusts, etc. with great results.

And that's with a toaster oven with a measured maximum temperature of 400°F and no scales to weigh the ingredients!

I had a few questions:

1. Why twenty minutes autolyse rather than thirty, or twenty-one, for that matter? Is there anything magical about the number twenty, or is it just a reasonable minimum beyond which nothing useful happens?
2. Is it necessary to tightly cover the dough in between autolyse, and then between the successive strech & fold sequences?
3. Why twenty strokes when folding? I tend to end up with a few small lumps (I do not have a mixer and do it all by hand, usually 8-10 cups of flour) and I found that if I fold some fifty times or thereabouts, I end up with dough that's a lot smoother. Any risk this might.. ‘damage’ my gluten, so to speak?
4. Why 21 hours refrigeration? My schedule being what it is, I sometimes cut down the fermentation time to something like ten hours, and there have been times when I made the dough in advance and left it something like 36 or even 48 hours in the fridge. I noticed that when I use it after 8-10 hours, the dough is a bit more difficult to work with and the resulting crumb is slightly more compact. If I leave it more than 24 hours, on the other hand, I get a better rise and both the crust and the crumb are even better than when I stick with the recommended 21 hours.

I would greatly appreciate any comments on the above.

Thanks,

cj

user icon

Thanks

Wow....it looks nice, thanks

sticky dough

i've completed this recipe twice.  both times the loaves were excellent, both in crust and crumb, but i've found it very difficult to shape (final shaping) them given how sticky the dough and wet the dough is.  does this mean i should reduce the hydration ratio, add a little flour during the final shaping, or do some post fridge stretch and folds to increase the membrane strength (is this even possible)? which option is best, is the last one even allowed?  any help would be most appreciated.

many thanks.

user icon

Sticky ficelle dough

Hi, mccvi.

I'm glad you are enjoying this bread.

The dough is sticky. If you added flour during the final shaping, it would be un-fermented. You would just end up with streaks of raw flour in the loaves. Not recommended.

Handling slack dough is an acquired skill. Frequently dusting your hands with flour or wetting them may help. In my opinion, the real key is to use a light, fast touch. The dough will stick to your hands less if they are in contact with it for an instant at a time. If the dough sticks to the board a little, just loosen it with your bench knife. If it sticks a lot, you can dust flour on the bench lightly.

Again, a light (but firm), fast touch is the key to handling this dough. You can lightly dust your hands and the bench as needed, but try to avoid incorporating raw flour in the dough during shaping.

Hope this helps.

David

oops.... 1/2 the yeast

just did this one for the first time and just realized i only added half the yeast (i doubled the recipe, and had 3 small children running around me as i was mixing). guess i'll give this a nice, loooooooooooooooooooong fermentation time and see what happens.


Just baked the ficelles, they

Just baked the ficelles, they taste good, but the crumb is more compact, then it should be. Also the loaves are somewhat  heavy for their size. Please tell me what can cause this. Thanks

user icon

Compact crumb @ mabdelsayed

Causes of a compact crust

1. Inadequate gluten development

2. Insufficient bulk fermentation.

3. Excessive de-gassing when shaping.

4. Insufficient proofing.

Those are the most likely causes, in order of likelihood. However, you can also get a denser crust from

5. Over-proofing

6. Not scoring.

7. Insufficient oven steaming.

David

In lieu of stretching and

In lieu of stretching and lifting, can you use a Kitchen Aid  mixer,  fitted with a dough hook. I love to bake bread, but I am limited by an old multiple hand/wrist fracture. Merci beaucoup David


user icon

Mixing @ mabdelsayed

Yes. You could mix with a KitchenAid mixer.

David

thanks David, for your prompt

thanks David, for your prompt reply, I will try again.

Tough Dough!

So I followed this recipe and tried to make the starter, but after 21 hours of rise it ended in tears, because the dough was still far too tough (absolutely not sticky or elastic, as other commenters have mentionned). 


I used:

a mix of King Arthur All-Purpose White and Bread Flour (1:1) ~4.3 cups

1/4 teaspoon of instant dry yeast, 10 grams of salt

1.5 cups of water

It was impossible to fold starting out, and my hope was that it would soften up with a rise. It didn't soften, I tried adding water after the rise (out of desperation) and that failed. Now I have a hunk of flour in my garbage. What went wrong? Wouldn't it make more sense to dissolve the yeast and salt in the water before hand, then mix in the dough?


user icon

Your hydration is off

According to the formula David listed at the top of the thread, he uses:

375g(water)/500g(flour)=.75   or 75% hydration

Since you're using volume measurements, it's impossible to get the exact hydration, but if your flour cups were 145g each, your hydration would be:

356g(water)/624g(flour)=.57  or 57% hydration

If you're going to use volume measurements, keep the yeast and salt the same but use 3.5 cups of flour and a little over 1.5 cups of water.

The salt and yeast can be added directly to the dry ingredients and it saves you a step.

-Mark
http://TheBackHomeBakery.com

Thanks!

I figured the measurements must have gone wrong. I'll try again!

user icon

And the flour mix

Using half bread flour (probably 12.5-12,7% protein) would result in the flour absorbing more water and a dough that would act even firmer than if you had used all AP.

David

user icon

Go for the gooey snake texture

In my experience with this formula, most of the dough should stick to your hands and whatever else it touches, and it should stretch far more than you want merely buy looking at it cross-eyed.  Think Gumby-in-a-microwave and you're on the right track.

I agree with the comments above about hydration and flour choice.

It is delicious if you can get it to hold still.

Glenn

Did it!

WOW!

I usually dont respond to posts... BUT, this recipe is AMAZING!

Thank You David for sharing it.

I have been out of baking for at least a decade. I somehow wandered across your recipe and thought "what the hell", I am so glad I found it. A good friend of mine, also a physician, opened my eyes to what sorts of processed crap we have been putting in our bodies for years. Needless to say our family has made a change to a more healty diet.  He and I have been going back and forth, in sort of a "one up ya" contest, we are both "foodies". My only problem now is, I have to wait a day to get him a couple loaves because these are not going to make it past noon today.

Comment viewing options

Select your preferred way to display the comments and click "Save settings" to activate your changes.