
Troubleshooting sourdough
Hi everyone,
I'm a beginner at sourdough baking, and I'd really be grateful for your advice about a (not very original) problem I'm having with my sourdough: holes that are too big. I'm attaching a picture.
I'm using this recipe (460 g flour, 290 g water, ~100 g ripe starter, 9 g salt): https://www.theperfectloaf.com/sourdough-bread-with-all-purpose-flour/
I give it 5 stretch-and-fold sets, as the recipe specifies. I bake it at 425F for 25-30 mins.
The first two loaves I made didn't have the holes problem, but the following ones did, and it's not clear to me what I'm doing to deserve these holes! I've already tried to increase bulk fermentation time (by 1.5 hrs, which is a lot compared to what the recipe specifies). But that didn't help. I also tried to make sure I shape it correctly, creating tension. But that didn't help either.
I have a couple of ideas about what might be causing the problem (I don't mix it well enough in the beginning? Using too much starter? Hydration too high?) but none of these seem very promising. Please help!!


I've actually been baking this formula a few times in recent weeks.
Let's start with some more information -
How is your starter - ripe? Is it doubling after feeding in about 8-12 hours? What temperature are you doing the bulk ferment at? How much protein does your flour have (for example, I recently realized that mine was on the lower end for a APF and so added 10 gms of vital wheat gluten last time.) I notice that you're using less water than prescribed in the recipe. Curious as to why - lower hydration can cause bulk to take longer to complete.
Unless you're sure that you've replicated Maurizio's conditions fairly closely, I wouldn't worry about exceeding bulk fermentation time. Watch the dough, not the clock. :-) Did your dough have a domed look and feel alive at the end of bulk? Had it grown and become smoother and almost shiny/satiny by the end?
Lastly, I notice your baking time is much different than the recipe. Maurizio says to bake 20 mins covered + 30 to 35 uncovered. So about 55 minutes total. That's about how long my loaves baked.
Happy to analyze further once you respond!
thanks for responding! My answers:
Yes, starter is ripe, doubling consistently in about 7-8 hours (1:2 starter to flour ratio when feeding, 100% hydration).
I bulk-ferment at about 72-75F. Flour is 11.7% protein (King Arthur unbleached all-purpose).
I used the lower-end quantity of water that recipe calls for, because when I tried to go higher the first time, the dough was flattening when I moved it from bulk fermentation to shaping, and it "rose" by extending its surface area, rather than going up much, if that makes sense. I realize, though, that could also have been the result of fermentation not being long enough.
Yes. dough grew and looked domed and shiny at end of bulk, but not very smooth. I am not sure if it doubled in volume (should it?), or grew less than that. I could try to bulk-ferment in a container in which I could see if it doubles.
Yes, I baked it for less time, because I don't have a dutch oven, and I noticed that similar quantities of sourdough bake for 25-30 mins at 425F. So I tried it, and it worked the first time, so I stuck with it. If I don't have a dutch oven, how much time and at what temperature would you recommend baking it? Should I use an oven-safe pot instead of dutch oven? Or is it better to just bake it uncovered on a baking sheet?
Thanks again for your time and attention!
It doesn't sound like it's a starter issue, or a temperature issue or a flour issue. You're also holding back only 50gms of water as Maurizio recommends.
Let's look at process now. Here's my first recommendation, if you aren't already doing it - keep a bowl of water handy when mixing and doing stretch and folds. I just dip my hands lightly in water before I get them in the dough and again if it starts sticking to my hands. Makes it much easier to stay in control of the dough when it isn't sticking everywhere. However, be careful not to get dripping wet hands in your dough.
Second, set a timer for the stretch and folds and also once all folding is done, check your dough every 30 minutes. Let bulk fermentation go until the dough starts looking lively - gassy, domed slightly where it meets your container. I don't worry about judging change in volume. It is hard to judge unless you use a graduated container and different formulas are expected to rise different amounts.
Baking - yup, you do need to provide steam for the first 20 mins and need to bake for the full recommended time. Yes, covered baking can be in any pot or a combination of overturned bowl/pot over a baking sheet or stone or oven safe skillet. If you don't have an oven safe combo for this, just have a pan during preheat in the bottom of the oven and then when you load the loaf in the oven for baking, pour a cup or so of water in the hot pan to create steam. Remove this after 20 minutes. Maurizio has an entire post about creating steam on his blog with more elaborate set up.
Give it another go and let's discuss again after. If you can take pictures along the way (bulk) especially, it might help with trouble shooting. Good luck!
Thanks for the suggestions! I'll try again tomorrow and take pictures, and report back!
Hi GrinChaser,
I've followed your recommendations in the loaf I baked today. Long story short: much, much better crumb, with no huge holes, but... the crust burned in with the longer baking time. Here's the longer narrative:
I times everything carefully, according to Maurizio's recipe. I did the 5 sets of stretch-and-folds. I ended up bulk-fermenting for 4 hours, after stretch-and-folds (the recipe only calls for 1.5 hours). I'm attaching a picture at the end of bulk: the dough is shiny, domed, and visibly larger in volume, but not entirely smooth. After bulk fermentation, I proofed for another 3.5 hours. I think I didn't do a very good job shaping the loaf, but the crumb came out so much better that I have no complaints.
I baked the loaf at 450F exposed on a baking sheet, with water to provide steam for the first 20 minutes (yesI had the small container there during preheating without water). Then took out the water, and continued to bake for another 30 minutes. I attach a cross-section of the result. Much better crumb, but burnt crust.
So, two questions, if you're willing to give any more advice:
1. How do I avoid the burned crust? Does it mean that my oven temperature is off? Maybe I should try baking for a slightly shorter time?
2. Why does my bulk-fermentation time so long, given that my starter is very active (especially now that it's warm)? I might be catching it not at peak, but slightly after peaking (about 1 hour), but I don't know if that matters that much.
Thanks again for your help!
Well done! Awesome to be making progress, right?
It is hard to tell from your dough picture, since it is a top view - at the end of bulk did it feel lively, gassy, have obvious bubbles on top or inside? Did you take any more pictures? For the next iteration, could you move your dough to a glass container for bulk and take 2 pictures just *before* you perform each S&F and then at the end of bulk - a top view and a side view.
Multi-part question 1: What is your set up for bulk? Is this happening in the oven with the light on, or on the countertop? Are you covering the dough bowl with a heavy plate or plastic wrap or other lid? Here is what I do - dough is in a heavy glass container with a lid. Container sits in the oven, with light on occasionally if fermentation seems to be going slowly. Between the light being on or off, lid sealed tight/placed on top/ajar and container being on the counter or in the oven gives me many ways to control ambient temperature for fermentation.
Shaping - as with everything else this is something you'll get better at with practice. I encourage you to watch Maurizio's pre-shaping and shaping videos. Also check out videos from SF Baking Institute. I really like this one: https://youtu.be/vEG1BjWroT0
In my iterations with this recipe, I found that the flavor is much better with retarding overnight in the fridge. So I tend to feed my starter in the morning around 9am and then mix around 4:30pm. I tend to be done shaping by about 9:30pm. It goes in the fridge at that point - I put the entire proofing bowl in a large plastic bag, trap some air in it and then cinch the bag closed. This goes in the top rack of my fridge overnight for about 12 hours (15 last weekend because life intervened) and then baked straight from the fridge. I typically make his Fifty-Fifty formula and that doesn't grow much in the fridge. But this formula was ballooning out of the proofing bowl when it came out of the fridge. It wasn't over proofed though. Anyway, all this to say that you have some leeway, so don't worry about extending fermentation time if the dough seems to need it.
Multi-part question 2: Baking temperature. Do you have an oven thermometer? If not, getting one is a good idea so you can verify that the oven heats to the temperature it says it does. Looks like you could drop oven temperature to perhaps 435 deg F after steam is removed. If you do this - you might have to bake longer for it to be done inside. Can you add a picture of your baking set up? I want to see the pan in which you had water for steam, its placement relative to the baking sheet. Did you read about Maurizio's steam set up? Thoughts about incorporating some elements? Do you have a meat thermometer for verifying the internal temperature of the baked loaf? It should be about 205 deg F, if I recall correctly. My meat thermometer gave up the ghost last year and so I've been judging/timing done-ness without one.
Since you are not baking in a cast iron dutch oven, it might help to have some heavy heat retaining cookware in there. For example, a cast iron griddle or skillet or baking stone would all serve this purpose. If you have something like this, you'd keep it in the oven right from when you start to preheat. Does that make sense?
I hope some of this helps! I'm happy to analyze again with more pictures! Good luck!
Yes, good to make progress! Thanks so much for your detailed response!!
Before I say more about the setup: I'll do another same-day iteration tomorrow, and will follow your advice re taking pictures during folds & bulk, and baking at slightly lower temp. Maurizio says that the internal temp should be around 205-210, so I'll try to go by that, without poking the loaf too many times with the thermometer.
About the dough after bulk: yes, it felt gassy, with visible bubbles. Just not as smooth as in Maurizio's pictures.
About setup for bulk: I don't do it in the oven, but on the counter. I do it in a plastic bowl (tomorrow I'll use glass) with a plastic-bag cover. I live in a rental, which I'm actually leaving in two weeks, with a pretty bad oven, which will not be missed :-) . It doesn't really have a light-on option, and I'm afraid that even the lowest setting will be too hot, so I'll avoid bulk-fermenting in the oven until I reach my new place, I think (is there a point to doing it in the oven if I don't turn the light on?).
About shaping: I've watched M's videos, and I try to do it similarly. But there is one problem: my dough seems to be more sticky than his. It is actually quite a struggle to get it out of the bulk-fermentation bowl onto the working surface, and after I leave it for 20 mins (as Maurizio suggests) on a floured surface before the shaping, it usually sticks a little to the surface despite the flour--which makes shaping a challenge. His dough looks magically light and not sticky; mine isn't exactly like that (and I'm always afraid of deflating it by handling it too much).
About the overnight process: I'll try that soon. What's the fifty-fifty formula that you mention? I don't mind giving the dough more time to ferment (either in bulk or proofing)--I just wish I knew exactly how long was enough. I could tell the difference this time around: the dough didn't flatten at all when I transferred it to proofing, which was a sign that it's more well developed, right? I guess this is a matter of experience, but if you have any other tips for knowing when it's time to finish bulk-fermenting, please do let mw know!
Which brings me to the next issue: after shaping, Maurizio moves his dough to a proofing basket. I don't have one. So I just proof it on the parchment-covered baking sheet, with a glass bowl on top (eventually, I just remove the bowl, score the loaf, and bake it. Is that a reasonable procedure?
Regarding baking setup and temperature: I'll lower the temp as you suggest. I looked at Maurizio's suggestions. The only one which I can implement was the one with the wet towels. But I don't want to burn the towels in the oven by mistake. Now, what I did was use a small aluminum bowl with thin sides (roughly the size of an average soup bowl) for the steam-water. I place it on a lower level in the oven, roughly underneath the baking sheet. The heating elements in this oven are below the oven "chamber" (and none above), so the water is closer to the heat source than the loaf. Does this sound like a good setup? Is Maurizio's wet-towels setup better than this?
I could put a cast-iron skillet in the oven to warm with it during pre-warm. Should it replace my small water bowl? Or just be in there empty, as an additional element?
Anyway, I'll try again tomorrow and get back to you with the pictures and the results. Thanks again for all your help!
Definitely trust Maurizio about target internal temp.
Dough gassiness after bulk - ok that's great. Lack of smoothness - perhaps a little more strengthening will get you there? I can't be sure though - there are way more experienced folk here that may be able to answer that. I've only caught the SD baking bug about 4 years ago and haven't done it often enough in that time. Look up coil folds when you get a chance. That's what I do. I don't just do one set of S&Fs at a time either. So with M's style stretch and folds I go North, South, East, West and then another half to full cycle through that sequence. You don't want the dough to tear. Same with coil folds - I'll do about 6-8 folds in one set depending on when the middle gets so thin that it looks like it might tear. This may or may not be a good thing. :-)
Bulk ferment - The idea with using a thick walled container and in my case putting it in the oven is to try and hold a steady warm temperature throughout. In my SF Bay home - there's often a cool evening breeze from an open skylight/window in the warmer months and in the cooler months my kitchen is 60-65 deg F. With a heavy glass container I hold on to the heat developed during fermentation and the oven further keeps that heat from dissipating in my cool/drafty kitchen. If you don't have these issues, by all means continue fermenting on the counter.
Shaping - by the end of bulk getting the dough out of the container should not be difficult. The dough should have a cohesiveness/elasticity to it. It should want to stick to itself rather than the container. In the SFBI shaping video the instructor demonstrates that elasticity. It is possible to over ferment and end up with soupy/sticky dough that will be very challenging to shape. But looking at your dough picture here I don't think you're going in that territory. I would still try to push fermentation long enough. Here's another thing that might help with smoothness - an autolyse period. But perhaps leave that modification for another time. Don't worry about the magical lightness/non-sticky behavior of the pro's dough. You will get better at handling wet dough with practice. I use way more bench flour than he does, but way less than I used to in the beginning.
Overnight retardation process - Here's Maurizio's Fifty-fifty formula that I alluded to: https://www.theperfectloaf.com/fifty-fifty-whole-wheat-sourdough-bread/ See his bagged dough under "Rest & Proof" section? Yep, wouldn't it be great to know exactly when (how many hours) for bulk/proof? :-) There are just so many factors that contribute to this time that unless you use equipment to tightly control these factors (such as a dough proofer, thermometer and being anal about water temp, dough temp and so on) it is hard to predict this time. IMO the only other way to get better at it, is using your senses and developing experience as to what the should look and feel like.
If your dough felt airier and more alive/jiggly than the previous time and it stood up taller after shaping, I'd conclude two things - fermentation went better and possibly shaping was tighter too. After shaping, put it in a towel lined bowl for proofing. Does not need to be a basket. Any bowl that the dough comes up with about an inch or two room left at the top is good. Dust the towel liberally with rice flour or APF first. Use a tight weave cotton towel, not a terry cloth one. Put the whole thing in a plastic bag, trap some air inside and cinch closed.
Baking set up - my concern is that with water in a small bowl you are not getting enough evaporation and hence not enough steam. The steam injection ovens that bakeries use, release a lot of steam. You want a lot of steam to prevent a crust from forming early on, so the gases forming can continue to expand your bread and make it lighter. Notice how M is using lava rocks and wide containers in his steam set up - all to provide lots of surface area for evaporation to occur off. So at a minimum, use a roasting pan or a 9x13 inch metal brownie pan or even a disposable aluminum pan. Yes, under your sheet is fine.
Cast iron skillet - yes! Use it! This can be your steaming pan too, once you figure out how much water to pour in it at loading time so that it boils off by 20 minutes. Until then you can have both on the bottom - skillet for heat retention and roasting pan with water for steam. I am not sure about what the wet towel set up achieves, though I have tried it the couple of times I did not use my dutch oven for baking in.
Hope this helps. Happy to do it. Good luck!
-G
So, long story short, the attempt today was a success! Here's a link to a google drive folder with all the pictures: https://drive.google.com/file/d/1aqpe3W2iQsHJ29m-fjjOk71TKTOAZjwq/view?usp=sharing
I don't think the side-pictures of the dough during folds/bulk are very useful. What were you wanting me to capture with these?
I followed your advice: took my time for bulk fermentation (5 hours after folds!). The dough at the end of bulk was very airy, and definitely less sticky. I was mindful of not tearing the dough when folding, and only folded up to 8 times. I proofed in a basket lined with towels. I used a wide and shallow roasting pan for steam, and put the cast-iron skillet in the oven for the baking.
I baked for a slightly lower temp after steam part, as you suggested. I was lucky to check on the dough 15 minutes after I took out the steam (so, 35 minutes total after I started baking), because the crust looked done, and the internal temperature was 210F (which is what it should be when the loaf is done). I guess my oven temp is just way off--which I've noticed before baking other things.
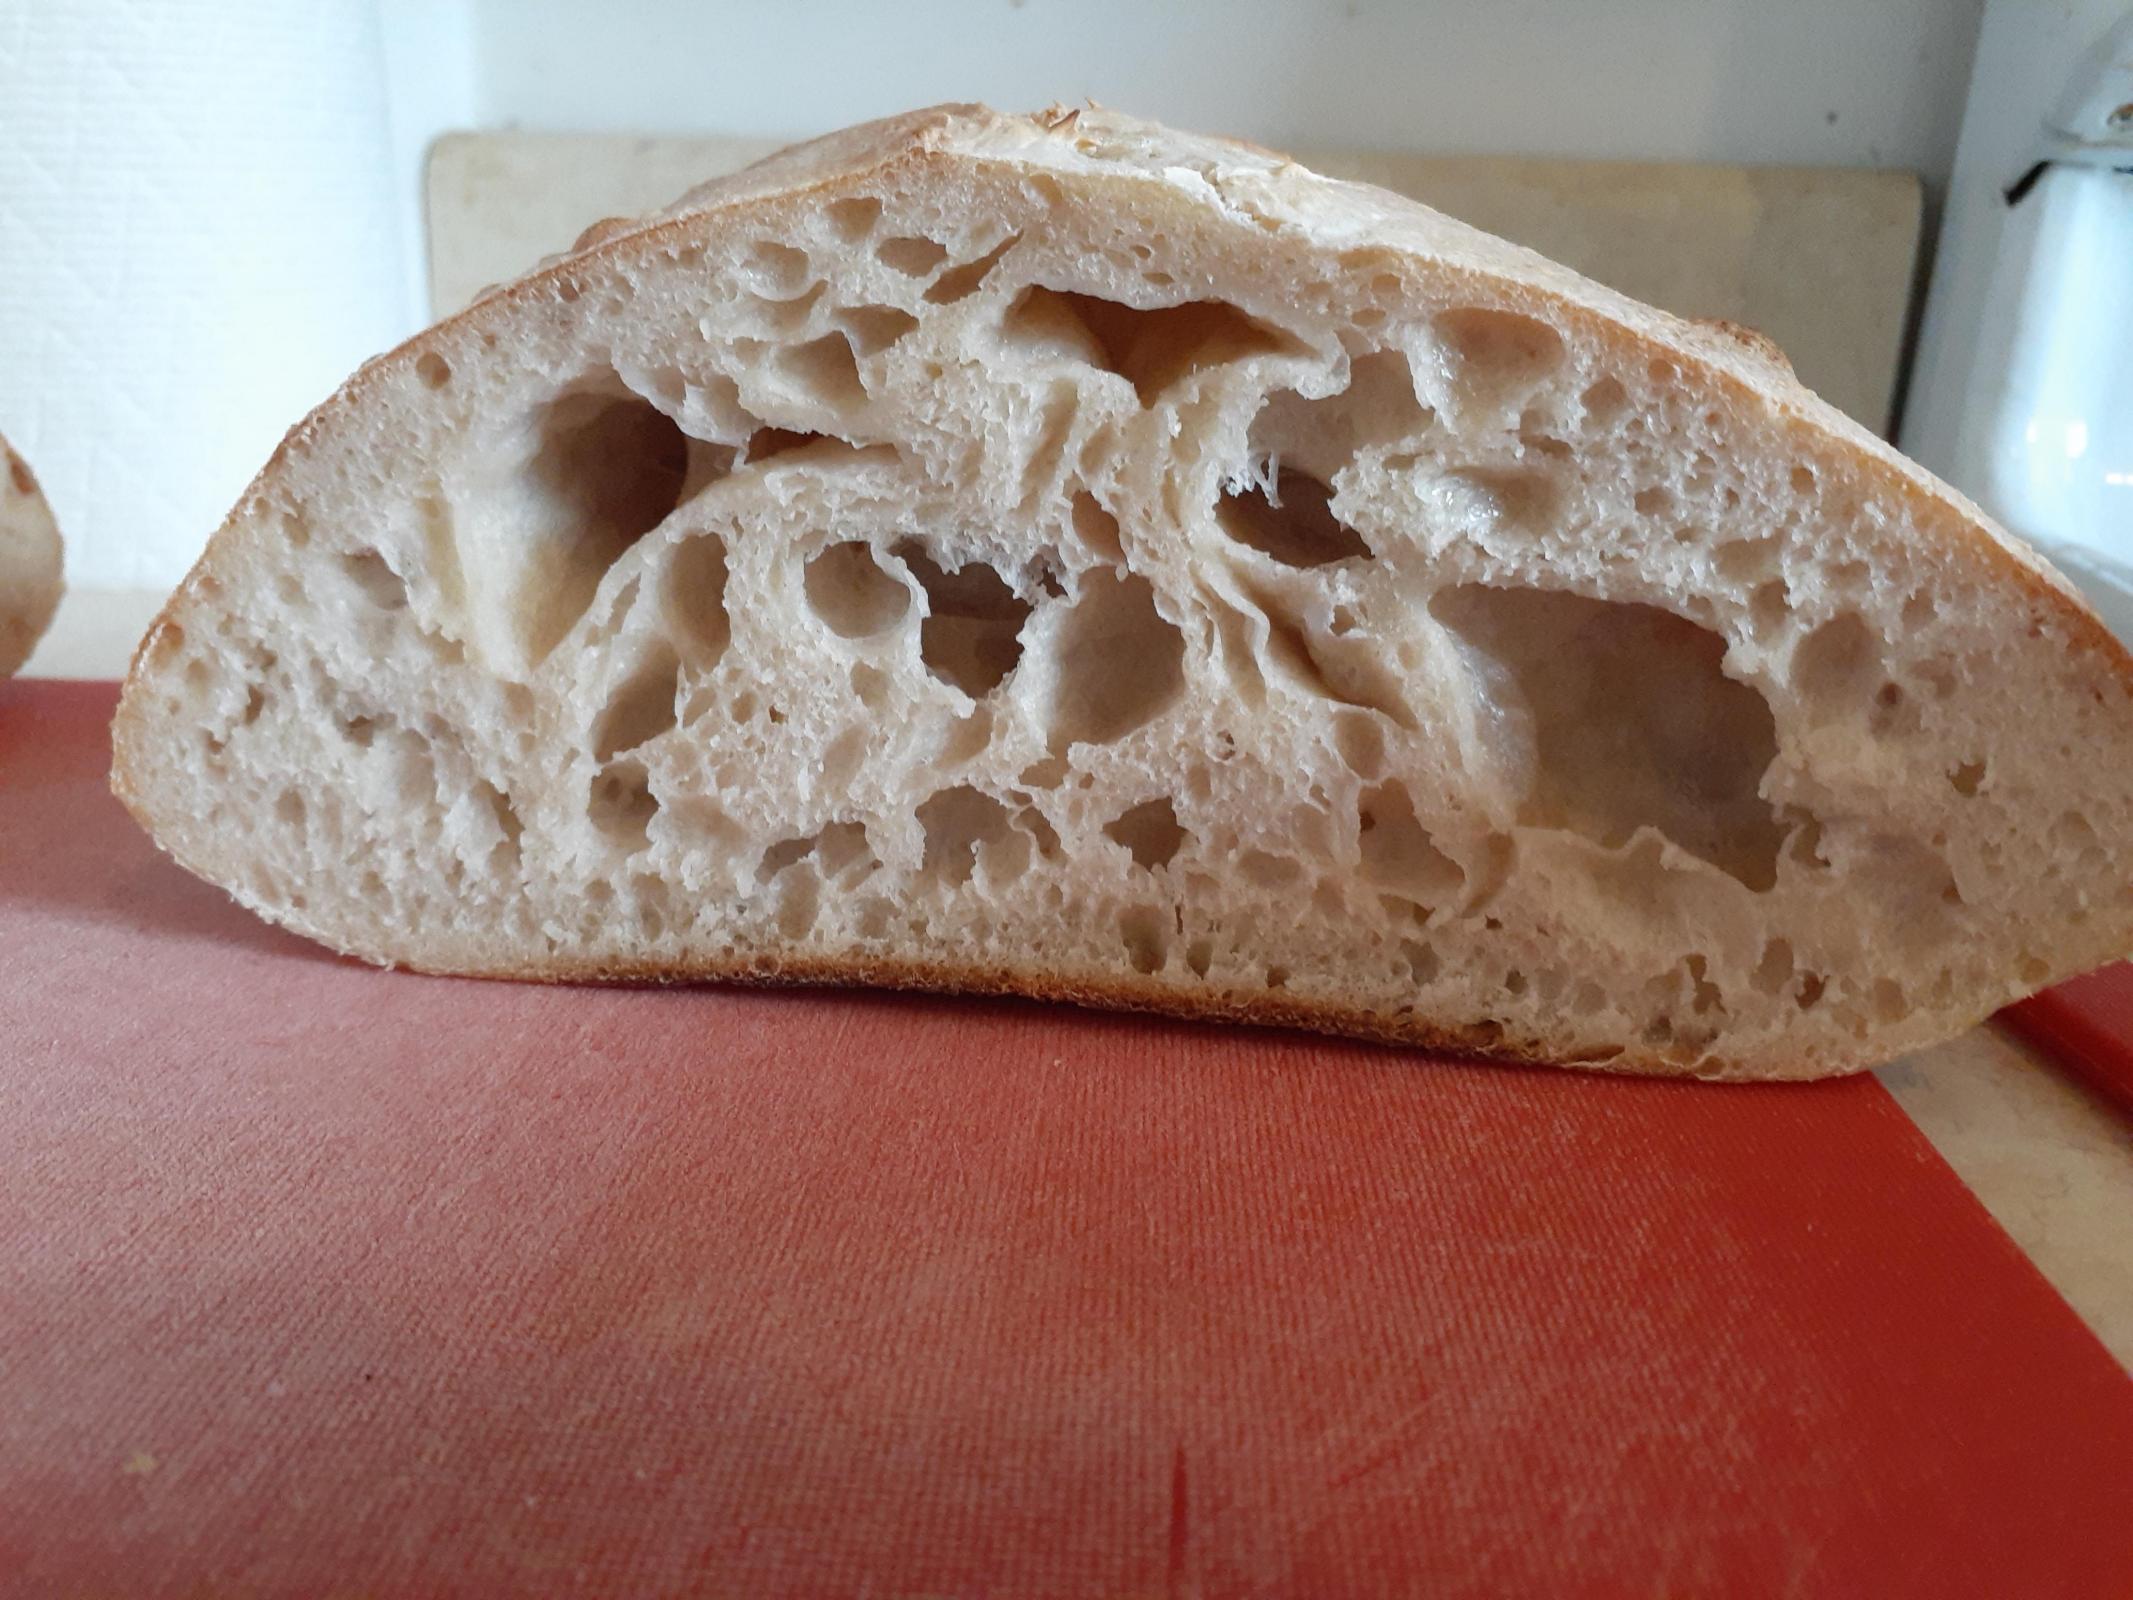
The result: better rise, bigger loaf, delicious (especially the crust!), with great crumb. I don't know if my steam setup os that great, but it seemed to work if to judge by hoe airy the loaf is. But: I'm having some big holes again, even if really not as bad as in the first loaf (see the two pictures of he cross-section). I mean, if I continue baking loaves like this one, I'm not going to complain--it's delicious and the bigger holes aren't really a problem. But maybe I can improve on it. Could the holes be the result of over-proofing? Or, there maybe I caused them when I took the dough out of proofing: the dough took a little "convincing" to let go of the towels in places (even though I floured them). so maybe my handling of the dough caused the holes? If you have any ideas about what's causing them, I'd be grateful to hear!
And the last thing is bulk-fermentation time. I'm a bit surprised that I needed 5 hours after folds, and additional 3.5 hours of proofing. My starter seems active: today, it doubled in 5.5 hours, and continued to grow until peaked in 3 more hours, nearly triple the original volume. So why are my fermentation times so much longer than Maurizio's?
Thanks again for all your advice--the improvement is really huge! Would appreciate any other suggestions or tips!
When I click on the drive link above. Bread looks fantastic! More when I can see other pics.
Here's the link to all the pictures: https://drive.google.com/drive/folders/1ELqe8_IF29jca9r3LlZqUR7mrEMr6nH0?usp=sharing
First - the proof is in the pudding! Congratulations on a successful loaf!
Pictures - What I was hoping you'd see is how the dough starts to get a domed look as it develops during bulk. But looking at your pictures, I think the hydration in this one is low enough that yours doesn't go from almost flat top (like a batter) to a more domed looked at the edges. For example, here are two pictures of a 80% hydration focaccia formula from theperfectloaf.com. The first one is before folding and the second after folding. This is about 3 hours into fermentation and dough is fairly well developed. In the first one see how at the edge the dough is convex? That's what I was hoping you'd see from side pictures. But the fact that the dough is a ball all the time makes this a useless marker to look for. Sorry for that wild goose chase. I haven't baked this formula as often as the 50-50.
Time in bulk - yeah that does seem a bit high. What is your room temperature? Drafty, breezy on the counter? Try moving the bowl to the oven (if it has a good seal) or a cooler. Another factor you can control is water temperature. Use warm water for mixing, instead of room temperature. I think if you feel up to increasing hydration to 74% as per recipe, you'll probably see your fermentation speed up a bit. Glad to hear you noticed the dough getting less sticky! That is a great sign to look for.
Seems like you could perhaps lower temperature some more if it still cooked too fast. Perhaps the sweet spot is 420 or 425 degrees F right from when you load your loaf in the oven? Steam set up sounds fine. Did you score your loaf? If not, that's the next thing to go for. Start with just one down the middle or go with a square. Sharp bladed knife or a razor blade with a pared wooden stirrer threaded through the middle; angle the blade about 45 degrees to the loaf surface; confident strokes - I'm still working on this after 4 years.
Holes - The bigger holes in this loaf are a much different beast than those in your first loaf, right? I mean just look at those stretchy threads of gluten and the shiny gelatinization in this loaf! This is what makes one want to have slice after slice. It is possible that dough over proofed slightly. Or perhaps these will go away as you gain more shaping experience. Hard for me to say. While pre-shaping and shaping, if you see any large bubbles on the top surface, pop them - just pinch lightly with floured fingers. Sorry I don't have any definitive answers about the holes, just hunches...
Flouring the towel - If the dough had to be coaxed off the towel, you need more flour on it. I spread the towel on my counter, sprinkle it liberally with rice flour and then I really rub it in with flat fingers held rigidly together. A fine dusting of it comes through to the other side of the towel on the counter.
Hope this helps. Happy baking and good luck with the move!
P.S.: I am a minimalist when it comes to equipment, but would highly recommend an oven thermometer for your new place. :-)
Thanks--yes, very happy with this loaf!
Oh--now I see what you mean by domed dough! Yes, at this hydration, this dough just stays ball-like throughout. Maybe after I'll do this one successfully several more times, I'll try it with the higher hydration (+50g water), and then I'll be able to see it becoming domed. Or maybe I'll try the focaccia if it's not too challenging--I like those!
Re time in bulk: temperature yesterday was around 75F, not particularly breezy, but I'll try putting it in the oven next time anyway. I already use water at around 80F when mixing to speed things up. Yes, I'll try the higher hydration one soon! I think I'll try using my starter a bit later in its "cycle"--I might be using it too early. Also, I noticed that M needs only 25g of starter per 100 g flour when he feeds his starter; I use 40-50 grams of starter, and get roughly the same time-to-peak that he does. So maybe this means that my starter is just a bit slow. But maybe this starter-analysis is going a bit too far into anal territory.
Yes, I'll try lowering the temp even more next time. Should I lower it for both parts of the baking (steam + no steam), or just for the non-steam part?
Yes, I'm scoring the loaf, but my scoring-work definitely needs more work--the dough tends to get stuck to the knife (though wetting the blade seems to help). I'll try the 45-degree trick--I always feel like scoring is a test of one's faith in one's abilities, and when it doesn't go very well, I'm always exposed as a non-believer, lol.
Yes! Holes are a completely different story, and like I said, this loaf is so delicious that it's fine with me if the holes stay in the next ones too. Good to know about the large bubbles--I did see some large ones when I was forming. I'll pop those next time. Will flour the towels more liberally next time!
Will definitely get an oven thermometer! That piece of equipment seems much more necessary than some of the other things!
Thanks for all the help! I'll report on the next one, too, but I'm think that all the major problems have been resolved!
If you like focaccia with chew and open crumb and awesome depth of flavor, this one will knock your socks off. I have made focaccia for 15+ years. For most of that time I've made it with commercial yeast. Since I started dabbling with sourdough 4 years ago, I started adding a little starter to my usual recipes for flavor. With the current yeast shortage, I started pushing the starter envelope even more, trying to get away with less and less commercial yeast. Anyway this was my first successful all-sourdough focaccia and it was so easy! I ended up having the dough develop all day for one reason or another. Was going to bake it last night, but ended up not and just put it in the fridge. Took it out this morning and baked after a couple of hours. It probably over proofed a little, but was still fantastic. With a panned bread, over proofing is less of a concern. Already planning to mix another batch later today! Tips - bowl of water to keep dough from sticking to hands will be really useful here when mixing, stretching and folding. Poking holes/dimples just before baking - using all 5 fingers doesn't work for me - dough sticks. Instead poking with wet index fingers of both hands goes better.
Okay back to the original loaf you're trying to perfect. Water temperature: you can go up to 90-95 degrees if needed. As long as the water isn't too hot to kill the yeast in the starter, you're good. Starter: can you point out where he says to use 25g starter and 100g flour and water? I've been following the 1:2:2 ratio of starter: water:flour for feeding he recommends in https://www.theperfectloaf.com/7-easy-steps-making-incredible-sourdough-starter-scratch/ under Day Seven and onwards. Hmm.. but looking around on his site, it seems like he varies his ratios quite a bit during the year depending on season/ambient temperature. Oven temp: yes, I meant go with 425 throughout (steam + no steam periods) and go even lower if you need to, in order to get about the same total baking time. Keep in mind that he is at about 5000 feet above sea level. I am at sea level.
You are very welcome! I'll be happy to see posts about your continued success. :-)
That focaccia sounds so, so good--I will definitely try it very soon! In the recipe for the focaccia, what does it mean when he says "malted" next to the flour? Anything special, or just the regular king arthur bread flour (which is still not that easy to come by here in upstate NY after the run on anything that has to do with baking!).
Made the same recipe again today. Used 90F water. Kitchen temp was 73F. I tried to bulk for 4.5 instead of 5 hours (in sealed oven), but even that small change seemed to produce a not-yet-fermented-enough dough (a bit stickier, a bit runnier than the previous one). I tried to compensate by increasing proofing time, but the loaf seems a tad smaller in the end (I might just be imagining), so not sure it worked. Anyway--still don't know how to shorten the bulk time. Maybe my starter is just too young and not active enough--it is 7 weeks old. I don't know. Perhaps I'll try higher hydration next time to see if that shortens bulk time. I'm a bit at a loss on this front.
I baked at 420F (roughly at sea level here too). And, again, after 35 minutes the internal temperature was 208F, so took it out very soon, again. My oven is just way off--I'll try 400 next time. The crust is not as dark this time around, which is good, because it was still just a tiny bit burned last time. But I think it shouldn't be any lighter in color. Here's a link to pics: https://drive.google.com/drive/folders/1A-dsCmnCWBtOe_7sX65ykJJG2USUSaki?usp=sharing
Crumb looks good I think--maybe a little tight? (see picture in folder). No big holes because shaping went better.
And, I had the ingenious idea of scoring the loaf in a triangle pattern. Which produced (duh!) a triangular loaf lol. Lesson learned...
About M's starter instructions: I was referring to this page: https://www.theperfectloaf.com/sourdough-starter-maintenance-routine/ . Here he says he uses 20g of starter per 100 g flour (and 100 g water). But, yeah, as you say, he seems to use different proportions in different places. I also use the 1:2:2 proportion. If I go for a few feeding rounds below 40 grams starter per 100 g flour, it seems to be less active--it will not double, or just barely so.
I think I'll go with higher hydration (add, say, 30 g water) next time, and report back. Please don't feel obligated to respond if you're busy or simply tired of humoring me. You've already helped me a lot. Thanks for that!
Good job on shaping, if that's what was causing larger holes. Score shouldn't affect shape of loaf, unless scores are more to the side than on top.. But yeah indirectly, scoring or lack of scoring can affect shape of loaf. When the steam has no place to go, it can push the dough wherever it finds a weak spot - sometimes on the side - causing weird shaped loaves. Scores are supposed to provide those built-in weak spots.
Crumb - Was the texture slightly gummy? I see something like that on the left edge in your photo. Did you let it cool at least an hour before slicing? Yeah, crumb looks slightly less open than before. What was total bulk time this time and last time? What was total proofing time? I wonder if over all this one was just a bit over proofed? Just something to be aware of - over proofing leads to a runnier and stickier dough. I have done it with the 50-50 formula and it almost made me cry (about 1800 gms of dough and hours of time wasted if it didn't work), it was so challenging to shape. Over proofed breads also produce less browning - in extreme cases they'll look sickly greyish brown instead of a rich color, texture will be chewy in an unpleasant way and sour. I just don't have that experience with this formula, so I'm not able to offer you suggestions/markers to look for so you don't end up over proofing. IMO, your previous loaf was closer to the mark in terms of fermentation/crumb. What do you think? How was the flavor of this one compared to previous one?
Baking temperature - yep, you might be converging on the correct temperature for your oven. Agreed - if you drop to 400 or 410, presumably you'll get a chance to bake for the full 20+30 or 20+35 minutes and it'll be the just right color outside and temperature inside.
Starter feeding - I see the 20% now. No idea about which he intends. He is amazingly responsive to questions on his blog. I would just ask him at the bottom of the recipe you're working on, what ratio you're supposed to be feeding and point to the Starter Maintenance Routine entry.
Hydration - yes! I think you've had enough experience now to try a slightly higher hydration. Do report back!
Focaccia - the "high protein, malted" is just a category of flour that mills produce and King Arthur Bread Flour is an example of that category. I am very carefully doling out the contents of my lone bag of bread flour for recipes because as you said very little to be found anywhere. Also, the only APF I've been getting reliably is a 20lb pkg from Costco (Central Milling) which happens be on the lower end of protein (around 10% rather than KA APF at 11.7%) as far as All Purpose flours go. So, the last few bakes, I've been adding a tiny bit of vital wheat gluten that I've had lying around for far too many years in my freezer. For this APF formula you're working on, I added 10g of the vital wheat gluten, just to bring up my low protein flour to the intended KA APF. For the focaccia, I did not use any bread flour and instead just used 20g of vital wheat gluten along with my Central Milling APF. I might reduce to 10-15g next time. I mention this in case vital wheat gluten is easier to find these days... of course it will introduce yet another factor to control. :-)
Very glad that my guesses actually helped rather than hindered. You're welcome! Good luck with future bakes.
Texture isn't gummy (I let it sit for an hour). The taste is noticeably more sour.
Total bulk time this loaf: 4.5 hours after fold-and-stretches. Plus 3.5 hours proofing.
Previous loaf (better one) bulk time: 5 hours after folds. Plus 3 hours proofing.
So no real difference in total time, but the dough did seem to collapse a bit when I took it out of proofing this time. This, plus the fact that it was more sour and less brown, maybe do indicate that it was overproofed like you said. But hard to tell, especially since the times for both loaves are so similar. What do you think? What fermentation times should I try next?
Yes, I'll drop temp even more next time. Do you still think I should try higher hydration next time? Or maybe get. better grip on the fermentation time before I try to vary the formula?
so that you could cut down on fermentation time, so you should expect fermentation to have progressed faster than previous time. Given taste was noticeably more sour, my money is on slightly over proofed. When you make changes to make fermentation go faster, start checking dough for "done bulk?" sooner. So in this case since you upped water temp + placed in less drafty environment, start checking at say 3.5 hours. It might be done by 4 hours and slightly over by 4.5. None of this to imply that it is easy to guess where your dough is at. So don't worry, just bake often and you'll start to get a feel for it. A trick that some folks here use to gauge increase in volume is they pinch of a small ball of dough at the beginning of bulk and put it in a straight sided glass jar and then use that jar to tell them how much fermentation has occurred. I haven't tried this. Another a very experienced baker suggested was to cut your developing dough to see what is going on inside. Also something I've never done.
All in all, since it is hard to control environmental factors, I think just baking often will help you develop a nose for this.
Another thing to try at this point might be the overnight retardation. Shape and put dough in fridge. It allows for more complex flavors to develop without over proofing. I really like doing that.
My opinion is to try higher hydration next, because I think a looser dough will be easier to read. Be warned that a looser dough can also ferment faster. So make it looser and expect it to follow M's timeline. Then push bulk + proof times in subsequent iterations if it turns out that you needed more fermentation.
Okay--I'll take the over-fermentation explanation--seems right! I'll do the shorter schedule when doing low-hydration again. And I'll probably keep a schedule closer to M's when I do the higher hydration one (which I will do next, in a couple of days). The sign to look for, for "done bulk", with the higher hydration, is the significant dome, right (as in your picture)?
About looking for "done bulk" signs: it is difficult for me to tell for now. A question: If I do pull aside in a straight-sided clear jar a small bit of the dough, what should I be looking for as a sign that bulk is done? Bubbles everywhere? It's always the same problem with all these signs--I just need to have enough experience to know what constitutes "many bubbles" or "not sticky" or "very gassy". I have a general sense of these, but not accurate enough yet. It'll come with experience, I'm sure.
I'll try the overnight retardation soon--just want to get a better handle on this procedure before I vary things!
Will report what happens with the higher hydration--thanks for all the help!
I tried the higher hydration recipe today. Unfortunately, it didn't go that great. Here are some pics: https://drive.google.com/drive/folders/1IJFOJ62DTGnNYsM4b7TAxVDwFgAm_fgO?usp=sharing
As you can see, I did get a bit of a dome, but it definitely didn't get as smooth as the picture of the dough you posted.
Bulk time was 2.5 hours after last fold (only one hour more than M's recipe calls for, and I kept proofing time the same as his, 2.5 hours. The dough did seem a bit too sticky when I took it out of bulk for pre-shape. And, despite flouring the towel generously, I had a really bad case of part of the dough sticking to the towel, and so I struggled to separate it from the towel, and at the end of the struggle the dough was a bit deflated. You can see the result: big holes here and there, but not too bad. Texture a bit dense (but not too dense). Color of crust was great. for some reason, my scoring completely disappeared--I can't tell on the baked loaf where it was--I don't know if that means anything.
Anyway, I'm not entirely certain, but my diagnosis is that if was a bit under-proofed, but not much. Maybe needed another hour (or maybe less) in bulk. So I'll try that next time. Hope I'm making progress--some days it doesn't look like it.
Yup, I agree with your diagnosis of slightly under proofed.
I wanted to do a run through of this recipe with lots of pictures to share with you what it looks like at my end.
Today was a cooler day here and I didn't really bother with warm water or anything because I had other things happening in the kitchen and didn't really want to risk having the dough get ahead of me. I used 10% whole wheat flour today, just because M says one could without changing the formula. I also used 10g vital wheat gluten to make up for my low protein APF.
Ok, on to some pictures.
This is right after I added the last 50g of water. Used it to clean my bowl before kneading it in. I realized, that given this dough is not super wet, I find myself kneading it a fair bit while mixing. I suspect I am building up quite a bit of strength right at the beginning.
All water incorporated. Starting bulk. Dough looks shaggy.
After first set of folds. Hard to believe this is just 15 minutes after the previous photo. This is so much smoother! All that kneading at the beginning was good!
Just before second set of folds.
Dough is already coming cleanly off the bowl. It already seems "strong" as far as I understand M's terminology.
This is the 3.5 hour mark. There is activity, but not as much as last time. It is cooler tonight and I've also left dough on counter for the last hour, so it wouldn't get ahead of me while I took care of dinner, kids bed times, etc. In retrospect, it would've been fine in the oven. But this way I was able to make sure I didn't over ferment.
Now, I am going to let it go another 30-45 minutes, since I can tell it is not lively enough.
At the end of bulk, dough was at the bottom of this large bowl - see a circle where scrape marks change pattern? To get it out, I tilted bowl so the nearer lip of the bowl rested on counter. With a wet spatula, I coaxed the opposite edge of dough off the bowl and encouraged it to flow to the counter. No rush, just lightly helping it peel off the bottom of the bowl. Once some dough mass was touching counter, I used it's adhesion to counter, gravity and it's desire not to tear, to tip it all the way out, tilting the bowl upside down and eventually leaning the bottom of the bowl towards me, so it would let go of the side of the bowl too. This is how cleanly it came off the bowl.
See how the dough tipped out folding over itself? This was not a bad outcome, as it got me started with pre-shaping. I just went under the right side of this with dough scraper and pulled it toward me (bottom of this image) and tucked under and so on around all of the dough.
After a few turns on counter with bench scraper.
Pre shaped round. Nice and tall and tight. I've just pulled it around on the un-floured counter a bunch of times with bench scraper.
Pre shaped dough round at the end of 20 minute rest. It has flattened for sure, but still has some height.
Flipped over pre-shaped dough. See where it came off? Before flipping, I pried it all around the right side (and top and bottom) with floured dough scraper using short quick strokes, to be sure it would co-operate.
Pinched off some air bubbles near bottom. This is final shaped loaf. Now to invert it onto towel spread with sesame seeds - one floured hand, floured bench scraper in the other hand.
I left it a bit too long on towel with seeds and then was a little worried about getting it off. But faking some confidence, flouring hands and using the towel to partially roll the dough left (where there were a lot of loose seeds still) helped. Then went under the dough on the right with one floured hand and then quickly under it on the other side with other hand. Lift and plop into the waiting proofing bowl.
In the proofing bowl.
Pinched the edges/sides in a bit, to create more tension/tightness. Most noticeable in top third and bottom left of loaf in image.
Last time this dough was further along in fermentation when I shaped it. To give it a little more fermentation time, I let it sit out on the counter for about 30 minutes while I cleaned up the kitchen. Checked it just before putting in a plastic bag, cinched closed with rubber band and then into the fridge - dough seemed a little more airy and jiggly. I'm thinking this was a good call. So note that today I've used an extra 45+30 minutes of fermentation time compared to the recipe.
Will update tomorrow with results! But I may have to delete some images if I am to upload any new ones. :-)
No worries about disappearing--life goes on, in all kinds of directions lately. Thank you so much for the pictures--this is really, really helpful! Looking at your process, it is clear to me that my dough just doesn't develop nearly as quickly as yours, even when I make the higher hydration formula. The pace at which my dough smoothes out and becomes gassy much slower, looking at your pre- and post-folding pictures. I don't know why it is so much slower, but I clearly just have to adjust to it's pace.
I just made the higher hydration formula, and added an hour to the bulk time after last time it turned out under-proofed. The dough was much more jiggly and gassy at end of bulk, but still didn't come out of bulk bowl that easily (thanks for describing your process--I'll try it with tilting and wet spatula next time!). But, it did resemble your dough after moving it to counter, with the that "tail" on top (the part of the dough coming out of the bowl last).
Yet, at the end of proofing, it stuck to the towel very badly *yet again*, and deflated when I struggled to un-stick it. It is baking now, so I don't know how bad it is, but will report soon enough. Now that I know how it is supposed to look and feel, I think I will add another 30 minutes of bulk, and flour the towel even more, and use the techniques your describe. Thanks so, so, much, yet again--this is very helpful, and I think I'm moving in the right direction. I'll update again soon. And please let me know how your turns out! Seeing the final result will help immensely as well!
but I have a slightly puffy pancake. :-/ Will post pictures tonight and will likely need to delete some pics from above. So download them if you want before then.
Dough was in the fridge overnight. In the morning it didn't look as puffy as last time or anywhere close to it when it was domed above the proofing bowl. I left it on the counter for about 1.5-2 hrs. After that, since poke test looked good, I decided to go ahead and bake. Dough spread more than last time after inverting out of proofing bowl. Spread even more after scoring.
To mimic your set up more closely I decided to try baking on a cast iron griddle with added steam. Seemed to start coloring even before the first 20 minutes were up. I turned it 180 degrees at one point and added extra water to steaming pan at about 15 minutes. In fact, because rise was so little, I left steam set up in for another 10+ minutes. It baked for about 20 minutes at 450 + 25 minutes at 435. It's been a long time since I baked on the cast iron griddle. I think I need to reduce temp a bit, since it gets so hot.
Let's see how the crumb turns out later tonight!
Ugh--sorry to hear about the pancake (although your standards might be higher than mine). I copied the previous post, so you can delete pics to add new ones.
Why do you think it spread so much? Was it overproofed? Or is it just an effect of the higher hydration?
I don't bake on the cast iron skillet--I just keep it in the oven as the loaf is baking on a separate baking sheet. Your baking time is very similar to mine right now (20+25). I should probably lower the heat even more--my oven is really very off the mark. But this baking time (20+25) is at least close to the recipe. Too bad about the oven rise--what is the cause you think?
I usually get decent (I think) oven-rise, but less decent ever since I've had to struggle to get the dough out of proofing towel (because the dough collapses a bit as I'm forcing it out of towel). I did get a very, very good crumb on the last one. So I'm thinking it was not underproofed by much, if at all. I probably just have to do a better job shaping, and make sure to flour the towel heavily.
Question: in the proofing basket, you mention that you pinched the dough a bit to get more tension. do you mean that you do small stretch-and-folds? Or pinch it toward the bottom of the dough?
Anyway--take a picture of the loaf/crumb! I'd be interested to see your final result.
So the crumb was really atrocious.
This is what I used to get when I was just starting out. Diagnosis - very under fermented. I was too carried away by how smooth the dough was and took that as a sign of dough being proofed enough. But that smoothness was likely because of the workout (kneading) to which I had subjected the dough. After all, it had started smoothing out even after the first set of folds in 15 minutes. Should I conclude that it was anywhere near well fermented then? Obviously not. Looking back, that dough was definitely not lively at the point I called end of bulk. I should've listened more closely to my instincts which made me let it sit on the counter for 30 minutes after shaping, before putting it in the fridge. I also let it sit on the counter while the oven preheated (something I never do) which was also my instinct telling me the dough wasn't ready. Consciously I was still giving too much weight to time on the clock and worrying I was going to overproof it based on time, even though instinctively I knew it hadn't progressed far enough. I need to walk the talk - "Watch the dough, not the clock". Also, hubris will always come back to bite ya. :-)
Naturally, I had to do a redemption bake. On to some pictures from this weekend's bake. I used the same formula as last time, with 46g whole wheat flour and 10g of vital wheat gluten, full hydration as per recipe.
This is right after mixing and transferring to glass container with tight fitting lid for bulk. Dough is shaggy.
This is after second set of folds (about 40 minutes after bulk started).
This after another half an hour.
This is when I called end of bulk. Notice between this picture and the one above (or this and the one at the beginning of bulk), how much dough has increased in volume? In this case I had a wide shallow container, so the increase is not so much in vertical height as how it spread to fill available space. Below is a side view:
I wish I could describe/convey how lively, gassy and jiggly this dough was! In comparison, the one from last week was noticeably less so. It was more sluggish with some bubbles. Unfortunately, it was also when I kept it in a metal bowl for bulk, so I had no window into it from the sides.
Here it is pre-shaped and starting 20 minute rest on counter. Compare this to the image from last week at the end of pre-shape. Even in a flat 2D image, I think you can tell the difference between a lively, jiggly dough and a sluggish one.
Shaped and in proofing bowl after a roll in sesame seeds. Below are some pictures where I try to demo pinching sides up to create more tension in loaf.
I finally found the reference for this - look at Pinching a Weak Dough in this entry: https://www.theperfectloaf.com/guides/shaping-a-boule/
I sprinkled more seeds on top and then covered the dough with towel ends, bagged it and it went in to the fridge at about 7pm. The next morning, around 9am, this is what the dough looked like:
I toyed with the idea of not scoring because given how much it had already increased in volume, I didn't expect a huge oven spring. Also, to be honest, I was worried about deflating this by scoring. I did score, but moved quickly, so no pictures.
Given this was a redemption bake and because there was no time to waste with this dough ready to pop out of the proofing bowl, I went back to baking in dutch oven. I reduced temperature to 435 after about 30 minutes. Baked 50 minutes total and then left loaf in turned off oven for 5 minutes as the edges looked paler than the top and bottom.
With some other impromptu meal plans intruding, we didn't even slice this loaf until more than 24 hours after baking. I just stored the cooled loaf in the cooled dutch oven with the lid on. Here are a couple of crumb shots:
These pictures taken at 8pm in poor lighting, don't do it justice. The crumb is just beautifully open and lacy. Taste is complex and has a tang. It is lovely toasted or not, spread with a dab of butter.
I think I just about escaped over proofing here. Just nailed it on the outer edge of the window of lacy open crumb. I don't think I went over board in bulk proofing. Bulk started at 2:35pm, ended at 6:15pm, in the oven in a closed container with light on. Afterward, the dough handled beautifully (over proofed dough is hard to shape). But given how early it went in the fridge 7pm, should have checked whether it was ready to bake at 6:30 or 7am. By the time this went into oven it was 9:45am.
sorry--long delay because I was moving to a new place, across the country. Your second loaf looks great! The dough development pictures are very helpful, and so are the "pinching" pictures--thanks!
Now I'm in my new place, and the oven is much better, and I've had time to try to bake that all-purpose recipe (full hydration) three times. I still add 2 hours to bulk (in addition to what M says).
Results are fine generally. Crumb looks good, I think:
But I have a couple of problems: first, the dough sticks like crazy to the towel in the proofing basket, despite flouring the towel heavily. It takes a crazy struggle to release the dough from the towel, and I always lose a bit of dough in the process. Second, the dough seems weak to me--despite being airy and jiggly at the end of bulk, it spreads out considerably when I move it to the counter for pre-shaping. At the end of proofing (right before baking), when I release it from the towel, it again spreads considerably (not sure if it is because of the effort to release it from the towel, or general weakness of the dough), and so I get a very flat loaf, with good crumb.
I tried adding 30 minutes to bulk, to see if it is under-fermented, but that didn't help. Looking at the crumb, it doesn't really look under-fermented to me. So... any guesses about what might be going wrong?
(When I replied previously, I made a mistake and so it didn't thread correctly. Copy-pasting in the correct location to make it easier to follow. Too bad I can't delete the other one!)
Great to hear you're now using full hydration. I agree with you - fermentation looks just right.
So this must be about dough strength. I'll be honest - I think I do way more strengthening than Maurizio's North-South-East-West folds. I think I've mentioned coil folds before, right? Here's what feels right to me and seems to work for me. Once I have the dough pried away from the bulk container's sides, with a wet hand, I scoop under the dough, lift it up supporting under the middle and so that it hangs down from my hand on two sides. Then I let one hanging side plop back down and then the other so that I've created a sort of letter fold in thirds with the middle third facing up. Then I rotate the bowl a quarter turn so that when I scoop under the dough next, I'll be stretching in a direction 90 degrees to the first stretch. Does that make sense? I repeat that a few times until I start seeing the dough in the middle get thinner and thinner. If it tears, I stop. Else I stop after the dough stops stretching. Here's one video by Trevor Wilson: https://www.instagram.com/p/Bju7aazn27T/?hl=en
No worries about delay. I figured you must be busy moving.
This thread is very helpful as I plan to make this recipe Thursday, except doubled and with 10% white whole wheat. I posted on another thread about my levain challenge. My levain didn't seem ready even 3.5 hours into autolyse. I hastily added my levain regardless as I worried about over-autolysing. Predictably my dough didn't get much rise, but I've already eaten both loaves as they tasted good anyway.
I finally got my starter into a normal pattern. Previously it bubbled but did not rise, but after changing the feeding ratio it both bubbles and rises. I let it hibernate in the fridge on Monday after a feeding and I took it out of the fridge this morning. I planned to let it come to room temp and build a 3 phase 36 hour levain starting tonight. I will then mix the dough on Thursday morning. I am tempted by a one day recipe as I've only done two days before but may end up retarding the dough overnight anyway.
I'm hopeful that my breads will get a little closer to the artisan open crumb loaves I see on here with my levain now back to a healthy state. FWIW I only bake in a cast iron dutch oven and I'm in NYC where it's been 75-80 and humid.
see some of your bakes! How did it go on Thursday?
Yup, good idea to get reliable rise in starter before attempting to use it. Happy baking!
-G
Hi, thanks for your reply. I posted here but it didn't get much attention: http://www.thefreshloaf.com/node/64757/most-recent-bake overall was tasty and I'm happy. building a 36 hour levain to bake wednesday now.
about your 36 hour levain. Why 36 hour?
I am no expert, but would tend to agree that tighter shaping would help nudge your tasty loaves in the right direction. You're getting decent oven spring, from the way those holes in your crumb are rising up. I wonder if you could ferment a little longer. Have you tried coil folds? I think I probably work my dough more this way than Maurizio's north-south-east-west stretch and folds.
Happy baking! -G
I do a 36 hour levain because I keep my starter in the fridge most of the time so the 36 hour helps to slowly revive it and bring it up to the quantity I need with minimal discard. When I was feeding every day I had mountains of discard and found it to be wasteful of flour considering I only bake weekly. I was able to work through most of the discard using various recipes, but I really don't like having multiple containers of discard in the fridge.
The 36 hour levain routine was on the advice of someone here. I started with 20g starter/20g flour/20g water yesterday night. This morning did 25/50/50. Tonight will do an overnight levain with 75/75/75 which is enough to bake and have 20g of starter left with a little extra just in case. Last time I actually did 2 feeds over 24 hours and then built my levain the morning after the 2nd feed. It was so hot it seemed like my starter was just begging to be used. This time things are moving slower so I'll do the full 36 hours. I typically build a separate levain in another jar but may just use my starter tomorrow morning if the timing is right after tonight's feed. But if my starter reaches peak before I wake up I'll just build a 4-6 hour levain in the morning.
I think if anything my last loaves were slightly overfermented. The temp shot up to 90f in the area where the dough was doing bulk fermentation.I saw a trick in a group of putting a ball of dough in a glass after final S and F and that BF will be done after the ball rises to the top of the glass. May try it. I have never done coil folds but would be interested.
Great to hear you're now using full hydration. I agree with you - fermentation looks just right.
So this must be about dough strength. I'll be honest - I think I do way more strengthening than Maurizio's North-South-East-West folds. I think I've mentioned coil folds before, right? Here's what feels right to me and seems to work for me. Once I have the dough pried away from the bulk container's sides, with a wet hand, I scoop under the dough, lift it up supporting under the middle and so that it hangs down from my hand on two sides. Then I let one hanging side plop back down and then the other so that I've created a sort of letter fold in thirds with the middle third facing up. Then I rotate the bowl a quarter turn so that when I scoop under the dough next, I'll be stretching in a direction 90 degrees to the first stretch. Does that make sense? I repeat that a few times until I start seeing the dough in the middle get thinner and thinner. If it tears, I stop. Else I stop after the dough stops stretching. Here's one video by Trevor Wilson: https://www.instagram.com/p/Bju7aazn27T/?hl=en
No worries about delay. I figured you must be busy moving.
Thanks! I'll try the coil folds. Do you do just one set of these at the end of bulk? and then let it rest 20 mins on counter before fermentation?
I meant that I do all sets of stretch & folds this way.
I replaced all folds with coil folds yesterday (and did a lot of them), but I got the same result: a flying saucer with good crumb. Didn't stick as bad to towel, though (not sure if that's the result of the coil folds, or just a coincidence).
If you have any other suggestion for increasing dough strength, please let me know--I'll be grateful for any help! Just yesterday I realized that I haven't been doing pre-shaping right. So maybe correcting that will help. Another thing I'll try is increasing the time I do folds right after mixing. Maybe that'll help. Would you recommend trying slap-and-fold for this recipe?
Meanwhile, I also tried the 50/50 recipe that you recommended for the first time. I tried to do only one loaf, so I halved everything (except the levain, which I didn't half. I used 67% of the what the recipe calls for, knowing my starter's weakness). I increased bulk time by 2 hours. This dough was stronger than my APF dugh. When I took it out of the fridge, it didn't look very alive--a bit too brick-like (but easy to peel off towel). End result is not bad: crumb a bit too dense, and loaf noticeably smaller than APF one, but otherwise okay. But, I know that whole wheat always comes out denser, so maybe this is good? What do you think?

Also: does it matter how long before baking you take the loaf out of the fridge? Mine went straight from the fridge into oven (only stopping for scoring). But later I realized that might have been a mistake.
Melissad1997--I'm following what you're posting! I'm only not responding because I am a total beginner, so I don't have any good advice for you!
I didn't respond at first because I haven't the slightest clue why your loaves continue to stick to the towel. Later I forgot to come back to this thread. The only suggestion I have is to post a specific question about it on these boards. Provide a recipe link or info about hydration, proofing time etc. so people can take a stab at it. You might also want to try searching for an existing thread on this issue.
Your 50-50 loaf looks good - a good distribution of hole sizes. Based on the shape (tall middle and narrow ends) and crumb I'd say push bulk fermentation a little more. Did you score the loaf? As it happens I just made this recipe last night, baked this morning - my dough at the end of bulk was so lively, it could've jumped off the counter. I'll post a crumb shot later.
It shouldn't look/feel brick like. It should feel airy and noticeably risen since it went in the fridge. These days I err on the side of too small a proofing bowl, rather than too large. In a smaller bowl, any rise that happened is easier to detect than in a too large bowl. I tend to go from fridge to oven with a brief pause to score after turning out of basket on to a cutting board/ inverted cookie sheet. If I need to bake but dough doesn't look ready yet (do you do the poke test?) I might leave on counter while oven preheats, to get it to finish proofing. But if that is the case, you're better off leaving dough in fridge for a few more hours until it passes the poke test or looks ready.
I don't understand much about building strength, so I am hesitant to offer advice. From what I understand if you've built enough strength in your dough, it should pass the windowpane test. I haven't tested this concept though with any of Maurizio's recipes. Yes, slap and folds, stretch and folds, coil folds or kneading by hand are all ways to build strength. What do you think was incorrect about your preshaping?
Hope all is well and that some of this helps!
-G