
Homemade Bread Day 2016 - Yard Sourdough

I hope this is not late for homemade bread day. There was no internet connection for several days, finally there is a connection now. I may not post for a while because our internet service provider scheduled a wide repair and maintenance, we're not sure if we will be affected. I'm going to keep this post short and sweet, the connection could be cut off anytime! I will surely repeat this bread and make a more "dramatic" post in the future. I missed uncle Dab's Mandela challenge last time and I don't want to miss this one now.
This is the bread of the countryside, of our yard. I named it yard sourdough because like many breads named after a place,; the starter was made here, the bread was made here and the baking method was based on primitive cooking styles from here.
What characterizes this bread? No measurements, all by feel, a super long autolyze (longer than 16 hours), a firm starter (or a starter that favors acetic acid production), and a long cold proof. It is baked in a clay pot on a banana leaf over heated pebbles. Our place is famous for it's vinegar all over the country so that's why I emphasized the use of a firm starter or one that favor acetic acid to keep the connection to our home.
I autolyzed some AP flour and water longer than 16 hours in the fridge. Unlike others who use ice water for a cold autolyse, I just use room temperature water to jump start the enzymatic reactions and just let the dough catch up with the cold in the fridge. I let the dough warm up for an hour before incorporating the 12 hour old levain (fed with BF, it smells lovely vinegar already) built using 2 builds. I incorporated it using gentle folds and let it rest for an hour. The dough is dry that you can pick it up in one hand or even just 3 finger and it won't droop or tear. After an hour, I gave it a stretch and fold did the same for the next 3 hours, 1 hour apart. After the stretch and folds were done, I let it rest for an hour at room temperature then an hour on the fridge.
I've been wanting to bake seam-side up for the longest time so I did not miss the opportunity here. For me it makes the loaf look more rustic, and rustic is what our home is all about. After the 1 hour rest in the fridge, I pre-shaped it into a tight boule and let it rest for 30 minutes and shape it this way. Place the dough seam-side up; give it a light degassing; give the edges an extra degassing/flattening and fold the edges as shown here starting at 0:32. Put in the cloth lined proofing basket dusted with corn starch and flour seam-side down and put it straight in the fridge for a 12 hour retarded proof.
I know, triangle proofing baskets are rare, I can't even find round ones in my area so I made a makeshift proofing basket from a legal size folder. I used "trusted" origami skills and made a tetrahedron and it worked!
Here is the dough after 12 hours in the fridge. I think it is just proofed right. It is already seam-side up in the photo. It is baked on the clay pot for 20 minutes over a live fire and the next 10 minutes on embers. I "skewered" it on a fork and the top now facing the pebbles browned for an additional 10 minutes.
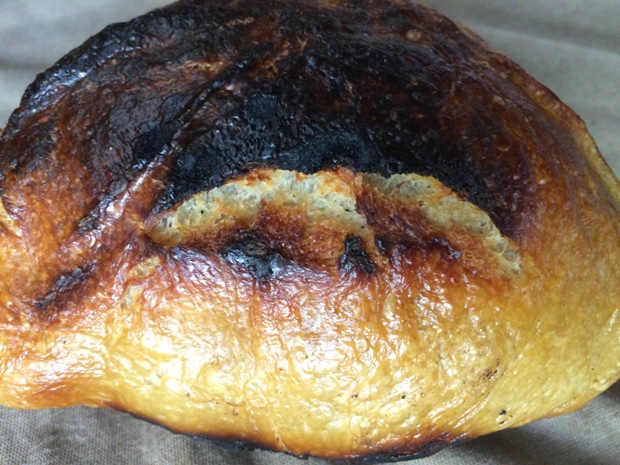
This is what I'm talking about, baked on a banana leaf over heated pebbles. This photo was taken after 20 minutes. The seams have started to open although one didn't and instead a weak spot on the side opened. The crust is nicely gelatinized. am I using the correct term?
I underestimated the thermal mass of the pebbles (they are even gathered from our yard) so the bottom and a little of the top got a little burnt, I should have used the embers earlier to avoid this but I think it's okay because I've seen some more charred breads like Jim Lahey's Truccione Sare. If you look closely at the bottom, you can clearly see the pebble marks.
Some close-ups of the crust. The crust was crunchy for the first 6 hours then softened at night. It was flavorful with caramelized notes. It even had some blisters!

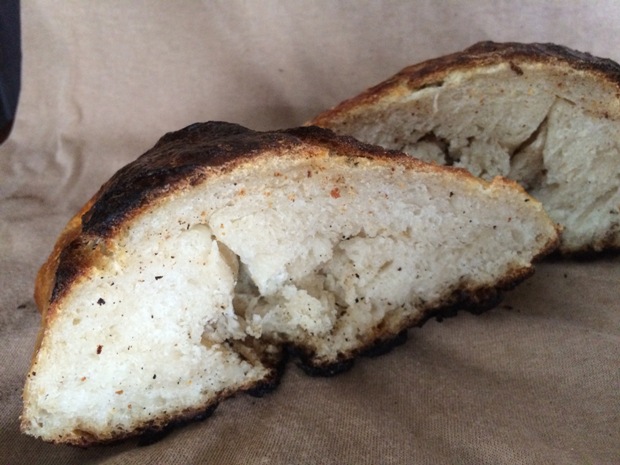
Some of the crumb shots are out of focus so I just included all of them. The big hole in the middle came from the fork I suppose and not from the shaping.


It was so good this is what was left in just half a day!

The crumb reminds me of David Snyder's old school San Francisco Sourdough. It is tight because of the low hydration but its is moist and soft with a little bit of chew. It is my favorite crumb texture so far. The aroma is heavenly, toasty and sweet with the unmistakable scent of the banana leaves. The flavor is super sweet like there is some added sugar and although made with only white flour, I could still taste some notes of the wheat. From all of the sweetness is a background of a mild tang. It is mild in my taste but definitely tastes like vinegar.

Definitely a bread worth repeating. I'm gonna tweak this bread further and I'm sure it's going to be a regular in the house. Gonna check your entries later. See you all!
Happy Homemade Bread Day!!!


Comments
Your techniques always fascinate me.
I think the make shift proofing basket is very cool.
Your bread turned out wonderfully. Great job Pal!
I'm looking forward to the next post.
Happy baking :)
Appreciate your comment as always Ru. I really like the look of it too but I think it would not do well with high hydration doughs. How's your exam?
Happy Baking!
a very interesting post, amazing what you have achieved
Happy baking
Appreciate your kind words.
Happy baking!
You've outdone yourself, Job! Your bread looks wonderful, and your makeshift 'basket' is truly inspired. I wonder how many may have come up with such an idea, but you've done it over and over. Your persistence and creativity are a model for us all.
Enjoy that bread and make more soon! Happy Homemade Bread Day!
Cathy
Thank you for your kind words and encouragement! I'm so excited to make this bread again.
Happy Homemade Bread Day!
So did you put the pebbles in your pot and then the bread with the banana leaf over the pebbles? I am not quite sure from your description.
And where is your fire? Outside or in a fire place in your home? I am really having a hard time picturing your lifestyle. You have a fridge and access to the internet, yet you cook over an open fire.
As an aside, we got 30 cm of snow yesterday and the outside temp is -8 celcius. Not happy that we went from 14 c with beautiful sunshine a few days ago to freezing cold weather in the span of 24 hours. :-p
Hope the weather chez vous becomes better. You will understand our lifestyle more if I have uploaded all of the pictures, maybe in a future post, stay tuned! Generally our place is pretty rural but we're just 10 minutes away from the big city with wide highways where all the universities, malls, and cinemas are located.


This is the set-up of this bake. Pebbles inside the pot are heated by a wood fire, when hot enough the dough on a banana leaf was placed then baked.
bake. Baking over hot pebbkes in a clay pot is very homey and those paper proofing baskets very nice to. I think this is youe best bread so far! I make origami panettone baking papers out of parchment papers one time. It was a disaster because nothing sticks to parchment paper and when you turned the panetttone upside down to cool they slid out into the floor:-) They sure were great for baking though:-)
Glad you got your homemade bread bake posted!
Well done and happy baking Job!
It's sad to hear about the parchment paper slip. I agree, this is my best bread and my new favorite. Thanks again for this challenge, I/we really enjoyed it!
Pretty cool baking and nice result.
Did you think about steaming them first in a food steamer such as those used for Chinese buns, and then finish them off on the pebbles with the banana leaves? I believe you would get all the seam openings due to steaming as well as the nice colors due to the high heat from pebbles or amber.
I've actually tried steaming first like Chinese buns but it was a yeast bread and seam-side down and scored with a blade. Oven spring and score expansion were poor because of the lower temperature.
Pal , oh how I wish I could taste it - it looks absolutely delicious ! Are those little stitches holding those proofing baskets together ? Amazing !
I always look forward to reading your posts - Merlie
Appreciate your comment! Those "stitches" are just staple wires, I don't want to get into the trouble of stitching a folder.
That is so cool; getting back to the basics like that and proving that anyone can bake bread, anywhere! All you need is some kind of flour, water and a source of heat. :) I am so impressed. and I like that it has local significance, too. I've named one of my breads Colquitz Creek Levain because I live by a stream (small river, really) and the beasties in my starter are very local! Anyway, it looks delicious and the crust and crumb are really lovely. Nice shape too!
When I saw the title of your post I had to look at it - I was thinking along the lines of a yard of ale (a beer in a yard-long glass) and expecting a very long loaf of bread. :)
I'm touched by what you said. I also live near a river, I will include pictures of it soon. That dumpling fold is the main inspiration for the shape, so beautiful!
First time to hear a yard of ale! Learnt something new today.
It is wonderful to live by a river and some natural space, isn't it? Here's a photo of our river:
Sadly our river is not as clean and prosperous as yours but nonetheless makes the surrounding soil very fertile so the banks have a lot of plants. I hope you can wait for my future post. :)
and stunning 2016 Bread Challenge Bread!!!!!!!!!!!! Fantastic result. You are amazing.
I bet it tastes delicious.
Fantastic work.
hester
Thank you for your sweet words!
to do this without a conventional oven, or an oven at all, just plain fascinates me. The crumb looks great although the crust appears to be a tad too dark in spots ;-) . I also like your inventiveness in creating the proofing basket. Bravo!
You are definitely an original around these TFL parts, and we are all a little richer for it.
alan
That's so nice of you! One day, I'll find a way to make baguettes too.
Another amazing bake Pal. love your inventiveness with the triangle shaped basket. I always look forward to reading about your exciting bakes and this one did not disappoint.
Thanks for posting.
Refards.
Ian
Many really liked the origami basket. :) I'm glad you like the bread. Looking forward to your next post too.
Pal, that was a indeed a very interesting bake with a lot of experimenting going on as well. I like this kind of projects. It is really not so important the outcome of fist bake but the idea to do something completely different.
Happy baking Pal!
Joze
Sure, lots of improvements could be made which makes this adventure more exciting.
Happy baking!
Pal:
You've once again outperformed yourself! This is the best crumb you've produced so far! It even looks better than the crumb of some oven-baked breads. Who would have thought if you didn't tell? I'm so proud of you! Keep up the good work!
Happy Baking!
Yippee
My best crumb, I was awakened about high hydration doughs, it is not completely necessary for a great result. Hope you can post soon and you are well. :D
The MacGyver bread mold alone makes this one excellent, and the bread itself sounds very tasty.
Thanks a lot Southbay!
I'm late to comment but had to say something. This bread looks and sounds amazing!! I love the story behind it, the interesting techniques involved - but most of all it looks so tasty. I imagine I would devour a slice if I were lucky enough to have one.
That's so sweet of you! It was really delicious and became my favorite bread. I'm planning to make this again.