
Step by Step Baking with Wood Oven
Aloha Bakers, this is my first process photo shoot. I don't like spending the time to take photos while working but I figured if I was going to get any better I had better try. The purpose of this photoshoot is partly for fun, mostly for critique/advice. Also to let me know If Im doing ok and going in the right direction. Thanks for taking time out of your day to check it out.
First things first. My dough mix. Starting with an autolyse, I only had time for about one hour in this batch. 2300g whole wheat flour 2000g water. (Mini, I tried using the 70% amount of 1535 but dough was starting to turn into a rock. It would have been unworkable, so I did a 100g step up until the dough was decently workable. I ended up adding 500g more than the formula) After autolyse: 51g salt 500g starter at 100% hydration.

After mix

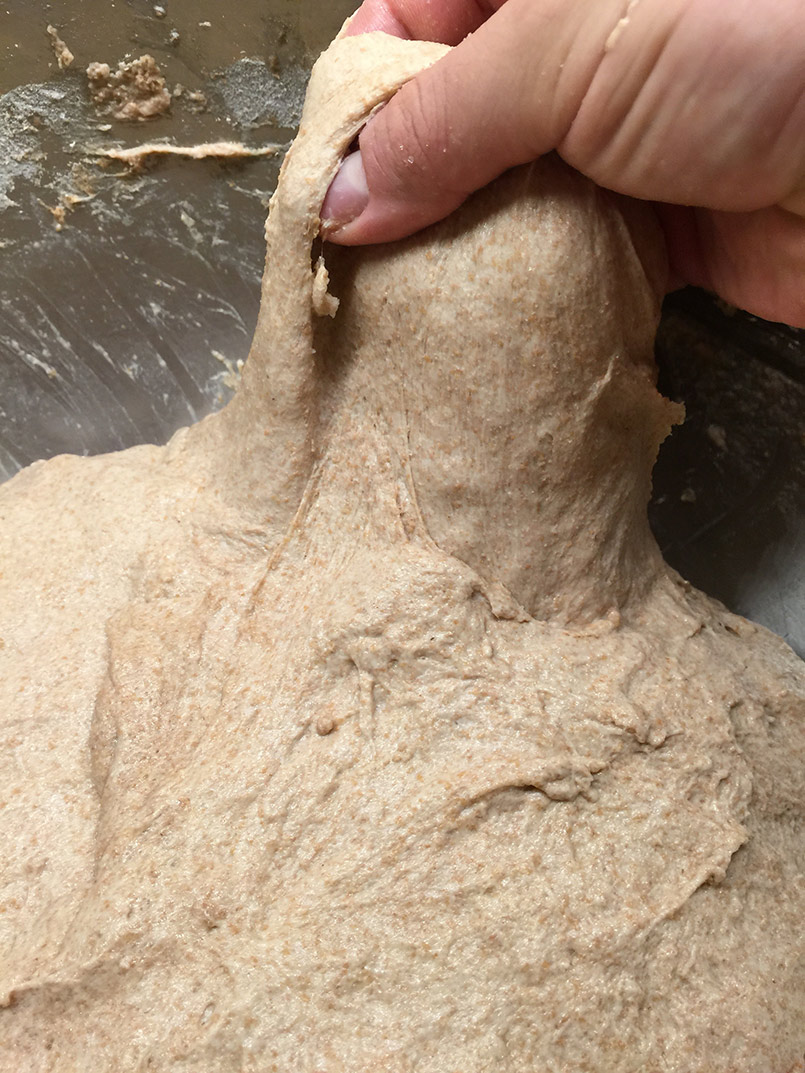
after autolyse, taking shape after a few folds. Added salt and starter.

slight stretch after autolyse and fold to see how its doing
added some flour, some folds and ready for bulk ferment
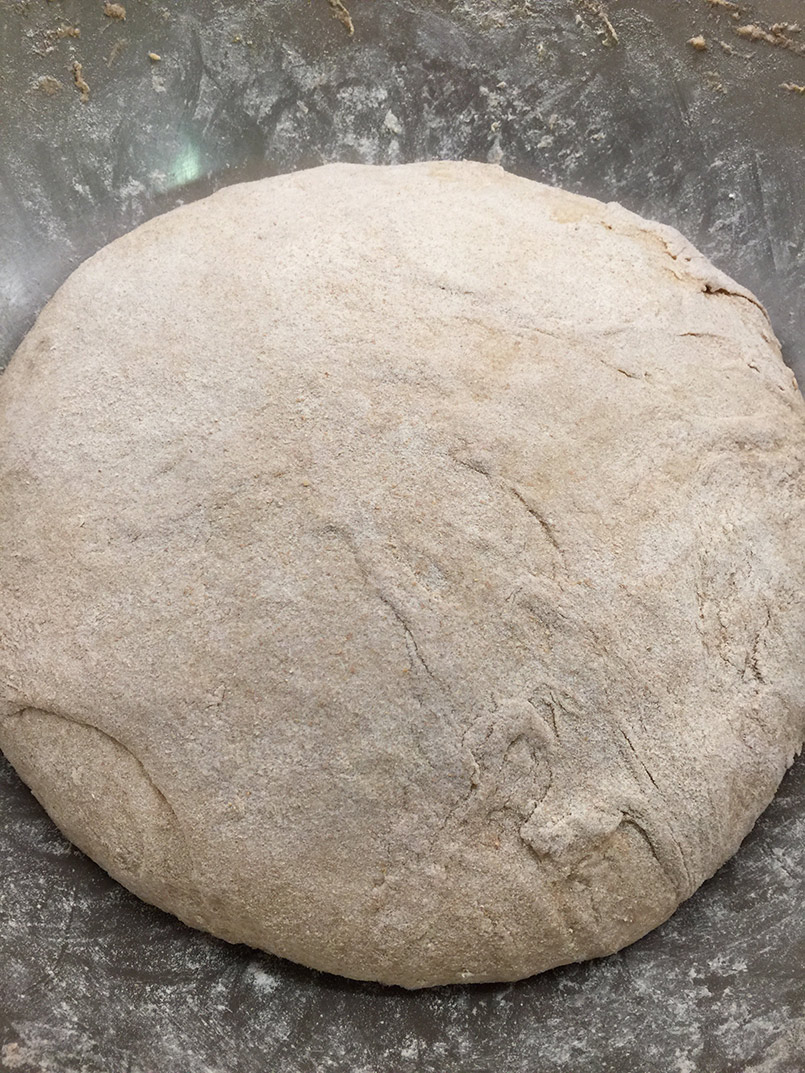
30 min in another fold and some flour

another 30 min and another fold

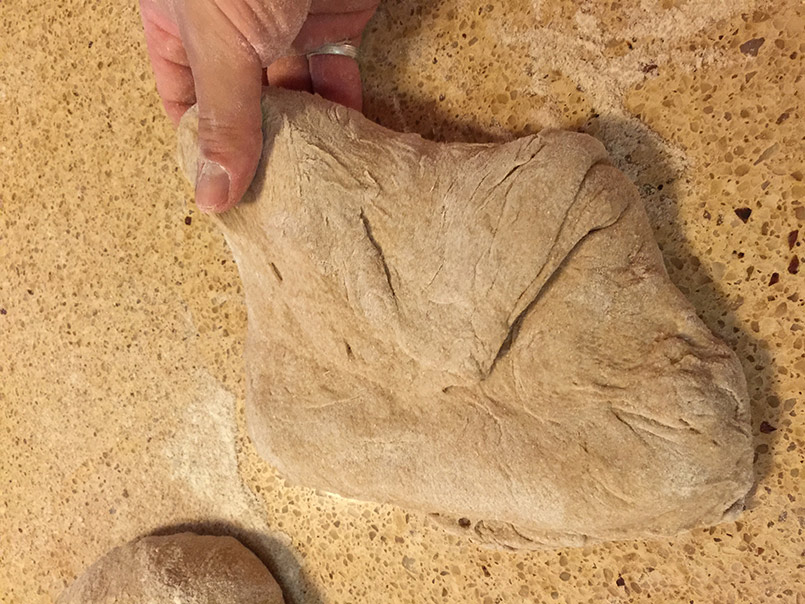
2 hours later and dough is at 77F and deemed ok for shaping. I attempted to slice 800g chunks.

I went with 4 - 850g boules and 1 - 1600g batard

My technique of S and F. Lightly tug...
and fold over, repeat.

bench rest, flipped this seam side up after photo

bench rest, only long enough until im done with all the loaves

Ok now its time to start a fire while the proof happens. Outdoor setup shown here. Plans to build a roof structure are under way, maybe finish by next year. Small cooler has kindling, big outdoor box has 1x1 and 2x2 inch pieces about 2 ft long.

Wood oven is surrounded by streams

small kindling fire in front to slowly heat up stone

small fire surrounded by side logs and wood house begins taking shape

torch basement of house for 30 sec and first fire takes off

move torch side to side, put torch away and begin taking care of fire.

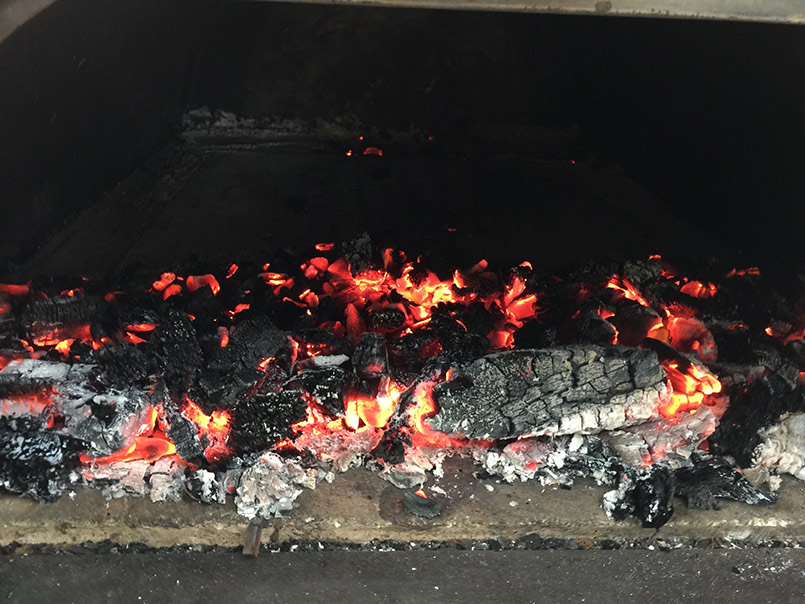
now fire is ready to be pushed back so another fire can be made in front of it. Stone is around 200F at this point, fire in front

both fires work together to evenly heat up the entire stone, which is near 650 at this point

now I take a moment to look up and see bamboo swaying in the wind

fire going good. Stone around 700F

Time to let fire die down abit and let coals take over, I grab coffee and look out at our back yard swimmin' hole; the Wailua River.

nows about the time i check for weak spots on the stone. Is any spot bare? I put some wood on that spot so there are coals evenly throughout.


getting tools ready for the big moment

coals moved near front. If i dont do this the back of the stone will be about 100F hotter.
After 20 min rest stone is around 650 and its time to clean the floor

ok moving fast now. Stone gets cleaned, goes to about 600F front and back. Loaves are scored and placed, sprayed with water and door is closed.

after about ten minutes I release some steam from the door

Another ten minutes and I notice more steam coming out of chimney, so i take a peek and release more steam.

After some time I take everything out and rotate the loaves. Front loaves go in back and back to front. And thats it! About 40 minutes go by and I bring loaves out to cool by the water.

Thanks for watching.


That is awesome!
How big is that oven?
Not big enough :)
measurement is i think 4 ft long and 2 ft wide....dont quote me on that.
So far its wonderful. but i want to build my own someday
Very informative post especially for one interested in wood fired oven baking. You live in a beautiful setting.
WW bread. A 5 # bag of BRM WW should weigh 2270 g and at 2200 g of water you are right at 88% hydration which is about right for 100% WW bread. A couple of tricks and ideas. Your salt is too high and not good for you. @% max is plenty so use 45 g max. You can sprinkle the slat over the autolyse ball so it will partiacially melt over the 1-2 hours. If you hold back say 90 g of water you can pinch the salt in with the water, called double hydration ,after the autolyse and it will be easier to get incorporated - then add the levain to the mix. Try not add any more flour to the mix after the autolyse.
Adding water a bit at a time.like you did, is good way to learn how the dough should feel up to the point of autolyse. Now you need to get some of that beer in the dough liquid:-) It will give you a reason to make more beer and to make a special bread for special occasions
Well done and happy baking in Paradise
all that info. Looking forward to incorporating these techniques.
"try not to add more flour after autolyse"
I cant even imagine working the dough without some flour on the bench. You mean not even bench flour for handling?
lol one day I will make some combo of bread and beer. The abv doesnt mess up fermentation in the dough?
flour at all. Get a good bench scraper for one hand and dip the blade in water and wet the other one...or wet both hands if you don't use a scraper. The more whole grains in the dough, the darker the beer you should use!
I have used 9.7% alcohol beer (Werewolf) with no problems in bread. Porters and stouts work best in 100% whole grain breads.
Happy baking
so much wood. I spend a few hours a week on wood prep. Yesterday was grabbing from the pile and cutting down to size for the next few fires. Here is some cypress getting cross cut and loaded.
Making pizza eats up tons of wood too.
Getting good dense wood is going to be hard in the tropics.
Cypress is not bad, same as Pine more or less. But a good solid walnut, oak, or almond is going to put out a lot more heat for the same volume. About 2 to 1 from what I can see compared to white oak.
I didnt know that about hard woods rgconner. Our master carpenter monk can produce some hard woods for me. We have Camphor, Catalpa, Cypress, Eucalyptus (rainbow, Swamp Mahogany, Blue Gum), Redwood from California, Ironwood, Sandalwood, Silky Oak, Lychee, Norfolk Pine and Mango. All are in abundance, most already milled and stored for drying in large slabs. We have about 50 acres of storage land where many many wood racks are kept for drying horizontally.
Your saying the hardest of those would be best? I will have to try them all I guess, unless you can point me in the right direction out of the list.
Of the woods available, the clear winner is the ironwood. But unless it is truly ugly scrap, I cannot in good conscience suggest burning it! Maybe if you have ugly scraps you could mix it in, but even those can be carved into amazing objects, so... what else can we work with?
I would think the aromatics would be out, Camphor, Sandalwood, etc, the imbedded resins would either leave a lot of creosote like residue or worse ruin the taste of the bread. Of the rest, the mango is the only question mark, I can't find BTU ratings for that wood. Most fruit wood is good, because it is fairly dense and has sugar in the sap.
Almost all of them are in the 15 to 20 Million BTU per cord, where the ironwood is more like 30. Only the eucalyptus is close, but I worry about the resin. Make your own call on this one, as many years as it is been sitting around it might work just fine.
The other option is to make charcoal from the Eucalyptus in particular, but that is a real Pain in the Ass.
PS. My wife approve the WFO, so I am going to build a Pompeii in the back yard in the next year!
Thanks and congrats on the approval!
For the next fire I have some redwood for kindling (burns quick), Blue Gum Eucalyptus and Norfolk Pine to test the main fires with. Will have to try Ironwood. This island is covered in Ironwood
Hi Natyam, great pictorial report you have compiled, i noticed that you still had some fire /coals in the oven when the bread was in the oven. When i use the WFO i always remove all the fire and scuff out the coals and ash, allow the temperature to settle with the door in place and when ready load as quickly as possible and close the door, the oven i use has no chimney so all steam etc stays in the chamber, i have heard of bakers using a roll of dough to seal the door tight, but a good fitting door is pretty good, the door on our oven is a thick wooden hardwood that can be soaked prior to use. With no combustion going on in the oven there is no draw of air, or loss of heat up the chimney.
Your loaves don' t show any sign of fierce heat which can often be a problem in a WFO , I will try to dig up some pics and attach to this thread later. A great reference for wood fired ovens is www.traditionaloven.com Rado an Australian guy sells plans for WFO's and has a wealth of knowledge on the subject, we built one of his ovens at the technical college i used to work at and it works like a dream.could be good if you do intend to build a bigger oven,you get a very informative CD.
Anyway thanks for your very informative pictorial post, the Monastery looks to be a very tranquil spot.
Kind regards Derek
advice you shared earlier made this work out well Derek, many thanks for that and the kind words.
I think im losing too much heat out of our chimney. The heat loss was much less with your help, but i think if i blocked the chinney with something I would have a hotter air temp. The air temp right now seems to be steady at 300F if the floor is from 400 to 600F, which seems a little low for oven spring and cooking of the bread, hence me leaving some of the coals in the back.
On my next firing in 5 days, im going to block the chinney during the end of the fire/beginning of coal rest and see if that helps air temps stay around 400 or maybe 500. Although as you mentioned, the tops of the loaves are happy and brown, and thats at 300F air temps so maybe im over thinking it.
Hi Natyam here is a good link on TFL. David's adventures into using a WFO and some pictures at the end of me at the college with some of the Chefs and their first try of WFO baking.
Note the colour on the loaves the thickness of the ovens insulation and the size of the door opening
http://www.thefreshloaf.com/node/42684/my-third-woodfired-oven-bake-getting-there
another link that will interest you is www.traditionaloven.com
Rado an Australian guy sells plans for his WFO's (cheap) but has lots of advice and tips for both building and how to etc, our oven was built using his cd.
Aloha Derek
Good advice there on wood selection pine etc great to get the show on the road but after that Hardwood is the go and here of course it is mainly eucalyptus. We don't seem to have any problems with good seasoned wood and it essential that we use dry rather than green timber because of the smoke problem, the smell of burning wood is one thing clouds of smoke not acceptable. if you have timber that is a bit iffy you can always stick it in the oven chamber after baking and it will dry it out ready for the next firing.
Perhaps a fruit can over the chimney when the firing is complete might help if the conical cap was removed.
regards Derek
Good idea, I was racking my brain trying to think of what i could use.
Works well on the tractor exhaust stack when its finished working.
If you get a chance to look at the traditional oven link i gave you get your carpenter to have a look at the project to build one, i got the carpentry / building lecturer at the college to have a look at the plans and they took it on as a project for students that were coming in one day a week from high schools under the try a trade program and they built the oven which now the Hospitality students get to use, (and so do I)
You will have greater capacity and much more thermal mass with this style of oven.
regards Derek
sounds great. I looked at the links you sent and bookmarked them for reference, very detailed. That oven you have at the school is fantastic, I remember seeing that post when I first found out we were getting the oven, read all 3 stories.
lol on our tractors we have metal baskets to keep the birds from nesting. Tin cans sound better though!