
Alfanso’s Fighting Gravity - PiPs 100% WW batard

A recent comment by fotomat1 led me to the link for PiPs Fighting Gravity blog entry. I hadn’t seen it before as I had not yet known of TFL until a number months later. I was enchanted not simply due to the photographic skill of the pictures, but specifically the photogenic images of his batards. They struck me as being as beautiful a set of batards as I have ever seen. So...it was time to give it a go.
Phil’s formula calls for 100% “fresh milled organic” WW flour at 4 x 1000g batards. I reworked the numbers to produce 3 x 500g batards. Starting with converting my all-purpose stiff levain scrapings (which are left over in the container I generally use for levain builds), I did a single stage build – per instructions to give me the 130g of levain that I needed for my 1500g mix. The Total Dough hydration is 88%.
Notes:
- First time at anywhere near 88% hydration for me.
- Never worked with a hydration above 83% before – and that is my ciabatta hydration.
- Never worked with anything more than 40% non-AP flour before.
- I use Pillsbury WW flour, I wouldn’t know how to mill grain, nor do I really ever look for “organic” on the flour label.
- The WW was thirsty enough that working with this hydration was not an issue. Shaping was a surprisingly simple task.
- 1 hour of fermenting at room temp with 1 set of letter folds, per intructions. Followed by a 1 hour cold retard. Then divided, shaped, couched and back into the refrigerator for 18 hours.
- Scored and baked directly from refrigerator.
- Steam 12 minutes, post steam 20 minutes, 2 minutes oven venting. Total time in oven: 34 minutes.
I couldn’t be more pleased!
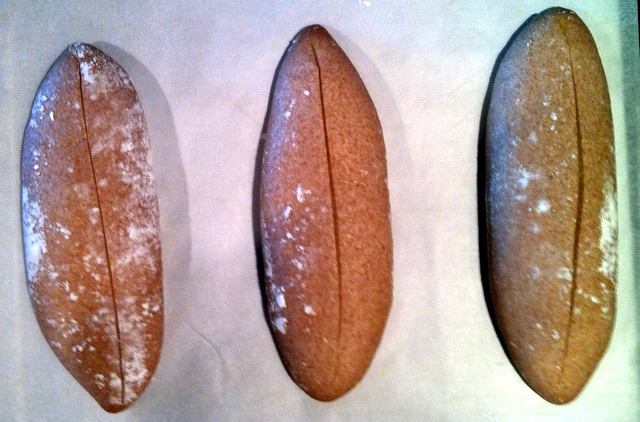
Left: Ready to come off the couche. Right: on oven peel and scored.

Steam just released and batards rotated.

Out of the oven.


Update: I was having bad dreams over the oddball moose bites missing from the crumb, so this morning I cut a few more slices past the offending tunnel. It was breakfast time and I wanted my toast, ya know. So things are looking a lot more normal further inland on the same batard, and somewhat more in line with what PiPs displays on his blog entry. Here is what I discovered after that spelunking expedition.

From PiPs entry:

And outside of photography skills, and color saturation from my phone camera (Grrr), they are at least in the same ballpark now.
alan


Comments
Alan...very nice job. I had such dismal results with the 100% home ground wheat I ended up adding 23% bread flour reducing the hydration and like you baking it straight from the fridge. Results were far better than my first 2 tries with the final resulting crumb being very dense similar to my Jewish Rye....taste was very good. Interested to see the crumb on your loaves and thank for sharing your experience, method and success. Congratulation and keep it up!!
Still too soon to cut into them. But I also just baked my first Jewish Rye earlier this week. Boy, did I learn a lot about rye flour, although also handling that dough was not as challenging as I was anticipating.
As far as home grinding wheat goes, I have about as much knowledge and skill at home grinding anything as I do changing the water pump in my car ;-) Well, I can certainly handle a pepper mill!
Excepting the changes that I laid out, I stuck to PiPs plan. First set of French Folds ~150, post second hydration FFs ~400-450. Way more than my standard 300 total before this.
Thank you for posting so that I was made aware of his marvelous handiwork. Phil is a truly skilled craftsman.
alan
I like the outside of yours even better than Phil's - the blisters are great. Now if the inside is like Phil's you have a near perfect 100% WW. Well done indeed
Happy bakng Alan
Thanks, but as I had mentioned earlier to a poster who had my name on a list of 2 alongside David Snyder, He is a Master Po, I am merely Grasshopper.
The crumb shot has me scratching my head. Two of the three slices look fine, but that crumb on the right makes me think that something went wrong. I had done a fairly tight shaping, so I don't think that was the issue. Must have been a gargantuan tribe of yeasts all gathered to belch it's last collective breath together! Yeah. That's it.
even when you salt and pepper them, they don't have much taste. I have no idea why the third batard has such weird holes? The weebeasties could not be contained!
Happy baking
Salt, pepper and butter don't help much for moose holes, but did you ever try to make croutons out of those holes? A dieter's delight!
I need to try PiP's formula. The only grain mill I have is a KitchenAid mixer attachment. It never gets flour as fine as I want. Maybe I will mix some home milled wheat with some organic WW flour from WFM.
Added Note: In the discussion following Phil's OP, it was revealed that he used White hard winter wheat.
I hope you caught the mouse that gnawed that huge hole in the right-hand loaf!
David
I think that you meant moose! Ha, I thought that I saw some large cloven hoof prints in the kitchen this morning.
Actually, the three are all from the same batard. I would never have the cruelty in my heart to carve open a few batards just for the sake of a photo. As I mentioned, these were shaped rather tightly. But having never breached ~40% whole grain before, everything is once more a new experience for me.
Boy, oh boy.. An awful lot of new experiences for me going on around these baking parts these days.
that batard can be classifies as a piece of art! Possibly a crumby one:-) Nothing like new bread experiences and why i think Lucy comes up with a new recipe every week - just to do something new. Keep after those new bread things - it works!
now looking more like I know what I'm doing. Can fool them, huh?
they're some very nice looking loaves.
I can make a wonderful, soft 100%WW sandwichloaf but looking at your past posts you are far above me, skill-wise. Even so, I do have a few thoughts, humbly offered, regarding your technique and formula as above.
First of all, except in the taste/color department, it doesn't matter if you use white or red whole wheat flour. Esp. if you are not milling it. Both will behave similarly as to handling, moisture absorption, etc. By all means use white if you want to avoid the tannin taste from the red. Freshly milled red wheat has little bitterness and usually only sweet grassiness. Careful-once you start down that path-it is totally addicting.
No matter what brand WW flour is used, I have found that I have to work a little harder to develop the starchy gel in order to get a great crumb. The gluten will develop on its own when moisture is added but the starch needs a little help. I believe that doing only the 1 stretch and fold may work fine for an easily elicited starchy flour like AP or bread flour but when you go to 100% WW, it needs more coaxing. I use a mixer and go for windowpane with the initial mixing-even with 100% WW. Holding the salt makes reaching windowpane easier but don't forget to add the salt !
I often mix my dough in the evening and put it in a plastic container overnight for baking in the morning. It usually is almost completely risen by morning but if necessary can finish bulk fermenting on the counter. This is when I would S&F to help distribute the bubbles. As for hydration- I always make sure the dough is slightly sticky when it goes into the refrigerator because all those branny bits need time to absorb the water. By the morning, it is then just tacky to touch and everything is well hydrated.
So I do a final shape AFTER the long cold retard. You shape BEFORE the retard. I think that order of events also had influence in forming those moose holes.
So my observations-possibly a little more hydration, elicit more starchy gel (either more S&F or mix to windowpane), shape or re-shape after the retard.
Have fun!
We are all in this together, helping everyone to hopefully get better.
Background is that I only made this one because PiPs' photos are exquisite, and hadn't yet made a high percentage whole grain bread before. I was still feeling my way through some early learning curves. A few things have changed since then. In fact looking at the batards now I'm surprised at how well shaped they are. I kind of remember that they were quite pliable and easy to work with.
However, I find that anything with too much WW tends to be a bit too "barnyard" for me and my wife.
My M.O. is to finish bulk fermentation, place the dough into the refrigerator for x number of hours, how long is irrelevant as long as it is at least a few hours. Then I'll shape, onto a couche and place back into the refrigerator again for another few hours before baking.
My guess is that I didn't give enough emphasis to degassing the loaves and getting a tighter shape. Thanks for the explanation of the tastes between differing WWs. Looking over the formula sheet for this bread, I see that I do indeed have only 1 Letter Fold, and I "always" do between 2-4. So that's a good observation.
Thanks for your comments and suggestions.
alan