
The Happy Baker The Sourdough dilema
As some of you may know I've had serious problems trying to get my Sourdough bread to rise, after posting my problem in the forum many of you guys took the time to give me some advice, for which I'm truly thankful. So for those who hadn't read my question before, here it is, and apologies for repeating myself to those who have.
I am very new to bread baking only taking it up a couple of years ago, and like many I guess eventually found my way to the mysteries of Sourdough bread. Although I grow a very healthy starter I am at a loss as to when I can use the starter after its last feed. I keep my starter refrigerated through the week, then bring it out to let it get back to room temperature before feeding with more flour and water, proportionately 120grms flour to 120ml water. I always use Organic unbleached white flour and only ever bottled water.
Within a few hours my starter has doubled in size and looks and smells very nice. but.....when can I start to make a new bread? while the starter is on the rise, at its peak, or when its dropping off? whatever I try, my dough always rises well in the 1st and 2nd proving but when I turn it out of my bannetton onto my warm baking stone, the dough just goes flat and looses all the air. the baked bread tastes pretty good but it never looks right.
I thought the problem may lay with when to feed and when to use, was I waiting too long after feed my starter or was I too impatient and making my dough before the starter had time to get going? many many many attempts later and with only some small success more by luck than judgement I occasionally produced a decent loaf.
So I was surprised to see the majority of replies I received all pointed to the same single thing - over proving! All the books I have go on and on about the necessity of a long slow prove which will give me a wonderful bread?
Now I am confident with each loaf I bake that my rise will remain and not drop like a pancake. so In pictures here is my result, I admit its not breathtaking or even modestly wonderful, but to me it is a massive success which will now allow me to improve and create better breads.
 My starter after being fed some 10 hours before it is at the very top of its rise.
Mixing the Flour, Starter, Salt, and water initially in my mixer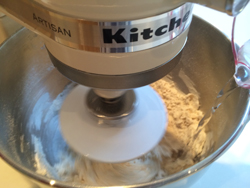
After 5 minutes the Dough comes together
I then continue to kneed by hand for another 15 Minutes
Then place in a bowl to prove 
And after 5 Hours I have this...
After gently folding I place in my banneton 
and this is where I have changed my Proving time I only leave for 2 hours for the 2nd proving
Now its into the oven at 200 for 30 minutes
and here is the result........
my only mistake (that I know of) was not to slash the top so when I sliced the bread..
 Still I'm Very Happy. Thanks again everyone


Comments
From what you have described above I do not think the issue is with your starter.
That being said -
Just a quick glance at the photos what jumped out at me right away was the photo of your dough in the proofing basket. It doesn't look like you shaped your dough at all which would account for the final outcome.
When shaping I generally gently deflate the dough and then shape into a boule or batard as demonstrated in many videos (The King Arthur web site has great shaping videos you can watch.). Shaping includes making sure that the dough has a nice firm gluten sheath on the outer side of the dough which helps trap the gas during proofing and will give your loaf the final nice shape. It also distributes the gas within the dough so hopefully no large air pockets but rather a more even and open crumb.
Good Luck :)
Janet
Hello , congratulations on developing your skills and confidence, your loaf looks delicious.
My first thought when looking through your photos (such a good idea to add photos in order to get assistance here on TFL) echoed Janet in regard shaping technique.
David Snyder has contributed two very useful tutorials to TFL which you may find helpful, his shaping tutorial and his scoring tutorial. In particular the toothpicks in the shaping tutorial provide a very useful illustration of what we seek to achieve.
Somewhere I have seen 'troubleshooting' material which explains what can be done to correct a loaf which rises up from the baking stone...... but as I don't have that issue, that detail hasn't been stored in my head. I'll bet Mini O will know......
Isn't it great that, other than bricks, even our less than perfect results can still be eaten with pleasure. So glad you are a happy baker.
Cheers, Robyn
and the dough is rising in the banneton, See what you can do about getting the stone lower in the oven closer to the heat source. The bottom of the loaf is very pale in comparison to the top of the loaf. The bottom crumb of the loaf doesn't look completely baked.
This could be caused by a cold stone, instead of radiating heat, it's still absorbing the oven heat and thus robbing heat from the bread. Stones take time to heat up so I suggest preheating the oven a good 45 minutes or longer at a higher temperature. Try 230°C for the preheat and turn down the oven soon after loading or after the first 10 to 15 minutes. That ought to help the loaf get a good dose of heat under it for some great colour to match the top of the loaf.
Mini :)