
The amazing baguette
Updated: 3/31/2011
Aki san no Baguette
I want to introduce one of amazing Japanese home bakers Aki who makes great baguettes that I have been trying get the crumb like hers. I really thank Aki who let me post her great baguettes here. Here is her blog and baguette's formulas. And, Please leave a comment for her if you think that her baguettes are great. She will be happy to hear it from you, guys. :)
http://blog.goo.ne.jp/rinrinmaman01/e/359d5570d2dd2fb57929b74e58ed3153
Aki's strawberry yeast baguette:
Ingredients: (straight method) Lenth about 40cm
- Flour 100% -( About125-150g for 1 baguette)( she uses flour for French bread like Lys Dor, Maison Kayser Traditional and so on. )
- Water + Strawberry yeast water (10%)= 70-75%
- Salt less 2%
Method: 1. Mixing the ingredients. DDT: About 23℃ ( I mix the ingredients except the salt and take autolyze for 30 minutes then I add the salt in it. I am not sure how she does)
2.Bulk fermentation: Punch down every 20 minutes for 2 times at 23℃
3. Rest for 4 hours at 23℃
4. Transfer the dough at 15℃ , and rest for 16-18 hours. * She put the dough in a refrigerator to keep the dough temperature down. If she keeps the dough at 15℃, the dough will be ready in 12 hours.
5. Divide
6. Bench time ( It is vary depends on the room temperature and the wild yeast's strenth that you use)
7. Proof at 23℃ ( It is also vary depends on the room temperature and the wild yeast's strenth that you use.)
8 Bake at 230℃ for about 20 minutes ( She uses steam)
* She also uses instant dry yeast ( She has used SAF blue instant yeast ): About 0.04% instant yeast as to 100% flour
* She degas the dough very well before shaping
---------------------
I have tried her baguettes about 10 times so far. Although I am not successful yet. I hope that I am able to get close to her baguettes soon.
This is the one that is my best one so far. I made 2 baguttes.
KA Ap 180g / Rasin yeast water 36g/ Water 100g ( 16℃)/ Salt 3g


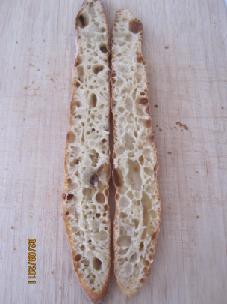
I bent the dough when I transfered it into the oven. You can see the black spots in the crumb because I used alcoholic raisin from the raisin yeast water. Aki doesn't use them. I just punched it down once before I put the dough in the place at 14℃。 And I divided it in two after 24 hours ( yes, it took for a long time until the dough was doubled that was actually tripled! I realized it after I found Juergen's exprement http://tfl.thefreshloaf.com/node/22228/test-tube-baking-2-bulk-fermentation-doubling-size Thank you, Juergen) Then I did a letter fold then took a bench time for 30 minutes, and I hit the dough onto the work bench twice and I did fold 1/3 from the bottome line, then I pinched the top and bottom sides and closed the seam very well, and I took 30 minutes for proof. Preheat 470F for 1 hour, using Syvia's steaming method and bake it at 470F for 7 minutes with the steam, and take the steaming towels and pan after that, decreased down to 450F and bake more 3 more minutes, then I took the baking sheets out of the baguettes then baked 10 more minutes at 450F. Shut off the oven then left them in the oven for 5 more minutes.
-----------------
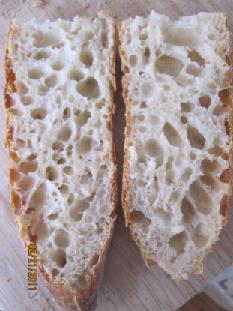
Next : This hydration is75.8%
KA AP 120g / Raisin yeast water (20%)+ water = 91g / Salt 2g
I waited the dough until doubled. It came out denser than the above. I degased fliping the dough twice.


----------------------------------------------------------------------------------------------------------
In the same time, I have made my baguettes (http://www.thefreshloaf.com/node/19118 ) for updating. I updated it in Japanese version here: http://cookpad.com/recipe/1168515
2 baguettes:
Poolish
KA AP 125g / Water DDT 20℃ 93g / Active dry yeast 1~2g
Final dough
KA Ap 125g / Water DDT 23℃ 93g / Active dry yeast 1~2g
Salt 3.8g
Method:
1. Poolish ( Let it ferment until doubled) I preferment the yeast and the water for 15 -20 minutes before mixing all the ingredients.
2. Adding the yeast and water into the poolish-- Rest for 20 minutes --- Add the flour and salt
3. Knead for a few minutes --2 times Strech and fold every 20-30 minutes
4. Bulk fermentation at 25℃。
5. Continue to rest until 1.5 times in bulk at 25℃
6.Move the dough in the place at 14℃and rest until 2-2.5 times volume
7. Divide in two: 1) A letter fold or 2) Degas: hitting the dough on the work surface 2.3 times and make a rectangle shape.
8. Bench time 30 minutes at about 23℃.
9. Shape : 1)Degas like the above (2)-- 1/3 fold from the bottom.- Pinch the both side and close the seam very well. or
2) 1/3 fold from the bottom, if you can fold it again toward to the middle.--- Pinch the both side and close the seam very well.
10. Proof 25 - 30 minutes at 23℃
11.Bake : Preheat 470F for 1 hour : Bake at 470F with steam ( Sylvia's steaming method) for 7 minutes --- Take the steaming out-- decrease down to 450F and bake 3 more minutes - Take the parchment paper out --- bake more 10 minutes --- Shut off the oven and leave it in the oven for 5 minutes.


I am testing about degassing a lot or not :
These are that I didn't degas a lot, just little. Left: (2) version Right(1) version I took 30 minutes for proof. The taste was awesome.
---------------------------------
Today: I did degas a lot


But I took almost 1 hour for proof.. Left:Shorter one - (1) version / Right: Longer one - (2) version. These reminds me of Juergen's experiment: http://www.thefreshloaf.com/node/22065/test-tube-baking-1-continued-white-french-bread-overproof Yes, they are over proofed.. I also thank Eric who examine an excellent job on Juergen's post. They didn't taste good because of the over proofed. The bad thing was that I had to drag when I scored because the dough was really soft.
Now, I am going to test that the one is little degas and the other is degas a lot..
ーーーーーーーーーーーーーーーー
2/20/2011 I couldn't bake my 2 baguettes to compare the test above. But I baked Aki's baguette in the morning.
Here is the result:
Aki san no baguette 2/20/2011
Ingredients:
KA AP 120g
Raisin yeast water 18g ( 20%)
Water 71g( 16℃)
Salt 2g
2/18 6:30 am - Mix all the ingredients except the salt.-- Autolyze --
7:05 am- Added the salt--- mixing for 10 seconds by FP
8:00 am-- S&F ( 23℃) -- I forgot to do it in 30 minutes---
8:30 am -- S&F ( 23℃)
Rest---- 23℃
1:00pm -- Moved the dough in the basement at 14℃.
2/20 6:00am 3 folds ( a letter fold) -- bench time (The dough rose 2.5 times in bulk. )
7:05 am Shape Degas a lot ( Flipped over the dough twice and slapped the dough many times) and fold 1/3 from the bottom and pinch the both sides then close the seam very well.-- proof---
7:50 Bake
---------------------------------
Now I am thinking:
1. dough temp should be warmer before shaping to get the airy crumb or wait until the dough tripled.
2. Degas a lot or less
3. How to score it straightly without dragging. -------------- I used to put some shortening on the lame before scoring. I better try it again to see how it works.


-------------------------------------------------
Degas test:
After I wrote that I didn't bake the other my baguettes to compare the test of degassing, I changed my mind, then I started to bake them to test. Here is the result:
Poolish:
KAAP 125 g
Water (16℃) 100g ( I recommend to use less water around 94g water ) Now, I am testing to use 68% hydartion 3/2/2011 Because I want firm strong gluten in the dough as same as Aki's baguette. 68% hydaration is the same firmness as 74-75% high hydration baguettes with natural yeast in my opinion.
Active dry yeast 1/32 tsp ( I took 19 hours to ferment)
------------------------------------------
Final dough:
KAAP 70g / Pillsbury ( all flour ran out except this) 55g
Water (16℃) 100g ( I recommend to use less water around 94g maximum)
Active dry yeast 0.1g
Salt 3.8g
----------------------------
1. 2/19 Punch down every 30 minutes.
2. Rest : 1+2 =3 hours in total..( It was too short) at 23℃
3. Rest at 14-15℃
4. 2/22 Divide ( The actual dough weight was 408g I divided it 204g each. The dough rose doubled.
5. Bench 30 minutes 6. Shape and Proof for 30 minutes at 22℃
----------------------------------------------------------------


Left: Degas a lot : Flipping over twice and slapped the dough a lot.
Right Gentle degas : Just little pat to make a rectangle to shape.
---------------------------------------------------------------------------------
Today 2/21/2011


Left : Version 1 (started from a letter fold) with gentle degas
Right Version 2 (Started to make a rectangle shape to flatten) with gentle degas. * My lame was without the chop stick. I was holding it by my left hand. I didn't put shortening on it.
The actual weight was 425g I divided it 212.5g each. Yesterday, it was lighter because I used the other flour or today's dough took 2 days to ferment ?? I don't know...

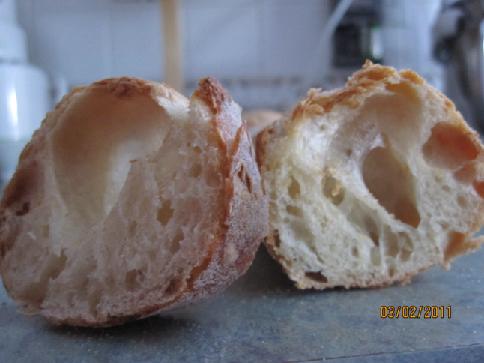
These are on the left one. I cut it when it was still hot. My husband and my dogs were eating it when I saw them.
So, I cut the other one when it was still warm. My son and daguther wanted to eat, too.
Hmmmmm.... I will practice more...
Thank you for reading, everybody!
ーーーーーーーーーーーーーーーーーーーーーーーーーー
Updating 3/1/2011
I got a book that AKi learned how to make the amazing baguettes from yesterday. I can't tell everything of the method unfortunetely.
Here is the book.
As Eric mentioned, You can degas firmly that is the key. Flatten the dough - 3 folds -bench 30 minutes- shape - proof 30 minutes or so.- bake
Luckly, You are able to see how to shape the dough on the sample of the book!!
Completely flatten the dough!
I used
260g KAAP
52g Raisin yeast water ( from refrigerator)
143g Water 16℃
4g Salt ( 1.5-1.8% as to 100% four... As you like)
Mix except salt -- Autolize 30 mintues--- Fold interval 30 minutes x 2 times---- 5 hours buk fermentation at 75F until the dough rose 1.5times
-------Move the dough in a colder place around 13-14℃ for over night (12 hours)--- divide-- preshape--bench 30 minutes -- shape -- proof 30 minutes-- bake

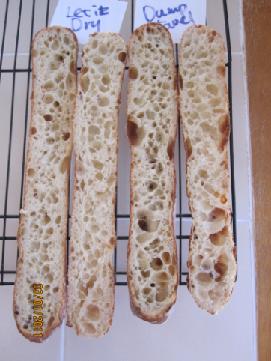 on the left crumb : I prooved at 21℃ without any dump towels. Right crumb: At 21℃ with dump towels
 I prooved at 26℃ with dump towels. I still test about this. But I think "With dump towel" make thin and crispy crust?


It have more big holes when I proof it at colder place? I don't know.. I just keep testing..
About taste: That is absolutely amazing.
----------------------------------------------------------------------------------------------------
Updated 3/2/2011
I made 68% hydration of my poolish baguette today.
Poolish
- KA AP 70g
- Water 48g ( 16℃)
- Active dry yeast 0.07g
Final dough
- KA AP 70g
- Water 48g ( 16℃)
- Active dry yeast 0.07g
- Salt ( I always use kosher sea salt) 2.3g ( I used 1.6% salt as to 100 % flour this time)
Method:
1. Mix the poolish ingredients ( DDT was 65F /18.3℃) Fermented at 76F/24.4℃ for about 15 hours.
2. Mix all the ingredients. After mixing ( folding?) for a few minutes with a dough cutter, The dough temperature (DT )was 65F/ 18.3℃
3. After 20 minutes: 1st S & F ( folding several times with a dough cutter) DT was 68F/20℃ The room temperature was 76F/24.4℃- I used a light to warm it up
4. After 20 minutes : 2nd S&F ( folding several times with a dough cutter) DT was 65F/18.3℃ The room temperature was 76F/24.4℃ ( I don't know why the DT went down.)
5.Bulk fermentation: 2.5 hours at 78.8F/26℃ until doubled ( If you want light and softer crumb, you better let it rise at 82F/28℃, the time will be shorten) DT was 70F/21℃ when it is doubled.
6.Put the dough in a refrigerator ( the temperature was 6℃)for 5 hours. DT was 48F/8.8℃ when I took it out of the refrigerator.
7.Preshape: Degassed and made a letter fold. I waited until the dough temp got to 50F/10℃ just a couple minutes or so.( I have been successful when the dough temperature was 50F/10℃)
8.Shape folding 1/3 fold from the top side, lift the other side to cover that I already feld. Pinched very well. DT was 65F/18.3℃ when I was about to shape.
9.Proof : 30 minutes at 70F/21℃. I put the dough in a gabage bag to avoid to get dry.
10.Bake : Preheat 470F/243.3℃ for 1 hour ( I can't use maximum temperature. If you can, you better use maximum temperature for better result)
Bake 7 minutes with steam (I used Sylvia's steaming method) at 470F/243.3℃-----> Take the steaming tool out and decreased down to 450F/232.2℃, bake 3 more minutes--
------------->Take the parchment paper and bake 10 more minutes-------> Shut off the oven left it in the oven for 3 minutes.


I am so glad that I had a lot of holes in the crumb, however, I am not a big fan of thick crust and too chewy texture. I should have let it rise at higher temperature until 1.5 times in bulk, then let it rest at 50-57.2F/10-14℃ for overnight, Or I better use more water in the dough around 70-74% hydration. I like the taste but it was sweet less than I usually get. Now, I realize that I don't want to let the dough rest below 50F/10℃ anymore。I tested it before...
3/3/2011 Next day: The crust and crumb are much better. The top's crumb is better texture than the bottom. The bottom's crumb was little wetter when I chewed it. I will make 68% hydration again, next time I will frement the dough at 28-30℃ around and let it rest at 10℃ for overnight or less.
-----------------------------------------------------
3/13/2011
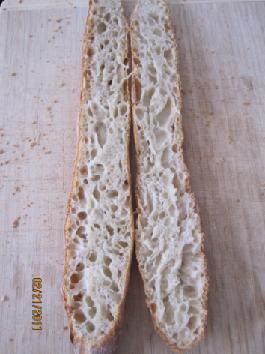
I changed a little bit of Aki's method, but I finally could manage 10% raisin yeast baguette.
Ingredients:
KA AP 130g
Rasin yeast water 14g
Water 76g ( DDT 69F /20.5℃)
Salt 2.1g
-------------------------------------
Method: ( I always set up at 6pm around so I can bake at 6am next morning)
1.  I mixed all the ingredients except the salt for a minute, then add the salt, mix it again for a few minutes with my hands (Dough temperature(DT) 69F)
2.  S&F x2 every 30 minutes ( I did in the air with my hands) ( DT was 70F both after the S&F)--Rest at roomtemperature was 26-28℃ /78.8F-82F for 4.5 hours until the dough is little flat and the surface is slightly bumpy.
3.I moved the dough at room temperature around 18-19℃ for about 8 hours
4.
 The dough in the morning: I saw a lot of bubbles on the bottom. ( DT62.5F/16.9℃)
5. I put the dough on the floured wood board very gently. The bottom is face now.
 Strech the dough X way to make a rectangle around 35cm x11cm is better ( I streched too much this time I did 41cmx11cm)
6.
 Using a ruler, make a fold like the picture. Pat the dough gently and
 Put tightly squeezed dump kitchen towels on the dough and take a bench time for 15-20 minutes ( I took 15 minutes )
7. After the bench time,
8. Using your finger tips, pat the dough gently... ( I feel like that I can shape the air in the crumb at this time)
9. Puch the edge little harder and
  Pat the rest of the dough with your finger tips again. ( If I didn't do this process, the crumb was tight... I think that both sides dough need some space to have airy crumb when you roll. )
10. Brush off the excess flour and roll and pinch the seam very well.
 ( This picture is a different one. I just want show you how I pinch the dough)
11. Proof : I pust a tightly squeezed dump kitchen towels on the linen, then I put it on the top of the refregerator for 35-40 minutes at 70-71F /21-21.7℃
12 Prepare the steaming towels ( Sylvia's steaming method), Scroing, then bake.


 I practice to score baguettes a lot using playdough playing with my daughter because I am not good at it. I used to drag so much.. A couple of my Cookpad friends gave me g reat advices. I am still afraid of it....
1. Score the right angle on wet dough.. ( 80-90 degrees)
2. Slice the dough the same speed and depth ( This is difficult for me... because my scoring is always deeper in the middle, then the top and end is shallow.. I RE-score the top and end lines from the other direction where I score first.)

This is my way.. You can make up other ideas to score the same depth each lines.
I recommend you to use bamboo skewers to detamine the length ( probably 10-11.5cm?)and make a mark with a tooth pick or so. --This is from the book.
How do you slice when you score the dough?
 I found out that I can score very straight when I use No.1 way. My cookpad friend suggested me the way. That is very helpful.. I don't think that my way fit everybody but, It may help some TFL members.
---------------------------------------------------------------------------------------------------
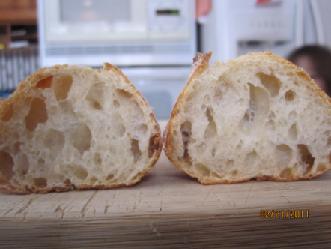
3/28/2011
Here is the best crumb that I got on 27th.
Ingredients:
Raisin yeast water 14g
Water 14℃ 74g
KAAP 130g
Salt 2.1g
-------------------------
Method:
4:40pm: Mix all the ingredients except the salt--- Autolize for 10 minutes--- add the salt -- mixing by hand for 2 minutes.
4:55pm Bulk fermentation DDT 70F Room temperature 79F
5:40pm S & F in the air Room temperature 79F
6:00pm- S&F in the air Room temperature 79F
8:00pm Transfer the dough at the colder place ( 62.6F)-- Overnight
Next day
7:30am Transfer the dough in the basement ( 50F) until 3:20 PM
3:20pm Preshape ( Strech to make a rectangle shape, hold 2/3 )
Bench time 20 minutes
3:40pm Shape ( Roll it and close and pinch )
Proof
4:00PM Bake


Recently, I score the line differently. I used to slice very straight, now I make a curve to score like Tartine book's baguette. ( A crescent shape)
Best wishes,
Akiko


Comments
Akiko, I am not a home baker... I bake everyday , my family has had a bakery for 35 years, and I came across this video a few months ago, and I am obsessed with getting it right, but I will tell you this, that even though I bake everyday because it is my career your baguettes are beautiful, and the way I came across your baguettes was that I looked at every baguette image that was on the internet, and yours were the nicest that I have seen.... I m currently experimenting with different things, and I will keep you posted.... One more thing, I think you are correct; getting big holes in the bread has alot to do with a long cold fermentation, I have tried a long room temp. fermentation, and although the baguettes were great they are not as open as what is on the video another experiment I did was with a 24 hour autolyse, these baguettes also were great, and the crumb was very open, but not as open as the ones on the video... I will keep trying and posting Happy baking yourself. Rob
Hi Rob,
Thank you for telling me about your great carrer! I admire you and your family, which makes me think of your background has been with a lot of breads!
I believe that a long cold fermentation is the key to make airy breads. However, I noticed the video's baguette seems to me really soft crust, which made me think how long they fermente the dough, and what the dough temeperature they keep until they score...
I don't know how to get the perfect crumb like the video you linked ... I will be really glad to read your post someday when you are succuessful. I will also keep update my baguette, too.
In the same time, I have tried to get perfect crumb for croissant. I also use a long cold fermentation method for it, too. I just don't know how to get such big holes in the center's crumb..
All the best,
Akiko
The link you have at the top of the page http://blog.goo.ne.jp/rinrinmaman01/e/359d5570d2dd2fb57929b74e58ed3153 those baguettes are exact, they are great I am wondering what process was used to make those they are better than anything I have ever made... let me ask you, after you take the dough out of the fridge, or remove it from the cold place where it sat for several hours I am sure it is cold,,, do you divide it immediately, or let it warm up ???? The next question is that,,, before your move the dough to the colder place to sit for many hours, [10 to 15] has the dough doubled in size before you put it there.... PS are those your baguettes pictured in the link???? they look better then the ones that are on the video LOOK forward to hearing from you... Rob
Hi Rob,
Yes, Her baguette is alway amazing. I tried to get her crumb and the outlook everytime I make baguettes.. but it doesn't come out like hers. She is Aki who is a Japanese home baker. I posted her formula and method above, but I can't get the good shape with 10% yeast water...
---Her formula and method----
Aki's strawberry yeast baguette:
Ingredients: (straight method) Lenth about 40cm
Method: 1. Mixing the ingredients. DDT: About 23℃ ( I mix the ingredients except the salt and take autolyze for 30 minutes then I add the salt in it. I am not sure how she does)
2.Bulk fermentation: Punch down every 20 minutes for 2 times at 23℃
3. Rest for 4 hours at 23℃
4. Transfer the dough at 15℃ , and rest for 16-18 hours. * She put the dough in a refrigerator to keep the dough temperature down. If she keeps the dough at 15℃, the dough will be ready in 12 hours.
5. Divide
6. Bench time ( It is vary depends on the room temperature and the wild yeast's strenth that you use)
7. Proof at 23℃ ( It is also vary depends on the room temperature and the wild yeast's strenth that you use.)
8 Bake at 230℃ for about 20 minutes ( She uses steam)
* She also uses instant dry yeast ( She has used SAF blue instant yeast ): About 0.04% instant yeast as to 100% flour
* She degas the dough very well before shaping
----------------------------------------
I assume that she make a baguette one at time, so that she doesn't divide the dough at all. Even though I put " Divide" in the method above.. because I use to think that she divide the dough at the time when I posted this.
When the dough is too cold, she wait until the dough gets warm at the room temperature before she preshape it, or she brings the dough back to refrigerator when the dough is too warm. She doesn't mention any detail about the dough temperature. So I don't know the exact temperature she aiming for. She told me that she move her baguette dough to adjust the right temperature until she preshape and shape. So, that is why I am try many things to find out....
By the way, Edwin who is one of TFL member showed us how to shape a baguette that has a lot of holes in the crumb. He divides the dough, so it is useful to know how he manages such wet dough. Here is the link.
http://www.weekendbakery.com/posts/baguette-movie/
He did a great job on his baguettes. Is it interesting to see how he shapes the dough?
I am sorry that I can't help you much,
Akiko
Akiko, I am still trying, and I will keep you updated, but I will tell you after talking this weekend to two experts on the subject, that alot of what we are trying to achieve and is proving to be difficult is due to the flour, The more I try, (and I have tried over two dozen methods over the past year) the more I realize that it has alot to due with the flour... Like I said before,,,, your baguettes are at the top of what I have seen, but still the very few I have seen on the internet that have extremely open crumb are those made with french flour... A man that now works at our bakery was employed at a bakery in north jersey, and they would import containers of french flour, that would last them about a month, I am going to try and get some, and will keep you posted, for my thursday morning bake, I am going to try to add about 10% 00 caputo flour... A good portion of my day was spent on the phone with a man from San Francisco, and he has been experimenting with techniques to try and get an extremely open crumb, he told me that he also was able to get his crumb to be open, but not to the degree of the video that we both saw. Talk to you soon Rob
Hi Rob,
Wow, It sounds very exciting for me to read your baguette story! Thank you for that.
How is it going ? Do you have any progresses on your baguette? It is really fun to see out for the perfect crumb, isn't?
I went back to see my baguettes that I have made.. When I make a high hydration baguette, I can get some good open crumb. How many percentage do you use water for your baguette?
Talk to you soon too,
Akiko
The link is actually
http://www.youtube.com/results?search_query=grenier+a+pain&oq=grenier+a+pain&aq=f&aqi=g1&aql=&gs_sm=e&gs_upl=12432l18596l0l18845l14l14l0l5l5l0l203l109...
In his older books Peter Reinhart (my favorite authority on bread baking) always advises to take the dough out of the fridge 2 hours before shaping. In his last one he says it's not necessary to let the dough come to room temperature, you can shape it cold. I did both, and I do not see any difference in the performance. If you shape the warmer dough, the proofing takes 45 - 60 minutes at room temperature, if you shape it cold, the warm-up time is added to the overall proofing time - you might shave off perhaps 30 minutes.
I prefer handling a less chilly dough, and, also, there is less danger of the shaped bread developing a skin (if you don't proof it in a basket). Rolls or pitas I shape cold, since here is, indeed, a time saver - the small pieces warm up much faster then a larger loaf.
Happy Thanksgiving,
Karin
Thank you for your nice note, which makes sense, Karin!! And thank you for your help too!!
I am glad to see you here ! :)
Happy Thanksgiving!!
Akiko
Pages