
20100106 Mr. Hamelman's 3-stage 90% rye
I've been very curious about other bakers' enthusiasm for rye breads, which, from their appearance and my past experience, I could only associate with tree bark and the nasty tasting caraway seeds. Mr. Hamelman's 90% rye bread has completely changed my impression. Not only did this bread turn out moist, but it also had that complex, mild, tangy aftertaste which evolved slowly and lingered in my mouth. This was a new experience for my taste buds. The earthy, almost chocolaty aromas of the flour plus the crunchy crust have made my biscotti-shaped slices a perfect tea time snack.
These loaves were not sliced, tasted and pictured until three days after they were baked, since I left them inside of the cooled oven and forgot about them. They tasted both moist and crunchy on that day. However, the next day, they started to taste a little dry. I then froze half and left the other half at room temperature in ziploc bags. Today, it is day 12 and the slices left in room temperature have shown no signs of molding but they have lost most of the moisture in the crumb.
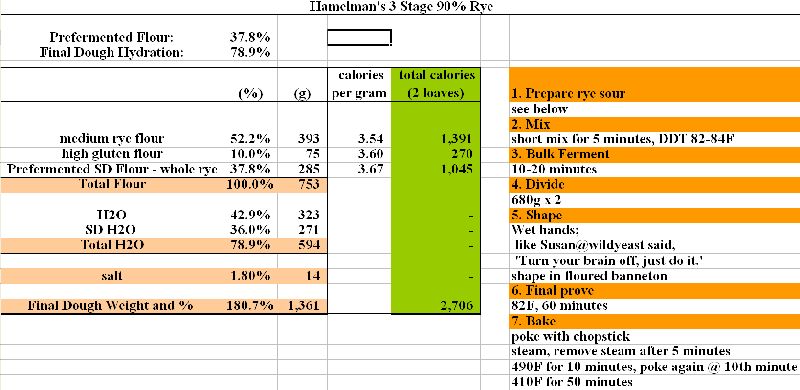
This formula used the Detmolder method, which required precise temperature controls at three different stages, to develop a rye sour with vital wild yeasts and well balanced flavors. With the help of my new proofer, I can say that monitoring temperature is piece of cake!
The following is a summary of my interpretation of Mr. Hamelman's formula and procedures:

With my background of growing up with all the Asian style fluffy white breads, it's probably too soon to make a statement that I'm falling head-over-heels for rye bread, but it is an interesting category I'll definitely explore further. This was the first bread I made from Mr. Hamelman's book and it was also my first bread in this new decade. I'm celebrating these 'first time occasions' by doing something special: I'm taking the extra time and steps to resize and attach a photo in my normally text-only entry. I think it's about time to learn, at least for once, how to upload pictures and add some colors to my blog.

For the remaining pictures, please visit my album of Mr. Hamelman's 90% rye at Flickr.
This post will be submitted to Wild Yeast Yeastspotting!


Comments
You don't do things half-way! A 90% rye is a challenge for a first rye bread, and you did a great job.
Did you proof in a brotform? It doesn't look like it. Forgetting the loaves in the oven certainly contributed to their drying out faster. Wrapping them in linen or putting them in a brown paper bag for a day or so after baking would have been better.
Looking forward to your future rye experiences!
David
I did prove in brotforms, one with liner and one without. How did your bread keep the beautiful marks? Could you please share your tricks? Thanks.
Yippee
Hi, Yippee.
I don't know any "tricks," but what I do is rub the brotform with with a 50/50 mixture of AP/Rice flour. I make sure all the spaces between the coils are filled and there is as little loose flour as possible in the bottom of the brotform.
After finding some flour moths in my pantry, I have started letting the brotforms dry after use and brushing out as much of the old flour as possible before storing the brotforms between uses.
David
I'll keep them in mind in my next proof. How do you prevent loose flour from dropping to the bottom? I tilted my brotforms when flouring them so that all the spaces are filled heavily with flour. As soon as I put them back to upright position, a lot of flour dropped to the bottom. Do you do it differently? Thank you again.
Yippee
Hi, Yippee. I rub the flour around the brotform several times (6-8?). If there is just a little flour (< 1/2 tsp) in the bottom, I leave it alone. If it's much more, I shake it out (gently).
David
your diagram was great work, i have to re-read it and digest all the valuable knowledge you've shared.
Hi Yippee,
Very nice 90% Rye bread. It is a hard project to get this to turn out visually similar to anything you have done before.
I will share with you a few thoughts about Rye that I have found work.
I have found that dusting the basket with whole rye and also the top of the loaf works very well and is not a contrast with the loaf material. The basket detail doesn't really transfer well in a high rye percent and hydration loaf so most of the time I don't use one. I just shape the loaf free form, proof a short time in a warm environment and bake.
When mixing, I add additional flour so I can just barely handle it with wet hands. After the primary ferment, it will be manageable. I proof on parchment and bake on a baking sheet.
I'm glad you shared this effort. This is a difficult bread especially for your first rye. I hope you enjoyed it enough to do it again. As David said, covering it as it comes out of the oven will improve the crust for later consumption.
Eric
for your kind words and sharing your experience with me. When you shaped your loaf free form, how did it hold up its shape? Did you find it spreading out quite a bit?
I felt like I had to race the dough to the oven once I popped it out of the brotform because it's spreading like landslide. I was wondering if it'd make a difference in the shape if I'd sent it in the oven sooner.
Yippee
I have a curiosity about the hydratation percentages of the Detmolder process: those listed in Hamelman's book are 150%,78% and 100%, while the ones listed in Samartha.net are 138%, 66% and 90%.
Which of the two procedures is the official Detmolder process?
Yippee,
I add enough additional flour to the mix so that the dough will just barely hold its shape for 15 minutes on parchment. This takes a little experimenting but as you say, a landslide isn't manageable. The dough is definitely pancake like but the spring compensates for that in the oven. The yeast will assure you of the rise you need.
Eric
I baked my first rye bread 2 weeks ago and boy was I frustrated with it. It's a chalange that I still need to win.