The Fresh Loaf

A Community of Amateur Bakers and Artisan Bread Enthusiasts.

Most bookmarked

PetraR's picture
PetraR

Can I keep a small amount of 50% hydration starter...

... and build it up when I want to bake, as I do with my 100% hydration Starter.

Right now I am feeding a 100g Starter with 100g Flour and 50g Water.

So say I only feed 50g Starter with 50g Flour and 25g Water, and than feed it 2 or 3 times without discarding anything and use that for baking so that I am left with the 50g Starter again at the end of the day...?

I have no problems with small 100% hydration Starters, but those stiff starters are all new to me.

keukaharv's picture
keukaharv

Improved Poolish Baguette

After taking a the wonderful three day Survey of French Bread course at KAF, I went back to my standard poolish reicipe. The 15 hour poolish is 5 1/4 oz AP flour + 5 1/4 oz water + a few crumbs of yeast. Final dough is poolish + 5 1/4 water + 11 oz flour. Mixing is 3 minutes low and 4 minutes medium.

Following Jeffrey Hamelman's advice, I got serious about autolyse (20 min), and also reduced mixing to 3 minutes on medium. I probably used an ounce less flour, and the dough felt quite a bit nicer -- almost pillowy. The result was very flavorful.

I have a starter going and when schedule permits I will try a pain au levain using his formula. So much to learn, but what a joy.

Truffles's picture
Truffles

bread with rye and whole wheat flour only

Has anyone made some rye bread, eg 40% rye, using only whole wheat flours

dabrownman's picture
dabrownman

Lucy’s Take on Einstein’s Swabian Potato Bread - Schwäbisches Kartoffelbrot

After last Friday’s bake found here: Götz von Berlichingen Ancient Age Sourdough Bread  our research on Götz of the Iron Fist turned up all kinds of interesting factoids.  After downloading our new Swami Swabi app for the iPhone, Lucy was able to channel many famous dead Swabians and ask them what Swabien bread they enjoyed the most when they were alive - amazing technology - really !


At 50% of the total flour and water in the dough, the levain is much darker than the dough flour.

First off, Götz isn’t the only famous Swabian out there but, not surprisingly, he liked Bavarian Missing Limb Sourdough the best.  This is a not so famous Swabian bread that is slashed very deeply, but only on one end and it is this burnt end tat falls off while baking.   You might have heard of some of the other famous, Swabians Lucy talked to.  I know I was taken a back with her list even though it contained no women for some reason.   Lucy has no time for other women and prefers men by far epecially those with Von in their names.


Albert Einsteain, Leopold Motzart, Robert Bosch, Gottlieb Daimler, Roudoloh Diesel, Earnst Heinkel, Johanner Kepler, Georg Wilhelm Friedrich Hegel, Erwin Rommel and Erich Hartmann the highest-scoring ace of WWII with 352 air victories …along with three other notables – Claus Von Sauffenberg and Friedrich Gustav Jaeger - both German Army Officers tied to the assassination attempt of Hitler in 1944 and Georg Elser who tried to assassinate Hilter in 1939.  These are just a few of the famous men that Lucy talked to with her new Swami Swabi app….. I’m glad I don’t have to pay her phone bill tied to those long distance, calls.


Lucy reports that most of them liked the usual SD Swabian breads like: Swabian Rye and Wheat Sourdough - Graubrot, or Schwabisches Weizenmischbrot which are still two of the most popular breads in Germany.  Sadly, these breads have commercial yeast kicker as a separate poolish for some reason.  I suppose the bakers just don’t trust their SD levain enough to raise the dough on its own?  We don’t have that problem here.


After hearing about most of these breads, Lucy was most impressed with Einstein’s mother's interpretation of Swabian Potato Bread (Schwäbisches Kartoffelbrot) that his mother would make for him supposedly to keep his mind sharp.  We love potatoes in bread too and anything that might help our brain is welcome.  This bread had some whole grain altus, a little rye and mostly white flour with a separate commercial yeast polish to help out the SD levain.  Lucy took one look at it and said she could come up with something a little more to our liking and way better than anything Einstein’s mother ever gave him to bite into.  She finds it amazing that Einstein could think at all after eating his mother's Schwabisches Kartoffelbrot.


Lucy abruptly hung up on Einstein after wishing him goof health and started working on her formula.   She ditched the commercial yeast replacing it with a yeast water levain that was combined with the SD levain to make a gigantic Mega Combo Levain that equaled the hydration of the original recipe.


A Swabian Breakfast with some smoked Swabian Ozark Mountain pork shoulder.


She used the 15% extraction from the whole wheat and whole rye milling to feed the levain and some of the 85% extracted wheat to go along with the AP flour.  She also chucked the Götz von Berlichingen altus in the levain too and used the potato boiling water for the liquid in the levain and dough.  Lucy won't throw anything away


This got all the sifted hard and whole bits in the one build combo levain which was left on the counter overnight so it could double in 9 hours.  We stirred it down and it doubled again in 3 hours and was ready to go at the 12 hour mark.  No autolyse this time but we mixed everything else up with, the exception of the butter and let it sit for 30 minutes before doing 3 sets of slap and folds of 8,1,1 minutes - 20 minutes apart.  The room temperature butter was slapped into the mix during the 2nd set of slap and folds


We then did 2 sets of stretch and folds on 20 minute intervals before doing a pre-shape and final shape of the dough into a boule.  It was then placed in a rice floured basket and retarded for 12 hours.  There was no room temperature bulk ferment since this is AZ and the kitchen is very hot at 88 F and Lucy didn't want the dough to over proof in the fridge while she slept - which is most of the time.  We allowed the dough to warm up for 2 hours on the counter the next morning to get to exactly 92.27% proof before firing up the mini oven to 500 F and getting 2 of Sylvia’s steaming cups, dish rag inside, to boiling in the microwave


We tipped out the bread onto the top of the mini oven's vented broiler pan that was covered in parchment, the steaming cups were placed catty corner and the whole assembly loaded into the Mmni oven for 15 minutes of steaming.  After 2 minutes we turned the oven down to 450 F.


Crab cake and grilled salmon with a  smoked rib tamale dinner below.

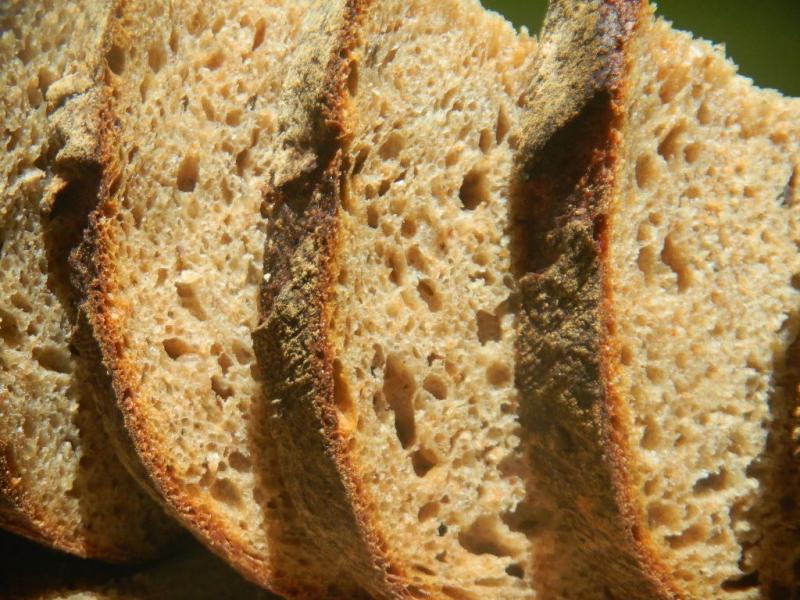
Once the steam came out, we turned the oven down to 425 F, convection this time. 15 minutes later the bread was 205 F on the inside and removed to the cooling rack.  It has bloomed a little, sprang well enough and browned that dark mahogany color showing it was boldly baked.  The crust was also very crisp.


Blueberry, strawberry and apricot galette makes for a a fine dessert anytime.

.Once it was cool we wrapped it in plastic and let it sit on the counter overnight for 8 hours.  The crust softened as it rested.   The crumb ended up open, soft and moist.  The crust was especially tasty and the bread was lightly sour with the yeast water muting the sour as it always does.


Lucy says..... don't forget to channel her salads.

This is fine tasting bread and no wonder Einstein loved his mother’s version even though hers was less healthy and tasty:-)  Just think what he could have accomplished if he had access to Lucy’s Schwäbisches Kartoffelbrot.  He might have been able to become telepathic, maybe enable him to teleport himself and others into the future or discover the Theory of Everything instead of wasting the last 30 years of his life with a stuck bran!.  At least we can still talk to him any time we want with our new Swami Swabi iPhone app.


Formula

YW SD Starter Build

Build 1

Total

%

Rye, Spelt & WW SD Starter

8

8

4.00%

Götz von Berlichingen Altus

50

50

25.00%

85% Extraction Rye & Wheat

40

40

20.00%

15% Extraction Rye & Wheat

35

35

17.50%

AP

75

75

37.50%

Yeast Water

53

53

26.50%

Potato Water

150

150

75.00%

Total

411

411

205.50%


Combo Starter Totals


%


Flour

204

102.00%


Potato Water

207

103.50%


Starter Hydration

101.47%


Levain % of Total

53.45%


Dough Flour


%


85% Extraction Rye

50

25.00%


AP

150

75.00%


Total Dough Flour

200

100.00%


Salt

8

1.98%


Potato Water

25

12.50%


Dough Hydration

12.50%


Add - Ins


%


Boiled Potato

100

50.00%


Butter

25

12.50%


Total

125

62.50%


Total Flour w/ Starter

404

Includes Altus

Total Potato Water w/ Starter

232


Tot. Hydration  w/ Starter

57.43%


Hydration w/ Starter & Adds

75.99%


Total Weight

769


% Whole Grain

70.13%


Nothing like a good lunch eaten with an iron fist.


Bob Marley's picture
Bob Marley

Lactobacillus versus Acetobacter

Which one gives the sour flavor?  I've read that less hydration in the starter produces more acetobacter giving a more sour flavor.  Please keep replies short.  8)  I'm very very confused with conflicting information I've been given.  Would Hamelman's explanation on pg 58 of Bread, first edition, be accurate?

Felila's picture
Felila

Report on the rice flour experiment

I've posted twice before re my quest to use up some brown rice flour that was given me. Thanks to the help here, I ended up substituting a cup of rice flour + vital wheat gluten for one cup of the white bread flour needed (have to do by volume and feel, don't have a scale). I used three tablespoons of vwg and filled up the rest of the one-cup measure with the brown rice flour. 

I baked my first two loaves of rice + wheat bread today. The bread is OK. It rose nicely, it's sour, it has a good crumb. It tastes different somehow. It certainly felt different when I was doing stretch-and-fold on the dough yesterday. Stretchier, but also a little grittier. 

As I've been using the same sourdough culture and recipe for years, it's not surprising that I would notice even small differences. I could get used to this bread. I have a lot of brown rice flour to use up. It was free, I'm poor, I will persevere.

bikeprof's picture
bikeprof

Not tempering and whole grain flour milling

Lots of great threads on milling, which have sucked me into considering getting into it, and then dissuaded me a bit, given all the procedural details one could (and I likely would) attend to...two of which have been tempering and sifting.

For high extraction (or any sifted) flour, tempering makes a lot of sense to me...but if using whole grain flour, I'm wondering if it is helpful (making for a bit more simple extension of my baking hobby).

On this front, I was interested to read this about Dave Miller: "Dave mills all his flours himself on Thursdays just before mixing time: from the way he describes it, I gather he pretty much spends the whole day milling and mixing, starting with the kamut he uses to make the wholegrain pasta he also sells at the farmers' market. He doesn’t add any water to the grain prior to milling and never sifts out anything. He doesn’t age his flour either." (taken from: http://www.farine-mc.com/2014/02/meet-baker-dave-miller.html).

Jim Burgin's picture
Jim Burgin

Using a Cloche

Hi, I just bought a cloche (King Arthur Flour) and find many conflicting instructions on the internet and in the best books (Including Reinhart) about how to use it.   Is there any single source of wisdom out there?

1.  To oil the interior of both parts before EACH use, or not.

2.  To preheat the cloche with the oven and THEN put the bread in, or not.

3.  To preheat ONLY the top part, while the dough rises in the bottom part, or not.

4.  To spray the inside of both parts, and the dough, before each use; or not.

5.  To turn the oven up 50 degrees over usual for the recipe; or not.  (This would yield 500 F. whereas the instructions that came with the cloche said it is only safe up to 450F.

6.  To not preheat the cloche with the oven, or not.  (Some say this will cause the cloche to crack when put in the oven.

7.  To remove the top part after baking 15 minutes; or in the last 3-5 minutes.

8.  Some say a cloche produces a thin crackly crust; some say a thick chewy crust.

HELP!   THANKS!  Jim Burgin


Jane Dough's picture
Jane Dough

Barm vs sponge

Is there any difference between a sponge and a barm?  Are the two terms synonymous?

sirrith's picture
sirrith

Caneles

Having just bought some nice copper molds, I thought I'd share the results of the first bake with them :)

I'm no expert on caneles by any means, this is just what I've picked up along the way.

I've previously only made caneles using silicone molds, and got decent results. However, I wanted to try and get as perfect a canele as I could, so I invested in some (comparatively) cheap copper molds.

I had a few problems with this batch; I did not have whole milk, and I only let them rest 24h instead of the 48h my recipe requires. Also, two of my eggs had double yolks, making the total yolk count 6 instead of 4. The result turned out just fine though.

I also did not have beeswax, nor did I have any desire to mess around with it. Here is the (regular) recipe I used without my slight modifications from this time round, for regular sized (55mm) caneles:
500ml whole milk
50g butter
250g caster sugar
125g AP flour
1/4 tsp salt
2 whole eggs + 2 yolks
60ml dark rum
2 tsp vanilla essence/extract

2 Days before baking:

1. Put milk and butter together in a saucepan, heat gently to ~85C
2. Take off heat and let cool to ~50C, add vanilla
3. While milk is cooling, mix together flour, sugar, and salt
4. Mix the eggs with a fork (don't beat, incorporate as little air as possible)
5. Add eggs to flour mixture and mix with a wooden spoon until it forms an evenly mixed paste
6. When milk mixture is cooled, gently pour it into the flour mixture and mix until well combined with the wooden spoon
7. Add rum
8. Cover the bowl, and refrigerate for 48h. Mix once after 24h to reincorporate the fat which will have separated and formed a layer on the top. It won't melt back in, but that is ok.

The day of baking:

1. Brush canele molds with a very thin layer of baker's grease (equal parts oil, butter, and flour) and put in the freezer for at least 15 minutes
2. Preheat the oven to 250C
3. When the oven is preheated, fill the molds, leaving about 0.5cm of space to the top
4. Place the molds on a rimmed baking sheet (one that won't warp) to catch any overflow of oil or batter, and place gently in oven
5. Immediately turn the temperature down to 230C and bake 15 mins
6. Turn once during the 15 minutes
7. Reduce oven temperature to 180C and bake for a futher 45 minutes, turning the tray 2-3 times to ensure an even bake
8. Take the caneles out when the tops are dark (not burnt), using tongs or oven mitts, turn each mold over onto a cooling rack, the canele should come out by itself if you have properly seasoned and coated the molds prior to baking
9. Let the caneles cool for around 1h before eating

Notes:
-You will probably have to play around with your oven temperature and baking time, all ovens are different. My times/temperatures are given for a convection oven that runs ever so slightly hot. Hotter temperatures for shorter times will give you a darker crust and softer interior. Lower temperatures for longer times will give you a paler crust and more well-done interior.

-If mixed properly, i.e. gently and without incorporating much air, the batter will not rise much using this recipe. Mine rise at most 1cm. Don't use a whisk at any stage or, god forbid, an electric beater.

-Ensure the layer of grease is THIN. You should barely be able to see it. If the grease is too thick, you will end up with dull crusts coated with dry flour. Or if you use "white oil" you'll end up with very waxy caneles, I'm led to believe.

-You don't need beeswax to get a shiny crust or to get the caneles to release easily from the molds. No need to give yourself extra work unless you absolutely must use the authentic method for one reason or another.

-Avoid silicone molds if you care about the appearance and texture of the canele. Taste will not be affected, but silicone molds will give you a tougher, chewier crust and paler colour. That said, I've only tried 2 different silicone molds so I can't say for certain all of them are like this. You can see the rather ugly silicone mold mini-caneles behind the nice copper mold ones.

Pages