The Fresh Loaf

A Community of Amateur Bakers and Artisan Bread Enthusiasts.

Most bookmarked

CAphyl's picture
CAphyl

Frozen Dough Tragedy and Triumph

As a number of you know, I have experimented with freezing dough and baking it later.  I have had some recent mixed results, and I thought I would share it to see if there are some things to learn from my experience. Recently, I made a wonderful Tartine sourdough with olives, herbes de provence and lemon zest, recipe link below.  I froze the second loaf to bake later, and I baked it in the last few days.  It was terrible--a flat, gummy disk.

It would not get done, and you can see how gummy the dough was after baking forever. The color was slightly white, looking overproofed. I did have another bad frozen dough experience recently when I left some frozen five grain dough in the Midwest and baked it from frozen after it had been frozen for some time.  When I baked it, I got a small, gummy disk that also would never get done. I kind of wrote it off as it had been frozen for a long time.  But, it was interesting that the exact same thing happened again back in my home kitchen in California with the olive loaf, which hadn't been frozen for very long.  The gummy olive loaf sure didn't look like the original loaf below, with recipe link:

http://www.thefreshloaf.com/node/39505/tartine-sourdough-olives-lemon-zest-and-herbes-de-provence

Interestingly, I had frozen some other dough a few days before the olive dough, when I made Ian's semolina porridge bread for the first time.  When I made the first loaf, it was tasty, but was a bit flat as you can see in the photos below.

The crumb was fine, but I just didn't get the lift. Ian suggested less hydration, so I tried something different on the second loaf, which I baked from frozen.  I defrosted it and kneaded in more flour and sprinkled it with a bit of yeast to try and get some lift.  It turned out very well when I baked it today, as you can see below.

The crumb came out very well, and the bread was just delicious!  Thanks, Ian. The crumb was just right.

It is interesting that this dough had been frozen longer than the olive loaf. All of the doughs I have frozen recently had pretty high hydration. Is that a clue?  If so, why did the semolina loaf turn out so well, as it was high hydration like the other two that ended up as flat, gummy disks? I have another five grain frozen, which has been frozen for some time, so that will be my next experiment.  Perhaps if the dough seems too wet, I should knead in flour as I did with the frozen loaf I made from Ian's recipe.  So many questions to pursue!  Thought you would enjoy the results of my recent experiments.  Best,  Phyllis

Here is the link to Ian's recipe:

http://www.thefreshloaf.com/node/39261/semolina-kamut-porridge-bread


amoroso's picture
amoroso

Need Help Containing Steam in Home Gas Oven

I have a gas oven that has a fan, and it turns on and off during the baking. So this really destroys my steam environment and I think it is the reason why my breads haven't been blossoming. I just bought a cast iron for more steam introduction, but need to do something about this fan. I go through the conventional bake, not Convection, which my oven has this option as well, but I've been avoiding that for obvious reason. Should I preheat the oven, and shut it down for 10 minutes and then kick it back on for the final cooking stage? Worried about a lot of heat loss when loading the loaf in. I also do not want to block the fan, as that is a safety concern. Thanks for any help.

edroid's picture
edroid

Want Steam?

This takes the "SFBI" steam method to the next level. 

There are two changes to the standard SFBI method: first is the use of a half inch round steel plate instead of lava rocks or bolts. This allows the second change: heat the steel plate and the skillet on the stovetop to whatever temp you want. I took the temp up to 550° with great results. The steel plate weighs 5.75 pounds and holds an incredible amount of heat.

The advantages are that the round steel plate has far more thermal mass than lava rocks or nuts and bolts, you can bring the whole thing to a much hotter temperature by heating directly on the stovetop, and by heating the steel to higher temperature you have less heat loss in the oven. The plates heat quickly on the stove, so my guess is that it is more energy efficient also. 

You can have a local metal shop cut the round plate for fairly minimal cost, or probably order one from BakingSteel Co. The skillet is standard 9" Lodge cast iron. The perforated pie plate is made by Chicago Metallic and is available on Amazon. 

An infrared thermometer is recommended to get a temperature reading of the steel on the stovetop. 

BE EXTREMELY CAREFUL WITH THIS STUFF! USE HIGH QUALITY MITTS!

DONT PLACE ICE ON SKILLET UNTIL AFTER THE HOT SKILLET IS PLACED IN THE OVEN! 

DON'T USE THIS TECHNIQUE IF YOU AREN'T CAPABLE OF BEING SAFE! 

lilae's picture
lilae

How to bake a sourdough Kouign Amann?

Hi TFLers!

I have been following some sourdough recipe posters on here for a while and trying to create a sourdough loaf! I've only baked bricks so far, but I'm working on it! I just started a san francisco sourdough starter 3 weeks ago, so it is still quite immature.

Now my questions is how can you bake a sourdough Kouign Amann? A friend showed me a pic and I'm dying to try and make it with sourdough! I think the flavors would be outstanding with sea salt and brown sugar together!

Now there is only 1 recipe online that is made with sourdough, however it doesn't look quite as impressive as the non-sourdough recipes below. 


Sourdough Kouign Amann recipe:

http://panaminthandmade.squarespace.com/blog/2013/4/8/kouign-amann-old-fashioned-breton-cake.html


Dry Yeast Kouign Amann recipes:

- http://highheelgourmet.com/2014/07/26/the-buttery-yummy-case-of-the-kouign-amann-and-kouignette/

- http://www.gbakes.com/2012/10/the-queen-of-maple-maple-kouign-amann.html

- http://www.chefsteps.com/activities/kouign-amann--2


Is someone who is an accomplished sourdough baker be able to try this out and convert the recipe?

I'm hoping txfarmer will find this post and try her hand at this delicious looking pastry!

Thank you! :)

sandy2's picture
sandy2

Sourdough + Yeast?

I encounter some sourdough bread recipes that include commercial yeast as well as starter.  I read somewhere that this isn't advisable, as the little beasties try to kill each other.  Could this possibly be true?

JoeV's picture
JoeV

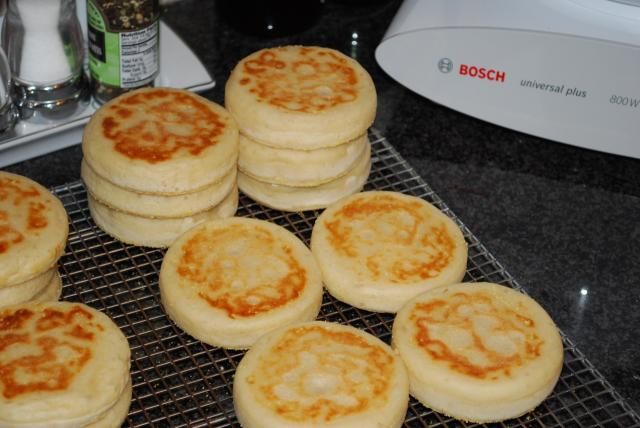
English Muffins

Got up early this morning and made a batch of English muffins, and turned one into a "Joe McMuffin."

paul0130's picture
paul0130

Kneading french method?

I remember when I was a kid, my grandmother would make the worlds greatest sweet bread. When I learned how to make bread myself and learned how to knead the traditional method (some 20 years later), I remember thinking to myself "I seem to recall my grandmother slamming the dough on the table". I had memories of my tiny little 5' tall (maybe) Hispanic grandmother slamming this giant dough on the table. And then trays of rising dough all over the house. Followed by the most delicious smell and the BEST bread ever. Anyway, I stumbled upon this video one day:

https://www.youtube.com/watch?v=PvdtUR-XTG0

This is it!! This must be what she was doing. Don't know how this method made it's way to the Amazon area of South America, but this must be it. Does anyone use this method? I really stink at kneading. It seems I can never quite pass the window test, and I knead for a good 10 minutes straight, or longer. Sometimes I'll give this a try for a minute or two, but the stretching of the dough makes the dough sticky again pretty quick. Sorry for rambling, just wondering if anyone uses this method. I'm thinking about saying heck with it and buying a bread machine just for kneading!

dabrownman's picture
dabrownman

Poolish Pizza Without Daughter

Who knew she wouldn’t be home for dinner when Lucy went al out on her favorite pizza dough. Yes it is our Focaccia Romana white dough made with an overnight poolish that I nearly half the dough.  But it also has garlic, sun dried tomato, olive oil and rosemary in the dough too – yum!.  No sourdough, no whole grains just plain old white bread made with a pinch of commercial yeast.


Since the daughter had disappeared, that meant more for my wife and I to wolf down with a brewskie.  This dough was 71% hydration and made with LaFama AP at 11.2% protein that we love so much for flour tortillas.  It makes great pizza dough too.  This batch of dough was about the best yet – strong yet extensible.


We did a half and hour autolyse for the dough flour and our usual 3 sets of slap and folds followed by 3 sets of stretch and folds - all on 20 minute intervals.  We incorporated the rosemary, garlic, EVOO and sundrie3d tomatoes on the first stretch and fold. 


We did our usual spicy tomato sauce but also made another new thing.  We sautéed some Swiss chard, spinach, onions, Hatch green chilies and fresh polish sausage for the next layer over the sauce.  This was followed by mozzarella pecorino and Parmesan cheese and topped with button and Crimini mushrooms.


We put the stone on the gas grill and heated it up to 550 F before the pizza was put on and  6 minutes later it was done - very crisp well browned on the bottom with the cheese melted and starting to turn brown.


This wasn’t or normal extra thin crust piled high with extras but, it was crisp enough, no to bending not soggy or foldable soft - just the way we like it.  Too bad the daughter missed out on this fine pizza.  It was too good for left overs.   Maybe I can make it up to her tonight when Lucy makes ribs for Cousin Jay.

It may look like a pizza biu it is our smoked chicken quesadilla dinner from Saturday night

CAphyl's picture
CAphyl

Sourdough with olive oil and rosemary

Our friends, Tim and Barb, are visiting us in California from the Midwest, and I asked them what kind of bread they wanted me to make.  Tim asked for sourdough with olive oil and rosemary.  As rosemary is plentiful (and drought-resistant), we have lots of it growing everywhere in our backyard, so this was not a difficult request.

I modified one of my sourdough recipes to make the bread, adding olive oil and rosemary (recipe below).

Ready for the overnight proof.

It popped up overnight.

Scored and ready to go.

The crust turned out well.  You can see the rosemary in there.

The crumb was good, and the texture of the bread was quite moist.

Our friend, Tim, is making his sandwich in the back of this crumb shot.  He loved the bread, so I am a happy baker!  Now, we are off for a spin around the lake.

Sourdough with olive oil and rosemary

Makes: One 2 pound loaf (this loaf was 2 lbs 9 oz).

Method adapted from: Classic Sourdoughs by Ed and Jean Wood.

I used my active starter that was a 70/20/10 mix of AP flour, WW flour and dark rye at 100% hydration.

Ingredients:

Final Dough:

  • 230 grams (about 1 cup or 240 ml) active starter, 70/20/10 mix of AP, WW and Rye flours at 100% hydration
  • 300 grams water (Approximately 1 1/2 cups or 360 ml water)
  • 10 grams salt (about 2 teaspoons)
  • 500 grams unbleached all-purpose flour (about 4 cups)
  • 9 grams chopped fresh rosemary
  • 40 grams olive oil (reserve some for kneading)

Method:

  1. Mixing the dough. Pour the starter into a mixing bowl. Add the water and mix well.  Add the flour a little bit at a time until it starts to stiffen. Let the mix autolyze for 30 minutes add then fold in the salt. After that, add the rosemary and about 2/3 of the olive oil.
  2. Kneading the dough. Turn the dough out onto an oiled surface, using the reserved olive oil, and knead in the remaining oil if the dough is too sticky. Knead for about 10 minutes until it the dough is smooth and easy to handle.
  3. Bulk fermentation. Lightly coat a glass bowl with olive oil and place the dough ball into the bowl, making sure that the top of the dough ball has a thin coat of oil. Cover and bulk ferment in the refrigerator for 24-48 hours. 
  4. Shaping and final proof. Use a spatula to ease the dough out onto an oiled surface. Allow the dough to rest for 30 minutes. After 30 minutes, shape it into a rough ball, cover it with a cloth, and let it rest again for 30 minutes. Now, shape the dough into a boule and place it seam-side up into a banneton coated in brown rice flour. Put in a clean plastic bag and refrigerate overnight (or longer if you want more sour flavor).
  5. Baking the loaf. The next morning, remove the loaf from the refrigerator and let it warm up before baking. You should be the judge of how long you need it to warm up.  My loaf needed to pop up a bit, so I let it warm up for about an hour at room temperature as I preheated the oven. It will overproof if you keep it out at room temperature too long. My experience is that this pops up in the oven quite nicely. As the original recipe calls for 8-12 hours of room temperature proofing, I did notice that this dough did need time to warm up and rise a bit at room temperature before baking. I used my covered baker, so I preheated it with the cover on at 500 degrees (260 degrees C).  When the oven and baker are at temperature, remove the lid and pop the loaf into the bottom tray. Score it in the pattern you desire.  I sprayed a light mist of water on the dough, trying to avoid the hot surface, as I was hoping for a really beautiful crust.  Bake at 500 degrees with the lid on for 30 minutes, and then take the temperature down to 435 degrees and remove the lid for the final browning, which is another 10-15 minutes, depending on the type of crust you like.  We tend to like a bolder crust, so I bake it a bit longer. Watch it closely during this phase. If you do not have a covered baker, you can use a baking stone or tray with parchment paper, but make sure you create steam by using your steaming apparatus or baking tray with boiling water from the start of the bake.  Bake the loaf at about 480 (250 C) degrees for the first 25 minutes and then reduce the temperature to 435 for the next 15-20 minutes, depending on how bold you like the crust.
  6. Cooling and slicing the loaf:  Remove the loaf from the covered baker tray or stone and let cool for at least 20 minutes before slicing.


Szanter5339's picture
Szanter5339

Italian bread recipe around.

 Ingredienti: 520 ml acqua1000 g liszt bianca BL55  2 cucchiaini di Fruktóz (o zuccheronormale)2 cucchiaio di olio6 cucchiaini di értékesítés+ 300 g tészta madre Preparazionedella "Pasta Madre": Mescolare3 cucchiai di Farina integrale di Frumento (od segale o di farro) con 3cucchiai di acqua tiepida (kb 40 ° C) coprire e lasciareriposare 1-2 Giorni az un posto caldo (20-22 ° C).1. Aggiungere ulteriore3 cucchiai di Farina Integrale 3 cucchiai di acqua (kb. 40 ° C) all'impasto che nelfrattempo comincia hirdetés AVERE ENSZ Profumo acido piacevole. Coprire di nuovoe lasciare riposare 1 giorno in un posto caldo (20 ° C).2. Aggiungere 1 etto difarina Integrale di Frumento o di segale ed 1 dl di acqua (kb 40 ° C) all'impasto, coprire elasciare riposare 1 giorno in un posto caldo (20 ° C). Preparazione ablaktábla con "Pasta Madre"Mettere ingredienti inuna Ciotola, lasciando a parte una Piccola quantitá Dell'Acqua, poi aggingerese necessario.Preparare un impasto abbastanza Duro, flessibile. Va bene se nem si attacané alla Ciotola né alla mano.Mettere Sulla Tavola d'impasto e lavorare Ancore per un po.Mettere nel tegame da Forno.Con questo inizia il PERIODO Lungo di lievitazione. Alla temperatura di20-22 centigradi ci vogliono almeno 3-4 érc.Se la Cucina e Piu Fredda, il tempo si allunga.Nem é de temere di una lievitezione eccessiva, questo nem accade mai con ilpane con la "Pasta Madre". PIU Lungo tempo si lascia lievitarsi, Piu acido saráil Sapore del ablaktábla.Riscaldare il Forno a 230 ° C-on, lasciare a questo livello Durante la cottura. Nelforno di gáz regolare kvázi al Massimo.Fare un Taglio sul lato dell'impasto e coprire con il coperchio (o con unaltro tegame) imbottito di Carta da Forno.Il tegame PUO essere Vario Vetro, terrakotta, ecc., Importante di AVERE ilcoperchio.Mettere nel Forno preriscaldato e lasciare cuocere 40 Minuti.Togliere il coperchio e continuare finché nem Avra ​​un bel colore Dorato.Togliere dal Forno, mettere su una griglia, spruzzare con un po di acqua.Il ablaktábla appena Fatto ha una crosta molto dura, ma nem c'é da preoccupare, diventa Meglio raffreddando. Tra un ora il szélvédő Sára morbido con la crosta croccante. Consigliutili:Per ottenere un panecon la parte Superiore Liscio e Lucido, l'impasto nem deve essere toccato dallafarina.Tenere il ablaktábla Forno tutto il tempo necessario, Piu Lungo il tempo nelforno, Piu croccante la crosta diventa.Se uno nem vuole occuparsi della Preparazione della "Pasta Madre", si puófare anche con la cosidetta pasta madre di 10-12 ércRicetta di Pasta Madredi 10 12 oreIngredienti: 1,5 dlacqua tiepida                                  1,5 Etti di liszt BL80 1 etto di lievito di birra

Pages