The Fresh Loaf

A Community of Amateur Bakers and Artisan Bread Enthusiasts.

Most bookmarked

Sebastos156's picture
Sebastos156

Confused about kneading and crumb holes

Best hi's. I have been uncertain about the quality of my kneading. I have in the past and in the near present been getting unsatisfactory kneaded bread. It used to be an issue of volume, now it's the holes that bother me more. is there something wrong with, during kneading, causing the dough to stretch in places until it rips; do I have to stop before that happens, to align but not rip the gluten? I never could get that windowpane test working right after kneading, like some tutorial makers can, and that seems like it could have something to do with it. Part of why it all bothers me is that I feel that it would be of importance if it did.

And about those crumb holes, I have been left in the dark as to how much development a sticky baguette dough needs, to have sufficient strength for an expansive open crumb structure, without causing too much resistance. I usually like to test that strength by pinching, but I am open to other methods.

bread1965's picture
bread1965

Scheduling Advice

Hi Everyone


This weekend I'm baking a whole wheat levain bread. I'll feed my levain at 8am to acheive the levain volume needed in the recipe and let it sit for about 6 hours. Then I'll mix the final dough - say about 2pm. The recipe then says to let this sit for 5 hours and then shape into boules - by about 7pm. Once in benneton baskets, into the fridge they go overnight.

The problem is the after 5pm I won't be home.

Lets ignore time guides and use visual guides. 1) when the levain is fed, do i just have to wait until a double and then I can proceed to mixing the final dough? 2) once the final dough is mixed, is it the same idea, wait for a double and then put them in the fridge?

If so, starting at 8am, I might get the the shaped loaves into the fridge by 3-4pm. If I'm not baking until sunday at say 9am am I leaving them to proof in the fridge for far too long?

Not sure how to schedule this. What would you do?Many thanks!!

dabrownman's picture
dabrownman

I ran across this book today

that I thought would be helpful for sourdough bakers, especially new ones

https://books.google.com/books?id=VA6y1EMnkpYC&pg=PA34&lpg=PA34#v=onepage&q&f=false


zelth's picture
zelth

Why won't my apple yeast water dough rise?

Admittedly I am a novice breadmaker. Never made a loaf in my life. So I decided to go the eccentric purist route, naturally. However, I believe my lack of experience and over romanticized ideal of simple breadmaking is getting in the way. I've tried making apple yeast water from granny smith apples and managed to get a nice strong vinegary smelling concoction that I brewed up in a mason jar with an air lock. Yesterday I used about a pint of it as a replacement for yeast packets and water. The dough had a nice consistency I thought so I let it sit for an hour to rise......but sadly it didn't. So with my need for instant gratification I decided "oh well let's just pop it in the oven and see what we get. Well what we got was a flat sourdough pita-like bread that was very dense and hard to cut....but it smelled very nice. What went wrong guys? I let my apple water ferment for 6 days and even began to see a mother forming at the bottom of the jar. I keep telling myself "it can't be this complicated, hell the pioneers were making this stuff with far less equipment that I have available to me today. I would greatly appreciate any and all advice given. I have an adventurous spirit and am willing to experiment....and fail.....if only for educational value.


jangozo's picture
jangozo

Fresh starter is not growing after refrigerating for two days

Hi,

Last weekend I had to put my 5 days old starter in the fridge for two days because I was away. After a bit of reading, I did the following:

Friday evening - feeding 1:2:2 (plain flour) to give it enough food for the weekend

Friday night - after rising has begun I put it in the fridge (top shelf)

Sunday night - I noticed there was very little rise while it was in the fridge (I guess that's normal since it's cold in there)

Monday morning - Feeding with 1:2:2 of rye to give it good quality food and help it recover.

Monday evening - See picture above. It now has very thick consistency due to the lack of rise from the past two feeds.

I'm thinking of feeding it 1:1:1 tomorrow morning to help hydrate it and speed up the rise. However, I'm losing confidence in my abilities to manage this one on my own. It looks like I made a few mistakes in a row to get to this stage and I need some help from peeps on this forum or I might finish my starter off for good.

Thanks!

loubarkley's picture
loubarkley

New to baking - any advice on sourdough hugely appreciated!!

Having always been a keen cook, I decided about a month ago to emotionally give up the day job and invest in self teaching myself the basic course content of a professional pastry course. Along the way, I've realized that nothing makes me happier than baking bread (and that sugar confectionery is a bit too fiddly).

This week I tried to tackle sourdough. My starter seems to have done all the right things over 7 days of feeding up. BUT in the final stages (principally transferring the dough from my rather crudely made up proofing basket) the dough seemed to loose it shape and never rose fully in the oven. See photo. 

My starter was 50/50 wholemeal and white bread flour, my sponge made from wholemeal, and everything else white bread flour. I'm not quite sure I understand the concept of % hydration in starter terms. I'd just been taking half away, adding in 100g of flour and enough water to make it sloppy (as per my HFW recipe). Would that cause trouble? 

After I added the flour et al to my sponge, I left this for a good 4hrs in a warm kitchen. I seemed to get a decent rise, and then kneaded for 10 mins (timed). I was then planning to leave this again (in bowl, flour covered cloth, oiled clingfilm) for another few hours, but nothing had really happened, so I left this overnight. 

It didn't look or feel right in the morning and kind of flopped everywhere. It never got back its shape. It has a really good flavour, and a great crust, and sort of OK crumb, but I'd really like to be able to produce big beautiful loaves. 

If anyone would care to give me some tips or advice or even a really good recipe to follow, I'd be so very grateful. 


sfsourdoughnut's picture
sfsourdoughnut

Sourdough Cinnamon Raisin Beer Bread


Sourdough Cinnamon Raisin Beer Bread

Even though I’ve never really liked raisins, I’ve always loved cinnamon raisin bread toasted to perfection then slathered with butter, melting into the nooks and crannys.  But I wondered, what would it be like if I made it with sourdough starter?  Even better, what would happen if I replaced some of the water with beer?  Well, I did both and the result is not only bread that tastes like a cinnamon roll, but with the subtlety of the sourness from the sourdough and the hoppiness of the beer.

The recipe is the same as any sourdough bread.  The only difference is I replace some of the water with beer.  I use part of the beer to rehydrate the raisins and the rest goes into the dough.  Plus I dust the final dough before I form into the loaves with cinnamon and sugar.  That's it, and Viola!

Ingredients:
1 - 12 oz bottle decent beer (I used either Lagunitas IPA or Deschuttes Black Butte Porter) divided
80g raisins720g King Arthur Unbleached All Purpose Flour
200g filtered Water
150g 100% starter (50g starter-50g water-50g flour)
14g sea salt
2-4 Tbsp Cinnamon
2-4 Tbsp granulated sugar
Cornmeal to dust bottom of dutch oven

Autolyze the main dough of Flour/Water/Beer

In an 8 cup bowl, place
200g beer
200g filtered water
600g All Purpose Flour

Stir to combine until the liquid has absorbed all the flour and no flour remains on the bottom or sides of the bowl. Set aside to autolyze/rest for 8 hours or overnight.

 Rehydrate the raisins and set aside.
In a tall glass, place:
80g raisins
156g (remaining) beer

Awaken the starter – in a 2 cup bowl:
50g starter
50g filtered water
50g flour

Whisk well, cover and leave on counter to awaken

Then, after 8-12 hours, refresh again:
toss all but 50g of starter, add 50g water and 50g flour, whisk well, cover and set aside for 1 more hour

After the second starter refresh is completed, drain beer from raisins into a cup, saving beer (you should have about 120g), add 120g flour to the remaining beer, whisk together.
Add the beer/flour mixture and the refreshed starter into large bowl of the main dough (autolyzed flour water beer), along with raisins and salt.  Hand mix to combine well (if you wet your hand frequently, the dough won’t stick as easily).

Every 20-30 minutes, wet your mixing hand and do the Ken Forkish stretch and fold and rotate 5-8 times, until dough starts to come together. Cover with greased plastic wrap to keep surface moist after each stretch and fold.

After 2 hours and the last stretch and fold, cover and place in refrigerator overnight.

The next day, remove dough from refrigerator and allow to warm up for about 1 hour.

Remove from bowl by lighting dusting all around edge, pulling the dough gently away from bowl so flour falls to the bottom of bowl.
Gently pour dough onto a lightly floured surface.  You are trying to preserve the bubbles and not tear the dough.
Divide into 1/3rd and 2/3rds (I do a 1lb loaf and a 2lb loaf).
Once again, using the Ken Forkish method, on a lightly floured surface, lightly stretch out each dough into a small rectangle, again, trying to preserve any formed bubbles (no rolling pins please).
Dust each surface liberally with cinnamon and sugar (I cover each surface amply).
Do the envelope fold over on top of the dusted cinnamon and sugar side, rotating the dough 1/8 turn for each fold over.

Once the cinnamon and sugar have been completely covered by the fold-overs, seal the seam side, roll over and gently roll into a ball.    You are trying to have the cinnamon and sugar on the interior of each loaf.

Set in a lightly greased bowl, seam side down, covered lightly with a greased plastic wrap.
Do the same with the other piece of dough.

Allow to rise for 1-3 hours, until bubbles form throughout the dough.  Do not over-proof.

During the last ½ hour of the rise, place 2 dutch ovens (2lb and 1lb) with lids in a 475F oven.

Once oven comes to temperature, open oven door, remove lids to side of inside of oven.

Put about 1-2 Tablespoons of corn meal on the bottom of each dutch oven.
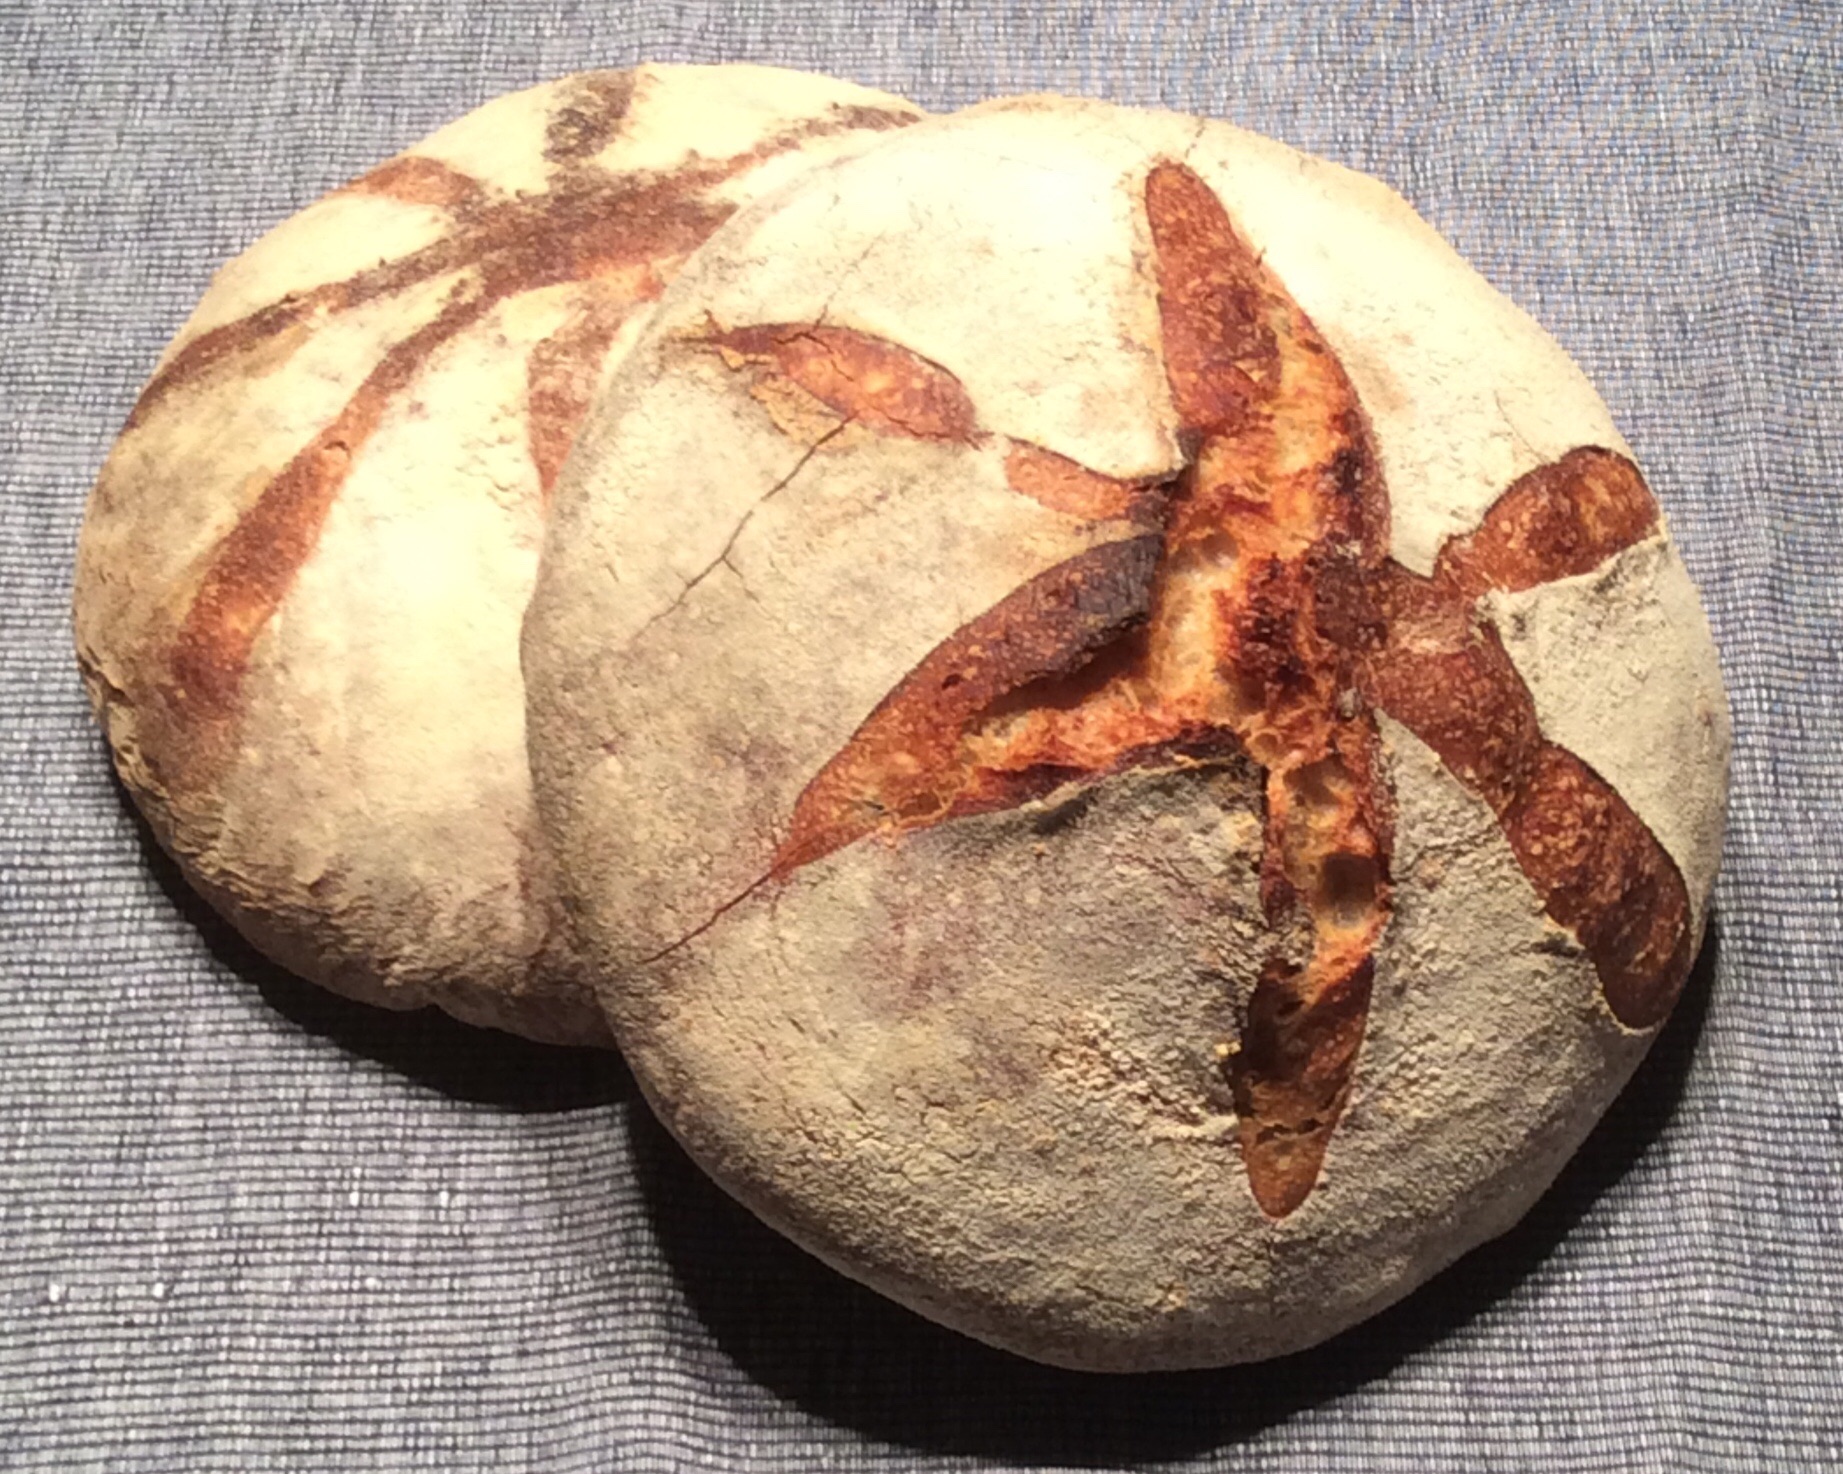
Add the dough (large in large, small in small).  Slash the tops.
Cover with lids (I have foil around my lid to form a tighter seal).

Reduce oven temperature to 425F.  Bake covered for 30-40 minutes (check at 30, if not brown yet, go another 10 minutes).

After 40 minutes, remove both loaves from dutch ovens and place back on the rack to finish cooking until the internal temperature is between 205F and 210F degrees (another 10-15 minutes).  The small loaf may be done after 40 minutes.  Just keep checking the temperature.

Remove from oven onto a cooling rack.  Allow to cool before slicing (if you can wait).

Serve warm or toasted with melted butter, or jam, or with broiled muenster cheese on top.

I use All Purpose Flour in this recipe as it delivers a softer, moister crumb.  I am not looking for a “hearty” loaf, hence no whole wheat flour.  Feel free to experiment however and keep me posted.
Bon Appetit!

chrisinweare's picture
chrisinweare

European flour?

My wife finds that bread doesn't agree with her. She watches what she eats and has bread only occasionally. You can imagine this isn't great for me as someone who likes to bake... :)

We recently traveled to Belgium and had some delicious breads, pastries, etc. We ate whatever we wanted and my wife didn't experience any ill effects.

So, is the flour different in Europe? If so, are there reliable sources for flour?

I've mostly given up baking bread but would love to get back to it if we can both enjoy it.

Thanks,

Chris

alfanso's picture
alfanso

40% rye w/caraway – in the spirit of PiPs

I recently came across PiPs’ 100% WW batards and had a go at it, with a lot of success.  Now that I’ve discovered the quality of what PiPs does, I took a gander at some other breads of his. This time I decided on his 40% rye with caraway seeds.

What I notice, also being new to any dough with a significant amount of rye, is that once the dough has proofed, there appears to be very little oven spring after that.  Also that the bread crust itself seems hard pressed to take on dark coloration.  Using standard bread flour and adding 7 grams of IDY to the 1500g mix, there is a lot of formula similarity to David Snyder's version of the Jewish Deli Rye that I baked a few weeks ago – my first foray into rye breads.

The rye was not difficult to handle.  Quite sticky during the initial pinch and fold, but then very manageable during the French Folds.  Divide and shaping was a breeze in terms of the cooperativeness of the dough.  There was also zero sticking to the couche upon transfer to the oven peel.

New for me this time out:

  • using a chevron score on dough.
  • using a couche for the proof instead of on parchment for rye dough.
  • proofing the shaped dough seam side up.
  • dropping the oven temp mid bake so precipitously – from 450dF to 400dF per PiPs’ instructions.


Corrections for next time:

  • give the dough a shower of raw flour just before scoring.  The rustic look, one I typically shy away from, will “hide” some of lack of deep crust color in this bread.
  • OR dose the finished batards with that same Jewish Deli Rye cornstarch glaze and then shower the top with more caraway seeds and a sprinkle of sea salt.  Yeah!  That's the ticket!!
  • exert more care in shaping the batards – there seems to be little self-correction from the dough itself.  Flaws in the shape will be obvious in the finished product.
  • perhaps try to give the dough a deeper score.


Changes from the original formula:

  • adjusted for 1500g, three batards at 500g each.
  • addition of 7g of IDY for a bit of “oomph”.
  • a 10 minute rest between pinch and fold and final mixing/French Folds.
  • couched instead of using a banneton.
  • activity times shortened (as usual) due to my warmer kitchen.

Baking underway - steam just released and batards rotated.

 40 minutes total bake time, 5 minutes venting on the baking deck.

alan

Colin_Sutton's picture
Colin_Sutton

Sourdough pain de campagne - first post here of something I've baked

I've been making yeasted breads for years, but recently started exploring sourdough.  Handling high (c.75%) hydration doughs has been a bit frustrating and at times it has felt like learning from scratch.  

My 100% hydration levain is working fine.  It's 50% wholemeal and 50% white bread flour, is stored in the fridge, and when using in a pre-ferment doubles nicely.  I love the fact that I developed my levain from scratch… and it works.

Trying a loaf at 65% hydration (including the preferment) has been helpful in restoring some dented confidence, not to mention a bit less frustration with breaking skins and gluey messes during shaping - or getting to the point where shaping was just impossible.  On occasions my loaves have been more like splats than boules(!)

Anyway, I've braved-up enough to post photos of my weekend bakes: two loaves of pain de campagne following the quantities and method from http://weekendloafer.com/2011/10/20/pain-de-campagne.

There's been a little variation from the recipe: I used Alinson strong bead flour (one of the main UK brands); the bannetons were dusted with wholemeal rice flour and cornmeal was scattered on the base of the loaves just before turning out.  Then...

1. The loaf on the (viewer's) left was cooked at the end of proving on a preheated baking stone, without steam.  I got a bit better oven spring than I've had on my last few attempts, even with steam and it was fantastic to be able to watch the dough rise in the first 10 minutes.  Clearly the dough was still expanding, because there was a bit of a split in the finished loaf at the end of baking.

2. The loaf on the right was from the same dough batch, but retarding in a banneton at 4°C for 12 hours and baked in a preheated 'La Cloche'.  This loaf was less rounded and slightly pointed on top.  The crust crackled nicely, as it can out of the oven and was slightly crazed by the time it was cool.

My conclusions based on recent sourdough baking:

  • I've been over-proving my loaves a bit too much until this bake;
  • Trying 75% hydration loafs is a bit too much to start with;
  • Watching YouTube videos on shaping doughs explains concepts that are nearly impossible to learn from a book.

Thoughts after this particular bake:

  • Retarding shaped loaves is something I will do more often;
  • My technique with a baker's grignette needs a lot more practice;
  • I still need to work out how to produce more oven spring;
  • I'm pleased with the open texture of the crumb.

Crumb-shot to follow.

Having had a bit of a dent in my confidence recently, I'd appreciate any thoughts from other readers, now that I seem to be heading in the right direction.  How can I build on this?

Best wishes & thanks, Colin

Pages