April 17, 2018 - 4:24am

Underproofed #uglybutdelicious #watchthedoughNOttheclock
Yesterday’s bake 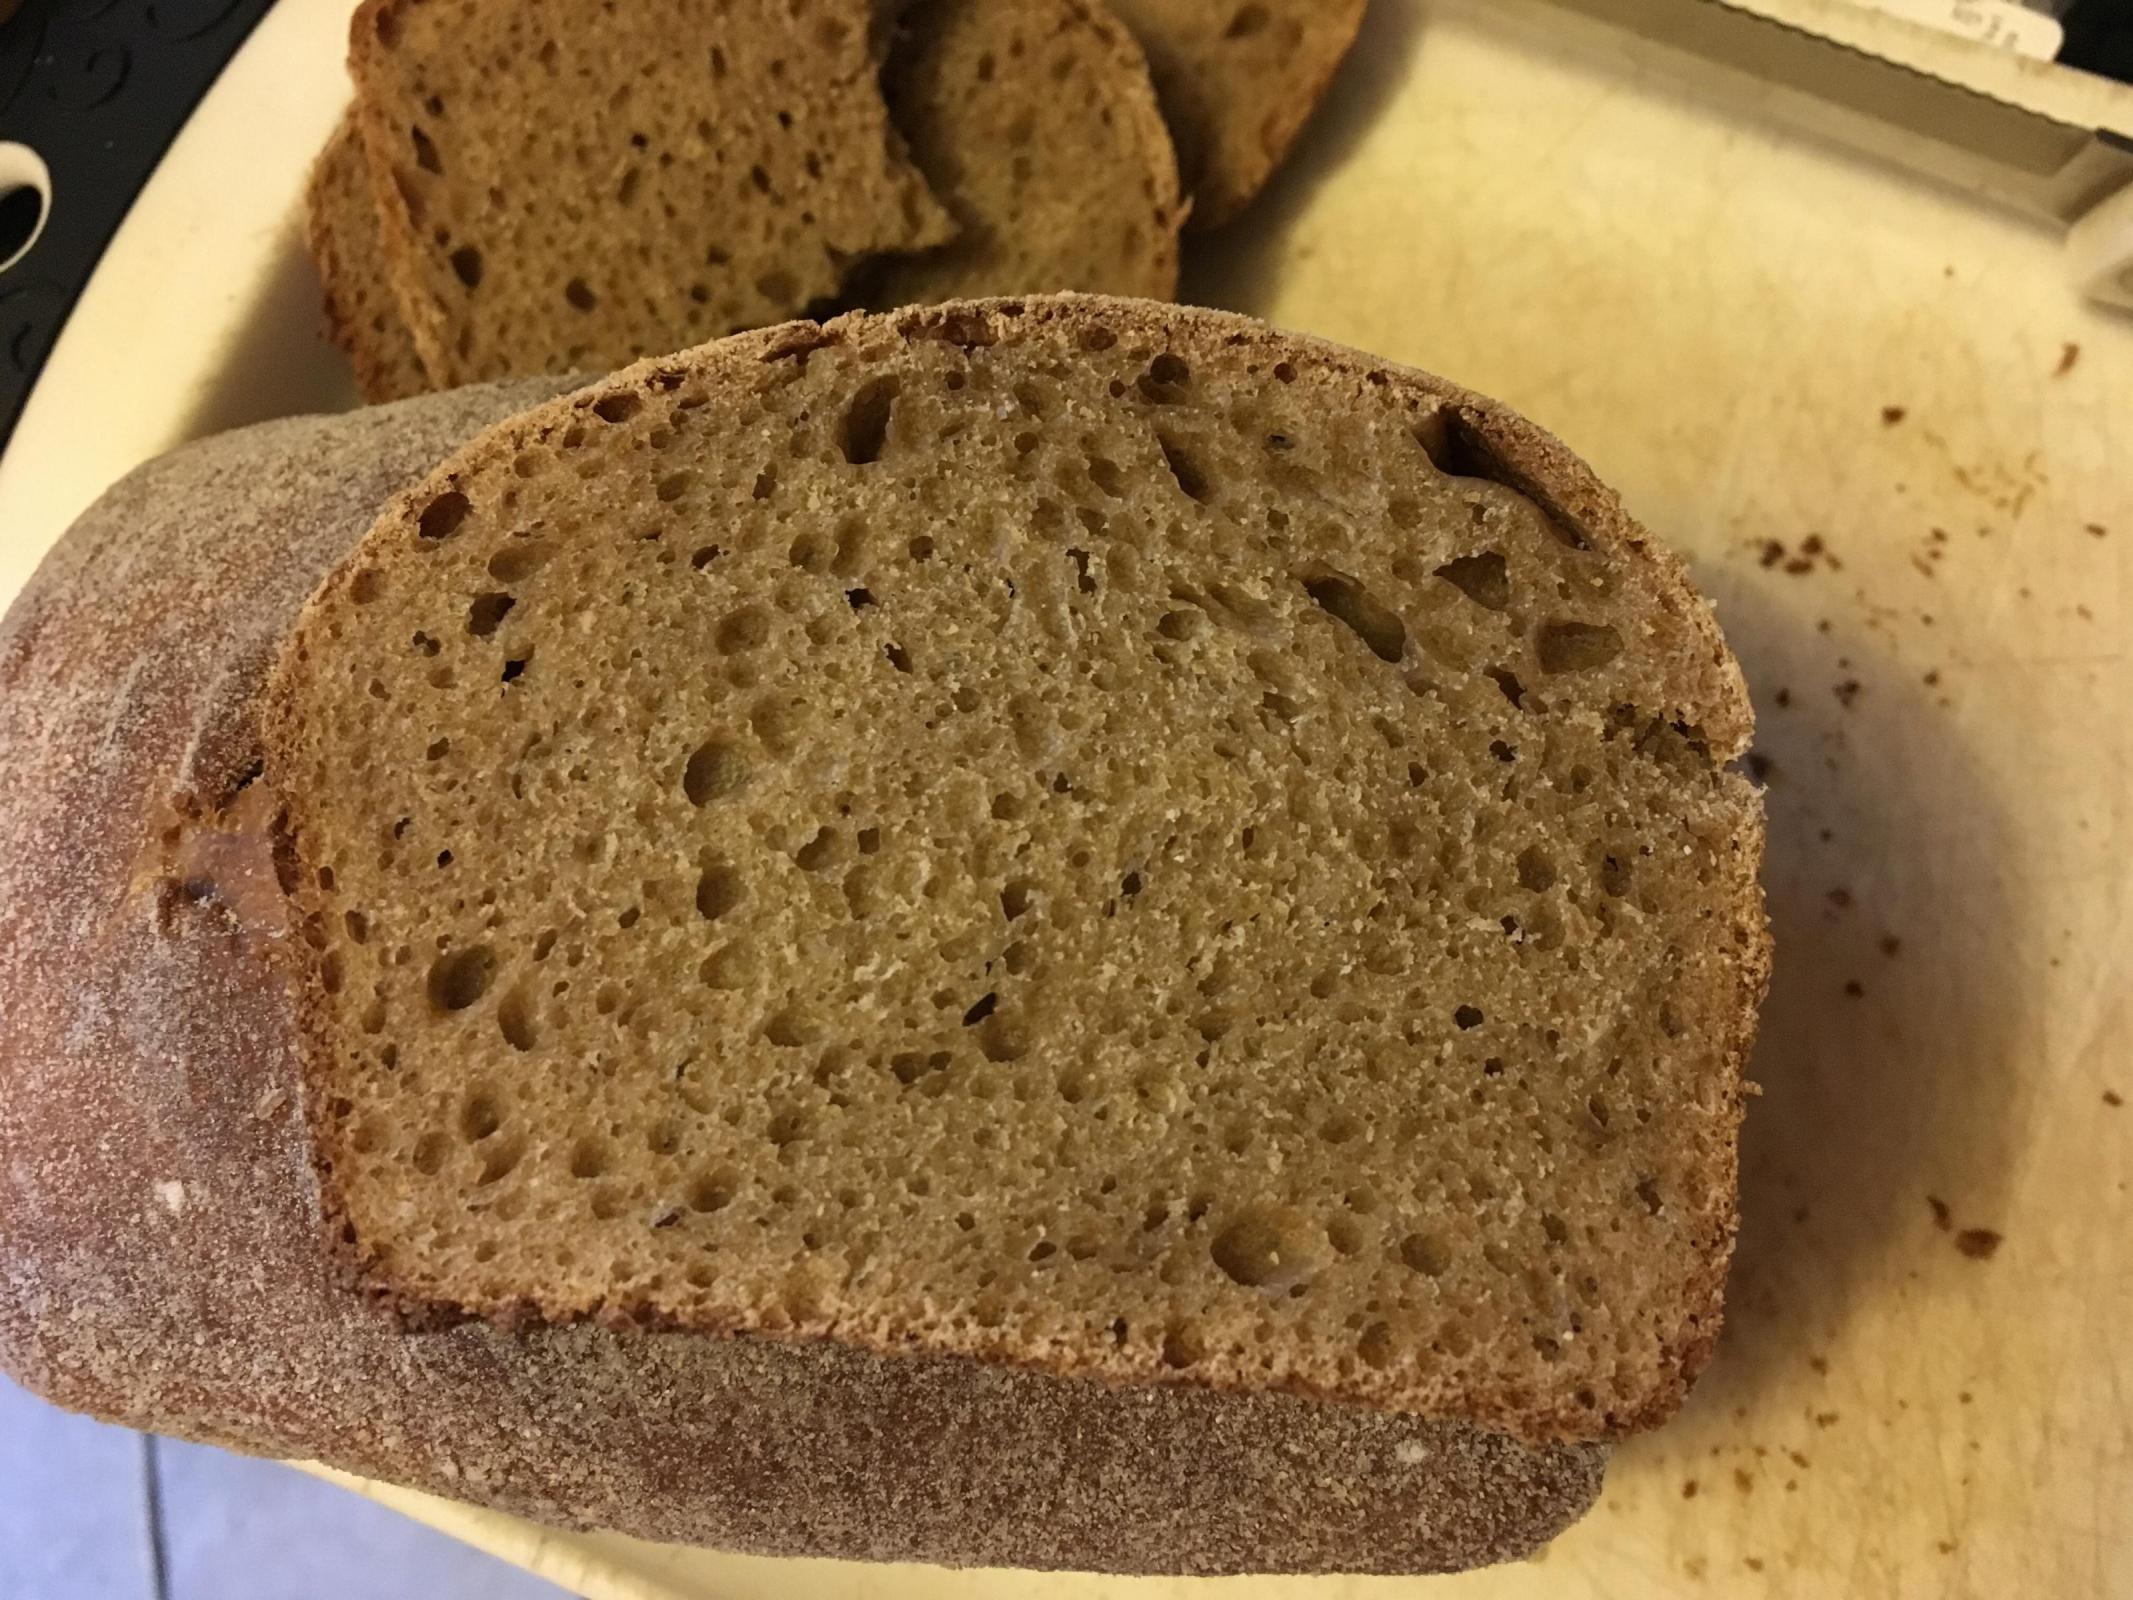
Share
Yesterday’s bake


First things first, hello I’m dink, and thanks to each of you for being such a collective of inspiration and encouragement. As a new loafer, I am looking to you for a suggestion as to what recipe or recipes I should try in my next few attempts.
Just let me know and I might even post my results, wether they be positive or otherwise. I literally have my fingers crossed.

TL;DR: looking for the ratio of flour:water:starter to give me 100% hydration but with more flour to starter ratio.
My bread recipe uses 100% hydration starter (or is it levain? - whatever you put in with water and flour when you make the bread). My schedule is to let the starter double over night so I can start making the bread in the morning. Since the weather is warming up, I want o give my starter more flour to chew on through the night. The question is what should be the ratio of water. If I use 2:2:1 (1 being the starter), then that isn't 100% hydration, right? (assuming 100% hydration means 30% of the total weight, so with 2:2:1, water is 40% or 33% more than with 1:1:1).

Recently, I read some comments on an old discussion topic here about the length of proofing time required for whole grain sourdough bread. Dabrownman mentioned that it is easy to over-proof whole grain bread because of the high bacterial, yeast and enzymatic activities. I wonder if I was letting my bread to proof for too long sometimes such that the oven spring was minimal at times, so I deliberately cut the proofing period by 20 minutes this time to see what its effect would be.

Simple Seeded Sourdough
Dough flour:
270g 90% Whole wheat flour
15g 5% Dark rye flour
15g 5% Whole spelt flour
For leaven:
10g 3% Starter
10g 3% Bran shifted out from dough flour
10g 3% Whey
For dough:
290g 97% Dough flour excluding bran for leaven
290g 97% Whey
34g 10% Leaven
10g 3% Vital Wheat Gluten
5g 1.7% Salt
3g 1% Dark barley malt powder
Add-ins:
20g 7% Toasted mixed seeds (10g white sesame seeds,7 g golden linseed and 3 g poppy seeds)
______________
310g 100% Whole grain
310g 100% Total hydration
Shift out the coarse bran from the dough flour, reserve 10g for leaven. Mix the rest back into the dough flour or soak them in equal amount of whey taken from dough ingredients for a minimum of 4 hours.
Combine all leaven ingredients and let sit until doubled, about 6-10 hours.
Roughly combine all dough ingredients and let ferment overnight for 10 hours. Fold in the mixed seeds and let the dough rest for 20 minutes. Construct 3 sets of stretch and fold over a 1.3 hour proofing period (20+30+30), shape the dough after the last set of stretch and fold and let rise untouched for 30 minutes (part of the 1.3 hour). At the same time, preheat the oven at 250°C/480°F and pre-steam at the last ten minutes.
Score the dough and bake at 250°C/480°F with steam for 15 minutes then at 230°C/446°F without steam for 15 minutes more or until the internal temperature reaches a minimum of 205°F. Let cool for at least 3 hours before slicing.

I felt the dough need longer proofing time but I still decided to bake it for experimental purpose. The resulting loaf turns out to be under-proofed indeed but the oven spring was really impressive. That’s enough to convince me that most of my loafs were slightly over-proofed. I would try cutting the proofing time by 10 minutes next time to see if it would produce a loaf with both great oven spring and open crumb.


I’m very pleased with the browning achieved for this bread. I think the dark malt plays a role in it. Although the blisters are not huge like those you find on the crust of white sourdough, there are a lot of them so it’s more than acceptable to me.

This bread actually tastes quite nice despite the slight denseness of the bottom of it. I really like the addition of dark malt, it reminds me of cocoa powder but in a sweeter and more complex way.

Sometimes I forget a simple loaf like this can taste amazing, it’s not a bad idea to bake some rather plain bread from time to time. Happy baking everyone!


Fellow Bakers,
I had the opportunity to get some special flour named Ruchmehl, which is used to make a darker bread in Switzerland. It is some sort of half-half wheat flour that provides a darker color to the crumb and nutty flavor. This flour is widely used in Switzerland for their daily bread.
The process was quite standard.
Levain:
10 g starter
50 g Ruchmhel
50 g water
Matured for about 18 hrs, which produced some sour notes to the bread flavor.
Dough:
All levain
245 g Ruchmehl
149 g water
4 g salt
Mixed well and kneaded for about 2 minutes on the counter. Applied 1 stretch and fold within the first 30 min into the fermentation. Let ferment for 1 hour and placed it in the fridge for 6 hours, then applied another S&F. Let it in the fridge for another 3 to 4 hours (can't remember well). Removed from the fridge and let rest on the counter for about 3 hours (final fermentation had some bubbles on the sides). Shaped and proofed for 45 min, then baked on a preheated oven / pot for 25 min lid on + 10 min lid off at 230C / 450 F.
I am pleased with the final result, including color, crust and crumb. The loaf presented a great nutty flavor with some tang notes, but nothing too overwhelming. The crumb showed a lot of small holes to my surprise, and that was a first for me.
If you have any experience with this kind of flour, please share here.

Yet more questions from an inexperienced but obsessed baker! I am trying to find a method that fits in with a very busy life. I have read that a lengthy bulk ferment produces excellent results. The suggestion was for an overnight bulk of 18-20 hours at ambient temperature, with reduced hydration and reduced amount of levain.
My present recipe is for 1000g whole wheat flour, 770g H2O, 20g salt, 300g levain@ 100%. If I adopted the long bulk approach, what would be the amount of levain and hydration that I should use? Does anyone have any opinion on the efficacy of the suggested long bulk ferment? Many thanks. Valerie
I


My husband and I are taking our first trip anywhere since we were married 3 years ago. We didn't have the funds for a honeymoon and the kiddo was created just one month after we said our vows. This year, for my birthday, I asked him to arrange a long weekend and surprise me with the destination. I wanted somewhere close enough that we could be back in a flash if necessary, but far enough that we had to take a plane. He chose Portland.
Naturally, I hear Portland and I think Ken Forkish. We're only going to be there for a couple days, but trips to his bakery and pizzeria are a top priority. Thus in preparation, I ordered Elements of Pizza.
I've only been at bread baking for just over a year. But I've been at pizza for over a decade. I spent 10 years working in the industry and I have a husband who loses his $&*^! at the mention of a Neopolitan pizza. Together, we spent years in pursuit of delicious pizza -- at restaurants and at home.
A few months ago, we made a trip to Central Milling. Much to our surprise and delight, we encountered Tony Gemignani's 00 flour. I've always understood that 00 requires north of 900 degrees, so I generally don't bother with it. But it's Tony. Tony of legend...Tony of some of the most delicious pizza I've ever had...Tony whose restaurant we never pass up even if it means we have to get in line half an hour early and eat our pizza standing up on the side of the road. So, yeah...we bought the flour with no real plans to use it.
In his 24-48 hour dough, Forkish calls for 00. I was skeptical for the reasons I mentioned. I also didn't think it could match the flavor of my usual 3 day cold fermented dough. But I followed the recipe. Anyway, it was the perfect opportunity to try this special edition 00 flour from The Legend.
I used my baking method. I developed it across much trial and error and it's the closest I can get to foolproof and repeatable results in the home oven. It solves two critical problems a). messy pizza transfers. b) the bottom being done before the top or vice versa. (I have never been able to get good results with the stone at the top rack under the broiler. My oven just isn't good enough and has too many hot spots. So, treating the bottom and top separately in this manner was a revelation.)
Amy's Pizza Baking Method
1. Place two oven racks in the oven. One at the lowest position and one at the highest position. Place steel or pizza stone on lowest rack.
2. Pre-heat oven at 550F for an hour.
3. Shape dough into disk. Transfer to parchment paper and top pizza as desired.
4. Use a peel to place the pizza with parchment paper on the lower rack's pizza stone.
5. After 2 minutes, your dough should be set enough to allow you to easily remove the parchment paper. Using tongs and pizza peel, remove the parchment paper.
6. Continue cooking until your pizza's bottom has reached your desired level of doneness.
7. Transfer pizza directly to the top rack. (It should have no problem being supported by the rack as the crust is well set at this point) and turn on the broiler.
8. Broil for 1-2 minutes until the top of your pizza has reached your desired level of doneness. Don't walk away. Watch it through your window so you know exactly when to pull it.
Forkish calls for a 7 minute bake time. I did 6 minutes on the bottom rack and 1 minute on the top. This pizza turned out a little too crispy. I did the second pizza for 5 minutes on the bottom rack and 90 seconds on the top rack. This was absolutely perfect. It had a thin crisp layer on the outside but a soft, air center. It was full of flavor. The difference in those 30 seconds from the first pizza to the second is transformative. It's not a matter of heat loss as the oven remained on and re-heated for half an hour between pies.
My pictures are not plentiful or super revealing, but this was really a great dough. Before bake the dough was more supple than any dough I've ever worked with, even without oil. This is some really good flour and it made a great pie.


Hello my dear gurus, I need to pick your brains once again.
I put together a dough last night and stuck it in the fridge, hoping to bulk ferment until after work today, then preshape/bench rest/shape and back into the fridge until tomorrow morning. "Problem" is that it looked like it's already doubled in volume. I stuck it back in the fridge, moving to the coldest spot.
So the question is: will there be any point to carrying out the rest of my plan (baking tonight isn't really an option), or will I wind up with a brick? Mind you, given the experiments I've been conducting in the last couple of weeks, another brick isn't going to killl me. But is there a way to save this?
It looks like I need to learn how to trust my starter -- after 3 S&Fs I'd given the dough an hour before refrigerating, fearing that it wouldn't rise enough by the time I got home.
Thanks so much for all your generous guidance.
Carole
PS: if it matters, this is a dough with 50g of 100% starter, 460g flour, 30g Greek yogurt and about 240g water, plus 10g salt…
i didn't realize this was even possible, but i was watching "the great british baking show - masterclass" last night, and saw mary use a food processor for some dough. i immediately rushed to the internet and looked it up, and found tons of recipes and videos using a food processor to make all sorts of dough including bread, pizza, cookies and cakes.
i'm over 2 months away from having a better stand mixer - i'm currently using a $34 sunbeam with a low speed that's literally faster than my daughter's kitchenaid's medium sped - but will be getting probably a bosch compact in mid june. in the meantime, i could use a bigger food processor - my mini isn't big enough to aerate enough flour to be useful and when i tried to use it to mix several dry indredients, they reached the top and only the middle was mixed - so i thought maybe i could get one now and use it to knead at least some doughs.
so i thought i'd ask you folks at TFL what you can and can't do when kneading or mixing using a food processor.
just started making sourdough and have had consistently good results from using a mates starter, 500g strong white flour, 250g water, 10g salt and 300g starter. as that always seems to come out well, i want to understand the different aspects of dough forming so i can experiment. could i ask a few questions to get me on my way please?
1. i dont really understand what gluten is or what it does to bread. i only know how to follow a recipe, not why. in my tried and tested recipe, i knead the bread for 10 minutes but dont know why, only that its something to do with gluten. however, i also know that the sharpness of wholemeal will cut into gluten which is 'a bad thing', so a 'no-knead method' is preferred. could someone explain what actually happens please, and if no knead works well for WW, then why not white too? why knead at all?
2. i just went straight in with a 100% organic white spelt flour which was a disaster. it had no strength to it and flopped like a pancake (i dont have a la cloche or anything, i shape in a long banneton and empty onto a hot stone). im told spelt is far harder to keep shape as it doesnt have the strength of normal white. however, i dont understand this, and i also have a pack of organic brown spelt, whats likely to happen with this, the same?
3. i just follow times given really, 2 hrs to rest, shape it then overnight in the fridge. i dont really know what im looking for after the initial 2hrs, i just shape cos it says 2 hrs. whats happening during this initial 2 hrs? i read that to test that its ready to cook, prod it with finger and if it comes back up halfway slowly thats about it. if the indent stays then its overproved, if it comes straight back up its under. is this the best advice for checking the proving?
4. im at present experimenting with a 50/50 wholemeal/white no knead method (cos wholemeal will cut the gluten if i knead it right?), and less starter, 100g. ive folded it every half hour for a couple of hours, its still pretty sticky. i dont really know what im doing and am a bit loathe to empty it into the basket as my last 'spelt splat' stuck to the linen when i emptied it which has made it really difficult to clean. i dont want to make that mistake again. will a sticky dough always stick to a well floured liner, so i need to ensure its not sticky before i empty it in?
5. best way of cleaning a liner after its all dried out with sticky dough?
6. what does more/less starter bring to a loaf of bread? a lot of recipes call for 300g starter, others just 50g.
think thatll do for now :D thanks for any advice you can give me, ive been reading loads and watching plenty of vids, so im getting the hang of some things, id just like to understand what happens and why so i can keep improving.
thanks