The Fresh Loaf

A Community of Amateur Bakers and Artisan Bread Enthusiasts.

Most bookmarked

HKbreadwinner's picture
HKbreadwinner

High Hydration Proofing Issues

Hello!  New to this forum and super impressed with the all the awesome exchanges.  I've been baking basic tin loaves forever: basic hearth loaves, silky Hokkaido milk loaves, etc., and they turn out great.  Kneading, rising, proofing, etc is almost second nature to me.  I've recently ventured into high-hydration (80%) rustic/artisan type breads employing a preferment (eg biga), and stretch and folds.  Here are the questions/problems I'm encountering:

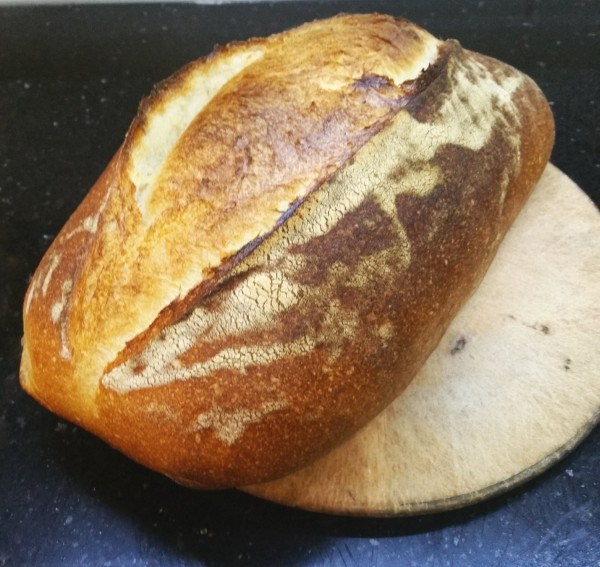
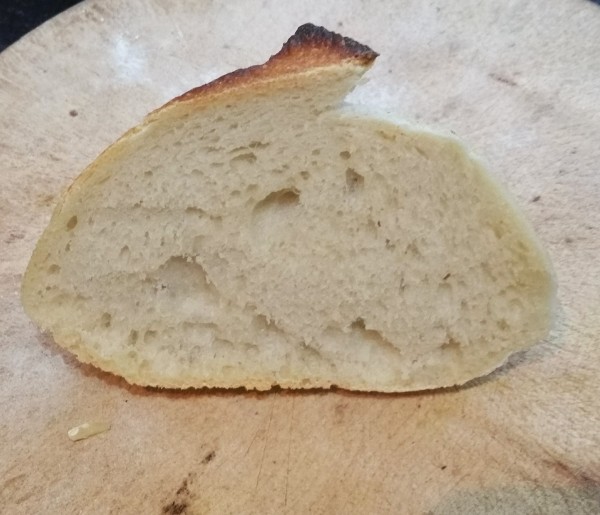
After the bulk ferment and shaping of the dough, I find that the final proof just doesn't rise like it does in the bulk ferment, and NOTHING like the rise I get when making regular sandwich loaves with 65/67% hydration and bread flour (high-protein flour).  Also, whereas I wouldn't dare to proof my sandwich loaves beyond and hour in normal warm conditions, most artisan bread recipes call for 2 hour proofs!  And even then my dough in the banneton barely rises.  Why does it rise so much in the bulk fermenting, but barely in the final proof?  How do you check if a high hydration dough is over-proofed?  Or is it normal for it to not rise as much as a lower-hydration dough?

Also, are you supposed to do any de-gassing (however gently) after bulk fermenting when dealing with high-hydration dough?

Lastly, if you choose to retard your final proof in the fridge, would you let it warm to room temp before popping it into the oven, or bake it immediately after taking it out of the fridge?

albacore's picture
albacore

Italian Biga Bread with Semola Rimacinata di Grano Duro

Abel's excellent 90% Italian Biga Loaf has created a lot of interest at TFL. I've made it a few times with great success, apart from once when I did the sourdough version, and it didn't turn out too well - dense/dry crumb - a victim of dough degradation in the biga, I now believe.

Not wanting to be beaten, and inspired by Lechem's recent bake I decided to have another attempt after getting some sound advice from mwilson on Biga procedures.

Then I chanced upon this recipe from Italian maestro Ezio Marinato. It's a biga based recipe, but uses 100% semola rimacinata. I had a bag of Divella semola in the cupboard that needed using, so the recipe was a good fit. I decided to use 50% semola and 50% bread flour as I believe that 100% semola can be a little dense.

I refreshed my stiff starter twice as per the recipe and then made the biga with 600g Waitrose Canadian flour (15% protein) - I guess Italians would call it Manitoba flour. I made the biga at 11pm and kept it overnight at 16C. In the morning at 9am I made the main dough with the biga and 600g semola. I upped the hydration to 65% on account of the 50% bread flour - all other additions were pro-rata. I mixed on low speed for about 4mins after the dough came together.

I pretty much followed the recipe instructions, eventually shaping to two 900g batards and a small boule.

I was quite pleased with how the loaves turned out - good oven spring, a subtle but pleasant flavour and a moist, tender crumb.

Lance

Hanzosbm's picture
Hanzosbm

My attempt at Pane casareccio di Genzano

After finding out that this was the official bread used for bruschetta in Rome, I had been wanting to try it for some time.  I went ahead and gave it a go this weekend using Local Breads as my guide.  Overall, it went pretty well.  I didn't use the bran coating simply because I didn't have any, and aside the some of the rise times, stuck to the recipe exactly.  

Here's what I got:

Flavor was good with a hint of sour, but the large open crumb near the crust is something I'd like to learn to fix.  My rise times were quite a bit faster than Leader gave and I chocked that up to it being a warm day.  Also, upon doing the first stretch and fold, oddly enough, the dough didn't deflate very much.  

Can someone suggest what I might have done wrong here?

Anonymous baker's picture
Anonymous baker (not verified)

Abel's 90% Biga (Italian Method)

A while back Abel posted his 90% Biga Loaf (Italian Method) which gained popularity. Here is my second attempt. 

Original Post: http://www.thefreshloaf.com/node/54556/90-biga-loaf-italian-method

My pre-bake forum topic (good to read through before attempting this bread): http://www.thefreshloaf.com/node/56013/did-anyone-do-abels-90-biga-using-sourdough-starter

The first time I tried it with moderate success. The temperature is very important which was a bit of a hit and miss but with the guidance I received in my forum topic yesterday I was ready to handle any obstacles. I was more ready for this bake. 

It seems more geared for yeast and while there is a sourdough option it's less consistent for good results. With the weather being warmer than usual, the biga performing better at lower temperatures and trying it using sourdough starter with no means of temperature control... the challenge was on! 

Thank you Abel, Alan, Michael and Lance for all your help and guidance. 

Danni3ll3's picture
Danni3ll3

Dab’s Eight Sprouted Grain Three Seed Sourdough 


My brother asked to add him to my bread list on a bi-weekly basis. Diabetes runs in the family and his doctor has told him to give up white bread in order to stay ahead of the game. So who best to emulate and steal recipes from but our very own Dabrownman! Well, while doing that, I discovered that Lucy is truly an evil creature! A four short legged creature, but evil nonetheless! The things that she puts Dab through in order to produce a loaf is nothing short of torture. No wonder his recipes start on Monday and finish on Friday. I spent a good part of each day this week, dealing with a myriad of different steps and discovering a few things along the way:


  1. Dehydrating sprouts takes a lot longer when you have a thick layer of grains. And using the rack that has the plastic liner for fruit leathers isn’t a great idea. I need to get one more piece of window screen to line that particular tray.
  2. Unhulled buckwheat is not the best thing for making sprouted flour. When you milled this, it leaves chunks of hulls that are very unsightly and huge! Remilling these chunks didn’t help at all! I finally sifted them out and gave them to the birds. They probably won’t eat them either!
  3. Using 12% as the amount of bran that will be extracted from the sprouted flour is too low. I was short 25 g so I need to up the amount of grain I sprout and mill.
  4. I hate toasting flax seeds! They start thinking they are Mexican Jumping Beans once the heat hits them and they fly all over the place. Even putting a screen on the frying pan didn’t help much! It makes it hard to ensure that the sunflower and pumpkin seeds that I put in the pan with the flax seeds actually get toasted. 
  5. Next time, I need to grind at least half of the flax seeds to get a better dough and for better nutrition.
  6. I need to use VWG more. Bread flour in the small 5 lbs bags is expensive and I go through them like there is no tomorrow them I am making 4 batches at once. 
  7. I originally dropped the hydration to 78% from Dab’s 85% but the dough felt too stiff so I brought up the hydration to 80% at the first set of folds. Dab had mentioned that this was quite a wet dough so I decided to be more conservative and add if needed. I should have added even more as the dough felt quite heavy in the end.


So here is the recipe:


Makes 3 loaves


Dough:

261 g of sprouted flour from Red Fife, rye, Spelt, Buckwheat (use hulled, not unhulled like I did, it will save you a lot of grief and agravation), Oats, Kamut, Selkirk wheat (hard red spring wheat variety), and Einkorn berries. (I used 62 g of each grain for sprouting. Next time, I think I would increase this to ~65 g. Process for making this flour explained below.)

355 g unbleached flour

330 g bread flour

700 g of water + 25 g

22 g salt

35 g yogurt

352 g 100% hydration levain (builds explained below)

Add-ins:

88 g pumpkin seeds

88 g sunflower seeds

88 g flax seeds


Making the sprouted flour:

  1. Weigh out the berries for sprouting and rinse them well under water. Leave to soak about 6-8 hours, drain well, and leave to sprout, rinsing occasionally, until the rootlets are just visible on the end of most of the berries. Don’t let the roots get too long. They should be about 1/16 to 1/8 of an inch. Total time from first washing the grains, soaking and then letting sprouts was 33 hours.
  2. Place grains in a dehydrator and dry until they are completely hard when you bite into a seed. If you crack a tooth, they are just right. ;-) The other way to find out if they are dry enough, is to weigh the berries and see if they equal the initial weight. In the past, dehydrating sprouted berries took only 3 hours but because I was making 4 batches and I had a thick layer of grains on each rack, this took about 7 hours.
  3. Put the grains through the grain mill and freak out because there are huge chunks of buckwheat seed coat in the flour. Decide if you want them in the dough or not. I chose “NOT”! To me, they looked like crushed insect exoskeletons. Ewww!
  4. Sift out the bran with a screen, then sift the bran again through a coarse screen to remove the buckwheat hulls but keep the rest of the bran for the first levain build and for dusting the bannetons. (I did this by first hand sifting the flour through a regular kitchen metal sieve to get the coarsest of the bran. I tried running this coarse bran through the mill on extra fine but the flakes still stayed huge. I even tried buzzing them up in a bullet. No luck! So I gave up on the idea of including these in the dough. The flour from the hand sifting was run through the Komo mill fine sifting attachment to get more bran extraction. Then I put the coarsest screen on the attachment and ran the hand sifted bran through. This got rid of those huge hull flakes but still gave me plenty of bran for the levain and dusting the baskets). 
  5. Save 176 g of the sprouted flour for the levain build and reserve the remaining 261 g for the main dough.

Add-ins:

  1. Weigh out the needed seeds and toast them in a dry frying pan. Be prepared to have your flax seeds impersonate Mexican Jumping Beans. Your kitchen will need a clean up after this activity!
  2. Reserve the seeds.

Levain Builds:

  1. A couple of days before making your dough, take 6 g of your starter and feed it 19 g of water and 19 g of bran. Stir every 8 hours or so. You won’t see much activity if any, but have no fear, the little creatures in there are doing their thing and multiplying like crazy. 
  2. Just before going to bed the night before, add 176 g of water and the 176 g of sprouted flour that was reserved for the levain. Stir down in the morning and refrigerate if you aren’t ready for it. Let rise again.

Main dough:

  1. In the morning, mix all of the flours with the add-ins and the water. Let sit for a couple of hours in a warm place (82F). Add the salt, the yogurt and the levain. Mix well to integrate the salt and the levain. I did 50 folds in the bucket. 
  2. Do 4 sets of folds each a half hour apart. Add the 25 g of water with the first set of folds. Let rise until 80-90% (~4.5 hours). Even though the dough had a lot of bubbles, it still felt quite solid. I don’t know if this was due to the add-ins or to the sprouted flour.
  3. Carefully remove the dough from its container (try to not deflate it), and divide into 3 equal portions of about 780 grams. Loosely shape into a boule and let rest for 45 minutes. Reshape the balls into boules and tighten the skin by spinning each ball like a top on a bare spot of the counter. 
  4. Sprinkle some of the bran into the bannetons and then place the dough seam side down. Cover and place in a cold fridge (37F) for the night. 

Baking:

  1. Preheat the oven and the pots to 475F for an hour. Place parchment rounds in the bottom of each pot and carefully place the boules seam side up. Cover and bake for 25 minutes at 450F. Uncover and bake for a further 20 minutes at 425F. Final internal temp should be at least 205F.

The boules felt quite firm when I took them out of the bannetons and I had doubts about good oven spring. This was justified as the first batch of six had minimal oven spring.  
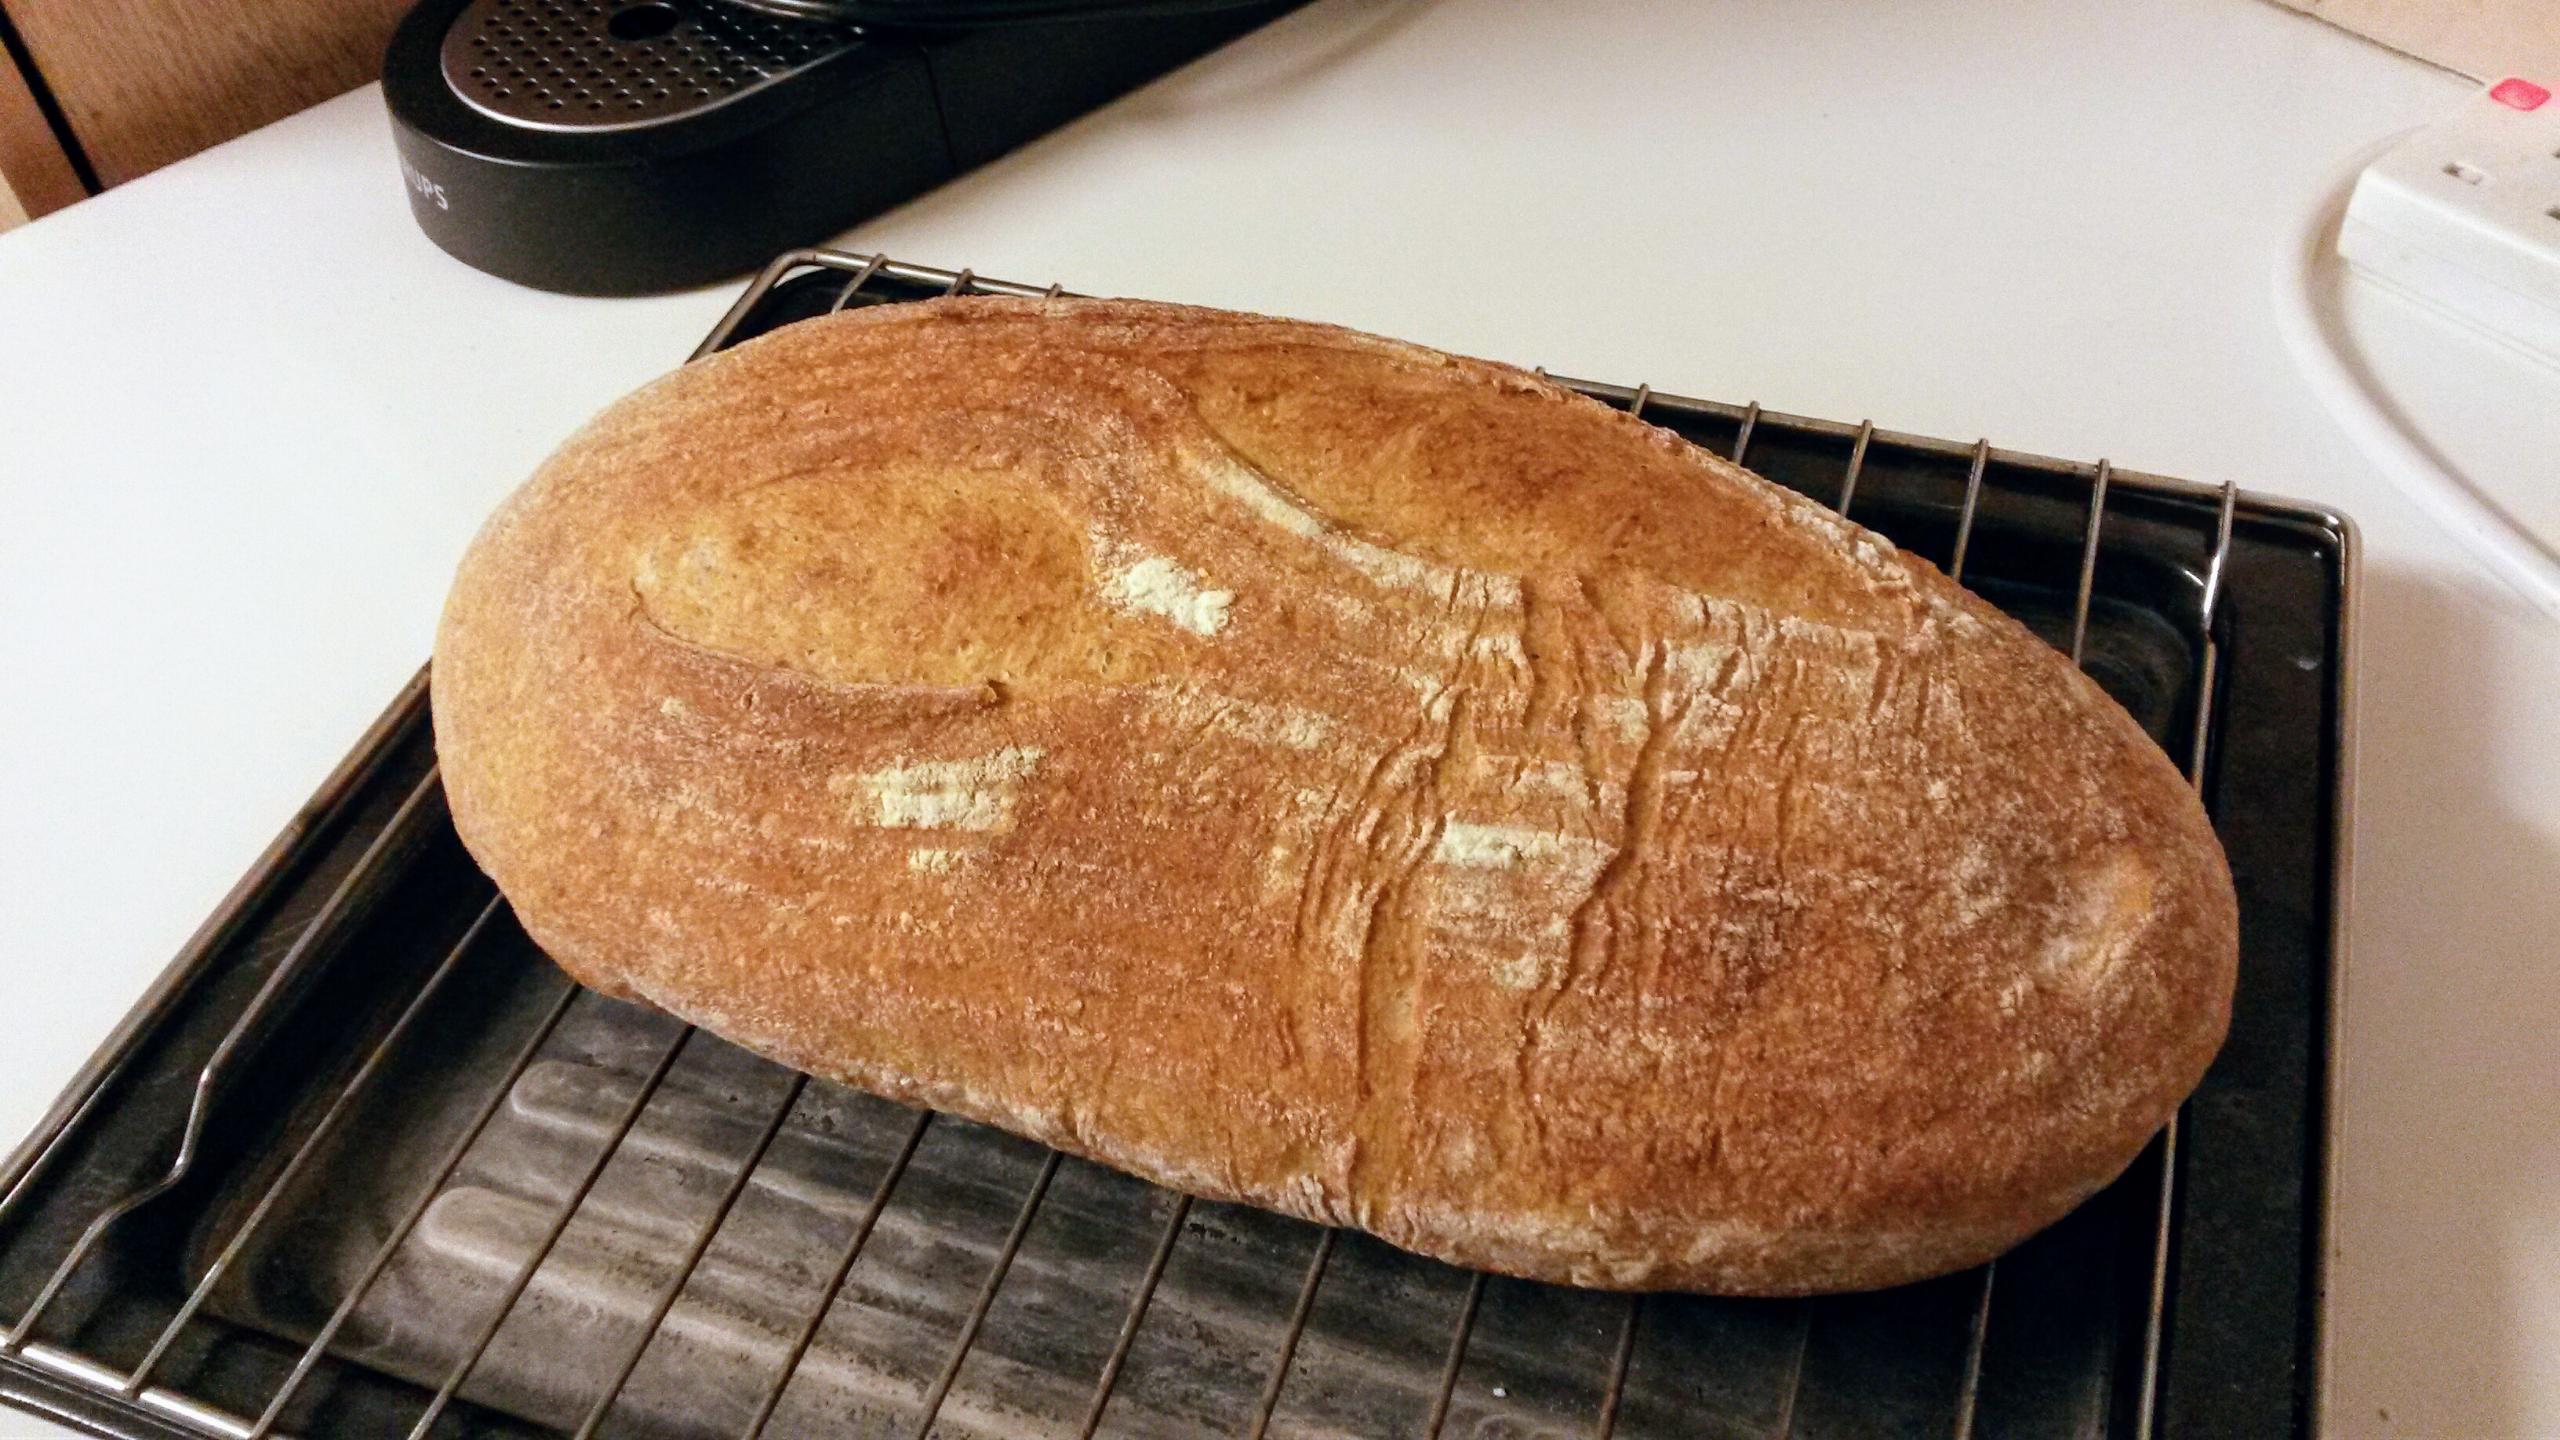
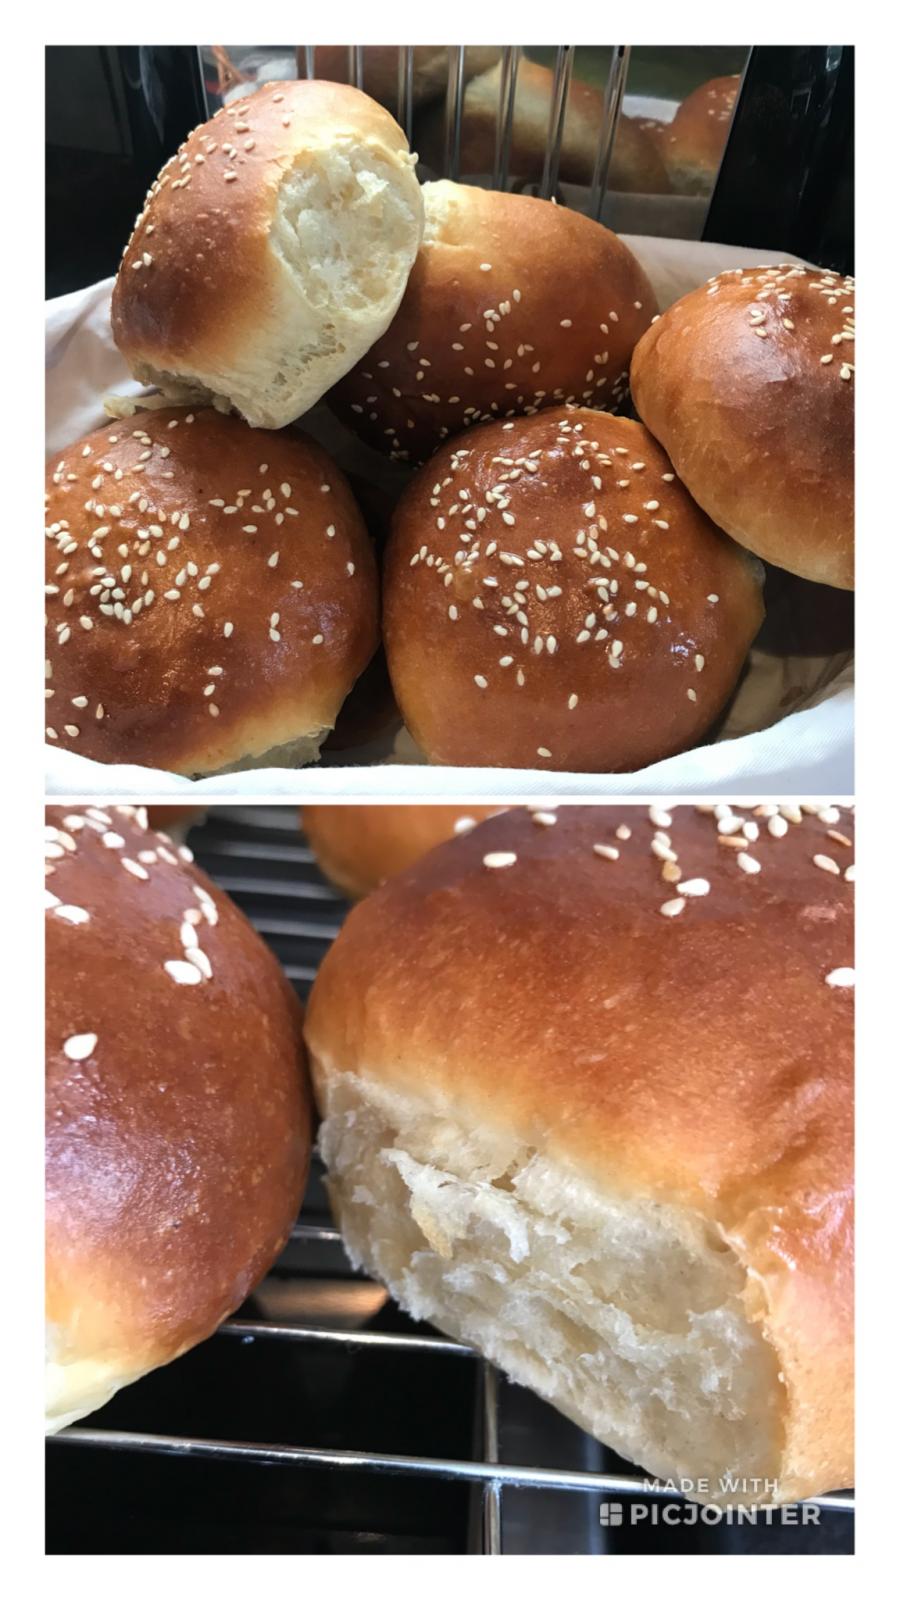
So I took out the other half dozen out of the fridge and let them warm up about 45 minutes on the counter before baking. The second batch had very slightly better oven rise and I got a deeper colour on the crust for some reason.  


So not a bad bake for Earth Day as I don’t think you can get more earthy than this unless you go for a 100% whole grain loaf!

Bagermanden's picture
Bagermanden

Lodge Combo Cooker maintanence / seasoning for bread only?

Hi


I just purchased a Lodge Combo Cooker and is pretty much only gonna use it for bread. I already have a Lodge skillet that i use almost everyday and season after every use. 


Is it the same thing for the Combo Cooker? How do you guys take care of it if you use it primarily for bread as well? Do i season it in oil after every bake?

Mason's picture
Mason

Second Hydration: why?

I regularly make bread by using a 66% hydration sourdough starter and a fairly stiff cold-autolyse soaker of all the rest of the flours I'll be using, so all the flour is somewhat hydrated for at least 8-12 hours.  

Usually it's about 40% whole wheat and 10% rye. I generally aim for a reasonably high hydration; often about 80%, but the whole wheat absorbs more, so it isn't totally liquid, but it is a sticky dough then needs a light touch.It needs the S&F to develop some dough strength. The photo above is from my last batch like this, with a wonderfully cool and chewy crumb and paper-thin crackly crust.

I reserve about 100g of the total water, adding that as a second hydration when I mix the soaker and sourdough starter together. I mix it in my Kitchenaid for a minute or so until it's evenly wet and mixed. I then let it sit for for about 30 minutes before I add the salt.

With the salt added, I mix about 3 minutes more. Then build final dough strength with 4-5 S&Fs over a couple of hours or so, before leaving for bulk rise (overnight in the fridge sometimes, depending on my schedule).

I do this "second hydration" because I read a few people on this site doing it.  TxFarmer, DonD, and David Snyder have attributed this to Anis Bouabsa.  I don't know much about him or his reasons for this technique.

I accept their expertise as a reason to save some water and give the dough a second hydration (I have made fairly good bread following their formulae and methods).

But I have no idea why this is supposed to be a good idea  

I like to understand the why as well as the how of bread making.  Not understanding why, I'm not sure if I'm doing it right.  

Is it just so the salt you add after hydration is incorporated easier, without the crystals cutting the gluten?  Or is there more to it than that?  

Explanations or corrections would be appreciated, please.


macette's picture
macette

Hunt for the perfect burger bun...

 Today’s bake is Hokkaido milk bread burger bun...this recipe from Growing Stella worked great as a burger bun, soft and light very happy ....

Anonymous baker's picture
Anonymous baker (not verified)

Did anyone do Abel's 90% Biga using Sourdough Starter?

If so, can you guide me through your process with your thoughts on the recipe when using sourdough starter?

Any tips and ideas?

miekenpetra's picture
miekenpetra

First attempt at sourdough - wet dough and minimal rise

Hello,

I'm brand new to sourdough and just made my first loaf. I didn't expect it to come out perfect on the first go but I want to know what I did wrong so I know how to adjust for the next go. 

I used a recipe with 775g water, 200g whole wheat flour, 800g all purpose (I used jovial einkorn all purpose), 150g levain (made with 25g rye starter 65g all purpose and 65g water) and 20g salt

The dough was very wet and stuck to everything, would not hold its shape when I tried to form it into a round. It rose a little during bulk fermentation but then I proofed for 24 hours in the fridge and it didn't rise any more. Just looked like a basket of thick pancake batter. Then when I baked it rose a tiny bit more and formed a nice crust but has the shape of a mushroom cap with a flat bottom and droopy sides. It's also quite tough and has a lot of large holes.

So, where did I go wrong?

My starter was 7 days old when I made my dough. Is it possible it was not mature enough? The recipe I used said it would be ready for bread in 7 days but to keep feeding it every day at room temperature for up to three weeks for best results.

Or is it something with the dough, like too much water or did I overwork it and break the gluten or something? Or is it overproofed?

Like I said I'm brand new to this so any suggestions would be helpful!

Thank you.


Pages