The Fresh Loaf

A Community of Amateur Bakers and Artisan Bread Enthusiasts.

Most bookmarked

Superbaker24's picture
Superbaker24

Sourdough under-baked ?

My Sourdough comes up regularly nice and dark and crusty, but inside it seems damp and under-baked.

Not wanting the crust to be burnt, would it help next time to reduce the oven temperature significantly and increase the baking time.

But how much lower, and how much longer ?

yozzause's picture
yozzause

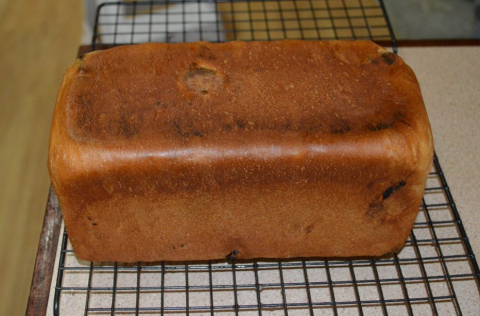
50% Pitted Prunes Fruit Loaf

It was  a Great day to have the oven on last week with a cold blustery day outside,  decided on a fruit loaf as the grand daughter was having a sleepover that night. i had a new bread tin that has a sliding lid in the cupboard so it was going to have its maiden bake and here it is sweet dough with 50% Pitted Prune Pan Loaf. hope you enjoy it as much as we did.

pul's picture
pul

Living dry starter recovered and performed better than expected

My starter has been living in the fridge since its creation, but last week it decided to die for some reason. Fortunately, I had some dry starter chips in the fridge, which I could revive and after two feeds the "new" starter was good to go, very active. 

I hydrated the dry chips for 4 hours, and then fed it twice over the next 20 hours. Notice that I used tap water directly and things worked out fine. I believe the tap water here does not have a lot of chlorine.

Baked a loaf made of 67% white + 33% mixed whole wheat and rye flour at 68% overall hydration and 9% fermented flour. I also added some 10% mixed seeds for texture (flax, quinoa, chia), which were soaked in cold water for about ten hours. Very pleased with the crumb and crust. The loaf had an explosive oven spring, tearing apart the scoring slit from side to side as never seen before in my loaves.


Anonymous baker's picture
Anonymous baker (not verified)

Why don't we (normally) include salt when making a starter?

I've heard of using salt to slow it down when feeding. I have also been told it isn't unheard of to use salt when making a starter from scratch. But 99.9% (a rough percentage) of recipes don't. Why?

Just to satisfy my curiosity I'm making a starter from scratch as follows...

  • Whole Rye flour 100%
  • Water 70%
  • Salt 2%

Each day I'll discard half and feed as above. 

So far it's been about 18 hours and it's fermenting nicely.  

I'll keep updating every now and again but what should I be expecting and how would this effect the final viable starter? Will it encourage more or less sour? Will it be stronger or weaker? Will it encourage more one type of lab and yeast than others? etc

____________________________________________________________________________________________

UPDATE: After 36 hours and one feed. Seems to be going very well. No discernible leuconostoc activity. It's a "controlled" ferment very much like a normal starter. But that could be because it's a very thick paste being 100% whole rye at 70% hydration. I'm using a very large tupperware container. It has doubled.  Please see photo above which I will change with every update.

Started with 50g whole rye flour + 35g water + 1g salt. It did grow over 24 hours but nothing remarkable (but then again it was just a small clump in a big container so wouldn't climb the sides just yet). It swelled to about 1.5x. Smell wasn't bad as such but - how to describe this - a slight smokey aroma with a fresh mowed lawn smell? Earthy, I think would be a good way to describe it.

24 hours in I fed it with again with 50g flour + 35g water + 1g salt, without discarding anything, after 12 hours it had much more activity and had doubled Has visible bubbles (enough to climb the sides now) and smells ok.

Not sure if I should just double the feed tonight (100g flour + 70g water + 2g salt) or begin to discard half and repeat the same feed. No difference really apart from the satisfaction of seeing it ferment more clearly and rise up the sides or save on flour.

_____________________________________________________________________________________________

Update 2: Arrived home to find the starter still peaked and with a lovely aroma. When stirring it there was no sunken in cavity (as one might find with rye when it appears still peaked but has fallen) but a lovely spongy texture. This was 48 hours after the initial mix and one feed in. So I proceeded onto the next feed which I decided to just add with no discard just yet. So the feed was as follows... 70g water + 100g whole rye flour + 2g salt. That was last night at 9.30pm.

This morning by 6am there was no discernible rise but on closer inspection there was some sponginess to it. I think we have entered the "quiet" stage and now we wait it out. Smell was fine, not like a freshly fed starter but definitely had some faint fermentation notes.

Some thoughts: 1. We have definitely not had any bad smells that usually comes off starters in the first few days. 2. A steady increase in activity till the first bubbling up. Nothing like the explosive activity from a leuconostoc stage but controlled, and strong, rather like an established starter. But this could be the nature of a low hydration rye starter unlike a high hydration wheat starter simply because of it being a thick paste. 3. Haven't avoided the quiet stage but it's not as quiet as previously experienced. It doesn't appear dead even if it hasn't risen up as such.

Will check up on it tonight 24 hours after the previous feed.

stantonfinley's picture
stantonfinley

Simple Sourdough Recipe Calculator

dabrownman's picture
dabrownman

Lucy’s New Almond Crust Fruit Stupid Tart with Peaches, Plums and Nectarines

Years ago, Lucy came up with a fruit stupid that had a sweetened, enriched bread dough for a crust.  This time Lucy really want all out with an almond crust, adding a cream Anglaise and cream cheese filling with the fruit on top.  This one is light years ahead of her first one if you ask me.

Baked almond crust


We used 3/4 can of evaporated milk, 2 eggs and 1/4 C of sugar for the Anglaise that we thickened on the stove and cooled in an ice bath with some orange zest and nutmeg to give it some flavor.  When it was nearly cooled we whisked in 1/3 C of whipped cream cheese.

Creme Anglaise filling down and the plums started

The almond crust was half ground whole almonds and half Lafama AP, 2 tablespoons of water, 2 T of melted butter, an egg, 1/2 cup of sugar and 1/8 tsp of salt.  We baked it blind for 12 minutes at 350 F until it just barely started to turn golden brown at the top edge and then removed it to a cooling rack

Ready for the heat

Once the crust was barely warm we spread the cooled Anglaise on and then placed the 4 black plums, 2 nectarines and 2 peaches, all sliced, in a rose pattern with the plums in the center.  Then the whole shebang was baked at 375 F convection for 36 minutes in the Mini Oven to give the fruit some color.

Glazed and waiting to cool

As soon as it came out of the oven, we glazed it with a tablespoon of apricot jam thinned with a tablespoon of orange juice.  It smelled pretty good baking and it looks good enough to eat but as soon as it cools we will put it in the fridge for coo; down for tonight’s dessert for the grilled salmon dinner with forbidden black rice, salad and steamed veggies.

eiriee's picture
eiriee

Left sourdough starter in fridge for weeks, now the liquid on top is black

Excuse the terrible photo, only the front camera on my phone works and the screen is also cracked to hell and back.

Title sums it up. It's been unfed for about 3 weeks. I've read that the liquid on top is hooch and that it's ok if it turns grey or dark, and that you should probably chuck it before feeding or stir it in for a "tangier" taste.

But how dark is too dark? Is this salvageable, and if so is it worth it or should I start again?

Thanks!

BethJ's picture
BethJ

1-2-3: Cream Cheese and Chive

Continuing my chronicles of 1-2-3 sourdough baking, here is a cream cheese and chive loaf.  Starting with 200 grams starter, I added 40 grams of cream cheese at the outset (before autolyse), and worked in 40 grams of chives during the S&Fs, starting with the 2nd S&F.

The bread came out tasty.  The cream cheese added just the slightest additional tang.  The chives were a little underwhelming to my taste, and next time I think I'll go 60 or 80 grams (if I can scrounge that much from my garden).  We ate it toasted with butter and cold-smoked salmon on top.  No complaints or leftovers - always a good sign!

I should note that I ran out of bread flour just before this bake.  Normally I would use 50/50 AP and bread, but this time it was 90/10.  I also had an issue with scheduling and had to cut the bulk fermentation down from my usual 4 hours to just under 3.  As a result of both these factors, the crumb wasn't quite up to par.


texasbakerdad's picture
texasbakerdad

100% WW Cooperative Baking with Franbaker

franbaker and I are going to be baking the same recipes and comparing the results. My bake yesterday is the first of our cooperative bakes. We both attempted PiPs' "Home with Bread/Fighting Gravity" recipe. I am looking forward to see Fran's post about her bake day results.

franbaker's post about her bake:

100% WW Cooperative Baking with Texasbakerdad


Recipe (thank you PiPs!):

Home with bread / Fighting gravity


Cool things about this bake:

  • Proofing in my clay baker and cooking the dough without an oven preheat worked out quite well:
    • Pro - Saved electricity (No need to time the oven preheat with proofing completion)
    • Pro - Zero risk of deflating dough when transferring to final cooking vessel
    • Pro - No loading of dangerously hot vessels
    • Pro - The oven steam production was impressive
    • Pro/Con - The crumb was softer and the crust was softer and chewier, I think I can change my baking temps, times, and top removal to achieve a crisper crust and a dryer crumb.
    • Pro/Con - The Romertopf retained so much moisture that even after baking for 40 minutes with the top on, the dough's surface was still wet looking. This could be adjusted by soaking the romertopf lid less, or pulling the lid off earlier, or cracking the lid open earlier.
    • Con - You have to use parchment paper to keep the dough from sticking to the vessels. Not having to use parchment paper would be a perk.
  • Breaking the dough hydration into multiple stages seems to do wonders for gluten development.
    • This is the 3rd or 4th recipe I have made in which the water is added in multiple steps to the flour. It seems like gluten development happens on its own pretty much when you have just enough water but not too much. Once you have the developed the gluten structure, you can add more water while retaining the initial gluten mesh.
    • I don't understand why this recipe called for french folds, after the 1 hour autolyse, the dough was pretty well developed. A french fold at this point seems like it would have done more harm than good.
    • I need to play with multiple stage hydration some more and develop some confidence that it 'always' works.

For convenience reasons, my plan was to make the following tweaks to the recipe:

  1. Halve the recipe and bake entire 2kg in my large Romertopf clay baker.
  2. Use my Ankarsrum mixer instead of doing the recommended french folds.
  3. Do the final proof in the clay baker and load clay baker into cold oven with dough inside. Adjusting cooking times to compensate.
  4. Skip the fridge retard

What actually happened

  1. 2kg seemed like too much for my Romertopf, so I split it into two, 1kg went to the romertopf and 1kg went to a dutch oven.
  2. After the 1 hour autolyse, the dough felt great, and I questioned the need for additional kneading. After adding the leaven and salt water, the dough still felt great. So... I decided the Ankarsrum was overkill for this dough and ended up doing about 10 stretch and folds over 1.5 hours to get to window pane dough.
  3. I proofed half the dough in the Romertopf, the other half was proofed in a boule banneton and then carefully loaded into a cold dutch oven.
  4. I tried to skip the fridge retard, but I had to go run some errands and ended up retarding the bulk ferment for about 1 hour.

The Bake:

Hard Red Wheat Starter (4 hours):

I started the sourdough 24 hours prior to usage, with a seed of 25g 100% hydration hard red wheat. I added 25g hard read wheat and 25g water. 8 hours later, added 50g hard red wheat and 50g water. Then, stole 46 g of that starter as a new seed for my final starter build. 46 g seed, 93 g hard white wheat, 60 g water. Waited 4 hours until usage.

46 g seed 100% hydration hard red wheat
93 g hard white wheat freshly milled
60 g water

Autolyse (1 hour):

950 g hard white wheat freshly milled
800 g water

Mix 1:

1750 g Autolyse (84% hydration)
199 g Starter  (71% hydration)

4 Stretch and Folds, then, wait 10 minutes...

Mix 2:

1949 g Mix 1 (81% hydration)
55 g Water
44 g Salt

Final Hydration: 88%

Bulk Ferment/Shaping/Final Proof:

  1. 4 Stretch and Fold, then, wait 30 minutes
  2. 4 Stretch and Fold, then, wait 1 hour
  3. 4 Stretch and Fold
  4. Bulk Ferment for 1.5 hours
  5. Retard for 1 hour
  6. Bulk Ferment for 2 hours until dough felt airy, but not bubbly
  7. Divided into 2, preshaped, bench rested for 10 minutes.
  8. Shaped 1 batard and put into parchment lined romertopf, Shaped 1 boule and put into rice floured banneton.
  9. Filled inverted romertopf lid with water.
  10. Proofed for 4 hours until poke test went from firm to a little bit bouncy
  11. Transferred boule into parchment lined dutch oven.

Bake:

  1. Drained romertopf lid and wiped off excess water.
  2. Using double oven, put one vessel in each oven and set temperature to 550 dF.
  3. At 35 minutes, reduced temperature to 460 dF.
  4. At 45 minutes, removed tops.
  5. At 65 minutes, removed bread from oven.
  6. Waited 6 hours before slicing.

Final Comments

  • The loaf cooked in the romertopf held onto its moisture much longer, I think that was due to soaking the lid. I am assuming why the romertopf loaf had about 20% more oven bloom than the dutch oven loaf.
  • The bread tasted great! Sort of a salty coffee flavor with a soft crumb and a chewy crust, it was really quite flavorful.
  • I like this loaf a lot. I would like to try this loaf with a harder crust and a dryer crumb. I would also love to achieve a lacy crumb at some point, because I want to know that I have learned to skills to do so.

Above: Dutch Oven Crust

Above: Dutch Oven Crumb.

Above: Romertopf Crust

Above: Romertopf Crumb

Above: Up close romertopf crumb

itsmen's picture
itsmen

Poolish or not poolish

Poolish or not poolish

Hello all,

I am a newbie to the forum and also a newbie bread baker, actually I shouldn't call myself a baker because I have been only baking since June '16, or 156 loaves to be exact, and the only thing I've baked so far is baguettes. So to clarify, I am just a newbie period!! I am still struggling with my dough handling and scoring; things seem to happen right only some of the times.

Since I was first exposed to baking baguettes I have tried quite a few different recipes and methods, from few hours no kneed to two day bake process.  Because of my inconsistency, too often my wife would say that there is little differences in results among methods I choose. I recently came across an article in this forum by Janetdo, where she mentioned Anis Bouabsa (http://www.thefreshloaf.com/node/8066/great-baguette-quest-n°3-anis-bouabsa), who did not use a prefermenter.  For the sake of efficiency, I want to bake quick and still get a good quality bread so comes this post- pretty much a comparison between a 36 hour poolish and non poolish recipe with various fermentation times.  I am also hoping to get some critics to learn more from people in the forum about making baguette.

Recipe:
. 500 g AP Ardent Mills (first time use)
. 375 ml water
. 10 g salt
. 1/4 tsp SAF
Note: for poolish: 150g of the 500g was mixed in 150ml water with 1/16 tsp of yeast

Method:
Poolish: 12 hours poolish at RT; mix poolish with remaining ingredients then slap and fold 3 times every 30'; refrigerate for 18hrs, 20hrs, 22hrs @ 43F; preshape approximately 2 loaves of 150g each for 60'; shape for 45'; bake at 490 for 12' and 460 for 8'.

Non-poolish:  Mix ingredients then slap and fold 3 times every 30'; refrigerate for 18hrs, 20hrs, 22hrs @ 43F; preshape approximately 2 loaves of 150g each for 60'; shape for 45'; bake at 490 for 12' and 460 for 8'.

The cold fermentation for both groups started at the same time in the same refrigerator.


Results:

After the long refrigeration time the poolish dough (right) was noticeable more in volume but it was not as smooth as its counterpart.  The polish dough was more bubbly and rougher where as the non poolish was smooth and glossy.  The non poolish also felt denser and more compact when handled but both seemed to have the same level of elasticity, hardly any noticeable differences when stretched.

Image 1

The first batch came out underbaked, I therefore increased the bake time to a little longer than 23'.  That resulted in batch #2 which was a little on the burnt side.  Batch #3 bake time was about 22'.

The poolish batches appeared to have better oven spring, except loaf #10 (batch #3, 22hrs).  I am not quite sure what happened in this batch but the non poolish loaf #12 also looked very deformed.  I can only guess that bad handling was the cause because timer was going off everywhere and I was rushing or perhaps 22 hrs was a too long of a fermentation process?  The crumbs also seemed to be denser in batch #3 except for loaf #9, a result that completely surprised me because I was expecting these loaves to be the best looking of all.  The #10, #11, and #12 were the most inferior looking in the entire experiment.  I could not say that they were under proofed or under baked because #9 did not exhibit any of those problems;   It is another baking mystery to me, may be someone can point out the possibilities.

Batch descriptions:
Batch 1 (top row, 18hrs): 2 loaves of poolish (#1, #2) and 2 loaves of non poolish (#3, #4)
Batch 2 (middle row, 20hrs): 2 loaves of poolish (#5, #6) and 2 loaves of non poolish (#7, #8)
Batch 3 (bottom row, 22hrs): 2 loaves of poolish (#9, #10)and 2 loaves of non poolish (#11, #12)

Note: 
loaf #2 is not in the photo, I had to make a sandwich for my daughter who was hungry and eager to leave the house.
loaves #5 and #6 were a little undersize- they were about 125g.

Note: the image below was rotated 90 counter clockwise when it was uploaded and I couldn't find the way to fix the problem. So, column #1 in the image is actually Row #1, loaf #1 is at bottom, loaf #4 is on top.  Column #2 is middle row, loaf #5 is at the bottom and #8 is on top, so on..  The image comes after matches the batch description stated above.

image 3


image 4

I could not tell the difference between the 18hrs, 20hrs and 22hrs fermentation time among the two groups as far as taste goes, but I could tell that the poolish groups had better flavor when doing a side by side smell test.  A subtle difference that I may not be able to detect if doing a stand alone taste test but it is easier when they are next to each other.  That kind of bring up the thought of how Anis Bouabsa bread was rated the best??

Conclusion:
At my level, it doesn't seem to matter much which method I would choose, poolish or non poolish, since they can both yield good tasty loaves of bread.  It appears that I could use a shorter fermentation time without any noticeable differences but the questions is- how much shorter.  So until I become more bread snobbish I would just use whichever one that I feel like doing and bake away.


sandwich

Thanks for reading and happy baking!


Pages