The Fresh Loaf

A Community of Amateur Bakers and Artisan Bread Enthusiasts.

Most bookmarked

albacore's picture
albacore

Three Hour Bench Rest?

While surfing the interweb, I came across the baker Dave Miller. He is a craft baker specialising in freshly milled whole grain bread.

What caught my eye was his use of a 3 hour bench rest, as noted here.

Just wondering if anyone has ever tried this?


Lance

gotokyo's picture
gotokyo

Can I Press *Pause* on My Starter?

I was going to bake loaves today but had other things come up, so I portioned out and fed the starter again to give it a feeding until it's time to make dough.  But given I fed it at around 5pm, instead of making a dough for autolyse..... I'm not into waking up a 4am to make dough!  Can I either 1. Put it in the fridge to slow it down until morning, and proceed as usual to make my dough, or 2. Give it a sort of "half" feed just to tide it over a few extra hours past usual "feed" time until I can put it together in the morning. I have 4 cups of bubbly starter ready built up and I don't want to have to divide and fully feed AGAIN to get back to 4 cups tomorrow for an evening/overnight autolyse.  I hope any of that makes sense :)

leslieruf's picture
leslieruf

Swiss farmhouse bread - just for Abe

I won’t write it up again but here you go. Raspberry YW, raisins & pecan nuts.  divine!

and crumb shot.

Leslie

leslieruf's picture
leslieruf

just found this interview with Trevor J Wilson

https://brotokoll.com/open-crumb-mastery-a-holey-talk-with-trevor-j-wilson/?lang=en


I picked this up from Trevor’s instagram post, sorry I don’t know how to link to it but he writes a bit about the interview.

Leslie

Danni3ll3's picture
Danni3ll3

9 Grain Harvest Sourdough or 1-2-3 with Lots of Grains

This weekend is Canadian Thanksgiving, and as usual, I have been asked to bring bread to the family dinner. Because it is going to be served with a number of different courses, I needed a rather plain sort of bread. At the same time, the 1-2-3 challenge presented itself. So how to combine the two… well, it is the harvest, might as well use the plethora of grains that are in my pantry as well as some flour from the local miller. He produces 100% wholegrain flour and a partially sifted flour. I bought both at the Farmer’s Market and made sure to include some in my recipe (the levain was made with this). The remaining grains were simply milled into flour and the bran sifted out to also feed the levain.


I must note that I initially thought “Yay, no math!”. But then reality kicked in. I needed to make loaves of a certain weight because I was selling some, I had to make 4 batches, each batch needed to make 3 loaves, I had to figure out the total amount of flour and how to split that between the levain and the main dough to respect the 1-2-3 challenge, the levain had to be multiplied by 4 with a bit extra so I would have enough, then that amount had to be split up to make a 3 stage levain, I had to decide which flour and how much would be used to put into the levain with the sifted bran, and so on and on and on. Just be happy that the math is all done for you in the recipe below. 


Recipe

Makes 3 loaves


Ingredients:

70 g Einkorn berries

70 g Spelt berries

70 g Kamut berries

70 g Rye berries

70 g Red Fife berries

70 g Selkirk berries

70 g Buckwheat groats

77 g Brulé Creek whole wheat flour 

76 g Brulé Creek partially sifted flour

630 g unbleached flour

720 g water

360 g 3 stage 100% hydration levain (process below)

25 g pink Himalayan salt

30 g local yogurt


The morning before:

  1. In the morning, mill all the grains and sift out the bran. I ended up with 459 g of sifted flour and 29 g of bran. Reserve the bran for the levain. 
  2. Place the sifted flour in a tub. To the tub, add the unbleached flour. Stir, cover and reserve for the next day.
  3. Take 26 g of starter from your fridge and feed it 26 g of water and 26 g of the bran. 

The evening before:

  1. About 12 hours later, feed the levain 52 g water and 52 g bran/wholewheat flour. Let rise overnight. 

Dough making day:

  1. Do the final feeding of the levain. Add to the levain 104 g each of water and wholewheat/partially sifted flour. This should use up all of the Brûlé Creek flour. Let rise till double. This took about 6.5 hours but mine sat for another couple of hours while the main dough autolysed (life got in the way). Amazingly enough, it hadn’t started receding when I finally got back to it.
  2. A couple of hours before the levain is ready (or in my case, when the levain was ready but I made it wait), add the water to the tub of flour and autolyse for 2 hours. I must note that I had to work a bit harder to get all of the flour hydrated. I do prefer to work with a slightly more hydrated dough but in the spirit of sticking to the 1-2-3 recipe, I didn’t add any water although I was sorely tempted to do so. I added the salt on top of the dough and left it there during the autolyse. 
  3. After the autolyse, add the yogurt and the levain. Mix well and let rest 10 minutes. Do in tub folds until the dough pulls away cleanly from the sides of the tub. Let rest 30 minutes.
  4. Do three sets of French slaps and folds (75/40/10) at 30 minutes intervals. Again on 30 minute intervals, do 2 sets of stretches and folds in the tub. Let rest until you can see bubbles through the walls of the tub, the dough feels a bit jiggly and there are some bubbles along the walls of the tub. The dough should have risen about 20%. I must say that this dough was a lot firmer than what I am used to and the gluten seemed to develop much faster. Total bulk fermentation at 72F was 3.5 hours. 
  5. Tip the dough out on a bare counter, sprinkle the top with flour and divide into portions of ~730 g. Round out the portions into rounds with a dough scraper and let rest 45 minutes to one hour on the counter. 
  6. Do a final shape by flouring the rounds and flipping the rounds over on a lightly floured counter. Gently stretch the dough out into a circle. Pull and fold the third of the dough closest to you over the middle. Pull the right side and fold over the middle and do the same to the left. Fold the top end to the center. Finally stretch the two top corners and fold over each other in the middle. Roll the bottom of the dough away from you until the seam is underneath the dough. Cup your hands around the dough and pull towards you, doing this on all sides of the dough to round it off. Finally spin the dough to make a nice right boule.
  7. Place the dough seam side down in rice floured bannetons, cover, let rest for a few minutes on the counter and then put to bed in a cold (38F) fridge for 8 hours. 

These are proofed and ready to go into the oven. 

Baking Day:

  1. The next morning, heat the oven to 475F with the Dutch ovens inside for 45 minutes to an hour. Turn out the dough seam side up onto a cornmeal sprinkled counter. Place rounds of parchment paper in the bottom of the pots, and carefully place the dough seam side up inside. 
  2. Cover the pots and bake the loaves at 450 F for 30 minutes, remove the lids, drop the temperature to 425F, and bake for another 17 minutes. Internal temperature should be 205F or more.


Once again, the shorter bulk and proof are giving me loaves that I am quite happy with!

leslieruf's picture
leslieruf

Understanding my starter

Dan has been talking about starters and activity so thought i would have a look at how mine performed.

My starter is a relatively firm one, and I usually refresh it based on the original post by Zolablue. This was the first starter that worked for me 4 years ago after several failed attempts.  I mix 10 g starter + 20 g water + 30 g flour.  Later in the day I repeated this mix and left it overnight.

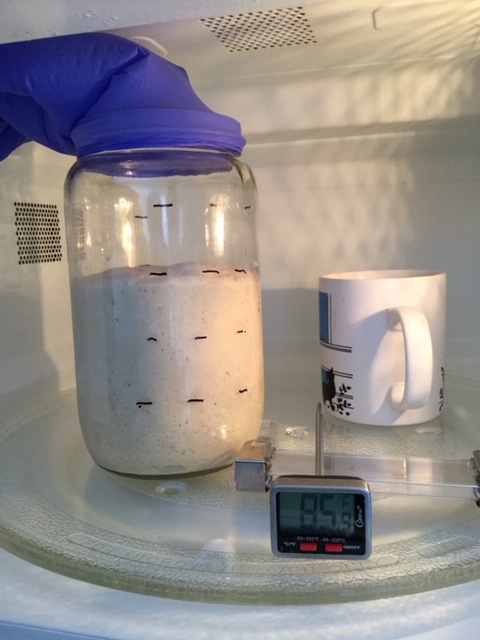
 In the morning I mixed up a new batch of 240 g starter and placed in a 1 litre glass preserving jar.  I marked the sides every 200 ml as the starter was approx. 200 ml in volume.  I wanted to see just how active my starter is at around 80 deg F.  I topped the jar off with a glove to see what gas production there was.  I preheated a cup of water in my microwave, thought I had it pretty much at 80 deg F but it was actually more like 82 – 85 deg F all day.  The door was propped open and temperature remains quite stable.  

08:20 am

10:55 am - not a lot happened so far


I had to go out at this point and hoped it would be ok but when I got back at

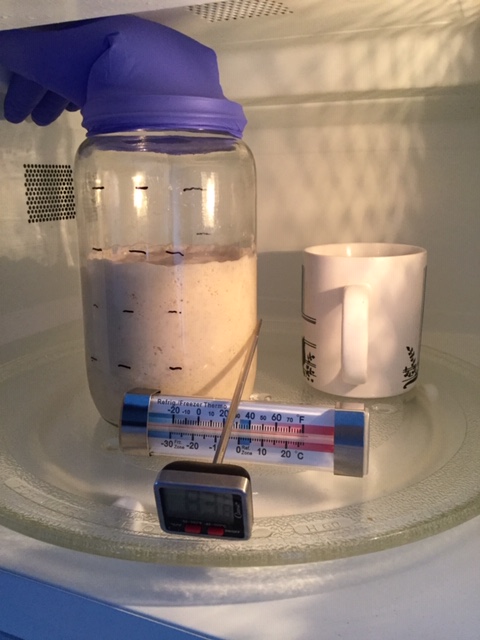
15:15 pm - this was the peak, glove full of gas. 


18:20 pm 


20:20 pm – 12 hours after mix and well past peak. 

 At this point I stirred the starter down,  level was just a bit above 200 ml mark, shut microwave and left overnight to see what would happen.

Just on midnight – on the move again

8:20 am next morning – it has doubled again but not a lot of gas in comparison to first peak.

Okay, now what happens when I have my firm starter at 66% hydration and compare it to a starter at 100% hydration?

Mixed up another batch of 66% starter using this as seed

Mixed up a batch of 100% hydration also using this as seed. 

Marked another jar in 200 ml steps and placed 230 g starter in each labelled jar, topped off with disposable glove.

Jars were left at room temperature and photographed as I could.

09:20 am start

11:20 am not a lot of activity in 66% but 100% was on the move but here at

13:40 pm 66% is cranking up with gas production ramping up and 100% has more than doubled

16:15 pm 66% has really out produced 100% in gas production and volume is also greater.  100% has just past the peak and is receding, less gas production.  

18:30 pm 66% reaches peak, 100% still very frothy but receding


21:20 pm - 12 hours after start both have past peak and receding


07:10 am  here they are this morning, at the end of the 24 hours. 100% has returned to starting volume although 66% had strength to stay a bit longer.  

Fascinating the way the 2 different hydration starter performed. comparing them side by side has been enlightening.  

The first part at 80 - 85 deg F the starter tripled - so I am happy with that but I don't know if more activity is achievable.

How would this impact on crumb?  would an even more vigorous starter (if it say quadrupled) give a more open crumb? 

It is often mentioned that firm starters are stronger, so it was interesting to actually see that happening.  the 100% hydration starter did not appear to have produced as much gas either - is this because there is less flour (food) in the same weight of starter?  

A few things to ponder.

Leslie


anthonyv23's picture
anthonyv23

Starter - My First Sourdough Loaf and Maintenance Questions

Hi All:

Thanks for several members on here in a previous post I was able to rehabilitate a start that wasn't taking off. It eventually looked as if it were taking off and I decided to bake my first loaf with it. Pic attached. Interesting experience, I have some troubleshooting to do on it ... as you can see the loaf spread wider than rose. But that's all OK for now. The taste was pretty good and the texture seemed very good. It will improve as I continue to feed my starters and learn more about my recipes, I am sure.

So, now that I have an active starter - at room temperature - and I am feeding each day. Basically, the routine goes like this: In the morning I scoop of discard leaving about 40g of starter. I then add 80g flour and 80g water to it. Let it sit at about 82*F for the day. It will rise throughout the day and by evening but quite frothy and risen. Actually, last evening it blew the top off the glass jar.

Anyway, my main question is how do I maintain this starter? Do I just keep doing what I am doing and bake with it as needed? I guess my concern is, there isn't very much starter I am maintaining. If I want to bake a loaf that uses a significant portion of starter - how do I multiply? Do I simply save and feed the discard, say, weekly? Or can I pull out a small portion of starter (20g) and feed that without discarding over and over again until it multiplies and is properly active? What are the rules! Ha.

Thanks all.

Bakertrav's picture
Bakertrav

Sourdough blowout

Hey guys. Had some blowouts on my loaves today. The taste was very good. 

25% whole wheat

25% starter

2% salt

67% hydration

1.5 - 2 hour bulk with 2 stretch and folds. Cold proof for approx. 17 hours. 


Any ideas as to why this happened? Too much steam? Scoring not deep enough? Underproofed?


chleba's picture
chleba

what's the point of an oven's proof setting?

My oven has a proof setting.  It uses the light and fan only.  I did a long-term measurement, and it starts at ambient room temp.  If ambient is about high 60F, it takes roughly 4 hours to get to 100F, then hovers around that temp.  Obviously it's not meant to stay on for only a couple hours.

What's the point of it, if it takes 30-60 minutes to pre-heat the oven to bake bread?  One would risk over proofing if you allow bread to fully proof.  On the other hand, you can start the proof, then remove to preheat the oven, but that seems.. like a waste of energy.  It would work if I had two ovens, but I don't.

Thanks for your thoughts :)

rgreenberg2000's picture
rgreenberg2000

Very first baguettes

Ok, so this weekend, I posted for the first time in over two years, and I mentioned that I'm not very adventurous......and, yet, here I am, posting about making my first ever baguettes.  I have long drooled over the many wonderful baguettes posted here, with Alan's leading the pack.  So, I got a bit of a wild hare, and decided that I'd give the baguette shape a go.  I started with one of my standard formulas - 75% AP, 10% WW, 10% Semolina, 5% Rye @ 70% hydration.  After doing a bunch of reading, and watching the King Arthur baguette shaping video, I dove in.....

I made up a standard batch with 1200g flour, autolyzed, S&F'd, and bulked.  I pulled off three portions of about 355g each, the remaining portion was destined for my usual batard.  I bench rested the dough, then shaped, and ended up with this (I floured the bejeezus out of my couche due to sticking issues the first time I used it!):

Proofed these up for about 90 minutes at room temp, then popped them into a 475f oven with steam:

Hee, hee.....I forgot to determine the length my stone would accomodate!!!  What a dope! :)  Oh, well, soldiering on.......

Well, I'll be darned, these don't look too bad at all (15 minutes with steam, 15 without):

Crumb shot (I love the color of semolina!!):

I was so excited, I had to have a sandwich in the vein of those I've had in Paris (butter, meat, cheese):

I'm pretty happy with how this first attempt turned out.  I will measure my stone for next time, will probably reduce the hydration to make for easier handling until I get used to shaping these, but really, I have no complaints!  They will get better with practice!

R

Pages