The Fresh Loaf

A Community of Amateur Bakers and Artisan Bread Enthusiasts.

Most bookmarked

thegreatbelow's picture
thegreatbelow

Taking this recipe further

Hi everyone, new member to the forum here.

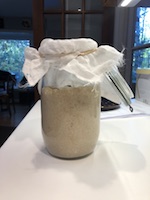
I got hold of a nice rye sourdough starter from a local Facebook group and have baked a couple of times with the following recipe: 

Classic sourdough recipe

It's worked quite well and now I'm looking for the 'next step' to take my bread a little further, perhaps to get a slightly more sour taste from my loaves and generally just to branch out now I have this recipe under my belt. 

I understand this recipe is quite basic and seems to skip a lot of steps and time compared to other sourdough recipes I've come across. Although this was one of the factors that drew me to the recipe in the first place I'm now ready to try some more advanced steps! I should add that the few times I made this bread I upped the water content a little, 175-200ml which the dough seemed to take quite well. 

Please let me know how I can expand on this recipe or if you have some other simple recipes for me to try that worked out great in the past when you were starting on your sourdough journeys. 


Here is the original recipe copied below:


Ingredients Method
  1. Combine the flour, starter and salt in a large mixing bowl. Add the water, a little at a time, and mix with your hands to make a soft dough (you may not need all of the water).

  2. Coat a chopping board or work surface with olive oil, then tip the dough onto it and knead the dough for 10-15 minutes, or until the dough forms is smooth and elastic. 

  3. Tip the dough into a lightly oiled bowl and cover with cling film. Leave to rise in a warm place for five hours, or until at least doubled in size. 

  4. Knead the dough until it’s smooth, knocking the air out. Roll into a ball and dust with flour. 

  5. Tip the dough into a well-floured round banneton or proving basket and leave to rise for 4-8 hours.

  6. Put a tray half filled with water on the bottom oven shelf and preheat the oven to 220C/425F/Gas 7. 

  7. Gently tip the risen dough onto a lined baking tray. Bake the loaf for 30 minutes at this heat, then reduce the heat to 200C/400F/Gas 6 and bake for a further 15-20 minutes. Cool on a cooling rack.


leemid51's picture
leemid51

It ain't' rocket science.

It is science, but no rockets. Unless, of course, you haven't gotten off the ground. Then everyone who has looks like they're flying rockets.

I've been making bread since forever. I actually taught the Egyptians the process ;-)

No, really, I've been either watching my mother or making bread myself on and off for at least 60 years. I've been making sourdough for twenty-ish years. The rewarding and fulfilling part of this is that I get to eat really good bread all the time. In addition to that, all of my friends think I'm the bread king. The accolades are nice but at the end of the day it's my own satisfaction that matters. After all these years I can now create completely new formulas (formulae?) like my latest coconut bread made for a friend, or go sideways with an old formula to try something new. 

So why do I sound so braggadocious? Because this post is my promise to those who are just starting, or restarting, or just struggling for what ever reason, you can do this. Remember, it doesn't require rockets. If you just keep trying, and by that I mean you need to make bread on a regular and consistent schedule, it will come. After years of making yeasted bread successfully I wanted to make that legendary and mystical sourdough stuff. So I did my research, long before this great site appeared, so in some ways it should now be easier, and gave up making a scratch starter when I found a source for a free one that had a good reputation, got said starter, and started making bread. Of COURSE the beginning attempts were horrific. It's a different world working with flour and acids. 

I made my formula, made adjustments, made it again, twice a week for 4 - 6 months before it got good. So there's nothing to boast about concerning my learning speed. If it was edible, I ate it. If it was more than I could eat I gave it away, and that's a key part of this process for me. And if it wasn't edible I chucked it. Eventually I got to the point where even my screwups made good bread. Maybe not great bread but better than that stuff in the stores.

Why is it important to give bread away? Tonight I'm borrowing a free dump-trailer from a friend I give bread to, to haul free soil given to me by a friend I give bread to, to increase the value of my property. I haven't even started to calculate how much value is involved in this little transaction, but it's more than the cost of a few loaves of bread.

Anyway, this last weekend I made my signature sourdough. I almost always make two batches of two loaves. I had prepared two portions of starter and when I began assembling the doughs, I discovered I had too little of white bread flour. So rather than throwing one starter out, I made a half-and-half white/wheat. I know wheat takes more moisture than white so I adjusted the hydration level on the fly from 75% to 79% and followed my standard process. After overnight cold retardation, I let it rise to room temp, portioned and baked.


The picture above is the whole wheat result. I'm not a photographer, the picture was just taken with my phone, but it turned out better than the intended turned out. The example below is the original formula. It's a little under developed but it will eat just fine. I'm not entering it in any contest. 

I think the whole wheat loaves are a little under developed too. Here's that crumb:

Personally, I don't like a crumb that is so open you can't make a sandwich to take to work because everything inside will fall out, but I like it a little more open than this.

I love making bread, or baking in general, and love eating the products of my efforts even more. I also love teaching people how to do it. That's the reason for this post: to encourage you stugglers. If you persist in your efforts, post your results, give your bread away so you can make more, study and learn, eventually it will be easy and even your 'failures' will delight you and your friends. Occasionally you might post some good looking images of what your pain and suffering taught you how to make. It won't take 60 years either.

One other encouragement: it's not rocket science and it's not religion. You don't have to believe everything you read. I almost never throw away starter. I feed mine once a week or two. I can hear the masses inhaling, aghast. Sometimes I go too long and have to resurrect it after three months of inactivity. It takes a whole day. You don't have to make only sourdough. A really superb yeasted bread is satisfying too. When I don't have two days to make SD, I make WW sandwich bread. It takes 4 hours. The only down side to all of this is I can't eat store-bought bread anymore. So if I have time I make SD, if I have less time I make WW. If I have no time, I go without. And that sucks.

danmerk's picture
danmerk

Sourdough blues

Hey gang. Used to post quite a bit here but took some time off because we moved to a new home. In Feb I had to depart with a very old starter that I wanted to leave it’s soul at my old Cleveland home and grow a new one at the new house we just built. I started the usual method described in Maggie Glazers book and failed 3 weeks in a row. I would see no activity, then by day 5 I would start to get mold.

Last week I gave up that method (which worked for me dozens of times over the last 10 years) and tried a new approach by a YouTube/Instagram chef named J.Weissman. I had activity by day 3 and I was really happy. I tried my first batch on Sunday using the left overs as a levain to test the culture. I continued 25g of remaining starter to continue feeding the starter because I know 6 days is still young.

The bread I made never rose but the starter was really active. I seem to having issues in my new home. I’ve always made great breads and really understand fermentation so I don’t know what it could be. Any help would be appreciated. Thanks.


Lastly, I am throwing away a few hundred grams of starter daily. How can I minimize this as I strengthen this starter without being so wasteful.


DesigningWoman's picture
DesigningWoman

Cashew coconut curry 1:2:3. Happy Diwali!

This one has been on my mind for awhile, so I needed to try it and get out of my system. It would have been a 1:2:3, except that I also decided to try Mini Oven's method of adding dry chia seeds to the flour and an extra 3x their weight of water to the final dough.

The dry

38g whole wheat flour

38g extra-fine semolina

299g T65 flour

30g chia seeds

1t garam masala

.5t turmeric

1T fresh curry leaves, finely chopped

9g salt

60g toasted cashews

Nigella seeds and toasted sesame seeds for coating

The wet

125g two-stages (100%) starter

125g coconut milk

125g inactive raisin yeast water

90g water (for the chia seeds)

Day 1

Mixed the whole-wheat flour with 75g water and let sit for an hour.

Added other flours, chia seeds, the 125g of RYW, the coconut milk and the remaining water.

Very, very sticky, wet goo, left to autolyse an hour.

Mixed salt with spices and curry leaves, pinched into dough.

Lost count of SLAFs, but there were alot of them to try and get the dough to come together.

After the last round of SLAFs, stretched dough out on the bench and added the cashews.

Placed dough in covered container, with STAFs every 20 minutes or so, which was a bit tricky because of the cashews. Dough was beginning to behave itself, but still terribly slack and sticky.

After four hours on the bench, gave one last letter fold and stuck the thing in the fridge, hoping dough would firm up a little.

After four or five hours, it had indeed firmed up and grown quite a bit. Dough still quite soft and very tacky.

Divided, preshaped, 15 minutes bench rest, shaped into seed-lined baskets and into the fridge after 15 minutes.

Day 2

Preheated oven to 230°C. Removed loaves from the fridge, spritzed, spinkled seeds, spritzed, slashed and spritzed again. Baked covered for 20 minutes (lowering temp to 220° after the first ten minutes) then uncovered another 12.

While they could have baked darker, they aren't nearly as anemic-looking as in the photo. This probably could have (should have?) risen a bit more, but at least it's not completely flat. And I got blisters!

I am extremely curious as to what this will taste like; I think I could have been a bit bolder with the spices and curry leaves, but we'll see. Can't wait to try this with a bit of mango chutney.

There. It's done, and now I can move on to other things!

Va's picture
Va

Absolute beginner here trying to make a sourdough starter

Day eight of trying to coax flour and water into a viable sourdough starter.

I started with a mix of 100g Arrowhead Mills rye flour and 100g King Arthur AP flour and 200g lukewarm water. Marked the level on the jar with a rubber band, covered with a coffee filter. Fed at 7am and 5pm with AP flour, using a 1-1-1 starter, flour, and water ratio, discarding half the starter. Dropped back to 100gs each starter, flour, and water.

I rigged a proofing box out of a styrofoam cooler and a light bulb, and it's keeping the jar between 74-80 degrees. 

There was rising/falling activity on days two and five. Hooch - or at least a separated liquid, appeared on days three, four, and five. The photo is from day two.

 Last few days no rise and fall, no hooch, and only small bubbles beneath a very thick skin formed on the top. It's like the kind that forms on pudding, only denser. Underneath that skin, the slurry is puffy and light, though it does not rise.

It smells like fresh flour with a distinct but pleasantly earthy whiff of ferment. It tastes very tangy/vinegary and feels almost fizzy on the tongue.

 Is that skin on the top a problem or a natural phase? What could be causing it? Any adjustments I should make to feeding ratio, timing, or temperature?

Thank you for your expertise and patience with a newcomer.


gillpugh's picture
gillpugh

How to soften the crust?

I'm happy with my crumb, usually 70/30 white, wholemeal, but the crust is usually a bit leather like, ok for me but some of the older/younger members would like it softer.  I know the tricks of covering the baked loaf to soften the crust after baking, but was wondering if anyone could suggest if I would be more successful if I changed the flour combo or added fat/milk  and if so what percent you would recommend .   The bottom of the loaf is usually very thick too, so would like any help on this too.  Thanks for any help. 

Higgledy's picture
Higgledy

What is high humidity?

what do you consider to be humid or dry? My thermostat states my home is 50 percent. Is that humid when making bread?

Elsie_iu's picture
Elsie_iu

15% Toasted Popcorn Sourdough with 30% Durum

A weeks ago, Tom (Toad.de.b) introduced Farina Bona to me, which is basically flour milled from toasted but unpopped popcorn. I love his idea of alt altus so much that I thought I had to try this flavor booster as well.


Warning ahead: popcorn is extremely tough to mill. I clogged my mill several time trying to mill it. It is suggested to use other varieties of corn. I have only used popcorn since it's the only thing I have access to. This was the second time I milled it. I was working with softer grains (i.e. spelt) for the first time that I was able to grind popcorn by mixing it with spelt. However, hard grains like wheat and durum were included in this time’s formula. I had to break all the grains into smaller pieces using a blender first, then mill on the coarse setting then again on medium and lastly on the finest one so that the mill didn’t clog.


15% Toasted Popcorn Sourdough with 30% Durum


Dough flour (all freshly milled):

150g      50%       Whole White wheat flour

90g        30%       Whole durum flour

45g        15%       Whole toasted popcorn flour

15g          5%       Whole spelt flour


For leaven:

5g        1.67%       Starter

20g      6.67%       Bran sifted out from dough flour

20g      6.67%       Water


For dough:

280g     93.3%       Dough flour excluding bran for leaven

100g     33.3%       Water

180g        60%       Whey

45g          15%       Leaven

9g              3%       Vital wheat gluten

5g          1.67%      Salt


___________

302.5g     100%       Whole grain

302.5g     100%       Total hydration


Prepare the toasted popcorn flour by toasting popcorns in a pan over low-medium heat. Do not pop them. Remove them from the pan to cool once they are browned and become aromatic.

Sift out the coarse bran from the dough flour, reserve 20g for leaven. Soak the rest (I got 24 g) in equal amount of whey taken from dough ingredients.

Combine all leaven ingredients and let sit until doubled, around 3 hours.

Roughly combine all dough ingredients except for the salt, leaven and soaked bran, autolyse for 30 minutes. Knead in the reserved ingredients than ferment for 15 minutes. Construct a set of stretch and fold then ferment for 3 hours 45 minutes longer.

Preshape the dough then let it rest for 15 minutes. Shape the dough and put in into a banneton. Retard for 11 hours.

Preheat the oven at 250°C/482°F. Take the dough out of the fridge and let it warm up for 30 minutes at room temperature.

Score and spritz the dough then bake at 250°C/482°F with steam for 15 minutes then without steam for 25 minutes more or until the internal temperature reaches a minimum of 208°F. Let cool for at least 2 hours before slicing.


The trouble of grinding popcorn is worth it in my opinion. The aroma of the resulting bread is out-standing even with the use of all the other whole grains. Popcorn also dyed the crumb into a lovely soft yellow colour which brightens my day.


It sprang pretty well in the oven with nice blistered crust. The crumb is not particularly soft thanks to the addition of durum and popcorn, which tend to weight down the dough. However, it still stays pretty moist and moderately open.

This bread is very sweet, so sweet that it kind of feels of eating popcorn :) I prefer bread with some tanginess so I’ll retard the leaven next time popcorn and durum are both used.


_____

55% rye 45% spelt pancakes with honey mustard and dill


Last week’s over-hydrated spelt masa harina SD with fresh grapes…


Roasted cauliflower & shrimp linguine in spicy sweet potatoes sauce


I’m not kidding! Those caramelized cauliflower leaves are addictive!


Chinese curried squid…so tasty…


Steamed sticky rice in lotus leaves, Braised pork belly with chestnuts, choy sum in broth and roasted sweet potatoes


Eggplant moong dal (skinned mung bean) curry, rava upma (semolina pilaf) and spiced okra     


Higgledy's picture
Higgledy

Hello from Virginia

Hello all,

My name is Phil. I am fairly new to bread baking. I have made several bloomers that came out well, IMO. But my real goal is to make good 100% whole wheat bread. I tried King Arthur's recipe, but I find working the dough is a real challenge. I ended up kneading in my mixer with a dough hook. Does anyone know how long I should let the mixer knead the dough and at what speed I should set the mixer? I did about 4 mins at medium. But I have no idea if this is correct. 

https://www.kingarthurflour.com/recipes/classic-100-whole-wheat-bread-recipe

Does anyone have advice? Thanks

BurgerBuns's picture
BurgerBuns

Burger Buns Molds/Pans - Looking great!

Hello guys, 

I'm from Romania and i run a Burger restaurant. We make the brioche/patato buns in house. I use baking rings to form perfect round buns, but i'm not happy with the result. The side walls of the buns where the ring is, are not forming good crust and this is a problem for the structure of the bun. The baking equipment in Romania is nothing special and you cannot find specific things here. I looked everywhere in the USA to buy baking pans or molds for the buns, but i don't know what to choose. Pretty much there are no specific molds for buns - what i get is cupcake molds, specially the 4.25/3.75/1.5inch pan of USA pan. I really like the buns looking like the pictures below. They are smaller at the bottom and bigger at the top. If i bake the buns in a cupcake mold is the result going to be the same as the pictures or the bun will look like cupcake? I guess it depends how deep the molds are and how much you let the bun proof. I wonder what they use for the dark color of the bun as well - they are not using eggs for sure. 

Pages