The Fresh Loaf

A Community of Amateur Bakers and Artisan Bread Enthusiasts.

Most bookmarked

Benito's picture
Benito

Koji Rice Porridge Sourdough

Cedarmountain here on TFL got me interested in making miso after he replied to my blog post about my red miso furikake sourdough.  One major ingredient needed to make miso paste from scratch so I learned from him was koji rice.  From Tartine Book No. 3 “Koji is the traditional Japanese food culture of rice inoculated with Aspergillus oryzae mold.  It has been used for more than two thousand years to make miso, sake, soy sauce, amazements, pickles, and many other umami-rich foods that form the backbone of Japanese cuisine.”  We have a local sake producer here in Toronto Canada that happens to sell koji rice.  I plan on starting my miso making project soon but in the meantime I was very interested to taste koji rice and wanted to try making koji rice porridge sourdough.

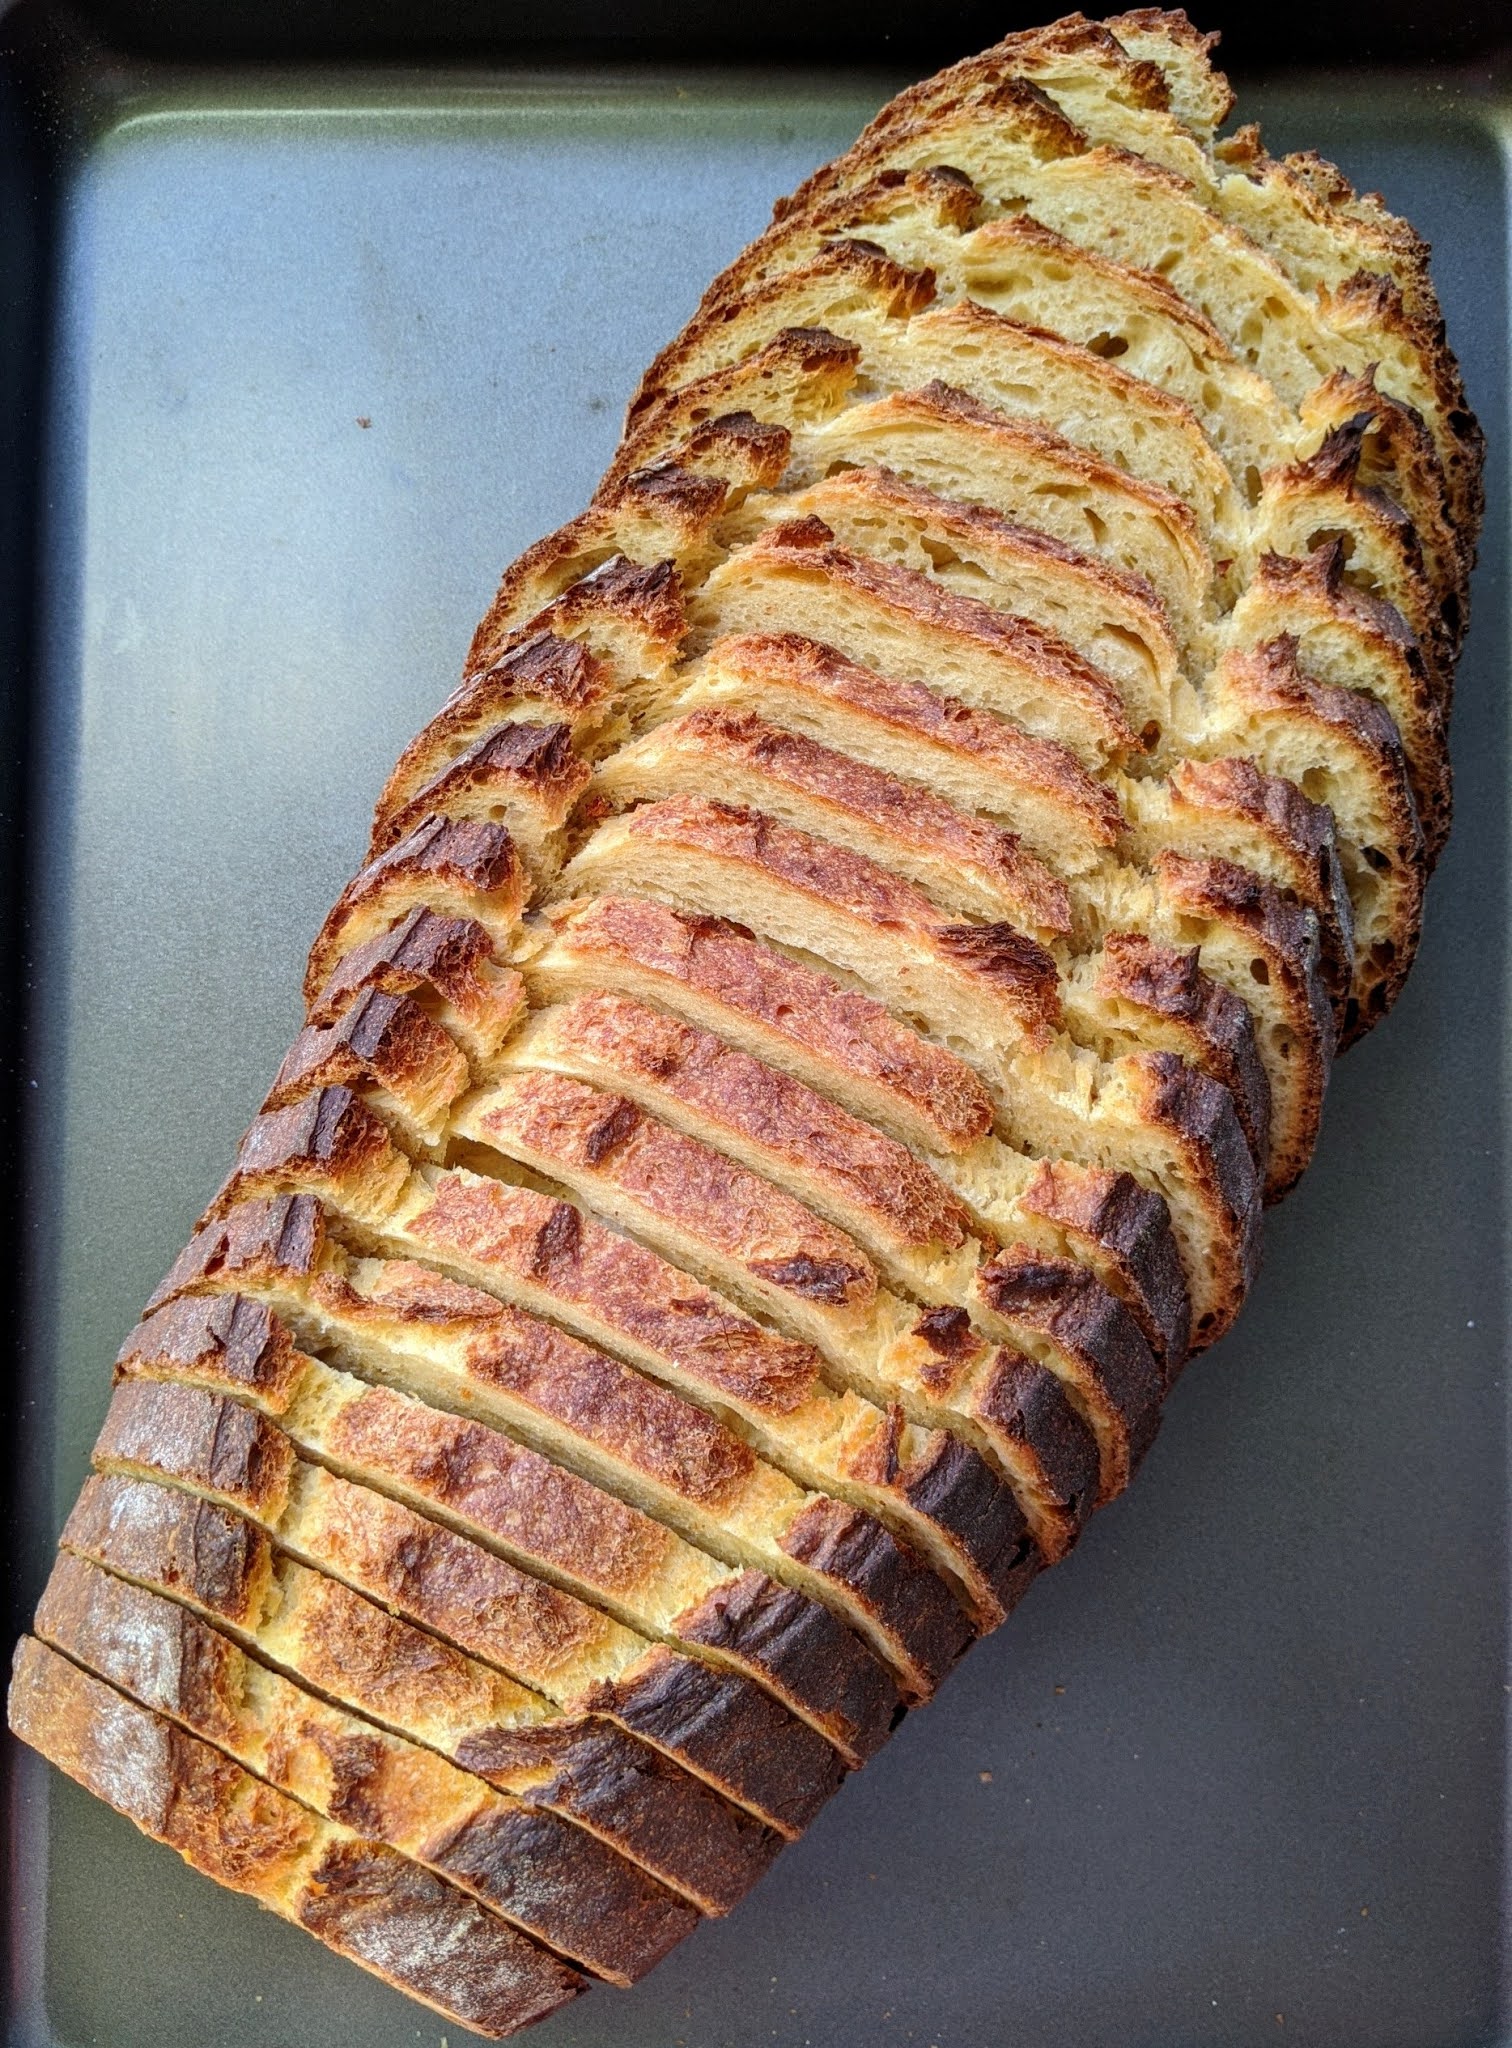
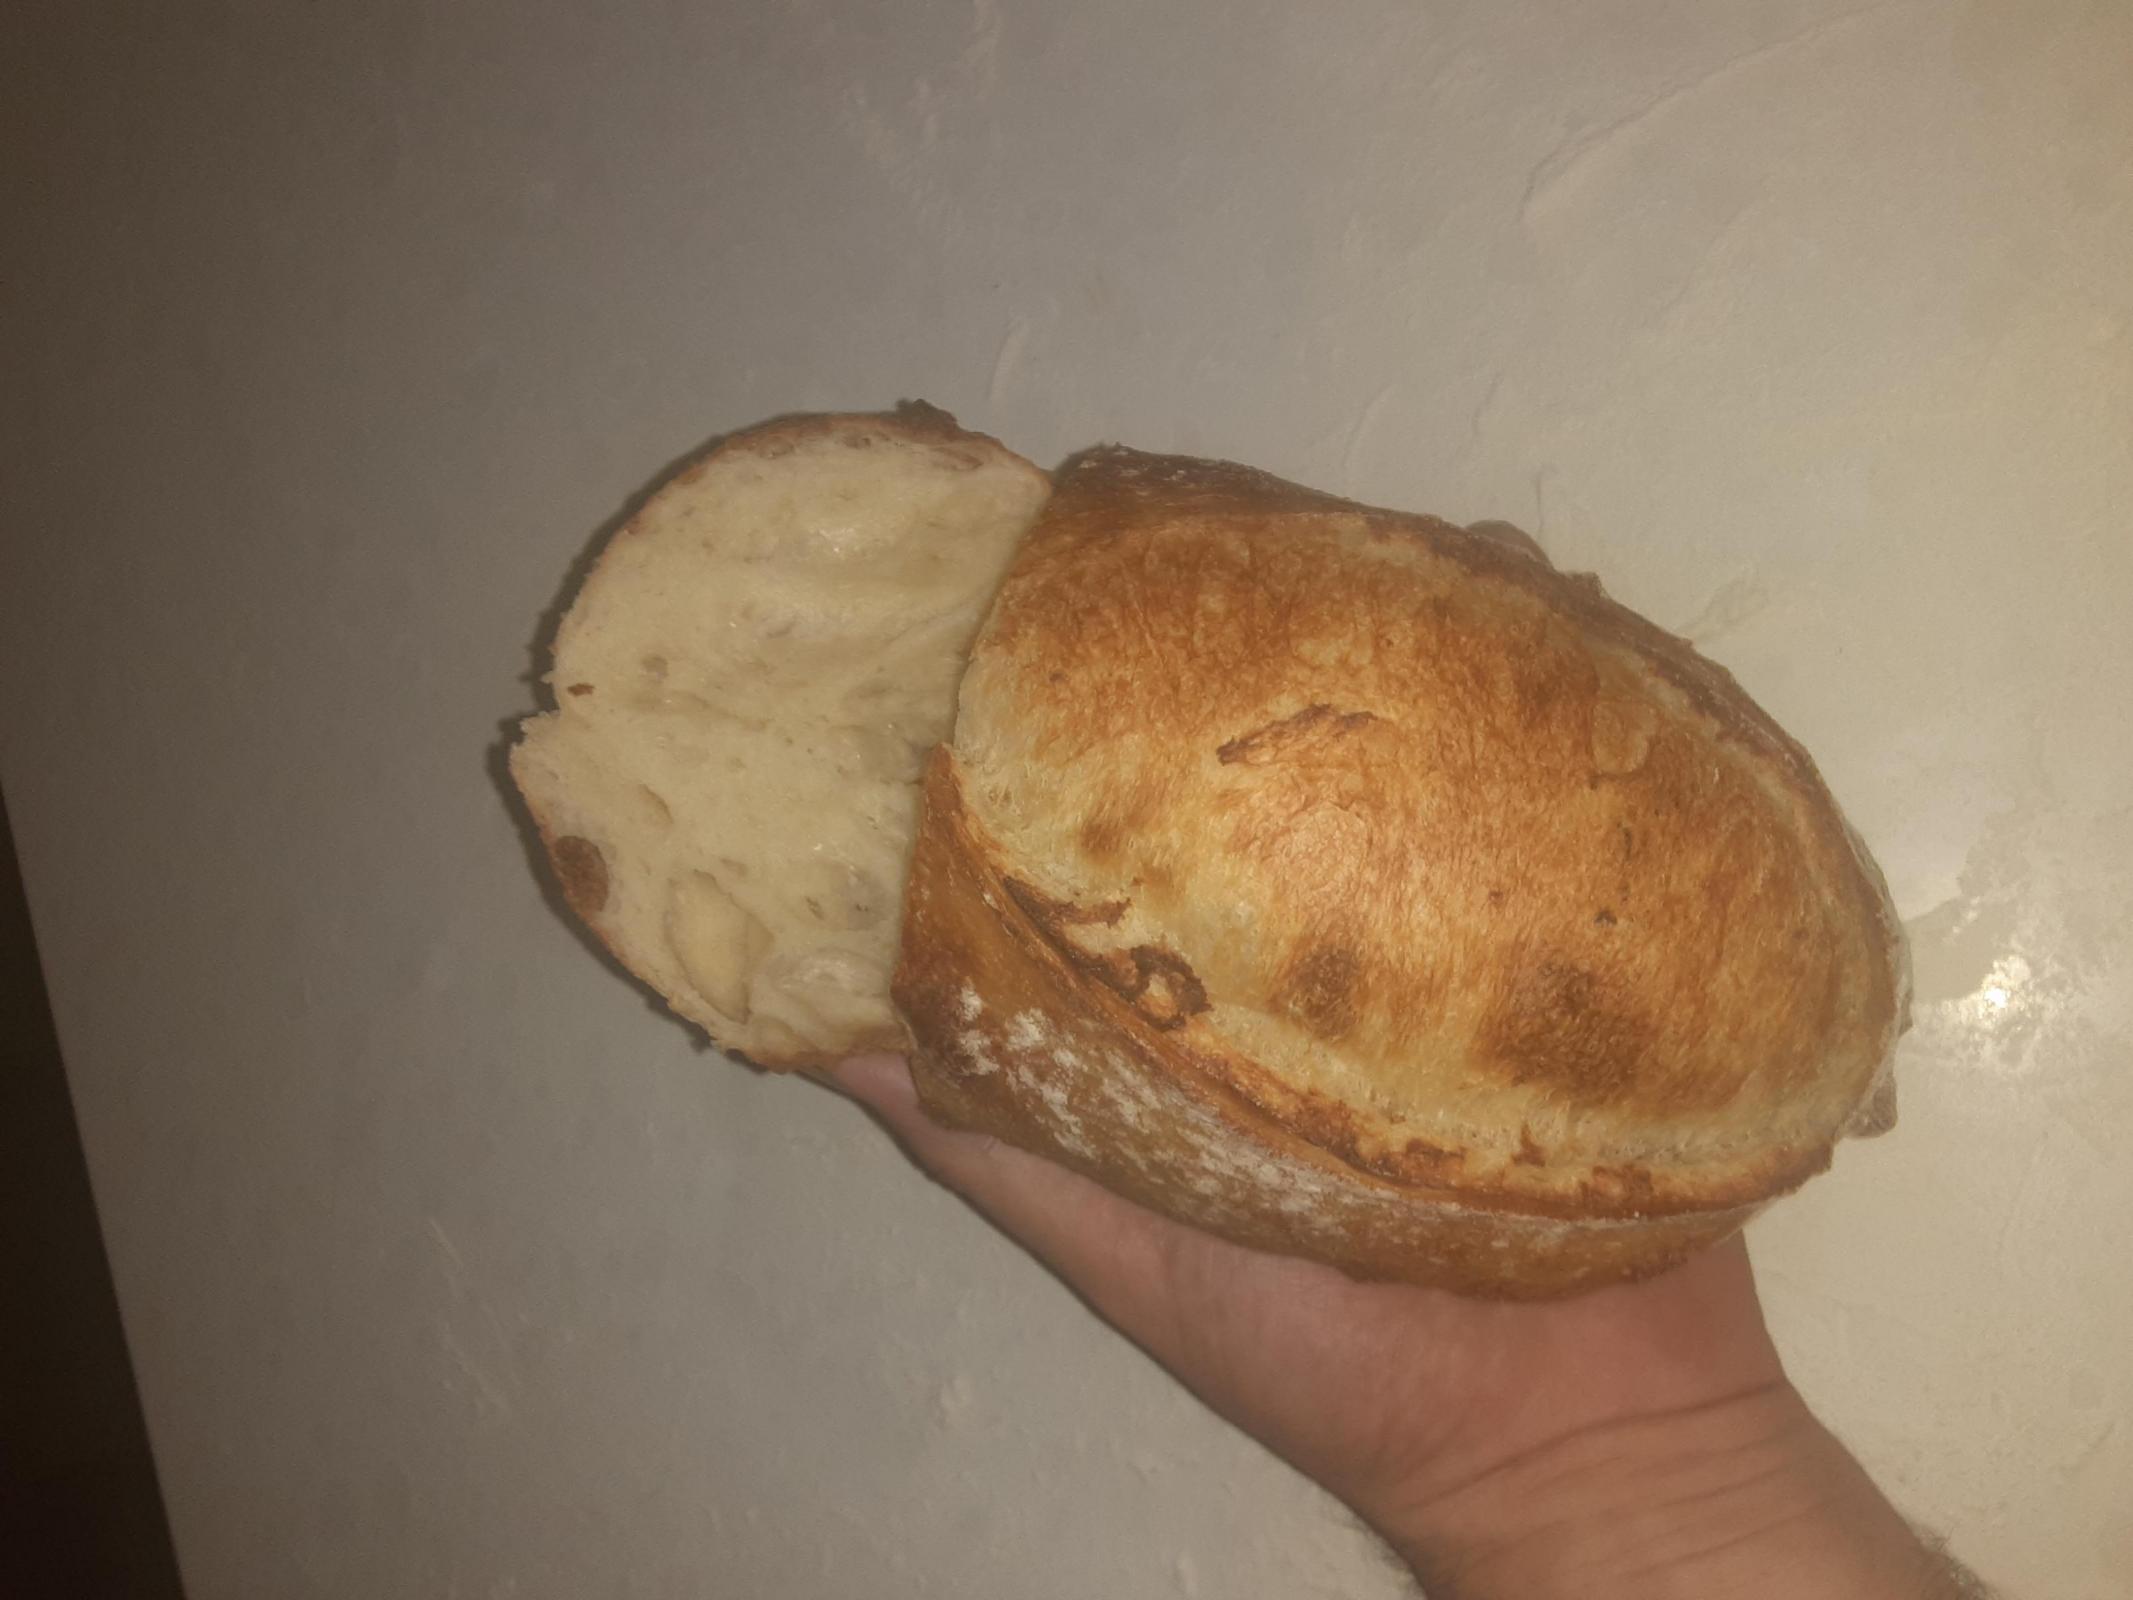
I adapted the recipe from Tartine Book No. 3 and blended it with an oat porridge sourdough from Maurizio of The Perfect Loaf as I liked his methods in the past.  This adapted formula has a lot of rice porridge in it, the rice is 50% in baker’s math and based on the photos in Tartine, I wasn’t expecting much oven spring from this bread since the rice porridge is such a high percentage of the dough and is weighing it down.  I was still surprised at how flat the resulting loaf came out.  If the flavour of the koji rice comes through strongly enough then I might be able to reduce the amount of koji rice in the bread and hopefully improve oven spring next time around.  On the other hand it might also be that the bread is overproofed.  The extra sugar in the dough from the koji may have moved fermentation along quickly and waiting for 45% rise in the dough may have been too much proofing since the dough had to overcome the weight of the rice.  The crumb will show what the truth is as usual.

I should mention that the cooked koji rice is quite delicious and has a nice sweetness to it so one has to bake this bread at a lower temperature once the steaming portion of the bake is over.

0 hours - Levain build, 18g starter 36 g water and 36 g whole wheat flour ferment 80*f for 6 hours

6 hours - prepare koji rice 100 g with 200 g water - after cooked spread out on cookie tray, cover with aluminum foil while cooling

6 hours - Fermentolyse - mix water 252 g, 72 g levain, flours.

7 hours - mix salt using some water then do slap and folds to ensure well incorporated and build gluten.

730 hours - add cooled koji rice a little at a time folding well after each addition, you may need to add small splashes of water while folding in koji rice. Then start stretch and folds

Break of any large clumps of porridge with your fingers to break them up.  Once first set stretch and folds complete remove small portion of dough to aliquot jar

8 hours - stretch and fold

830 hours - coil fold or consider a lamination

9 hours - coil fold

930 hours - coil fold

10 hours - coil fold

13 hours - end of bulk 6 hours after salt mixed - bulk rise 50% in aliquot jar - go to shaping - 30 mins bench rest then cold retard until baking next day

Following day - preheat oven with dutch oven at 500*F for 1 hour

Bake in dutch oven 20 mins the drop temperature to 450*F keeping lid on, then remove cover and drop temperature to 375-400*F (dough has a lot of sugar so will brown quickly) and complete bake may take 30 mins or so before crumb fully baked.


EqualRise's picture
EqualRise

Is this an underproofed loaf, and if so, why?

Hello all you knowledgeable bakers!

So, I'd really appreciate some input that may help explain the visuals of my latest bake (pictures below).

I don't particularly hate the result as it kind of ticks my boxes in terms of looks, texture, and taste. However, I'm a bit surprised at how it turned out and would of course always like to get a better sense of why stuff happens with the potential of more intentionally making it (or not making it) happen in the future.

In short, compared to recent breads, this one came out with a slightly denser crumb, and I don't know why.

I'm very much on the beginning part of the sourdough baking journey, and I generally vary a small part of the baking process every time I bake in order to learn (and perhaps even improve a bit) while still having some sense of what my changes mean.

This time I did a slightly prolonged bulk fermentation + cold proofing than usual, but attempted to keep other things the same, as I had gotten the feeling that I might be underproofing my doughs. However, the result I got after doing so looked even more underproofed than my previous breads--at least to my untrained eyes.

What particularly surprised me was the somewhat smaller hole structure in the crumb compared to my recent loafs. That and a more cracked crust (which may perhaps, however, be explained by a more shallow scoring than usual) along with a more caramelized, dark surface despite a slightly shorter baking time than usual.

Perhaps I was wrong about my underproofing hypothesis, or perhaps something else affected the result here. I'd love some input on this and perhaps other observations that could help me interpret the looks of the loaf and figure out how to go on experimenting in a meaningful direction.

Some more details on the bake:

400g wheat (11.5% protein), 50g whole grain "ølandshvede" (an old Scandinavian wheat variety), and 275g water (yea, it's a low hydration 65% bread) autolyzed for a couple of hours.

I then add 100g peaked 100% hydration starter and around 10g salt to the mix, let it rest for a bit, and then do 4 stretch and folds in the span of two hours (until I can do a decent windowpane test).

So, here's where I changed it up a little compared to previous bakes. I wanted to push the bulking further than usual and ended up letting the dough sit covered for around 3 hours on the counter on what was also a summer day with a room temperature of 25 degrees celsius (77 degrees fahrenheit), which is around 4 degrees more than my typical baking days, and which seemed to definitely get the dough to where it needed to be (again, judging with my untrained eyes).

Then preshaping, resting, final shaping, and finally in the banneton for an overnight proof in the fridge at around 3-4 degrees celsius. This is all pretty much as usual as well, though I also let the dough sit in the fridge for 4-5 hours more than with my usual bake--a total of 17 hours--after which poke test looked reasonable (not really being sure if it's super meaningful to use that test on cold dough, though).

Ending the process as I usually do with preheating oven + Dutch oven for 45 minutes, getting out the dough, score it, then bake it for 20 minutes with the lid on and 20+ minutes with the lid off until I'm satisfied with the color.

Alright, apologies for the novel here, but wanted to be as specific as I could. Feel free to comment on whatever--even if it's just a "good luck next time!" ;-)

Much love, Espen


cyber's picture
cyber

The Science of Sourdough: How Microbes Enabled a Pandemic Pastime

Scientists peer into those jars on the kitchen counter to find out how what’s really happening

https://www.scientificamerican.com/article/the-science-of-sourdough-how-microbes-enabled-a-pandemic-pastime/

kendalm's picture
kendalm

New oven 'build' preliminary results

Recently I posted the arrival of a new oven that I purchsed as a dedicated bread oven, and since then have been in setup mode and quickly realized this has become a project as opposed to a more plug-n-play scenario.  So with that, I am seeing some positive results and want to share them here.

This is a small 350g batard tester loaf to see how well this (relatvely) cheap import mini deck oven performs.  the oven I puchased is a 'xoeleo' from china manufactured primarily for pizza and as such has required some tinkering and tuning.  Danny ayo was kind enough to send me links to a seal for the door and www.brookbake.com dug up a rofco steam tray (despite them being out of stock).  To date I have applied a door seal but still seeing considerable leaking steam from some of the other seams in the body.  Despite the leaks I very surprised by the fast spring on this bake.  Another surprise is the paper thin crust on this loaf.  never had such a thin crust like this ever.  

Very little went into the preparation of this loaf - the bake was more a first 'wet' test (as opposed to dry steamless) test, in fact I originally did not even plan to load but rathet test the steam so this is a last minute loaf sort of thing.  Very interested to see whats next. 


Wartface's picture
Wartface

Croissants

I figured it was time for me to try making croissants... which seemed overwhelming a couple of years ago. 

I found this recipe and figured I would give it a try... nothing to lose right? 

https://www.weekendbakery.com/posts/classic-french-croissant-recipe/


I read somewhere that Chocolate Croissants ought to be shaped using a rectangle shaped piece of dough instead of the normal crescent shape. It said that that shape would hold the chocolate better and keep it from leaking out. Plus that just seemed easier for my first try at it. 

I did the 3 day process and I was pleased with how they came out for my first go at it. 

My 8 and 10 year old grandkids loved them too.?

Grant Bakes's picture
Grant Bakes

Testing my Challenger Bread Pan vs. my Enameled Cast Iron Dutch Oven

Hey bread bakers,

This week I tested out my new Challenger Bread Pan against my standard dutch oven that I have been using for almost a year (a Lodge enameled cast iron dutch oven).

I baked the same size sourdough boules (about 860g) in each baking vessel and compared the results at the end.

The video detailing the whole process is included below if anyone is interested in watching - 

BulletProof's picture
BulletProof

A Newbie Looks For a Mixer

Hello.  I do not make bread - my wife does. Over the years we have bought several different machines - a couple Kitchenaids (KA5, K5SS), a couple Bosch's (Universal MUM6621), and a Kenwood.

None of these have done the job.  The Bosch's have a penchant for committing suicide by walking off the counter (who else puts a powerful motor into plastic housing?.. Oh, that's right - Singer Sewing machines!)  The Kitchenaid 5SS is ok, and has lasted the longest - but you can tell its struggling (I recently disassembled and re-greased it which helped).

She bakes three loaves a week of standard whole wheat bread - the household staple.  She also makes something like Cinnamon Buns or a couple loaves of White Bread as a treat.  But she also likes to try new things - heavy rye breads, Ezekiel bread etc. which we enjoy... well, we enjoy it but the machines don't!

So my question is this... what is our next mixer.  We are not wealthy, so cost is a consideration - but repeatedly buying $400-$500 machines isn't cheap either!  Should we get a spiral dough mixer? A Hobart?  One of the new Chinese brands (x1000)?  I would like it to be a machine she can grow into... so she can try bagels, and other breads.  The machine will only be only used for breads (if I want whipping cream, I pull out the hand mixer).

Suggestions are greatly appreciated!


BigHungryBelly's picture
BigHungryBelly

Anyone familiar with Central Milling's flours (in particular the High Mountain flour)

I am thinking about giving CM's organic flours a try. I typically bake sourdough bread, yeasted baguettes, and pizza. I am mostly familiar with King Arthur's bread flour and have generally had great experience with it, in particular in relatively high hydration applications (my sourdough breads typically range from 78% to 85% hydration). 

With respect to CM, I only have experience with their non-organic Red Rose Bakers Special flour. At 12.5% protein, Bakers Special flour doesn't seem to handle as much water as KAF's bread flour. A hydration level that is above 75% seems to produce really unwieldy doughs for me. Perhaps the right way to describe the doughs made with the Red Rose Bakers Special flour is that they are really extensible, to the point that it is hard for me to build good strength, and the resulting breads tend to spread more than they rise. On the other hand, I've made breads with KAF's bread flour that were 90% hydration, and I felt the doughs were much easier to handle. 

I wonder which CM organic flours would be good for my typical applications. I've done some search on the forum, and found that some people suggest Type 70 and Organic Artisan Bakers Craft Plus. Since both have 11.5% protein, I wonder if these two flours can handle relatively high hydration applications. On the other hand, it doesn't seem that there is much discussion on the High Mountain flour which is 13.5% protein level. I wonder if anyone has experience with this flour.

Any advice would be much appreciated!


Yippee's picture
Yippee

20200810 Golden Durum Bread with CLAS

To learn more about concentrated lactic acid sourdough (CLAS), please see here and here


Before I show you my bread, let me introduce my new friends to you.       I've started a new hobby - vermicomposting - during the COVID quarantine.  These red wigglers will produce "black gold"  that will be very beneficial to my plants.

       Hopefully, I will show you more beautiful flowers from my garden next time.      Now, back to the durum bread.  My formula and procedures are straightforward, and the bread is very delicious.  By now you probably know my trick - CLAS.  I bought a bag of durum berries, which cost me an arm and a leg, to make a durum CLAS so that my bread is 100% durum.     Given the speedy one-day delivery and the successful outcome of the durum CLAS, I'd say the 13 was well spent.      I have lots of durum flour.  It would be nice if I can make CLAS out of it.  Then I don't have to buy another bag of berries that takes up storage space. I'm making a batch of CLAS using flour to see if it works.  
 
       I autolyzed the dough overnight. Therefore, it was very easy to handle. The rest of the procedures are just like making a regular white loaf.This loaf is 60% hydration. I don't think it needs higher hydration for the simple shaping and scoring that I did, but I probably will increase the hydration a bit when I shape it into a hat-like loaf next time.      


  Total dough weight ~ 1.1 kg  Autolysis  overnight at room temperature, 97% extra fancy durum, 55.5% water, After autolysis, the dough became very pliable, smooth, and silky after a few folds.   Dough Autolyzed dough, 3%  durum CLAS, 4.5%  water, 0.6%  yeast, 2%  salt,  Mix in KA 600 speed 10! x 2 minutes to fully incorporate all ingredients, a few folds to smooth and tighten the dough,  Bulk 88F ish x 150 minutes, Two sets of folds in between,  Shape,   Proof 88F ish x 20 minutes  Bake Preheat @ 550F, 482F x 10 mins with steam, 374F x 40 mins w/o steam,   
metropical's picture
metropical

GF artisan in 5

been working on their Oatmeal Maple bread for a while.

Both the dough and final bread come up too wet.  Not unusable, but definitely needs toasting.

I have varied the recipe.

I use a 100% oatmeal starter in place of oat flour and oats, same weight 300g.
Obviously the starter has water in it.

And 1 tsp yeast instead of 1 Tbsp.

Any experienced thoughts as to whether I should be calculating an equal amount of water out of the recipe?

It calls for 740g water.  Should I drop that number by 150g or more?
The bread tastes good, it's just way moister than I want.


Pages