The Fresh Loaf

A Community of Amateur Bakers and Artisan Bread Enthusiasts.

Most bookmarked

icantbakeatall's picture
icantbakeatall

How long should I cook my breads for in a Dutch oven and how do I prevent the outside from burning?

I think that I am undercooking my bread, but I have no idea how long I should be baking them for. I feel like after about 10 minutes after taking the lid of the dutch oven off, my breads start getting too dark. So how can I cook for longer but not burn my breads? I cook at 450F for the most part. Thanks!

dabrownman's picture
dabrownman

Getting ready for World Bread Day

Doing a dry run for the upcoming World Bread Day 2020 in a couple of weeks.  This is a SD bread I shouldn't eat since it a 100% white bread with just 15 g of NMNF starter, but it does show that Focaccia is one bread where your artistic side can make you feel at least a bit Bohemian.

This recipe is our standard go to pizza dough as well. A 123 recipe where the dough development begins with one set of 150 slap and folds and 4 sets of slap and folds on 30 minute intervals.

We then added a paste made in the mortar and pestle of EVOO,  2 cloves of minced garlic, fresh herbs  Thai basil, rosemary and oregano incorporating them by spreading the paste the exposed sides of the 3rd set of stretch and folds.

We let it sit in the counter for an hour before we put it in the fridge overnight for a total of 16 hours so it could finish proofing.  After taking it out of the fridge, we let it sit in the counter to warm up for 2 hours before spreading it out on a sprayed jelly roll pan. 

The fun part was decorating the top to look like some weird abstract flowers made with roma tomatoes, Lemonm slices, scallions, asparagus, dried black olives, red bell pepper, Thai Basil flowers and leaves and crimini mushrooms. 

After proofing for an hour it went into the oven fat 425 F with Mega Steam for 8 minutes and then 8 minutes with the steam removed and switched to convection.  Lucy reminds us to have a great salad every day....

Happy baking Fresh Lofians!

Danni3ll3's picture
Danni3ll3

Honey Oat Porridge Bread with Hemp Hearts, Sesame, and Sunflower Seeds


This is a rare mid-week bake of a single batch that gives 3 loaves. What prompted this? James (aka Ciabatta) produced 12 loaves of 4 (Yes! Four!) different breads. His streamlined method piqued my interest so I decided to give it a shot since it I think it would shorten my dough making time significantly. So here goes:


Recipe

Makes 3 loaves 


Porridge

100 g rolled oats

200 g water

45 g honey

40 g butter


Add-ins

25g raw Black Sesame seeds

45g raw Sunflower seeds

35 raw hemp hearts


Dough

700 g unbleached flour

200 g freshly milled Red Fife flour (Red Fife berries)

100 g freshly milled Rye flour (Rye berries)

50 g flax, freshly ground

30 g yogurt 

600 g filtered water + 25 g + 25g + 25 g

22 g salt

250 g levain (procedure in recipe)


The morning before:

  1. Take 2 g of refrigerated starter and feed it 4 g of filtered water and 4 g of any kind of wholegrain flour. Let sit at room temperature about 6 hours. 


The afternoon before:

  1. Feed the levain 20 g of water and 20 g of wholegrain flour. Let that rise at cool room temperature for another 6 hours. 


The night before:

  1. Mill the Red Fife and rye berries. Place the required amounts of Red Fife and Rye flour in a tub, and add the unbleached flour to it. 
  2. Grind the flax seeds in a bullet and add to the tub. (I added the salt too at this time). Cover and set aside.
  3. Add the water to the rolled oats and cook on medium low until very creamy, then add the butter and the honey. Stir well and put into the fridge for the night. 
  4. Toast the sesame and sunflower seeds along with the hemp hearts in a dry frying pan or in the oven at 350 F. They are done when lightly golden and fragrant. Reserve.
  5. Before bed, feed the levain 100 g of filtered water and 50 g of whole grain flour and 50 g of unbleached flour. Let rise overnight until doubled. 


Dough Making day:

  1. In the morning, when the levain is nice and bubbly, put the filtered water in a stand mixer’s bowl and add the levain, the flours from the tub, and the salt if it’s not in the flour mix already, as well as the porridge.  Mix on the lowest speed until all the flour has been hydrated and everything is homogeneous. This takes about 4 - 5 minutes. Place dough in a lightly oiled tub. Once I got the dough into the tub, I felt it was a bit tight so I added 25 g water to be absorbed during the folds. Let the dough rest for 45 minutes in a warm spot (oven with the light on and the door cracked).
  2. Give the dough a coil fold, add the next 25 g of water (dough still felt tight), and let rest another 45 minutes. 
  3. Dimple the seeds into the dough and give it another set of coil folds. Add another 25 g of water. Let rest 45 minutes. 
  4. Do another two sets of coil folds 45 minutes apart until the dough has developed enough to give a windowpane.
  5. Let the dough rise to 30%. This only took another 30 minutes. The dough already was at 30% at the last fold but I decided it needed one more to strengthen it. 
  6. Tip the dough out on a bare counter, sprinkle the top with flour and divide into portions of ~830 g. Round out the portions into rounds with a dough scraper and let it rest 15 minutes.
  7. Do a final shape by flouring the rounds and flipping the rounds over on a lightly floured counter. Gently stretch the dough out into a circle. Pull and fold the third of the dough closest to you over the middle. Pull the right side and fold over the middle and do the same to the left. Fold the top end to the center patting out any cavities or big bubbles. Finally stretch the two top corners and fold over each other in the middle. Roll the bottom of the dough away from you until the seam is underneath the dough. Cup your hands around the dough and pull towards you, doing this on all sides of the dough to round it off. Finally spin the dough to make as tight boule as you can.
  8. Sprinkle half rice/half AP flour in the bannetons. I also sprinkled some rolled oats in there. Place the dough seam side down in the bannetons. Cover with plastic bowl cover or shower caps. Let rest for a few minutes on the counter and then put to bed in a cold (38F) fridge until the next day. (I actually baked these at midnight since I had started so early in the morning and they had proofed in the fridge for 10 hours by then.)


Baking Day

  1. The next morning, heat the oven to 475F with the Dutch ovens inside for 45 minutes to an hour. Then take the loaves out of the fridge. 
  2. Turn out the dough seam side up onto a cornmeal sprinkled counter. (For fun, since I only had 3 loaves, I scored them.) Place rounds of parchment paper in the bottom of the pots, and carefully but quickly place the dough seam side up inside. 
  3. Cover the pots and bake the loaves at 450 F for 25 minutes, remove the lids, and bake for another 22 minutes at 425 F. Internal temperature should be 205 F or more.


I wonder if I should have skipped the scoring as my loaves were quite a bit flatter than what I usually get. They also baked up quite dark and crunchy. I’m quite impatient to see the crumb. 


I really like that James’ method cut quite a bit of dough making time but I think I need to do a few more bakes to get loaves as nice as his. 

MontBaybaker's picture
MontBaybaker

LifeLatch grain bucket - help please?

I've been unable to reach anybody at the manufacturer or the container company I bought my buckets from last year.  Maybe you smart people can help.  I have a never-used bucket that spent a couple of weeks in my car trunk in the early summer (70s).  The full bucket made it to the house, this one didn't.  Discovered it, put it in the cool garage, and forgot about it until recently.  Now the lid won't budge (it was fine on delivery).  Normally you press the lever and gently twist the lid; it ratchets back on to close.  Even my strong husband can't open it and offered power tools.  My arthritic thumbs love these lids, and I hate to damage one to use the bucket.  Thank you!  

Carvendive's picture
Carvendive

My second loaf

My first loaf was done in a loaf pan and while it didn't rise well I preferred the crust. I used 2 tin loaf pans and clamps. This time I used a tray of water and it just came out kind of leathery. I'll go back to some sort of steam trap next time. The crumb is OK but I'd like more rise. I took it out at 205°F internal. I'm using a KitchenAid recipe as I've got arthritis. My starter at least triples 5hrs after feeding. I then make a sponge and leave it at 70°F for 4 hrs. Then in the fridge for at least 12 hrs. Then I mix up the bread and proof it for 4 hrs, folding it each hr. Then I shape it and put it in a towel lined colander and let it raise another 4 hrs. Then I bake it at 425 and check temp at 30 min. Once it's at 203-207 I pull it (~38 minutes for the loaf shown which weighed 40 oz).

Verc0003's picture
Verc0003

Cooking on Stone

Hi


I am getting into a commercial shared kitchen space so that i can make more bread. 

Up to this point I have only used dutch ovens. I feel I could probably bake more breads using a cooking stone. 

I was looking into a 20 x 20. How many loaves do you think I could fit? 


Also what temperatures and cook time do I need?


Can I get the same results in a convection oven on the cooking stone when I cannot turn convection mode off?

Suggestions appreciated! =)

Surveyor K's picture
Surveyor K

salt rising bread starter

After many attempts to get a Salt Rising Bread starter to come to life I finally used my bean to arrive at a solution.  The scalded milk always had granular corn meal (no matter what brand I used) sitting in the bottom like sand - dead.  So, I tried mixing good old Albers (which had failed me many times in the past) with the sugar and dampened it, covered it and let it sit in my warming box for two hours and then proceeded with the rest of the starter process.  Eureka, success!  I have since tried this with many of the other partially used corn meals in my pantry with equal success.

kendalm's picture
kendalm

Au canada

I've been taunting Benny for weeks now about trying out some Canadain T55 and decided to have two baguettes square up and have a face off for the TXX grand prix.  For the record on the left is Canadian T55 blended 50/50 with French T65.  This blend is done by recommendation of lepicerie.com seeing that this particular T55 is ancieny Khorasan grain.  On the right is straight T65 from france.  First impressions is that the Canadian blend turned out really much nicer than the French.  The shaping and lead up was noticeably different in that the Canadian dough was a bit more putty-esqe and required some more force while shaping.  Basically much better ear development and just overall more appealing shape.  Maybe it was due to that loaf being shaped better.  who knows, and it may take several bakes to really stamp a blue ribbon here but first impression is very positive - 


 This loaf is 73% hydration and I noticed it felt more like a 70% or lower so the khorasan is likely more absorbent.  The French loaf I brought up to 74% anf really didnt get much burst.  Crumb pics on the way ... 


Danni3ll3's picture
Danni3ll3

Sprouted Rye Sourdough 


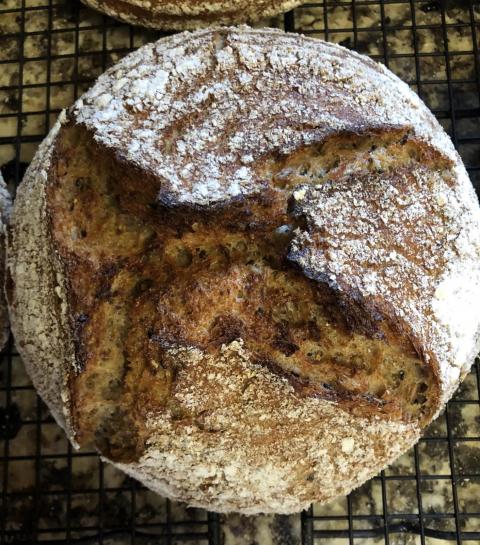
This is another one of Cedar Mountain’s recipes. I definitely need more practice handling dough that has this much rye in it. The dough was super extensible but not very elastic. I managed to keep the stickiness down to a minimum by keeping my hands wet during the coil folds, and being liberal and quick during shaping. It felt quite heavy even after bulk even though the bulk was fast compared to my usual bulk times. I gave it at least an hour proof at room temperature before retardation in the hopes of lightening the crumb a bit.


Recipe

Makes 3 loaves


Add-ins

215 g rye berries (to be sprouted and then split into two equal portions)

15 g of black sesame seeds


Dough

300 g freshly milled rye flour (sifted and reserve bran for dusting loaves)

100 g freshly milled red fife flour

50 g freshly milled Kamut flour

550 g strong baker’s unbleached flour

700 g water

30 g yogurt

22 g salt

250 g levain (procedure in recipe)


A few days before:

  1. Soak the rye berries for the add-ins in filtered water for 8 hours. Drain and rinse every 8 hours until the berries have just started sprouting. I was shocked that they were ready in 24 hours. Then place into fridge until needed.


Two days before:

1. Feed 8 g of your starter 16 g of water and 16 g of unbleached flour. Let that rise at cool room temperature for the day. 


Two nights before:

  1. Feed the levain 40 g of water and 40 of unbleached flour. Let that rise overnight.


The morning before:

1. Feed the levain 100 g of filtered water and 100 g of unbleached flour. Let rise until doubled (about 5 hours). 

2. Place into fridge until the next morning. 


The night before:

  1. Mill all the grains necessary for the dough. Sift the bran out of the rye flour and reserve.  Place all the flours along with the unbleached flour in a tub and cover. Reserve the barn for dusting the bannetons. 
  2. Divide the sprouted rye berries into two equal amounts. Using a food processor, chop the sprouts until finely ground. Be careful not to turn this into a paste. Add back to the other portion. Refrigerate. 
  3. Toast the black sesame seeds and reserve.


Dough making day:

1. Take the levain and both ground and sprouted rye out of the fridge and place in a warm spot.

2. Mix the water with the flour on the lowest speed in the bowl of a stand mixer until all the flour has been hydrated. Autolyse for at least a couple of hours.

3. After the autolyse, add the salt, the yogurt, and the levain to the bowl. Mix on lowest speed for a minute to integrate everything, then mix on speed 2 for 7 minutes. 

6. Add the add-ins to the bowl and continue mixing another 2 minutes or longer until well distributed.

7. Remove dough from bowl and place in a covered tub in a warm spot (oven with light on). Let rest 30 minutes. 

8. Do 2 sets of coil folds at 30 minute intervals, then switch to hourly folds for another 2 sets.

9. Let the dough rise about 50%.

10. Tip the dough out on a bare counter, sprinkle the top with flour and divide into portions of ~825 ???g. Round out the portions into rounds with a dough scraper and let rest 30 minutes on the counter. 

11. Do a final shape by flouring the rounds and flipping the rounds over on a lightly floured counter. Gently stretch the dough out into a circle. Pull and fold the third of the dough closest to you over the middle. Pull the right side and fold over the middle and do the same to the left. Fold the top end to the center patting out any cavities. Finally stretch the two top corners and fold over each other in the middle. Roll the bottom of the dough away from you until the seam is underneath the dough. Cup your hands around the dough and pull towards you, doing this on all sides of the dough to round it off. Finally spin the dough to make as tight boule.

12. Sprinkle rye bran in the bannetons. Place the dough seam side down in the bannetons, sprinkle more bran on the dough and cover. Let rest for an hour on the counter and then put to bed in a cold (38F) fridge until the next morning. 


Baking Day

1. The next morning, heat the oven to 475F with the Dutch ovens inside for an hour. Turn out the dough seam side up onto a cornmeal sprinkled counter. Place rounds of parchment paper in the bottom of the pots, and carefully but quickly place the dough seam side up inside. 

2. Cover the pots and bake the loaves at 450 F for 25 minutes, remove the lids, and bake for another 22 minutes at 425 F. Internal temperature should be 205F or more.


These came out flatter than my usual oven spring but I’m happy they aren’t completely flat considering the amount of rye and add-ins in these loaves. Unfortunately these are all claimed for so I won’t know what the crumb is like. 


Levixmo's picture
Levixmo

Famag IM-10, IM-10S Owners.

Hello fellow Bakers,

For those who own Famag IM-10 or IM-10S mixers (or similar capacity mixers but of different brands like Sunmix).

After owning and using the mixer how many of you would rather have gone with a higher capacity mixer like the IM-15 or the IM-20, and why?

In your experience what has been the production limit in the number of loaves (or type of bread and hydration) that the IM-10 can handle?

Would you rather have the convenience of the IM-10’s removable bowl, or have the capacity of being able to mix larger quantities of dough and therefore fewer batches a day with an IM-15 or IM-20? 

Thanks! 

Pages