The Fresh Loaf

A Community of Amateur Bakers and Artisan Bread Enthusiasts.

Most bookmarked

Maine18's picture
Maine18

Question about "gummy" crumb streaks?

Hi all -- Overdue for a proper update on recent bread experiments (there have been many this year, from so much time at home!).  But before that, wanted to see if others might be able to help me figure out an occasional problem I see with some sourdough loaves.  Specifically, every 15-20 or so loaves (e.g. infrequent, but not completely one-off), I tend to see a thin layer or layers of only partially cooked/gummy crumb near the bottom of a loaf when I cut it open.  It's really hard to predict when this will happen until I cut into the loaf, and I'm pretty consistent with my process, cooking time, etc, so I haven't been able to predict when it will happen.  My current theory is that it is caused by something I'm doing in the shaping process, potentially when I "cinch up" the batard, which can sometimes get a little messy/thick and layered, so I wonder if I'm unintentionally creating some lamination at the bottom of the loaf which causes the gumminess. I'll attach some photos of a normal/good loaf, one with slight gumminess, and one with egregious example, for reference.

Normal/Target Inside & Out Example:

Slight Gummy Streak Near Bottom Example:


Lots of compression/gumminess at Bottom Example:


Has anyone else experienced this and some up with some solutions? 


Thanks very much in advance!


PS Some additional detail on process:

My baking set up: 3/4" fibrament baking stone; custom stainless metal steel cover (fits snag around the stone), parchment paper to load the loaves; occasionally some extra water/ice for added steam.  

I generally cook for 20 min with lid on at 500; then 25-30 min lid off at 450; dry out for 6 min with oven off.  

Flours/Hydration: generally a mix of central milling wheat flours (bread and AP) and some fresh milled flour. Hydration in the 75-85% range, depending on the loaf

will-you-wont's picture
will-you-wont

Hot Cross Buns Help: how to get shop-bought squidgy-ness

Hi all,

I'm brand new here so please forgive me if this is a well-covered topic. I went through five or so search pages and hadn't found anything that fitted my query.

I've made hot cross buns for years and have always been ambivalent about the results. They always have a firm dome, relatively dry crumb and harden pretty quickly. They also almost always use an apricot jam glaze, which renders them nigh on untouchable.

They never, ever, ever have that dense squidgy-ness that you get from UK supermarket versions (perhaps abroad too, but my HCB research hasn't gone international...yet). I love that dense squidge. I probably shouldn't, it's probably terrible bread, it probably makes me a terrible baker, but recreating it has become a decade long obsession.

I thought I'd found the answer in tangzhong, but tried that today and they still have a drier crumb and a crust. I'm starting to consider mochi flour as a possibility but this seems unlikely to be in common use in the UK.

From what I can tell, supermarket HCBs don't maintain a dome shape - they seem to collapse in on themselves. I also once bought a pack from Tescos only to discover the dough was still raw inside, all of which makes me think they're cooked remarkably quickly and maybe deflate like a cake.

The ingredients on packs contain added emulsifiers and acids – I don't know if these would really contribute to a squidgy dough or are simply there to long-life them. I've never used them and would like to avoid them if possible. The supermarket also contains a lot more oil, in place of the butter more often seen in homemade. Enough to make a difference?

Turns out I'm not alone. Love her or hate her, Mary Berry even said mid-bun bake that supermarket HCBs were always better than homemade.

Is there a way to marry the two, online experts? Can anyone offer advice on changing ingredients, method or cook time?

Thanks!

Tropical's picture
Tropical

Sources or book recommendations for ancient grain combinations or ratios?

Hi all,

Hope you are all good

Does anyone have any recommendations around ratios/recipes for loaves combining spelt, einkorn, emmer, other grains?

I have two young kids so don't have a lot of free time to research on here or online, so any books would be a great solution

Any steer warmly welcomed


Ilya Flyamer's picture
Ilya Flyamer

"Swedish" rye bread, 1912 recipe

A while ago I found this very unusual and interesting recipe on Rus Brot's channel on YouTube: https://www.youtube.com/watch?v=JsDHSrhTgWs

"Swedish" bread based on a 1912 Russian recipe (so not actually Swedish). It uses 100% light/white rye flour, flavoured with bitter orange peel, aniseed and coriander seeds. The procedure is very unusual: 2/3 of the flour is "scalded" with a small amount of boiling water (too little water to even make it into a cohesive mass), then when it's cooled down a tiny amount of rye starter is added (just from the fridge is fine), together with the flavourings (bitter orange peel is dried, and then boiled before using), and a small amount of water as needed to make it into a stiff dough. Here, and later when mixing the final dough, the stickiness level is 11 out of 10, until everything is combined into a nice cohesive dough. And it's too stiff to use a dough whisk, possible only by hand. Then it's left to ferment for 16 hrs at 28°C. In the morning it smelled like panettone!

Then next day the remaining flour is added (during fermentation the dough becomes much looser, and still takes up lots of flour), together with salt, malt extract (or honey), and a tiny bit of CY (approx. 0.1% of total flour). After incorporating everything, the dough is left to ferment 2 hrs at 30°C (I did 2.5 hrs, since it took a while to come up to that temperature for me). Then it's shaped and proofed at at least 30°C (I proofed a little longer than in the video, around 1hr 40 min). It increased in size a lot during the proof!

Another unusual part is before baking it's brushed with a beaten egg - not the more common water or liquid dough. And then baked around 1 hr at relatively low temperature: 220°C in the beginning, going down to 200°C.

As you can see, it looks like I screwed up the last fold I did during shaping, and it created a dense line in the bread - and also caused, or amplified the cracks I got along the bread on the bottom. Typically, the reason for this is starting the bake when the stone (or steel, in my case) is not hot enough. And apparently, using baking paper (like I did) can also cause this, since it slows down heat transfer. So next time I would preheat the oven at higher temperature, and then drop it to 220°C when loading the bread, so the steel is super hot.


However I am pleased that I didn't have any cracks on top of the loaf! Those can be caused by more different reasons, and getting rid of the bottom ones next time should be more straightforward.

The flavour is really nice: indeed, sweet and sour, with slight bitterness from the crust and a very nice citrus-y note. The spices are not very prominent, but I am sure they contribute a lot of depth to the overall flavour. The crust is hard and thick, but the crumb is soft. Really tasty bread with an unusual flavour.

agres's picture
agres

100% whole wheat PdC

My current daily bread is fresh ground whole wheat flour, 2% malt powder, 2% salt, a hand full of yesterday's dough, and enough water to make a firm dough.

 The night before I put the flour, malt, & salt in my plastic dough trough. I mix enough water into my old dough to make a runny mess. I make a well in the flour mix, very gradually pour in the old dough mix, as I stir the liquid, pulling in flour from the edges of the well as I stir. I pour in water with my left hand as I stir with my right to make a firm dough.

I knead a couple of minutes to make a smooth dough, without expecting much elasticity.  I cover the dough trough, and leave on the counter on the cool kitchen over night.  This is a seasonal recipe. 

In the morning, I stretch and fold, and put in a warm place 20 minutes doing 3 or 4 stretch and folds in the course of an hour.  Then, I form the loaf, cover in a banneton, and set in a warm place for the final rise as I preheat the oven with a cast iron griddle in it to 375F. When the dough is risen, I turn it on to a peel covered with parchment paper,  slash, and slide it, (on the paper) onto the hot griddle in the 375F (electric)  oven. (Putting additional water into the oven for steam would just cool the oven.) After 15 minutes I turn the heat down to 360F for 10 minutes, then down to 350F for 10 minutes,  then I shut the oven off, and let the loaf sit on the griddle in the hot oven for another 5 minutes.

I admit that there are 2 or 3 kinds of white flour in the kitchen, and that sometimes I make brioche and  baguettes (from white flour).  However,  this is bread with rich flavor, and pleasant texture that goes better with more menus and is enjoyed by more different people than other bread that I make. While, it has a pleasantly open crumb, the crumb is tight enough that it can be used for sandwiches of all kinds.

And, by starting with a 400F oven/griddle, I can bake a 2- kilo loaf that will feed a table full of folk in one bake.

Carlo_Panadero's picture
Carlo_Panadero

Walnut and Cranberry Sourdough

Cranberry and Walnut Sourdough


Recipe:

70g Whole Wheat Flour(@WholegrainMilling)

280g Strong Bread Flour

280g Water

70g Starter(100% Hydration - Feed 1:3:3)

7g Salt

120g Walnut and Cranberry(Soaked overnight and left to drain for 8 hours)


A little minute more on fermentation would have over fermented this dough....


2 hours Autolyse


30 minutes rest after adding starter


2 x 5 minutes Rubaud Mixing with 10 minutes rest in between.


Lamination - adding inclusions 


30 minutes rest and transferred to a rectangular glass dish


1st Coil Fold


2nd Coil Fold


3rd Coil Fold


4th and last Coil Fold - Temperature is just going high!


Dough is really puffy and almost tearing up! Dough went Crazy from 27°C to 31°C in about 2 hours!!!


Shaping is hard to handle....


Did 'Dan the Baker's' Shaping....


4 x coil folds with temperature as follows - 27°C/28°C/30°C/31°C

Added starter at 2:50pm/6:35pm last coil fold with 31°C internal dough temperature.

8:00pm Shape and rested at room temp for 5 minutes

1 hour in freezer while heating up the oven.


Bake for:

250c for 30 minutes 

220c for 10 minutes 


Subscribe on my Youtube Channel: https://youtube.com/channel/UCUy-wB_IPjBl_cDydF0R2mg

Follow me on IG: https://www.instagram.com/jc_bake_it/

Another Girl's picture
Another Girl

Anova Precision Oven as bread baker: My Impressions

This is my first blog entry but not my first post. I thought it might be worthwhile to post my experience with the new Anova Precision Oven, which has been promoted, in part, as a steam oven suitable for bread baking. My review is pretty mixed, but after a dozen or more failed bakes, I’ve finally begun to see good results.

For those who aren’t familiar with it, the Anova Precision Oven is a combi (steam and convection) oven. It’s said to retain temp to within 0.5°F for sous vide-like cooking. The oven has many capabilities and, in my experience, some flaws, but I’ll limit my review to bread baking because A) this is bread bakers forum; and B) that’s about the only thing I’ve used it for. 

When I first got the oven, I thought I could follow the baking instructions from a recipe in much the same way I would bake a loaf in my old GE gas oven, except that I’d use a setting to steam the oven instead of pouring boiling water on old towels and lava rocks. Turns out that was a gross over-simplification and unless you’ve used a combi oven before, you might find the learning curve pretty steep. At least, I have.

BAKING

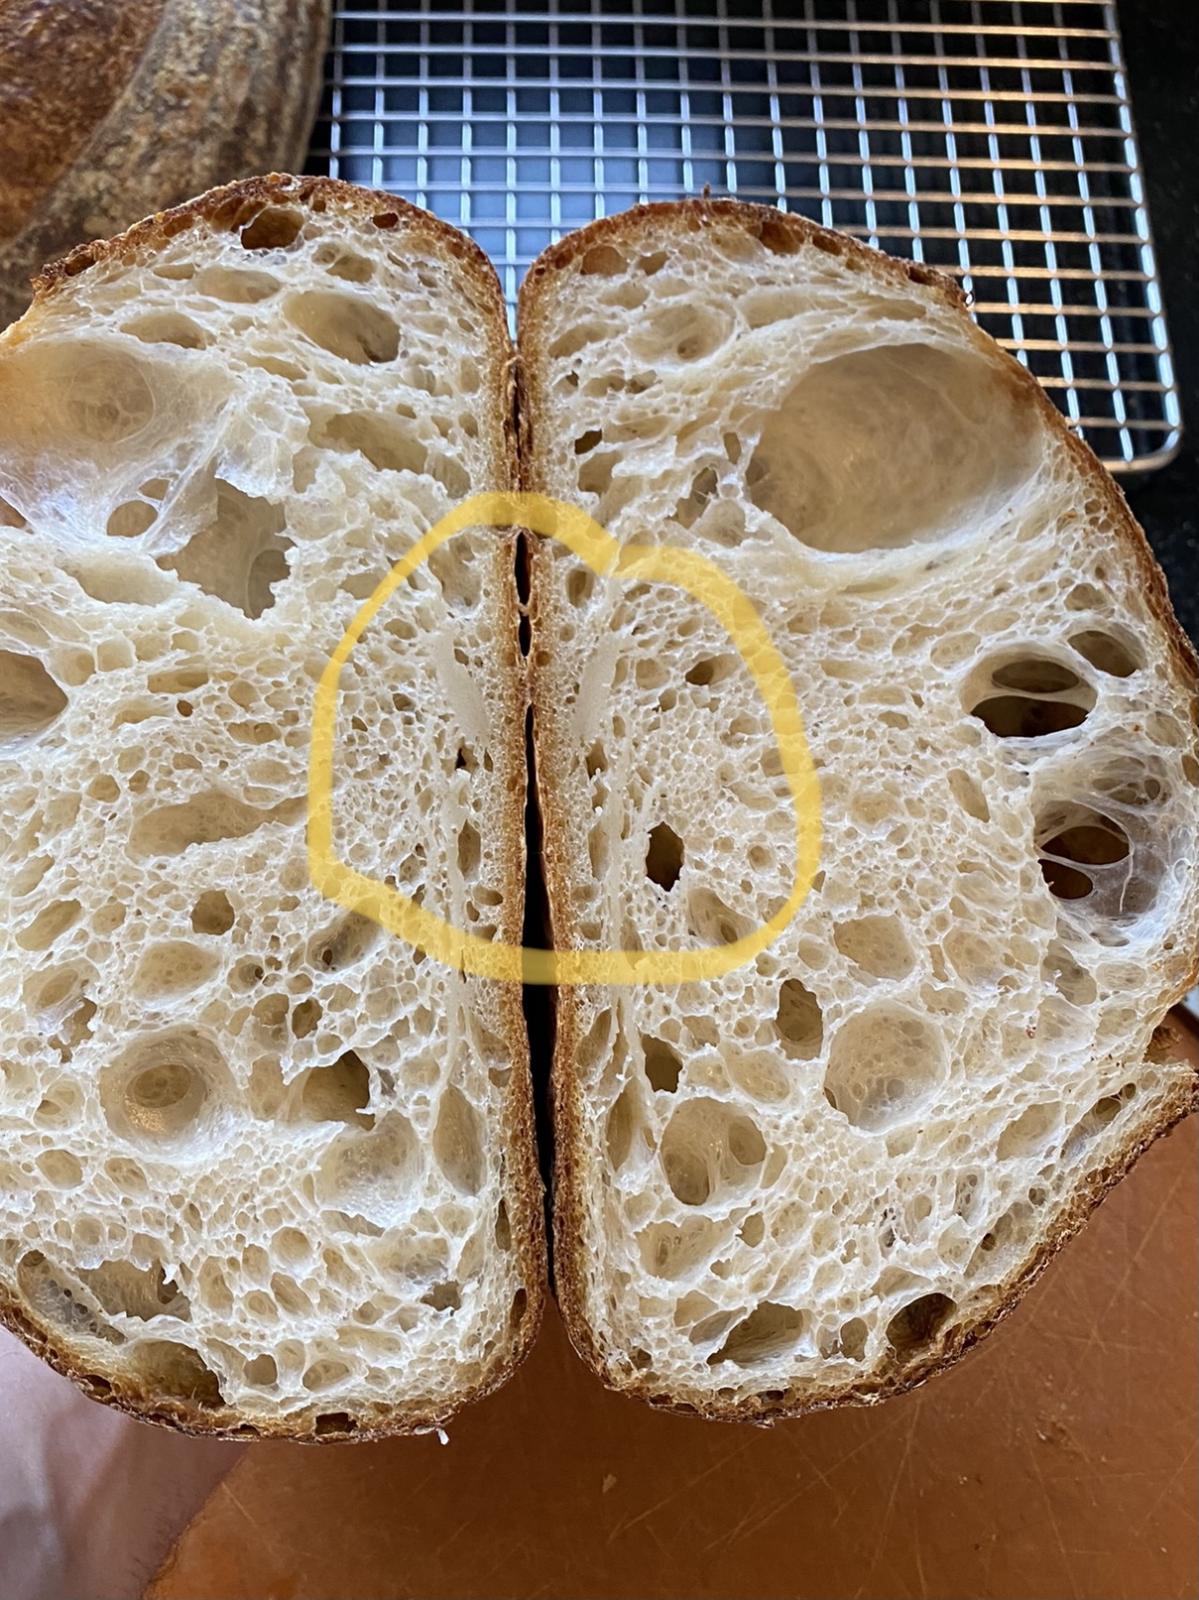
I’ve had a hard time getting bread right in this oven. I prefer darker crusts, but when baked in this oven, the crusts set and darken very fast – well before the interior of the loaves have time to fully bake. At this point, about 15 loaves have been baked in my Precision Oven, nearly all of them with dark exteriors and interiors that range from gummy to doughy. Anova’s Customer Service seems unable to provide meaningful guidance on how to *properly* bake bread in their oven. The app has few bread recipes and I’ve been unable to find any solid direction on how to migrate standard baking instructions to the steam oven. I’ve referred to a number of online resources (Anova Cusine app, some Facebook pages, and even a subreddit for combi oven users that seems to have a lot of Precision Oven users on it), but there’s no authoritative place to get meaningful guidance. I’ve found the app to be disorganized and not particularly helpful. Baking decent bread in the oven has, unfortunately, involved a lot of hit and miss experimentation.

The oven has some “limitations” that, in my impression, might contribute to less than ideal bread baking conditions:

  • The convection fans in the Anova oven are variable only under certain configurations; unfortunately they are not configurations you’d normally use for baking bread. If the rear heating element (recommended for bread baking) or steam (the whole reason for using the oven) is in use, the fan is locked on high 
  • The oven cavity is small, so the baking bread is mere inches away from the fan blowing intensely hot air onto it at full speed (it’s a countertop oven, so…)
  • Water/Steam conducts heat faster than air, so I would imagine that using the highest steam setting (100%, which is what the recipes on their app seem to recommend) intensifies the heat and accelerates the browning. (Most if not all of the recipes I’ve found on the app recommend 100% steam.) 
  • Using the bottom heating element in place of the rear element is a non-starter because the heat maxes out at 356°F
  • I have wondered if the water inside the loaf can’t evaporate quickly enough in the steam-saturated air to keep up with the fast-cooking crust

I could be entirely wrong about the effect of these items, but they do limit the baker’s control. Reducing the fan speed and switching to the bottom heat element were among the things I intuitively wanted to try in order to “fix” the overbrowning/underbaking problem, but they ended up not being viable solutions. That said, I have no scientific training and these are just my impressions. Hopefully those of you with more experience can correct me if I’m wrong. 

After reaching out to Anova Customer Service and waiting days for a reply, I was advised to reduce the oven temp (no direction as to how much) and tent the loaf if it appeared to be browning too fast. I already thought of tenting, but their marketing material promises “no hack”  bread baking and, frankly, fiddling with foil in the small, hot, and steamy oven cavity does not appeal to me. They also referred me to a Facebook page where some bakers were posting results with their own time and temperature combinations. Ultimately, it was the fb page and advice from everyday users like me that got my bakes in the ballpark. Based on other user experiences, I now reduce temperatures more than I’d have thought necessary (425°F) and dial the steam down to 70% – 75%. In this scenario, I turn the steam off after the crust sets and starts browning, but don’t vent it for another 5 minutes or so after that. Then I continue baking at the same temp without steam until done. This results in a dark brown crust and a tender, moist, but not under-baked, crumb. If you’re a person who prefers a lighter crust, you might have to resort to tenting. Over the next week, I’ll do more experiments with different hydrations and dough sizes (up to now I’ve been limiting my bakes to 700g). 

PROOFING

I’ve also tried using the oven for proofing dough and maintaining starter. I did this only to see how it would go because the oven seems like overkill for this purpose, especially considering that I already have a Brod & Taylor proofing box. The oven is supposed to maintain temp within 0.5°F in sous vide mode and I found that the oven actually fluctuates between 5°F – 10°F above the set point. There are reports online from users who say the oven doesn’t maintain temp at the low end of the sous vide range, and this sounds like an example of that. It seems to perform better at higher temps. I reached out to Anova customer service on Feb 11 to see if they could help me understand that, but I have not yet heard back. However, when I used the probe thermometer to sous vide some steaks, they came out really good, better in my opinion than steaks I’ve cooked sous vide using a water bath circulator. 

I’d be most interested in comparing notes from any other users out there. 

Two weeks ago, I thought I would return the oven for sure, but now I’m leaning toward keeping it. If I didn’t already own one, I would probably hold out for a while though. Anova does seem to be making adjustments based on user feedback, so I would expect subsequent iterations of the oven to be better. And now that I’m getting used to it, I’m finding there is a lot to like about the oven. I just wish Anova had dedicated at least a little bit of energy to supporting the consumer market that may not be familiar with the more practical aspects of using it. 

As an aside, I’ve had some issues with the physical oven: the water tank bowed and Anova put me on a waiting list for a replacement. Also, the pan buckled at high heat and they promised to send a replacement for that, too.

Albertino's picture
Albertino

Simple Sourdough Loaf

Hello everyone,

Thanks to Benny and everyone for your help in this new Sourdough bread and sweets journey.

I have done so far 3 Loaf of Bread flour and Wholewheat and am having ok results, but not yet high rise Loaf.

I probably should post here the recipe and process to facilitate some help to see which passage needs improvement.

I guess its a process and needs time, experience and lots of flour.

Just happy to be here with this lovely community.

Any tips and recipes how to make a simple Loaf are welcomed.

Thank you all

Albertino


albacore's picture
albacore

Mad Scientist Project #999

The Heated Dough Board

Here's a project I made last year. It's an electrically heated dough board - very useful for those like me who live in cold climates.
My kitchen temperature is only about 16C in the winter so I hit upon the idea of a heated dough board for working the dough and proofing.
After much searching for a suitable heater, I hit upon the idea of using a piece of heating film, normally used for underfloor heating. For safety reasons, it had to run on low voltage and luckily there is a 12 volt version for use in caravans. It's only 0.33mm thick and an available size of 500mm x 300mm was fine for my dough board and draws 3 amps at 12 volts.


The dough board is made of 3mm thick anodised aluminium for good heat conduction and light weight. I fixed the film to it with foil tape. I then made a backing board from a piece of 3mm birch ply and glued this to the rear of the board.


Power is suppled by a 12 volt power adaptor. There is no automatic temperature control, but the adaptor can be switched to supply different voltages. In practice I nearly always keep it near 12 volts.
I glued a thermistor to the underside of the board so I can see the temperature on a remote. LCD thermometer.

I was really pleased with how this project turned out and use the heated dough board for every bake.

Lance

sasha's picture
sasha

diastatic malt powder

I've been baking sourdough for about a year now and cannot seem to get any consistency with Baguettes. I've used the Tartine recipe, The Perfect Loaf recipe and a recipe from Dan Leaders Living Bread. They are all quite good but still not what I'd like to achieve. Despite good oven spring, they are all too dense or doughy. Anyhow, I've read that diastatic malt powder can help with this but I don't know whether or not this constitutes cheating.  I realize that the goal is to make bread that I like but I do want to learn to do it using legitimate and respectable techniques. 


Thanks!


Pages