The Fresh Loaf

A Community of Amateur Bakers and Artisan Bread Enthusiasts.

Most bookmarked

RainingTacco's picture
RainingTacco

Beginner questions

I like to make boules from cake flour[10% protein]. I encounter few problems. Even at low hydrations like 60% the dough is tacky and won't knead well. I try to knead the dough just after mixing all ingredients -maybe i should let the dough wait a little?. I have to use stretch and folds, but then the dough feels quite stiff and not that extensible i reckon i could add another 5-7% of water. Why is that? I can't really understand what's happening -either it looks like water content is too high, but then it looks like its actually too low. 

Another question. After bulk fermentation i shape my dough and let it for second proofing, and then i bake it. How long should second proofing take and should the dough rise twice its size, just as with bulk fermentation? Since this process usually take place on counter and not in the fridge[i cold ferment] it's pretty hard to time it. In most videos i watched, second proofing is much shorter than first proofing, even if that was also done on the counter. 

Thid question. Assuming same flour, does higher hydration make the bread smaller with less oven spring? Should i always aim for high hydration if i want big loaf, or is high hydration only for making the crumb more open? 

Fourth question. What's the best way to incorporate fresh yeasts after autolyse? I tend to dissolve it in very small amount of water, making a goo and then push it into dough. The problem is that dough has already well developed gluten and the yeasts with water make it a slimy, sometimes a goo if even a little too water is used. And then when i try to knead that yeast with water the dough lose the gluten structure. 

Fifth question. When making boule, bread or pizza dough do i always aim for high strength gluten/dough? I always thought that strong dough with lots of gluten = chewy dough. When i make pizza i sometimes get chewy bottom, like you would get with bread crust. Why is that? I use thin steel plate for pizza and i usually make pizza in a pan, meaning i place the pizza on the plate, and then i put it in oven. 

Six question: Should you preshape your bulk ferment before first proofing? Are there any benefits? And when shaping after first rise, do you degass strongly, or not? One time i had a dough that had problem rising, because i didn't degass it strongly i very gently shaped it, and seems the yeast didn't have enough food source in the vicinity because it didn't rise much when proofed. Now i always strongly degas, since new gas will be created through second rise. I heard that second rising is necessary to minimise the risk of having large pockets in the dough, but i haven't encountered that when baking after just one rise.

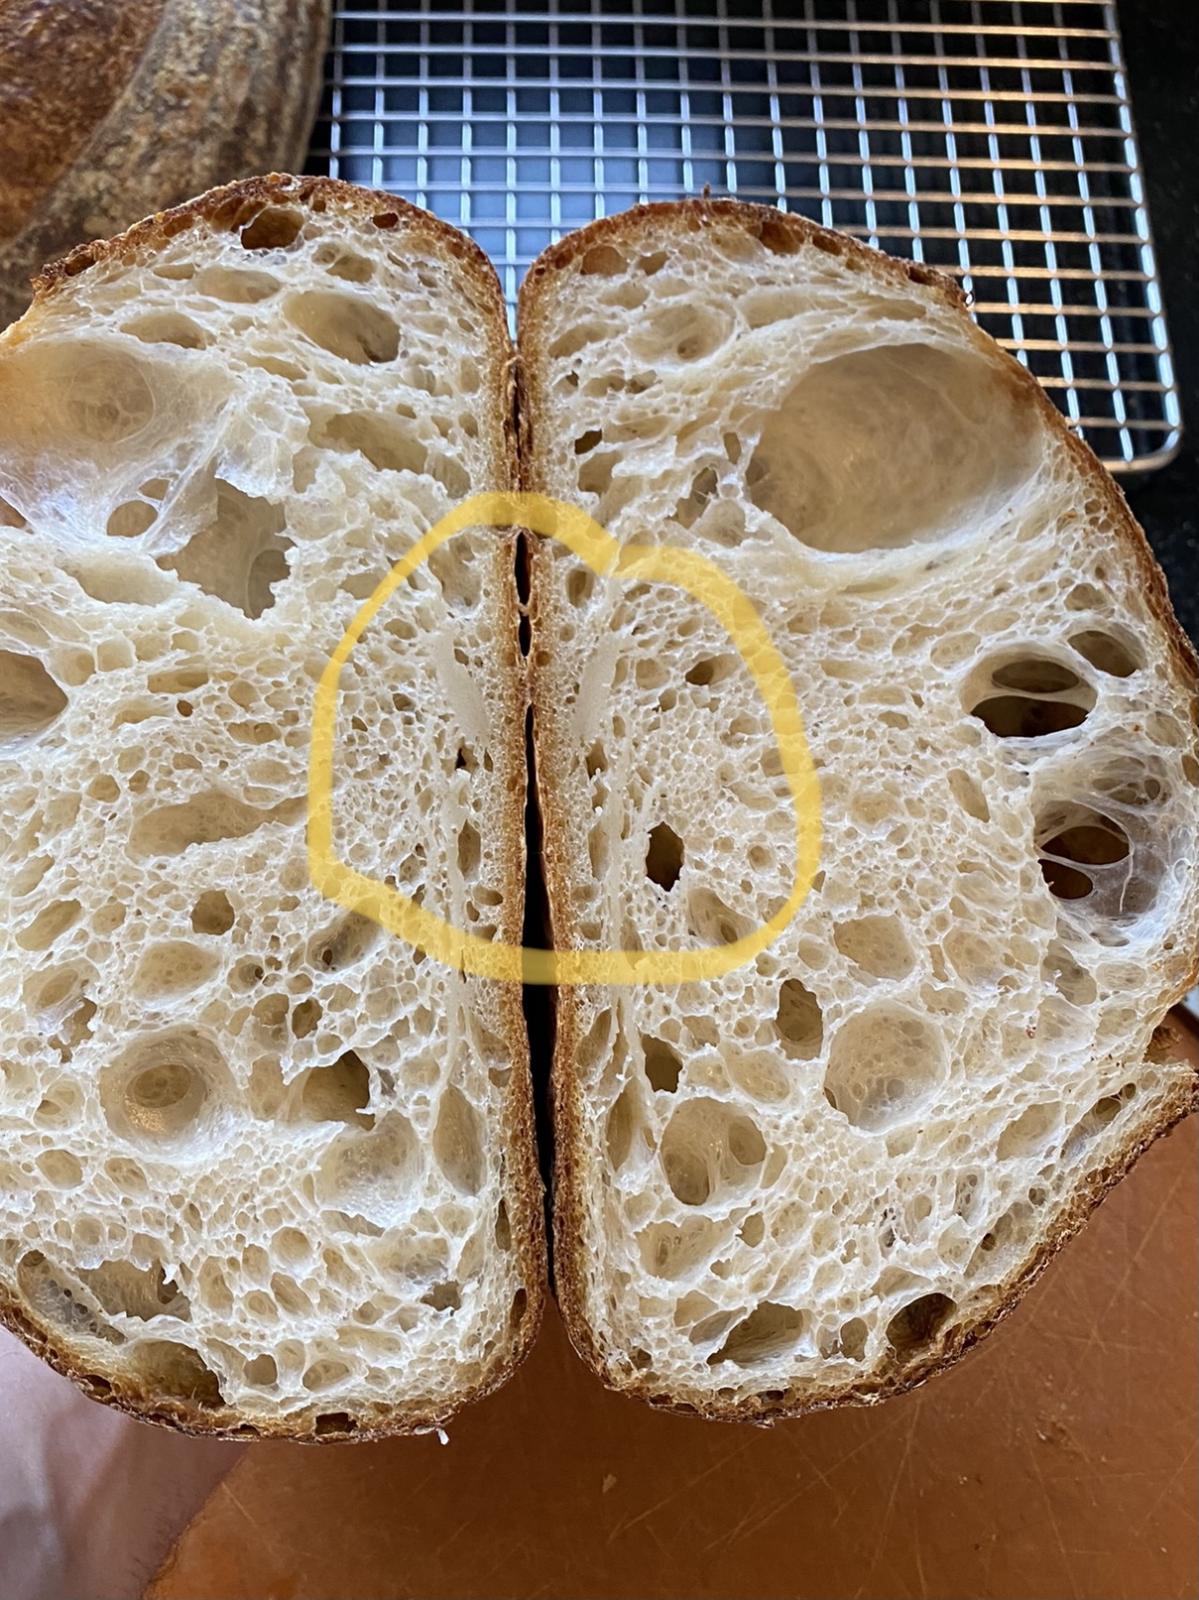
Seventh question: I rarely get that jelly consistency with dough, that many people aim for. Maybe because im preshaping in before bulk fermentation and the dough is quite tense already? Should it be slack for first rise/bulk?

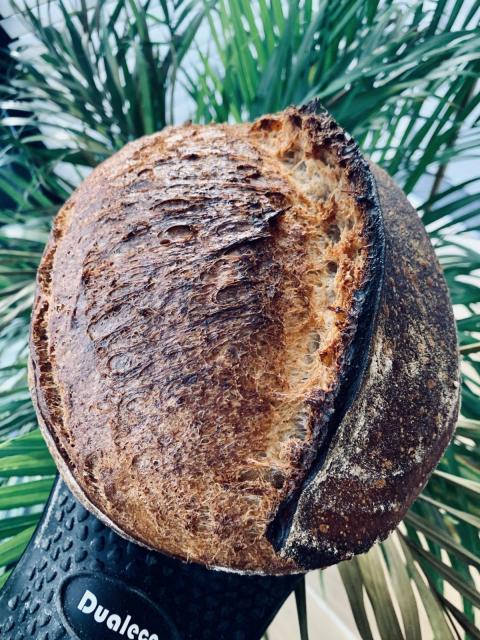
Eight question: This one is related to my oven. I only have two settings that could be suitable for baking bread -either top and bottom heating element or bottom element with a fan[convection oven?]. I've used top and bottom element but it seems my bread browns on top too much and too quickly hence it hinders oven spring -i also have to lower temperature after 20 minutes to not burn it. Do you think that baking with bottom element and fan could be better? Im afraid that fan will dry the dough and vent of the steam. Im going to try it tomorrow. I also have a mode where there's a heating element behind fan, but that burns the bread so quick. 

Ninth question: Any way to increase oven spring/open crumb of graham flour bread? I love the taste of graham flour, but the breads turn out pretty dense. 


idaveindy's picture
idaveindy

notes on whole grain durum vs whole grain red/white wheat.

(From comments to another user.)

I too experienced what you call the bubble gum effect. I called it "gooey gluey paste".

If I may...:

There are three steps needed:

1. don't give it all the hydration at once. If you give it all the water at once, the finer particles or the bran locks up the water, and it will never leave the glue state.  However, even with the lower hydration, it will be gummy/gluey, but only temporarily so.

My WW durum (store bought, roller milled, Sher Fiber Wala) is like this:

a) if I give it 85% water up front, it becomes _permanent_ gluey paste. Nothing will then change it to workable _dough_.

b) If I give it 77% water up front, it becomes gluey paste (bubble gum), but in about 3 hours it absorbs the water and becomes workable dough, to which I can add 12% more water in 3 steps of 4% each.

2. Wait 3 to 8 hours. Durum is glassy, glass-like, aka vitreous, which slows water absorption. Its flour is not powdery like wheat, it is glass-like shards. Tiny shards, but not a "powder" like red or white wheat. 

3.  Add the final water slowly, in 2 or 3 steps, or it will enter permanent glue state again.  Add, wait, add, wait, add, wait.

--

I think you are possibly operating under three misunderstandings:

1. What you are sifting out might not be the bran.  The seive only knows the size of the particles, not where they come from. What if the larger particles are the hard glass-like endosperm, and the small particles are the more easily broken down and softer bran?

Suggestion: don't sift, at least for now.  Sifting is just adding another variable.

Durum is not the same species as wheat.    same genus, different species.  NOT just a different variety/strain like red/white or hard/soft.    Therefore..... as we learn to use it, all assumptions about how the flour should behave have to be abandonded because it is not "common wheat".  It is Triticum Turgidum Durum, not Triticum Aestivum.

Therefore, don't assume  that what is retained in the seive is mostly bran, or most of the bran.   

In other words:  Durum does not and can not mill and break down like red/white wheat because it is not red/white wheat.  It is a different species of plant.

2. To get rid of the gummy gluey paste, the solution is not less water. The solution is time time time, and more water added slowly in stages.

3. Being whole grain, the flour you and I are working with needs more water than the other bakers who are using endosperm-only durum.  Our hydration will need to be in the 85% to 90% range.

Side note: semolina and semolina rimacinata does not behave like this, so the "culprit" must be the bran.  The bran is somehow interfering with how our flour hydrates, so we need to figure out a different approach to how we hydrate our whole grain durum.

Note:  bran absorbs water differently (different speed and different amount) than endosperm.  You already know this:  WW just hydrates and handles differently than white endosperm-only flour.

again, Note: Durum bran is going to behave differently than red/white wheat bran. If durum is not red/white wheat, then durum bran is likewise not red/white bran.  How is it different?  Let's abandon assumptions and explore!

(the first assumption to abandon is that what was retained in the seive is bran. So to simplify, do.... not..... sift.)

I think I figured this out with Kamut which is closer to durum than to red/white wheat. Kamut is also vitreous / glassy like durum.

I have made home-milled Kamut, but not durum.

And what made my home milled Kamut "bakeable" for me was.... soak time.

--

Your stone ground whole grain durum will have larger particles than my roller milled whole grain durum.  So... that initial wait time after you add the first water at  77% could be as high as 8 hours as opposed to my 3 hours for roller milled whole grain durum.

--

What I suggest is ___establish a hydration baselne__, like how I discovered my 77%.

Take 4 bowls. Put 100 grams unsifted durum, and 2 grams salt, in each.  Hydrate each one differently: 70%, 75%, 80%, 85%.  

Cover and let stand 8 to 12 hours.  Then... knead each sample... and see which ones are now workable dough, and which ones are still gluey paste.

The highest hydration that is workable dough is your first iteration or approximation of a baseline.

Forget, toss out, the higher hydration samples that are still gluey after the 8 hours. In my experience, something happens, where you can't "undo" the gluey nature. Again, the notion that we can "correct" the glue situation by adding flour ..... comes from our experience with red/white wheat, and durum is just not going to act like red/white wheat.  (Maybe there is a "fix", but I haven't discovered it yet.)

Now... Add 4 grams water to the lower hydration samples that became workable dough.

The samples will all likely turn to gluey paste, which happens to me.  but as before... give them time. Say 45 minutes.

The question now becomes....  how high hydration can you go and still have the "paste" revert to "workable dough" after giving it time to absorb?

so.... 77%, wait 8 hours, add 4%, wait 45 minutes, add 4%, wait 45 minutes.

But now, don't throw out anything that is still paste after 45 minutes. Just set it aside and see if it just needs more time. Your magic wait period might be 60 minutes.

My answer for roller milled flour is 30 min wait times and a max 92%.  But I can still get a good loaf at 89%, which is what I shoot for now.

Yours could be more or less, as your durum grain might have more or less native moisture.  And your time-to-absorb will be be longer than mine due to home-milling likely creating larger particles than roller-milled.


Benito's picture
Benito

Greek Sourdough Focaccia

Sacrilege I know, focaccia is Italian but I wanted feta today on my focaccia.  So this really is just a simplified Greek salad on bread, what’s not to like?  Cherry tomatoes, kalamata olives, shallots, feta cheese, salt, pepper and oregano are the toppings.  The feta is buried under each pair of tomato and olive, I wanted lots of toppings.  I followed Maurizio’s sourdough focaccia recipe again however, I did adjust down the dough weight so I would end up with a more “normal” thickness of baked focaccia in the end.  Because of scheduling, I had to do a cold retard of the dough overnight for the bake today.  I wasn’t sure how long to let it final proof for and I’m not sure if it is over or under proofed.  I was hoping to have lots of big bubbles, which I also didn’t get on my last focaccia.  

9” round skillet

Total dough weight 450 g

Levain 19%

Hydration 76%


Weight

Ingredient

Baker’s Percentage

95g

All-purpose flour 10% protein

38.4%

131g

High protein bread flour 13% protein

61.6%

4.5g

Extra virgin olive oil

2.00%

172g

Water

76.00%

4.13g

Salt

1.80%

43g

Levain (100% hydration)

19.00%


Total flour 247.5g


Levain build 1:6:6 75ºC 8-9 hours

4 g starter + 24 g water + 24 g bread flour

Method

Mix – 9:00 a.m.

This dough can be mixed by hand (I would use the slap and fold technique) or with a stand mixer like a KitchenAid.

To the bowl of a stand mixer fitted with the dough hook attachment, add both the flours, water, salt, and ripe sourdough starter (hold back the olive oil until later in mixing). 

Mix on speed 1 for 1 to 2 minutes until incorporated. Then, mix on speed 2 for 5 minutes until dough strengthens and clumps around the dough hook. Let the dough rest in the mixing bowl for 10 minutes.

Next, turn the mixer on to speed 1 and slowly drizzle the olive oil into the bowl while mixing. Once all of the olive oil is absorbed, turn the mixer up to speed 2 for 1 to 2 minutes until the dough comes back together.

Transfer your dough to a bulk fermentation container and cover.

This highly hydrated and enriched dough is  wet and loose , it won’t strengthen to the same degree as a typical bread dough.

As you can see below on the left, immediately after mixing the dough is still very wet and chunky. However, it’s not falling apart or soupy. Resist the temptation to add more flour at this point, as you can see below in the image at the right, by the middle of bulk fermentation it’ll strengthen after several sets of stretch and folds.


Transfer the dough to a covered container for bulk fermentation.


Bulk Fermentation – 9:15 a.m. to 11:15 a.m.

Give the dough 4 sets of stretch and folds, starting 30 minutes after mixing, and a set every 30 minutes thereafter.

Every 30 minutes for the remaining 2 hours of bulk fermentation gently stretch the dough, with wet hands, toward the corners of the rectangular container. The dough will resist stretching and spring back (especially with the oil underneath), but don’t force it—each time you stretch it’ll relax a bit more and eventually fill the container.


Proof – 11:15 p.m. to 3:15 p.m.

Transfer the dough to a deep rectangular pan that’s been greased with olive oil. If you don’t have a pan with a silicone liner, make sure to heavily oil the pan’s interior so the focaccia doesn’t stick during baking.

At 76-78°F (24-25°C), the dough will proof for 4 hours. This time period is flexible and dependent on the temperature: if it’s cooler, let it proof longer, and conversely, if it’s warm, you might be able to bake sooner.

Every 30 minutes for the first hour, uncover the pan and gently stretch the dough with wet hands to the pan’s edges to encourage it to fill the pan. The dough will naturally spread out during this proofing period, so it’s unnecessary to spread the dough aggressively. Once the dough is mostly spread to the edges, cover the pan and proof for 4 hours.

OVERNIGHT OPTION: After two hours in proof, cover the rectangular pan with an airtight cover and transfer to the fridge. The next day, take out the dough and let it come to room temperature, and continue with the Top & Bake step below.

The rectangular pan I use fits perfectly inside my B&T Dough Proofer. I keep it inside the proofer, covered with reusable plastic, and set to 78°F (25°C) until ready to bake.

About 30 minutes before you anticipate the sourdough focaccia dough being ready, preheat the oven to 450°F (232°C) with a rack placed in the bottom third (a baking stone is not necessary).

Top & Bake – 3:15 p.m.

First, dimple the unadorned dough with wet fingers. Make sure the dimples are evenly spaced and go all the way down to the bottom of the pan. Then, drizzle on 1-2 tablespoons of your extra virgin olive oil and sprinkle with herbs and coarse sea salt. If using other toppings, add them now as well—I like to press them into the dough gently.


Bake the focaccia in the oven at 450°F (232°C) until deeply colored on top, about 30 minutes. Rotate the pan front-to-back halfway through this time. Keep an eye on it during the last 5 minutes and pull it out if it’s coloring too quickly, or leave it in longer if you’d like it a little darker.


Let the focaccia cool a few minutes in the pan, then transfer to a cooling rack. It’s fantastic warm from the oven, and best on the day of baking, but it’ll keep well for a couple days loosely wrapped in foil (reheat under the broiler before serving).

hodgey1's picture
hodgey1

Franken Oven

Hello all, many years a baker. I am toying with the idea of adding and investing in a commercial/pro type baking oven. I have a WFO, but I live in the great white north and have near zero interest in firing it up in the winter, as I am growing older everyday. My current interests are in artisan sourdough breads and I am using the dangerous preheated Dutch oven method with great end results.

My fantasy is to retire in the next few years and possibly make a few extra dollars selling some loaves for fun. I am having to do multiple batches in my home oven and grown tired of the lack of space and handling the hot DO's.

I have the perfect setup to add a oven in my Mancave/Garage, since that already houses my other food hobby devices, like a commercial mixer and meat grinder.

So i have looked a little at the Rofoc 40 and that looks like the near perfect solution until I look at them being completely sold out and unavailable until next fall... Which brings me to my 2 questions for my fellow bakers.

1: I am not opposed to something commercial used, since I have the space. With that line of thinking, what should I be searching for brand/type wise in a used oven? I would like to be able to do 1/2 dozen to a dozen  900g/2 lb loaves .

2: I am a handy/fix it/build it kinda guy for a living, I also built my own WFO. I want to see anyone thoughts on this. From looking at the Rofco type oven, the key to what makes it bake so well is the brick lining. With that in mind, what if I took my old spare olive green electric oven "Circa 1975" and turned it into the Franken Oven? Reline the shell with high temp insulation like I used building my WFO and then complete box in the oven space with cut to size Corderite stones? My thought would be two shelves lined with the stones, the sides as well as the back lined with the stone? Has anyone tried such a thing or seen such a Frankin oven? I currently use a Corderite shelf when I do pizza now in the house, but it doesn't cut the mustard for bread and why I use the Dutch Oven, but if I enveloped the entire space and preheated stones and misted with water for steam, I think it may work?

matt291's picture
matt291

Problems with milling fresh flour

I've recently purchased a Mockmill Lino 100 to start milling a percentage of my own flour at home. I'm using Gilchesters wheat, rye and spelt grain berries. I've had great success using 70% strong Canadian white flour, 15% Spelt, 10% strong wholewheat and 5% rye, but all using either Matthews Cotswold Flour or Shipton Mill, not fresh-milled, at 78-80% hydration. See the first two photos for examples of good bakes, which are very consistent. 

To get used to fresh milled flour, I've been using the same formula but with fresh-milled wholewheat, spelt and rye at 78% hydration. I've also been using the same process, and have been experimenting with different bulk fermentation times, as I know that fresh-milled flour ferments much quicker than conventional flour. However, my results are far from promising. The last two pictures are of a loaf I baked today, with the following process: 

Build levain at ratio of 1:2:2, leave for 4-5 hours at 80F. 

1-2 hours before levain is ready, I mill the fresh flour and mix all the flour with most of the water (leaving 2% out to mix in levain and salt later). 

When levain has reached peak and passes the float test, mix in with the dough. Rest for 30 minutes. Add in salt and mix. All mixing done in a KitchenAid mixer with dough hook. I also hand mix larger batches for my micro bakery with fantastic results. 

Start bulk fermentation, with 4 coil folds at 30 minute intervals. Total bulk is usually around 3-4 hours at 80F. 

Divide, pre-shape, rest for 30 minutes, final shape using stitching. Cold retard overnight at around 2-3C. 

Bake in a small deck oven, 20-25 minutes with steam. 

--- --- 

My thoughts on the problem are the following: it could be that I'm not allowing the fresh flour enough time to rest and to lose some of the heat from milling, as I mix it with the white flour and water right after I mill. Could this be a problem? I've also adapted to the increased fermentation rate by decreasing bulk fermentation. But still, no luck. 


Anyone have any thoughts on what I'm doing wrong? All help is appreciated! 


Matt, Hobz Bakery, Edinburgh. 


CharlotteS's picture
CharlotteS

Swedish Rye inspired by Abe’s recent post

After reading Abe’s recent post of his beautiful Swedish rye bread bake, I couldn’t stop thinking about the flavors—in particular the addition of orange rind to a dark rye bread. So I gave it a go, using the Breadtopia recipe https://breadtopia.com/sourdough-rye-bread/  rather than Abe’s slightly modified version. The bread came out beautifully. The initial flavor was a bit too sour for me, but after about 48 hours of maturation, it was perfect! It’s unusually light and airy for a bread with such a high proportion of whole rye (50%). And, it’s really an easy recipe with little hands on time. Which is good because this is one sticky, gooey dough!


Thank you so much Abe for posting about this delicious recipe!

Charlotte

Lemonie's picture
Lemonie

Hot Cross Buns tweak

I have made some hot cross buns for the first time and am unsure which part of this recipe is making the buns a bit dense.

Adjusted from BBC Good Food recipe


300ml whole milk

50g butter 

500g bread flour

1 tsp salt

75g caster sugar

1Tbsp oil

7g yeast

1 egg, beaten

**20g malt extract - syrup form (addition)

**150g sultanas - pre-soaked (was 75g but that was no where near enough plus I pre-soaked them)

50g mixed peel

zest of 1 orange

**2 tsp mixed spice (doubled)

**2 tsp allspice (addition)

      **adjusted by me.


> Boiled the milk then cool a little, put some in a bowl with the yeast and malt extract and melt the butter in the rest.  Cool.

> Combine bread flour, salt, caster sugar.  Add the yeast mix, milk and butter mix and oil.

> Knead for 5 mins > rise for 1 hour.

> Knock back.  Add sultanas, mixed peel, zest of an orange, mixed spice and allspice.  

> Knead until combined. > rise for an hour.

> Split into 12 balls 105g each.  Put on baking sheet. > rise 1 hour.

> Bake at 210 for 16 mins ish.


Next time I was thinking to lower the temperature and cook for longer as these were almost too brown on the top after 12 minutes and I lowered it from 220c after reading the comments on the recipe.  I had to cover them loosely with foil to continue cooking.  Any advice where to start?


agres's picture
agres

Flour and water, together

By the time I was in high school, I baked regularly - including huge challah for large Friday night gatherings at my girlfriend's house. Mixing the the dough for those huge loaves was a significant effort. Oh, I wanted a stand mixer!

My mother was a good baker.  She was cooking noon "dinner" every day for a large farm crew from the time she was a little kid (6 years old). She DID teach me the easy method to mix flour and water together without a stand mixer. (Gradually stir the water into the flour.)  However, I went off track in high school, studying recipes for breads and pastry, that my mother had never made. Many of those recipes came out of commercial kitchens or were developed by professional chefs,  and assumed a stand mixer. They added the water all at once. When you do that, an electric mixer is much easier. Chef Louis Diat and others taught me much, but they also encouraged me to abandon some smart practices.

Later,  when I worked in the kitchens, I often had to make 50  or 80 or a hundred loaves every day. We used a mixer, because at that scale, a mixer is easier. Using a mixer for bread dough became a habit, that was very hard to break. I also developed the habit of making pasta in a stand mixer and pasta roller. We always used a stand mixer, and I forgot what my mother taught me. 

Now, I have time to really think about what I am doing, and I bake bread almost every day.   I can consider the best way to make dough for the daily bread of a house.

Now, I remember what my mother taught me. I find that it really is faster and easer to mix flour and water AND DEVELOP THE GLUTEN by by gradually stirring water into the flour. I stir with one hand and pour water in with the other hand. I started doing this again  because I was working with fresh stone ground flour, for which I did not know the moisture content, so I did not know how much water to add.  So the easy thing to do was to add water until the dough had the correct consistency. I measure flour, salt, malt, oil and such, then I  gradually stir in water until I have the correct dough consistency. Such stirring is low physical effort, and it develops gluten quickly, very quickly,  The method is quicker and easier than using a stand mixer (at least for batches of dough of less than 5 kilo.)

Now, I look at commercial bakers in YouTube videos vigorously kneading their bread dough, and I think, "Hey Dude, if you just had stirred the water gradually into the flour, instead of dumping it all at once, you could have saved yourself a lot kneading." (In the videos, they are working with batches of dough no larger than what I make.)  I know the "stir the water in gradually method" works for batches of dough of less than 5 kilo of dough at a time, and 3 kilo/ hour is about what my ovens can bake. So, with 45 minutes of dough preparation the night before, I can keep my oven full all morning, and provide bread for a BIG party. I know that with this method, I can mix bread dough much faster than my ovens can bake it.  An hour of work in the morning, will produce fresh bread all afternoon.  I can mix the dough for a 600 gram loaf while our morning oatmeal cooks, and it comes out of the oven 11:30, in time for lunch at noon.  Why would I make dough any other way?

I do this for: bread, pizza, and pasta.

I have a pasta roller in the garage, but if you stir the water gradually into the flour, you can stretch the pasta dough rather like a pizza (using a rolling pin on the bench rather than tossing) to make a very thin, delicate fettuccini, or whatever.  If you want to easily make wonderful ravioli or tortellini, the path is through pasta that has been stretched, rather than rolled though a pasta machine. And, stretched pasta is the path to lasagna of wonderful delicacy.   

However, if you are making pasta, and you  just dump all the water into the flour, all at once; Oh, yes! you will want some kind of machine to mix/knead/roll your pasta, and you will have pasta with the one virtue; it is like the stuff you can buy at a good supermarket. 


Maine18's picture
Maine18

Question about "gummy" crumb streaks?

Hi all -- Overdue for a proper update on recent bread experiments (there have been many this year, from so much time at home!).  But before that, wanted to see if others might be able to help me figure out an occasional problem I see with some sourdough loaves.  Specifically, every 15-20 or so loaves (e.g. infrequent, but not completely one-off), I tend to see a thin layer or layers of only partially cooked/gummy crumb near the bottom of a loaf when I cut it open.  It's really hard to predict when this will happen until I cut into the loaf, and I'm pretty consistent with my process, cooking time, etc, so I haven't been able to predict when it will happen.  My current theory is that it is caused by something I'm doing in the shaping process, potentially when I "cinch up" the batard, which can sometimes get a little messy/thick and layered, so I wonder if I'm unintentionally creating some lamination at the bottom of the loaf which causes the gumminess. I'll attach some photos of a normal/good loaf, one with slight gumminess, and one with egregious example, for reference.

Normal/Target Inside & Out Example:

Slight Gummy Streak Near Bottom Example:


Lots of compression/gumminess at Bottom Example:


Has anyone else experienced this and some up with some solutions? 


Thanks very much in advance!


PS Some additional detail on process:

My baking set up: 3/4" fibrament baking stone; custom stainless metal steel cover (fits snag around the stone), parchment paper to load the loaves; occasionally some extra water/ice for added steam.  

I generally cook for 20 min with lid on at 500; then 25-30 min lid off at 450; dry out for 6 min with oven off.  

Flours/Hydration: generally a mix of central milling wheat flours (bread and AP) and some fresh milled flour. Hydration in the 75-85% range, depending on the loaf

will-you-wont's picture
will-you-wont

Hot Cross Buns Help: how to get shop-bought squidgy-ness

Hi all,

I'm brand new here so please forgive me if this is a well-covered topic. I went through five or so search pages and hadn't found anything that fitted my query.

I've made hot cross buns for years and have always been ambivalent about the results. They always have a firm dome, relatively dry crumb and harden pretty quickly. They also almost always use an apricot jam glaze, which renders them nigh on untouchable.

They never, ever, ever have that dense squidgy-ness that you get from UK supermarket versions (perhaps abroad too, but my HCB research hasn't gone international...yet). I love that dense squidge. I probably shouldn't, it's probably terrible bread, it probably makes me a terrible baker, but recreating it has become a decade long obsession.

I thought I'd found the answer in tangzhong, but tried that today and they still have a drier crumb and a crust. I'm starting to consider mochi flour as a possibility but this seems unlikely to be in common use in the UK.

From what I can tell, supermarket HCBs don't maintain a dome shape - they seem to collapse in on themselves. I also once bought a pack from Tescos only to discover the dough was still raw inside, all of which makes me think they're cooked remarkably quickly and maybe deflate like a cake.

The ingredients on packs contain added emulsifiers and acids – I don't know if these would really contribute to a squidgy dough or are simply there to long-life them. I've never used them and would like to avoid them if possible. The supermarket also contains a lot more oil, in place of the butter more often seen in homemade. Enough to make a difference?

Turns out I'm not alone. Love her or hate her, Mary Berry even said mid-bun bake that supermarket HCBs were always better than homemade.

Is there a way to marry the two, online experts? Can anyone offer advice on changing ingredients, method or cook time?

Thanks!

Pages