The Fresh Loaf

A Community of Amateur Bakers and Artisan Bread Enthusiasts.

Most bookmarked

Milhouse's picture
Milhouse

When to feed starter after baking?

Hello, I am a COVID-triggered sourdougher, so still inexperienced ?. I bake infrequently, say every few weeks, so keep the starter in the fridge. It's around 300g. I use 150g per loaf, so i feed it with 75g water and 75g flour. A few questions:

- do I feed the starter immediately or wait until next time I bake?

- if its immediately, do I put it straight into the fridge or leave it at room temperature until it doubles in size, then put it in the fridge?

- should the jar be sealed tight or loose, to allow a little bit of air flow when in the fridge?

TIA. 

breadmonster's picture
breadmonster

Please help! My croissants are struggling!

I need help! I've been trying the Dominique Ansel method for croissants, and am unable to solve the issue with the crumb that you can see in the above picture, specifically:

  1. Crumb layers aren't well defined and are quite thick
  2. A large hole in the top

I've followed all the advice I can find, including working with cold dough / butter, increasing hydration etc, but I'm still not getting the elusive honeycomb. Below is a photo of their exteriors. 

Can anyone help diagnose what are the likely causes of a crumb that looks like this? Any help would be hugely appreciated!


Kistida's picture
Kistida

Mini Orange Cake and a semi-successful Gâteau Invisible

I simply added ingredients to make a small single layer orange cake for dessert today. The 6” pan is preferred because it provides enough cake for 2 human beings without guilt of over-stuffing our bellies or having to cope with leftover dessert. :D 

Cake

  • 115g all purpose flour 
  • 5g corn flour 
  • 1/4 tsp baking soda
  • 1/4 tsp salt 
  • Zest of 1 orange
  • 60g sugar 
  • 25g unsalted butter 
  • 20g light olive oil
  • 1 large egg, lightly beaten 
  • 60g fresh orange juice 
  • 60g milk
  • Optional: chocolate chips, nuts, sugar 

Orange syrup 

  • 1/4 cup orange juice 
  • 4 tbsp sugar 
  • 1 tsp orange zest

Sift dry ingredients in a bowl.

Rub the zest into the sugar (releases fragrant essential oils and lightly tints the cake yellow). Then, butter, oil and beaten egg. 

Weigh juice and milk in a measuring cup (this makes an orangy buttermilk). Then, alternate milk and flour mixtures into the sugar mixture. 

Pour into grease and lined pan. I used chocolate chips and a sprinkling of about 1 tsp sugar. 

Place the pan on a quarter sheet and bake for 28-30 minutes at 180°C. After baking, let the cake cool for about 10 minutes then loosen it out onto a cooling rack. Remove the parchment paper on its base, flip the cake topside up and poke the cake all over with a toothpick/skewer and drizzle/brush orange syrup over the warm cake. About 45 minutes (couldn’t wait any longer), I took a little slice and was pleasantly surprised by the citrusy burst of flavor. So happy with this first time bake. 

A few days ago, I tried making the Invisible Apple Cake (Gâteau Invisible is its fancy name). I guess the Ambrosia apples I used were overly juicy because the cake stayed relatively wet even after the batter had set. And the cake shrank a little once cooled too. 
I checked with Bea (the owner of that El Mundo Eats site) and she said it looks fine and just to bake a little longer with a foil tent. This was a very tasty cake but I will make it again when I get new bags of apples. ??
 

Benito's picture
Benito

Ichigo Daifuku (Strawberry Mochi)

This is the first time I’ve eaten an Ichigo Daifuku so I can say it the best I’ve ever eaten ?. This is the second time making mochi and I don’t think I’ve shared the method I found on the net that makes this so easy to prepare.  Normally, the traditional Japanese method is to prepare glutinous rice and then pound it for hours and hours.  OK I do NOT have time for that so there is a shortcut.  Does the shortcut make exactly the same chewy texture we so love about mochi, not quite, but it is good enough for most of us except diehard mochi perfectionists (not me).

Ingredients

115 g glutinous rice flour

60 g sugar

125 mL water

8 tbsp anko

8 small strawberries

1 tbsp potato starch (preferred by Japanese) or cornstarch


Instructions

  • In a large bowl, mix together the 1 heaped cup of glutinous rice flour, 4 tbsp of sugar and 1/2 cup of water until combined.
  • Loosely cover with cling wrap and microwave for 1 minute.
  • With the spoon, give it a quick mix, re-cover and pop back in for another minute.
  • Get a spatula, and wet it in water. Pull the mochi away from the sides and fold it in until it's a rough dough ball shape. It should be sticky and pliable, with the colour turning from bright white to a more translucent cream.
  • Spread the cornstarch on a clean dry surface, and pop the mochi onto it using the wet spatula. Cover it with cornstarch until it's no longer sticky, molding it into a thick and flat disc, and allow to cool for a few minutes.
  • make 8 tbsp size balls of anko and place on a plate
  • Clean and hull 8 small strawberries
  • wrap each strawberry with the anko all around leaving just the tip of the strawberry exposed.
  • Repeat until all the strawberries are wrapped in anko.
  • Sprinkle the top of the dough lightly with more cornstarch. Cut the dough into 8 equal pieces, ideally with a bench scraper (it can be easier to visualize if you cut the round into fourths and then divide each of those in half).

  • Dust your hands with a little cornstarch before handling the sticky dough (an excessive amount will dry out the dough too much and make forming the balls harder). Roll a piece into a ball, then flatten into a disc 2 1/2 to 3 inches wide. The dough should be soft and malleable. Place the anko covered strawberry in the center of your disk of mochi with the exposed tip of the strawberry pointing down.  Then gradually and careful fold the disk of mochi over the anko covered strawberry twisting to seal the dough.

    It can help to flip the round seam side down to form it into a neater ball. Roll the mochi in the cornstarch pressing a little to help it adhere, reshaping the ball as needed. If your hands are feeling sticky, just dust again with cornstarch. Repeat with the remaining dough and filling (you may have some filling left over, which can be stirred into yogurt or oatmeal). Work as quickly and confidently as you can so the dough doesn’t get too cold.

    Serve immediately.

Mark Sealey's picture
Mark Sealey

Tartine #3 White-Wheat very flat

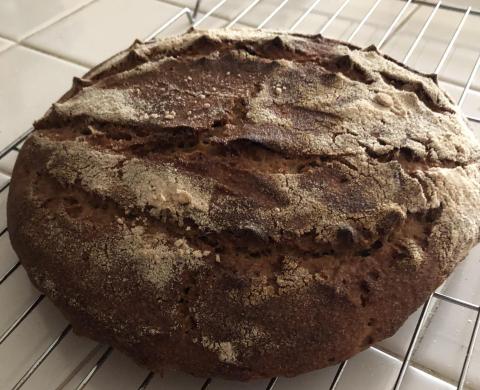
My latest attempt at the Tartine #3 White Bread (Ode to Bourdon) on page 46 was equally disappointing.

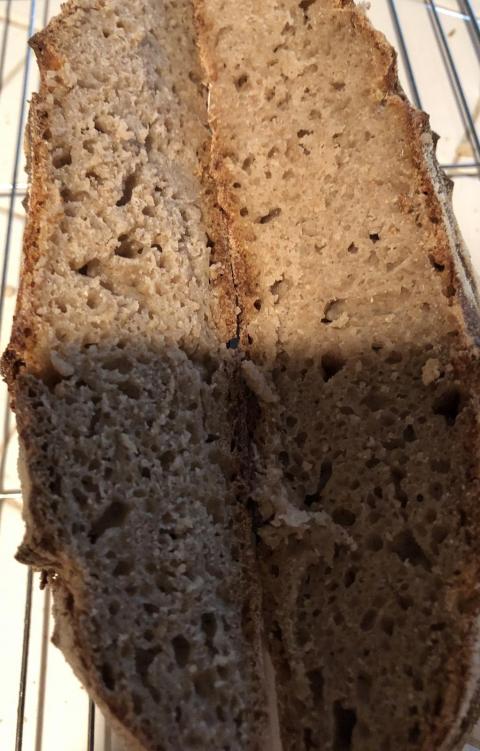
Though in a different way this time: lack of rise.

Two images attached: the flat loaf; the crumb.

I halved the quantities Chad Robertson suggests; and used the flour types - as discussed here.

In bowl 1:

  1. 125g All Purpose
  2. 125g Whole Wheat
  3. 125g Whole Grain Wheat
  4. 125g White Whole Wheat
  5. 35g Wheat Germ

In bowl 2: 

  1. 350g filtered water; less than the 375g specified because of the advice given in this thread.
  2. 75g of a very healthy, bubbly, lovely-smelling, beautifully risen KAF AP leaven which was poured off from my kept starter and fed at room temperature twice (1:2:2) a day each day for two days before beginning this recipe - and doubled in size.

The starter originated with the KAF kit. But I have been successfully feeding it for a couple of months with KAF organic All Purpose. Usually 1:1:1 twice a week with Britta-filtered water and plastic/silicone tools. Stored in fridge. Always looks and smells what I take to be just right.

Yet it is tempting (to me) to think that - despite this - the starter is just not giving the bread the sustained rise it should… even though at warm proofing (see below) the dough rises very well.

Added contents of bowl 1 to contents of bowl 2; OXO stainless steel. Four hours autolyse at room temperature. Little sign of any appreciable rise. A couple of folds.

Added 13 g salt and just enough water mixed with more starter (room temperature) to make what seemed to me like a nice springy dough. Much more workable than my last attempt, which was far too sticky. I was able to pick up the dough from the bowl this time with two hands. Some tearing. But passed the Window Pane test.

Rotation-folded half a dozen times carefully as on pp 38-39.

Proofed at 80°-85°F in Bród and Taylor for six hours.

Rose significantly (60%-90%) between each fold.

Transferred to brown rice-floured cloth-lined banneton. Covered with cling-wrap. 

Transferred to lower shelf of fridge (< 40°F) for eight hours (overnight).

In the morning back to Bród and Taylor 80°-83°F for four hours. No real further rise.

Preheated conventional electric oven (elements top and bottom exposed) to 500°F with Challenger + lid on for 55 minutes.

Removed Challenger from oven. Closed oven door immediately.

Inverted loaf (by now no higher than 3") onto double-folded parchment paper. Dropped out of banneton with ease.

Placed onto shallower Challenger pan. Added three ice cubes. Sizzle sizzle. Put Challenger lid back on. Into oven.

Baked for 15 minutes at 435°F. Oven is 50°F slow. I have two thermometers in oven. Showing that my setting of '485°F' does give exactly 435°F.

Took Challenger pan out of oven; inverted cover/top below pan; back into oven for 30 minutes also at 435°F

Removed from oven. Load very flat. Not at all what I am trying to get.

Over-proofing???

Very grateful for any help anyone can give as to what I may be doing wrong, please :-)

HeiHei29er's picture
HeiHei29er

Sesame and Chia Seed Sourdough

I wanted to push my learning curve a little bit on this bake and used Benny's recent bake as my template.  This one turned into a definite learning curve.

Everything started well.  I used Raisin Yeast Water for the hydration in the levain and my whole rye starter from the refrigerator.  After 9 hours, it was 2.5x in volume.  I stirred it down, and it doubled in less than 2 hours.  Figured it was ready for the mix.  Added the levain to the final dough water for mixing, and it passed the float test with flying colors. 

Dough was higher hydration than I usually work with but manageable.  After mix and autolyse, I developed gluten using this kneading technique.  I used it on both bakes this weekend, and I can say it works quite well for me so far.

Wanted to try lamination for inclusions this loaf as I usually add them at final mix.  That went well also.  Maybe could have stretched the dough a little more, but I was worried about tearing it.  After lamination, things went in the opposite direction.

Even though the levain seemed active and ready to go, bulk fermentation took forever.  I started with coil folds every 30 minutes.  I lost count and did my best to do them every 30-45 minutes.  After 7.5 hours, the dough was getting jiggly, but the aliquot was only at 25%.  It didn't look like it had grown much, and I was using a Pyrex dish to make coil folds easier instead of my normal bowl, so I didn't have a point of reference.  The "jiggliness" threw me off, and I almost shaped it way too early.  After 12 hours of bulk, the aliquot was just over the 50% mark, but it was getting late in the day.  The plan was to shape, give it an hour in the banneton, and then cold retard overnight.  Dough was extremely jiggly at that point (by my standards anyway), and I didn't degas it very much (it was rising so slow, and I didn't want to lose anything).  It was very slack and hard to get any tension in it, but I was surprised how much it filled the banneton.  After the hour of proofing, the dough had pretty much filled the banneton.  That, combined with the jiggle, had me rethinking that the aliquot was off and that I would overproof with the cold retard.  So, I preheated and had a late-night bake.  Should have trusted the aliquot...  :-)

Flavor is good with a definite but not overpowering sour note.  Very happy with the blistering and color in the crust!  Unfortunately, oven spring was so-so, and the dough was definitely underproofed.

HungryShots's picture
HungryShots

La Tabatière du Jura Sourdough Bread

There is nothing fancy about the recipe for this bread, but its shape is definitely one to remember. French bakers are very creative with how their loaves look like. La Tabatiere is a French regional bread from the East of the country. There are dozens of French regional and traditional varieties of bread. One is more beautiful than the other although some of them are probably less practical to cut and eat. I am tempted to try more French bread shapes in the future but for the moment let's look at this one.

This is a classic 65% hydration loaf. The hydration needs to be kept low so it makes it easy to create the specific shape. Usually, this type of bread is baked either only from bread flour or, with some inclusions of rye or whole wheat flour. Also, very common is to make this bread with yeast or with sourdough+yeast to speed up the process.

Ingredients:

  • 765g strong wheat flour (14% proteins) 
  • 100g whole rye flour
  • 532g water (lukewarm)
  • 175g sourdough starter (100% hydration)
  • 20g salt 

For the method, this is a loaf to do in one day. Bulk fermentation at desired dough temperature 26ºC for 8 hours. I shaped the dough when it reached a 100% increase. I did a final fermentation of 1 hour and my dough had 125% volume increase before the baking.

The challenge of this bread is to get the flap to rise nicely in the oven. First of all, the flap doesn't have to stick to the main dough and that's why I brushed it with oil on the borders. Also, I found that retarding the loaves in the fridge doesn't help with this either.  The flap doesn't have to be stretch very thin otherwise it doesn't rise but behaves more like skin.

For the scoring, well there is no scoring... it is rather scratching, otherwise the dough opens through the little decorations instead of rising the flap. The dough opens itself at the base of the flap as there is the weakest point.

Here I have the full making video of this bread:


Benito's picture
Benito

100% whole stoneground red fife take five!

You may know my frustration with this grain and trying to learn to bake with it at 100%.  With much advice and good helpful suggestions from many here, you know who you are so thank you, I think my fifth bake is the best so far without having seen the crumb.

So what changed with this bake?  First was a drop in hydration from 80% to 75%.  This really did seem drier than I am used to dealing with and now that I think I have the fermentation a bit better figured out, I think I would increase this back up.  The dough was so NOT sticky that I didn’t really need to wet my hands to do the coil folds.  I still did a fair number of slap and folds, but I didn’t do a lamination.  The reason for this is that I was worried about the gluten and didn’t want to stress it by doing a lamination.  Whether or not that was a good thing to leave out, who knows.  I did four coil folds during bulk after an initial bench letterfold and ended bulk at only 40% rise in the aliquot jar.  Other than for baguettes where I end bulk at 20%, this is the lowest I ever end bulk.  But for this flour going to 50% was too far.  Then the dough was shaped and left for 30 mins on the bench until the aliquot jar reached 45% and then placed in the fridge at 3ºC.  After a few hours in the fridge I noticed that the dough had risen further which I’m not used to seeing in my cold retarded doughs.  So after a short for me 8 hour cold retard I decided to bake.  This is what came of all of this.  

JettBakes's picture
JettBakes

My 1 yr old starter needs... something. Help!

Hi Friends, Long time reader but first time poster. I've been a SD baker for a little over a year now and I'm so thankful to the community of bakers - here on TFL and on IG - everyone is so generous with help. I have poured over posts here, blogs, Kristen Dennis' Fullproof Baking tutorials, Trevor Wilson's e-book, The Sourdough Podcast - you name it! I've been making Kristen's basic sourdough loaf for months now but no matter what I do I cannot get the open, lacy crumb. The exterior of my loaves are gorgeous - great rise, nice ear, crackly crust but the crumb is still pretty tight. I don't think I'm creating too much tension and while I have over and under proofed them on occasion, I don't think thats the issue. Also, I do autolyse, lamination, coil folds, etc and have good gluten development (window pane early shows that) so I don't think its any of those things. My only guess at this point is my starter. 

For a couple of months now my starter will only double  - despite attempts to optimize it over 2-3 days before building levain(Kristen Dennis' optimatization method - 3 day feeds, varying ratios from 1-1-1 to start and 1-4-4 overnight, temp between 75-80 degrees). No matter what I do I can't make it more vigorous. Double is all I ever get. I have read some posts here about increasing yeast populations or tackling weak starters and the recommendations by Debra and others haven't helped (stirring, converting to stiff starter, etc). My guess is maybe I've got too much acid and not enough yeast? 

When not baking I store it in the fridge but typically bake at least one loaf every week and create new offshoot to replace what's left fridge. Have I depleted my beasties? Thanks in advance for any help! 


dsendros's picture
dsendros

Liquor in Bread

I replaced some (about 10%/31 grams) of the water in my white bread recipe with rye whiskey this weekend. It went ok, but I was hoping for a little more flavor, so I'll probably bump it to 20-25% next time I make it.

I'm wondering if I also need to adjust the sugar or any other part of the recipe? I didn't notice anything this time around, but as the ratio goes up, I wonder if it will cause issues.

Pages