The Fresh Loaf

A Community of Amateur Bakers and Artisan Bread Enthusiasts.

Most bookmarked

Esopus Spitzenburg's picture
Esopus Spitzenburg

Whole Wheat + Gluten

This loaf is a complete game changer for me. This is my first (nearly) 100% whole wheat loaf (I think!) that I have found to be delicious. I'm generally an aspirational high-percentage whole wheater - I'll often make high percent whole wheat loaves wanting to enjoy them, but ultimately finding them overpowering in flavor and sourness.

For this loaf, I used some leftover whole wheat flour from Maine Grains that I had purchased to make matzah. This particular flour was shmurah, or "watched," which means that it was observed from the time of harvest to ensure it didn't come into contact with water. While I've been familiar with the company for a while (I won their lottery for a ticket to the NY Grains Home Bakers Meetup a few years ago!) this was my first introduction to actual Maine Grains flour, albeit in a roundabout way. The flour was marketed as whole wheat, but because I didn't get it from Maine Grains I don't have much other information about it - the taste is so mild that I am slightly worried it isn't 100% whole wheat (I'm reaching out for more info).

Anyway, this loaf has 100g starter (75% hydration, 50/50 AP and WW), 500g mysterious MG flour, 20g vital wheat gluten (Anthony's), 10g salt, 383g water. 45 min autolyse, stretch and folds every 30 mins for 3 or 4 hours. Refrigerated for about 14 hours, pre-shaped cold and rested for an hour, shaped and did a final proof for another hour in the Lodge, baked at 475 first covered, then uncovered (no idea for how long). 

This is my first non-matzah use of this flour, so I can't tell how much of an impact the vital wheat gluten had, but I am very pleased with this loaf. It has a nice crumb as far as I am concerned, and it is flavorful without being super wheaty or very sour.


I generally mill my own whole wheat, but I'm afraid to say this flour is far superior to my own... I need to learn how to get my flour closer towards this one. 


You can see that I need to re-season my Lodge!

headupinclouds's picture
headupinclouds

(ruis)reikaleipa

I stopped by the Grow NY grain stand at the local farmers market and picked up the lone bag of Frederick soft white wheat berries they had and a few bags of stone-ground flour from Farmer Ground and Small Valley Farm so I could sample some local wheat varieties and try a few bakes with professionally milled whole grain flour for comparison with Mockmilled flour.  Larger bags of wheat berries can be ordered for pick up in advance.  I am interested in the Renan flour, but a 50 lb minimum is a bit intimidating.  If someone in the NYC area is interested in splitting an order please let me know. 

In addition to the wheat flour, I picked up one bag of whole rye from Farmer Ground.  I have been wanting to try the recipe for the Finnish (ruis)reikaleipa from Daniel Leader's Living Bread, so I queued it up.  (Leader refers to it as reikaleipa, although Wikipedia clarifies the rye version is technically ruisreikaleipa.)   It is a thin circular UFO-like rye with a hole in the middle, which was traditionally used for storage and aging on poles just below the kitchen ceiling.

From Wikipedia:

This is lower hydration than the whole rye Volkornbrot I've been learning to bake and has a pleasantly chewy texture.  It would be a great bread for a camping trip!  It employs a single rye sour build prior to the final mix, but I was quite surprised by the depth of flavor from such a simple formula, and am not now unsure why I don't bake rye more often.  Leader recommends consuming within 4 days, although various articles I have seen suggest these were often baked in large quantities and consumed well beyond that.  Taking a hint from the small Finnish cafe where these were photographed, we baked the holes and post stenciling dough remnants as biscuits and ate them as egg sandwiches for brunch to get a preview of the flavor while the larger loaves cooled.  The recipe suggests baking a 12 inch round with steam, although our gas oven is unforgiving to uncovered bakes, so I opted for two 8 inch discs that would allow for covered bakes in a round DO and lodge pan at 400 F for 40 minutes.  The photos below indicate a doubling in the initial rye sour after approximately 12 hours, followed by a roughly 30% rise of the final mix at 1.5 hours and an additional 25% post-shape rise after 45 minutes with a corresponding reset of the aliquot jar.

I noticed the crust puffing up in a few places after I uncovered it, so I used a chopstick to dock it while it was in the oven.  I will probably do that ahead of time for the next bake.

Ang's picture
Ang

Shaping.... batard vs boule

These were from the same batch with very different results.  The batard got a nice ear with good oven spring.  However, the interior was very weak and collapsed when sliced.  

The boule also had a nice oven spring, but interior was very dense.

5 hours bulk ferment, with temperature evenly throughout  process at 79 degrees.

Very active starter that tripled within 3 hours.

Start autolyse when I feed my starter.  Three hours approximately

73% Hydration

I use King Arthur Flour

Any advice would be appreciated!  :)


John2021's picture
John2021

Spiral mixer advice needed!

Hi, any advice would be appreciated.  I’m looking at upgrading my spiral mixer.  I have a small bakery and our focus has shifted slightly from retail into wholesale.  Currently we mix our sourdough and ciabatta in a 30ltr planetary mixer as our spiral mixer is a cheap single speed machine that just doesn’t do the job.  I’ve looked at Sunmix they have two machines one with dual speed (70 & 210 rpm) and one with a multi speed range of 0 -300 rpm.  I guess I’m just wanting to see if I need the larger speed range or if 210rpm is sufficient for mixing sourdough.  Or does anyone have any other machines worth looking at?  Thanks

pmccool's picture
pmccool

Hamelman's Sourdough 80% Rye with Rye Flour Soaker

I've been jonesing for a rye bread, so when my most recent bread (a yeasted 100% whole wheat bread with tangzhong) developed mold before the loaf was half-eaten, I seized the opportunity. 

The first order of business was to pull my starter out of the refrigerator and give it a good feeding.  Although I have tended it, the poor thing has been in cold storage about a month and a half since it's last use.  Happily for me, it perked right up and was ready for use with just one refresh.  (Although not germane to the bread that is the subject of this post, we took delivery in April of the refrigerator and freezer pair that we ordered in February.  That's received in April 2021, ordered in February 2020.  Yes, more than a year later.  Thank you Electrolux/Frigidaire for getting right on that.)

Early that evening, I mixed both the levain and the soaker.  The levain went into my Brod & Taylor proofer overnight.  My one deviation from the recipe was to mill the flour for the soaker at a coarser setting and then use boiling water, rather than room temperature water, to hydrate it.  The soaker was then covered and allowed to cool overnight.

The next morning, about 7:30 or so, the levain was puffy and well aerated, so I went ahead with the final dough.  The KitchenAid mixer made short work of combining everything, following the recipe's directions for mixing times.  The dough went back into the proofer for the short 30-minute bulk fermentation. 

Hamelman's instructions talk about shaping the dough and proofing it in baskets for either round or oblong loaves.  But then, almost as a aside, he mentions that it works well in Pullman pans, too.  After checking on the amount of dough that he recommends for a 13x3.5x3.5 pan and scaling for my 9x4x4 pan, I found that the amount of the dough in the recipe would work perfectly for my pan.  Consequently, at the end of bulk fermentation, I shaped a single loaf and packed it into the pan, using wet hands to dome the top of the loaf.  Then I put it back into the proofer for final fermentation.

When I came back to check on the fermentation progress, I was surprised and rather concerned to see that it was at full proof and needed to go into the oven.  Just one small problem: the oven wasn't preheated yet.  Two, actually: it was also apparent that the lid wasn't going on the Pullman pan, since the dough was crested slightly above the rim already.  After re-reading the baking instructions, and checking another recipe that was specifically written to use Pullman pans, I elected to adhere (mostly) to the instructions for this bread.  There's an initial 10-minute bake at 470ºF.  Then the temperature is turned down to 430ºF for ____ minutes, depending on loaf size.  Between the directions for the two recipes, I guesstimated that 50 minutes at the lower temperature should get me pretty close.

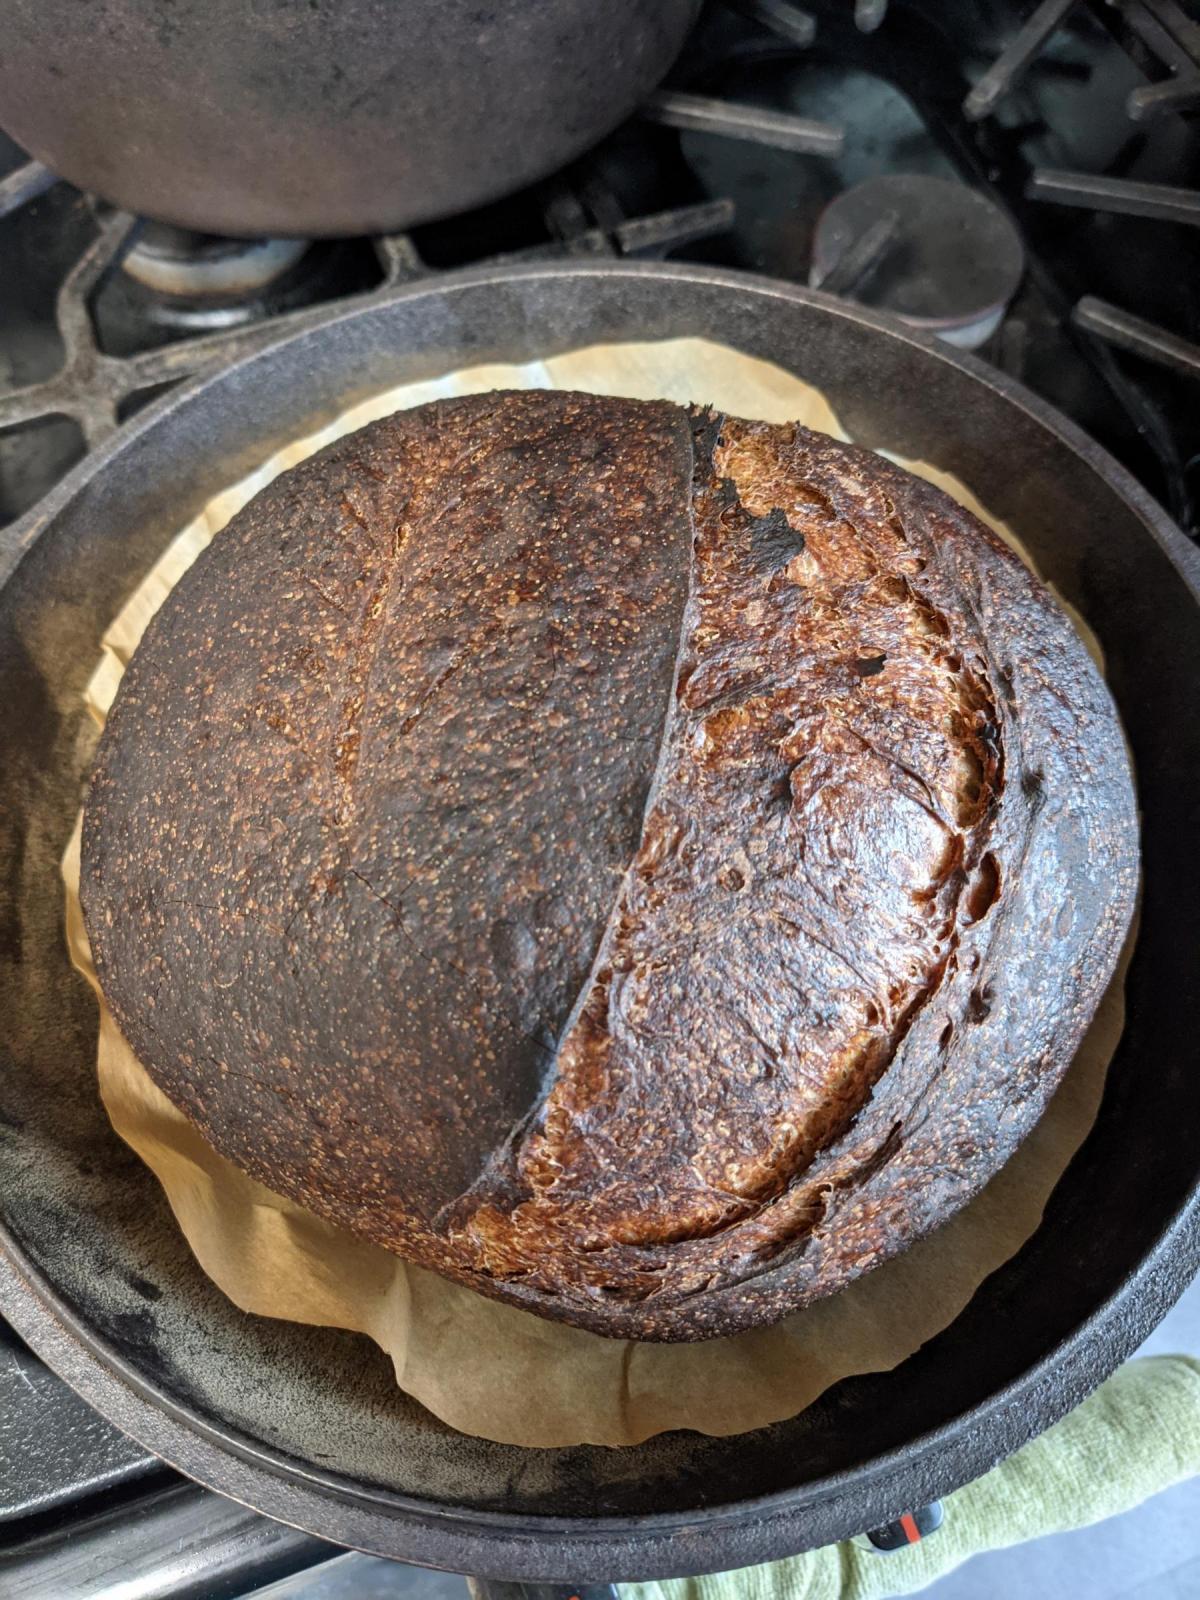
When the oven reached temperature, I gently maneuvered the pan onto the center of the middle shelf.  Ten minutes at the higher temperature and 50 minutes at the lower temperature brought the internal temperature of the loaf up to about 203ºF.  The top was a chestnut brown and the sides, once depanned, were golden.  This:

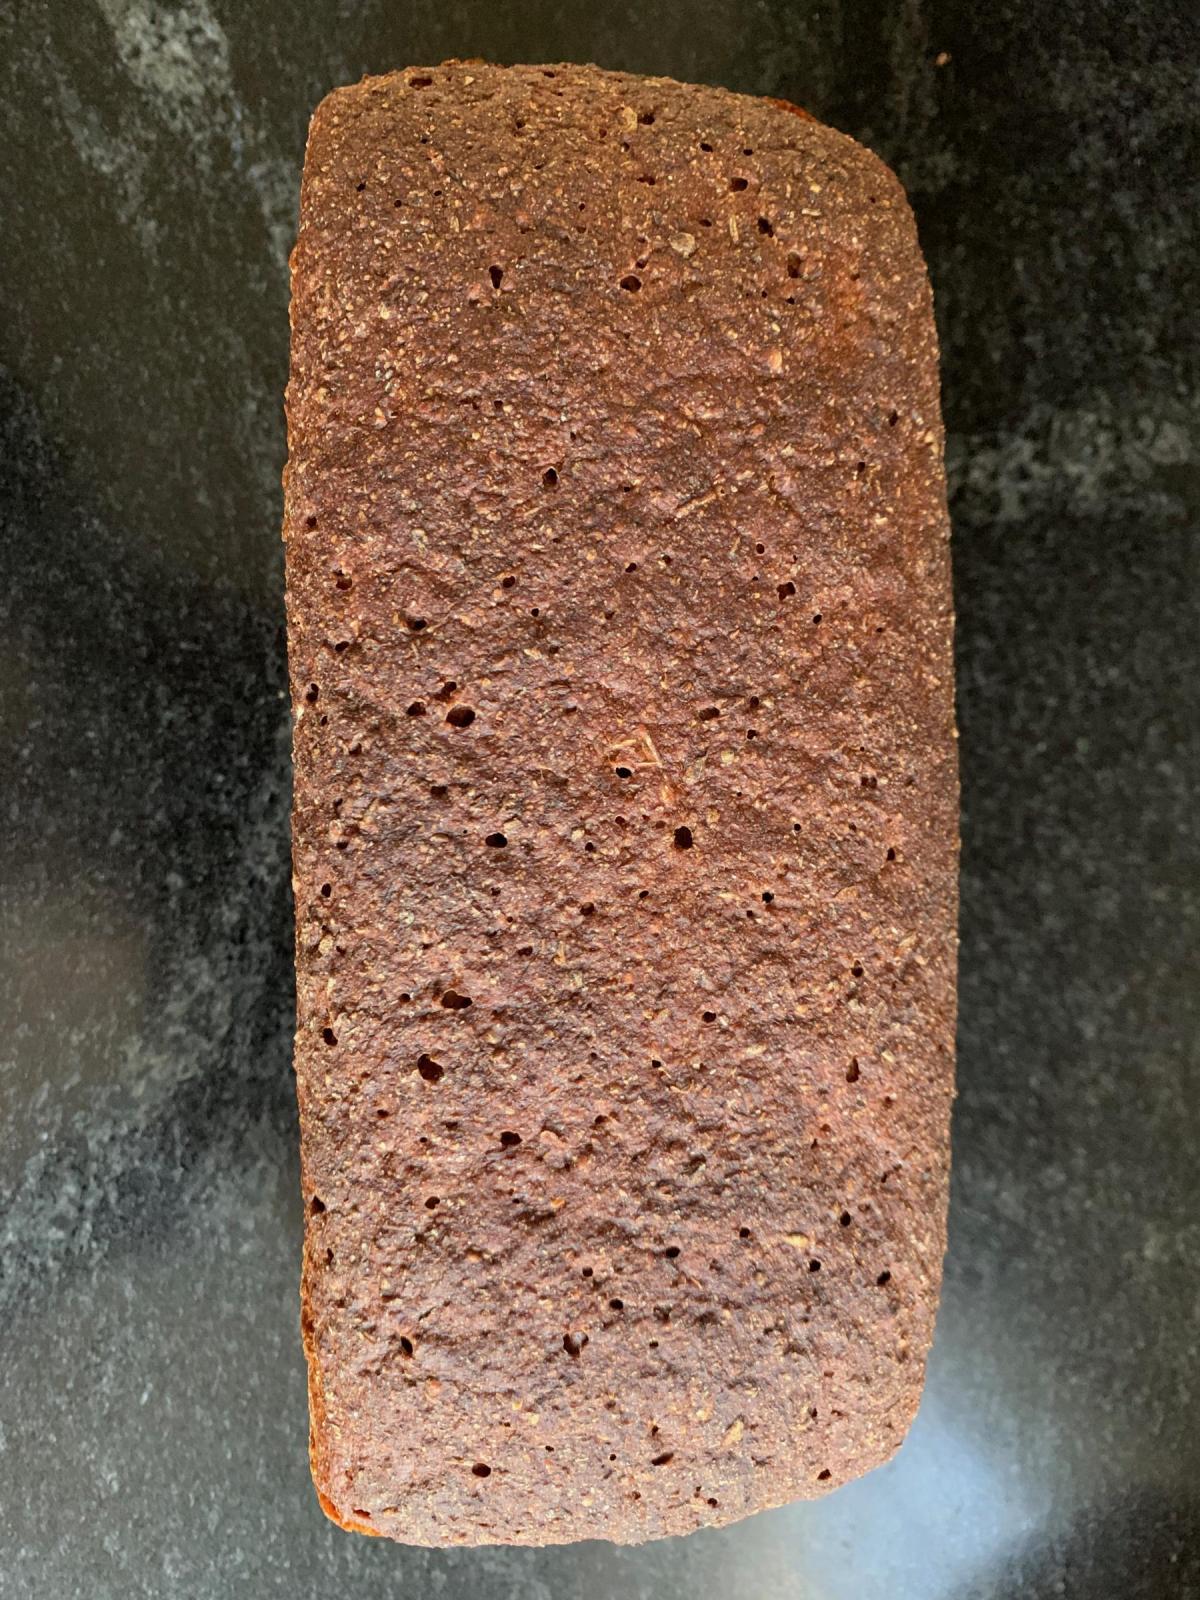
To illustrate just how close to the edge of the over-proofing cliff I was, take a look at all of the pinholes in the top crust where bubbles were beginning to pop:

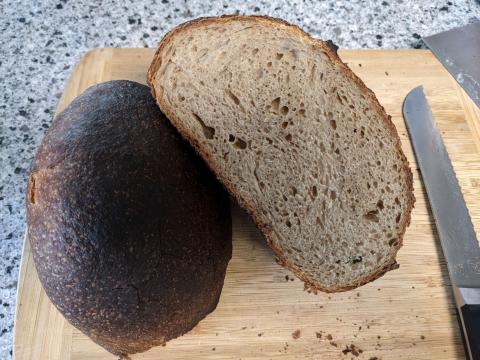
Luckily, there isn't a flying roof, nor has the top crust sunk after cooling.  The crumb shows some compression zones around the pan sides and bottom but I think these are more a product of the final expansion of the loaf's center during the bake, rather than overproofing tells.

For an 80% rye, the crumb looks pretty good.  It is very moist but doesn't coat the knife blade, some 30 hours after coming out of the oven. 

The flavor is surprisingly mild; just a faint hint of sourness and the earthy/spicy notes that I associate with rye.  There are no seeds or spices, so all of the flavor comes from the flour. 

To avoid a rerun of mold before I can use up the bread, I've cut the loaf in three pieces.  Two are in the freezer, one is in the pantry.

Paul


justkeepswimming's picture
justkeepswimming

Maurizio's Oatmeal Porridge Bread

This is my first time making a porridge bread. They always looked more challenging than I was ready to tackle. After reading the entire previous CB that featured this bread (read it several times, lol), I decided to go ahead and give it a try.

Levain:

75 gm, half bread flour, half WW, 100% hydration (9 gm seed culture)

Oat soaker:

125 gm oats (home flaked)

250 gm h2o

Pinch of salt

Dough:

350 gm bread flour

150 gm whole wheat (home milled, hard white wheat)

375 gm water - held back 25 gm

75 gm levain

11 gm salt

Added levain to mixing bowl, then added water and mixed til levain dissolved.

Added flours, mixed to shaggy mass, then rested (covered) 1 hr. 

Boiled water and poured over oats, allowed to soak x 10 min. Much of water was soaked up - added10 gm of held back water and cooked oats slowly (about 12 min), covered and cooled to 85F. Oats were more of a thick paste than creamy, wondered if it was a mistake to not use commercial oats. 

After 1 hour dough rest, added salt and 10 gm held water, mixed til sticky.

Transferred to bulk container and rested 30 min. Folded porridge in slowly (was certain my oat choice was a mistake and no way they would disperse evenly - and then they did). Rested 10 min, then began first S&F sets every 30 min.  

S&F every 30 min. X 6, then rest 1-2 hrs. (Me, bulk may finish fast w warm temp and fresh milled flour). After 2 sets of S&F, swapped ti coil folds x 3 sets total. Dough was extensible and not as slack as I had been reading. It wasn't tight either, but would firm up sine with each set of folds. Total bulk time 3.5 hours. Dough was getting puffy but wasn't jiggly yet, I think it would have benefitted from a little longer bulk. But it was getting late and time for bed.

Turned dough out onto floured surface, sprinkled top with flour and preshaped. It oozed outward somewhat but then stopped. Covered and rested 15 min then shaped, flipped onto towel covered with oats, and put into the banetton seam side up. Seam was sticky and needed extra stitching to get it to stay together. Banetton placed into plastic bag and into frig overnight. 

After 11 hr cold retard, oven preheated with DO at 475F x 1 hr. After preheat, banetton out of fridge, dough flipped onto parchment (it didn't stick ?), scored, sprayed, then loaded into hot DO. Bake covered 20 min at 450F, then uncovered 40 min. 

So far I m pretty happy. After reading some of the hydration issues and trouble getting the dough to cooperate after adding the porridge, I count myself lucky to have it all go this well on my first try. Fresh out of the oven - the proof will be in the crumb shot tomorrow. ?


Update with crumb below. The crust is still crisp but not overly so, with a very soft and moist crumb. It leaves a little gummy residue on the knife, but neither of us notice any gumminess in the chew. Hubby really loves this one, which fits. He's a big fan of any bread with seeds or decorative toppings. All in all, a successful bake. (Note to self, scale this down a little for loaf pan.)


MontBaybaker's picture
MontBaybaker

Bunny bread

These are adorable!   I'm married to a Dutchman (a few generations removed from Holland), but his father was raised with some traditional dishes.  I enjoy the newsletters from The Dutch Table. 

https://www.thedutchtable.com/2010/04/paashaasjes-easter-bunny-rolls.html

Milhouse's picture
Milhouse

When to feed starter after baking?

Hello, I am a COVID-triggered sourdougher, so still inexperienced ?. I bake infrequently, say every few weeks, so keep the starter in the fridge. It's around 300g. I use 150g per loaf, so i feed it with 75g water and 75g flour. A few questions:

- do I feed the starter immediately or wait until next time I bake?

- if its immediately, do I put it straight into the fridge or leave it at room temperature until it doubles in size, then put it in the fridge?

- should the jar be sealed tight or loose, to allow a little bit of air flow when in the fridge?

TIA. 

breadmonster's picture
breadmonster

Please help! My croissants are struggling!

I need help! I've been trying the Dominique Ansel method for croissants, and am unable to solve the issue with the crumb that you can see in the above picture, specifically:

  1. Crumb layers aren't well defined and are quite thick
  2. A large hole in the top

I've followed all the advice I can find, including working with cold dough / butter, increasing hydration etc, but I'm still not getting the elusive honeycomb. Below is a photo of their exteriors. 

Can anyone help diagnose what are the likely causes of a crumb that looks like this? Any help would be hugely appreciated!


Kistida's picture
Kistida

Mini Orange Cake and a semi-successful Gâteau Invisible

I simply added ingredients to make a small single layer orange cake for dessert today. The 6” pan is preferred because it provides enough cake for 2 human beings without guilt of over-stuffing our bellies or having to cope with leftover dessert. :D 

Cake

  • 115g all purpose flour 
  • 5g corn flour 
  • 1/4 tsp baking soda
  • 1/4 tsp salt 
  • Zest of 1 orange
  • 60g sugar 
  • 25g unsalted butter 
  • 20g light olive oil
  • 1 large egg, lightly beaten 
  • 60g fresh orange juice 
  • 60g milk
  • Optional: chocolate chips, nuts, sugar 

Orange syrup 

  • 1/4 cup orange juice 
  • 4 tbsp sugar 
  • 1 tsp orange zest

Sift dry ingredients in a bowl.

Rub the zest into the sugar (releases fragrant essential oils and lightly tints the cake yellow). Then, butter, oil and beaten egg. 

Weigh juice and milk in a measuring cup (this makes an orangy buttermilk). Then, alternate milk and flour mixtures into the sugar mixture. 

Pour into grease and lined pan. I used chocolate chips and a sprinkling of about 1 tsp sugar. 

Place the pan on a quarter sheet and bake for 28-30 minutes at 180°C. After baking, let the cake cool for about 10 minutes then loosen it out onto a cooling rack. Remove the parchment paper on its base, flip the cake topside up and poke the cake all over with a toothpick/skewer and drizzle/brush orange syrup over the warm cake. About 45 minutes (couldn’t wait any longer), I took a little slice and was pleasantly surprised by the citrusy burst of flavor. So happy with this first time bake. 

A few days ago, I tried making the Invisible Apple Cake (Gâteau Invisible is its fancy name). I guess the Ambrosia apples I used were overly juicy because the cake stayed relatively wet even after the batter had set. And the cake shrank a little once cooled too. 
I checked with Bea (the owner of that El Mundo Eats site) and she said it looks fine and just to bake a little longer with a foil tent. This was a very tasty cake but I will make it again when I get new bags of apples. ??
 

Pages