The Fresh Loaf

A Community of Amateur Bakers and Artisan Bread Enthusiasts.

Most bookmarked

JonJ's picture
JonJ

Free-form and high-hydration bread shaping

Joy Ride coffee has a YouTube channel with what, for me, are quintessential quarantine videos. Videos often have a transporting sound track, and the visuals usually include beautiful tracking shots of Romanian scenery which have transported me out of lockdown. His quest for lacy crumb has been quite 'infectious', if you'll excuse the covid pun.

In his latest video there is an appealing technique for shaping directly from dough that has been coil folded. No banneton is used.

The method relies on dough preparation that included a lamination and gentle coil folds. Good dough strength is required, with the dough proofing under tension. It can include proofing in the fridge too.

Instead of performing a traditional shaping and transfer to a banneton he does something different. Dough that is already highly fermented and has already doubled in volume (at least) is gently inverted from the dish in which coil folding was being done onto a lightly floured surface. It is then gently folded over, as you would fold over an omelette in a frying pan and sealed around the edges. It is then lifted a quarter turn by means of a dough scraper to give a shape more like a batard, and transferred onto a parchment for baking. Finally, it is left for an hour covered with a tea towel before baking, although I do wonder if this additional settling is actually required.

It makes sense that this gentle shaping with very little degassing could create a better crumb. Plus, the resultant loaf has a shape that looks more or less like a traditional batard produced using a banneton.

I played around recently making a loaf with the method, but since my dutch oven is round I added an extra manipulation for pushing the batard shaped dough into a boule shape. After making the batard shape, and working my way around in a circle, I pushed in from the side moving down to the bottom, cinching the dough to the base as I went. I used two dough scrapers for this -  taking turns with each dough scraper to free the dough scraper trapped underneath the dough. Working this way I managed to get a round boule too, but as you can see from the pictures the crumb was quite unusual - there were these elongated and vertically oriented alveoli clustered near the base, almost certainly created as an artifact from my additional step of transforming the dough into the boule shape. I suspect that if I'd stopped at the batard shape without doing that last step it would have had a more regular crumb, and been more successful.

Hope this post gives someone ideas! It is exciting to try out a completely different method sometimes. What I like about it is that it has the potential to produce a better crumb and maybe even simplify the process of bread making. The number of steps could be reduced. An it might be a neat way to make bread after an overnight counter ferment.


-Jon
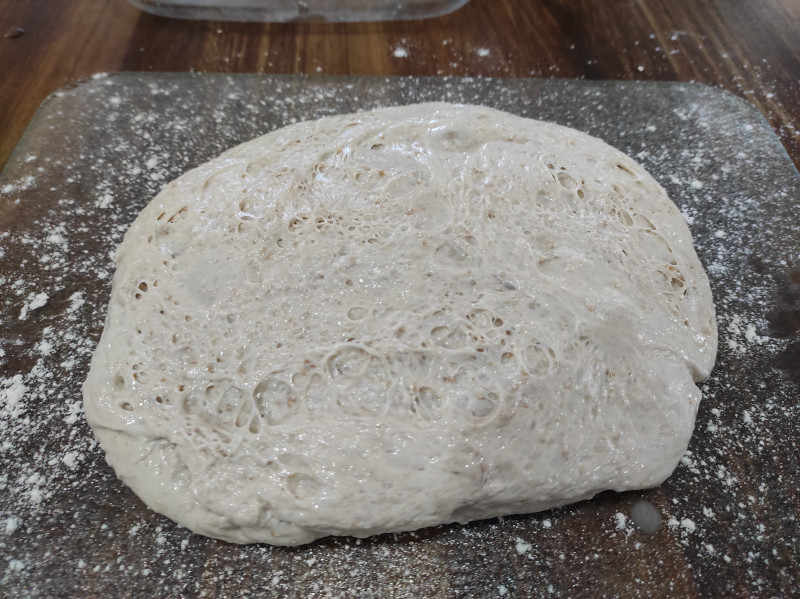
After removal from Pyrex dish used for coil foldsAfter removal from Pyrex dish used for coil folds

Then folded over as you would fold over an omelette in a frying pan, and sealed around the edges.

Given a quarter turn, then rounded using two dough scrapers, as described in text.

The boule shape is retained.

The additional rounding to make a boule shape seemed to result in these vertically oriented elongated alveoli. Will try again and leave it in the basic batard shape next time as I think that will work out much better.

jimmyoven's picture
jimmyoven

Grain flaker - electric vs hand crank?

I'm going to take the plunge and get a grain flaker. If you have one...

-Do manual crank ones go fast enough? Do you wish you had an electric instead?

-If yours can adjust the thickness of the flaked/rolled grain, do you use that feature? I see several where you can't adjust them, wondering how useful that feature is. 

Thanks!

-Jim

HeiHei29er's picture
HeiHei29er

My first high rye loaf

Week #2 of working on my list of TFL'er bakes I've been wanting to try.  This week was one of Ilya's rye bakes.  Well, not exactly one of his bakes, but with his guidance and tips, I tried this recipe from Rus Brot.

Overall, the bake went really well I think.  Each step of the process went according to the video, and I had similar results.  My only difficulty was proofing temperature.  My maximum temp is 84-85 deg F, so I was a little low on the final dough fermentation and the final proof temps.  However, everything progressed just fine even at the slightly lower temps.  I also had a to guess a little bit on the consistency of the final dough, and I added 10g of water above what's listed in the method below.

It looks like I maybe blistered the crust, and I think it happened on the second misting towards the end of the bake.  My guess is it should have been a light mist, and I moistened it quite well.

This was a great first bake for high rye, and the bread smells great!  Giving it at least a day before slicing it.


mahlerization's picture
mahlerization

First time croissants - postmortem?

Very new to yeast baking, and this is my first post on TFL!

The following photos are from the first time I've made croissants (though I have known how to do puff pastry I guess).

While it was absolutely delicious (and goes straight to my waistline), I wanted to ask if anyone has advice on these issues:

- The egg wash seems to brown a lot faster than the rest of the croissants. I used a whole egg with a dash of 2% milk. Any suggestions? It also tastes a little too distinctly eggy for parts of it.

- Crumbs seem a bit uneven at the center. Is the diagnosis that I rolled too tightly at the beginning? Or is that something else (e.g. lamination or if I can proof even more)?

Appreciate the advice!

(Shaped pre-proof dough, forgot to take a photo of the proofed ones)

Danni3ll3's picture
Danni3ll3

So what happened?

I did my usual procedure but when I preshaped my boules, they fell apart. I shaped them as best as I could and literally threw them into the bannetons. They are heavy dead feeling hunks of dough. They are in the fridge now but I don’t have any hope that I’ll have anything decent to bake in the morning. 

I’ve made this before but I changed the procedure for this bake. This is the original recipe: https://www.thefreshloaf.com/node/56089/rosemary-cranberry-sourdough-seeds-and-barley-flakes 

This is the changed place recipe:

Soaker:

90 g barley flakes

180 g boiling water

Add-ins:

100 g dried cranberries

50 g pumpkins seeds

50 g sunflower seeds

20 g sesame seeds

1 1/4 tsp finely chopped fresh rosemary

Dough:

660 g strong bakers unbleached flour

220 g freshly milled Selkirk wheat flour (220 g Selkirk berries)

110 g freshly milled rye flour (110 g rye berries)

50 g fresh ground flax seeds

715 g water

22 g salt

30 g yogurt

250 g levain (Procedure follows)

The day before:

1. About 8 hours before bedtime, take 2 g of refrigerated starter and feed it 4 g of filtered water and 4 g of wholegrain rye flour. Let sit in a warm spot. 


The night before:

1. Mill the Selkirk and Rye berries if using, on the finest setting of your mill or measure out commercial whole grain rye and whole grain wheat flour if you don’t mill your own.

2. Place the required amount of each freshly milled flour in a tub and add the unbleached flour to it. 

3. Grind the flax seeds and add to the flour mixture. Cover and set aside.

4. Boil the water for the soaker and add to the barley flakes. Let sit overnight.

5. Toast the pumpkin, sunflower and sesame seeds in a dry frying pan. Once cool, add the cranberries and reserve. 

6. Before going to bed, feed the levain 20 g of water and 20 g of wholegrain flour. Let it rise at room temperature for the night. 


Dough making day:

1. Early in the morning, feed the levain 100 g of water and 100 g each of unbleached flour. Let rise until it is very bubbly and has peaked. This takes 4-5 hours in a warm spot.

2. About two hours before the levain is ready, using a stand mixer, mix the water with the flours, and mix on speed 1 until all the flour has been hydrated. Let this autolyse for a couple of hours.

3. Chop the rosemary very finely and add to the cranberry/seed mixture.

4. When the levain is ready, add the salt, the yogurt, the barley soaker and the cranberry/seed/rosemary mix , and the levain to the bowl. 

5. Mix on speed one for a minute to integrate everything, then mix on speed 2 for 9 minutes. 

6. Remove the dough from the mixing bowl and place in a lightly oiled covered tub. Let rest 30 minutes in a warm spot (oven with light on).

7. Do 2 sets of coil folds at 30 minute intervals and then 2 other sets at 45 minute intervals, and then let the dough rise to about 40-50%. It should have irregular bubbles visible through the sides of the container and quite a few large bubbles on top as well. 

8. Tip the dough out on a bare counter, sprinkle the top with flour and divide into portions of ~850 g. Round out the portions into rounds with a dough scraper and let rest 30 minutes on the counter. 

9. Do a final shape by flouring the top of the rounds and flipping the rounds over on a lightly floured counter. Gently stretch the dough out into a circle. Pull and fold the third of the dough closest to you over the middle. Pull the right side and fold over the middle and do the same to the left. Fold the top end to the center patting out any cavities. Finally stretch the two top corners and fold over each other in the middle. Roll the bottom of the dough away from you until the seam is underneath the dough. Cup your hands around the dough and pull towards you, doing this on all sides of the dough to round it off. Finally spin the dough to make a nice tight boule. 

10. Sprinkle a mix of rice and all purpose flour in the bannetons. Place the dough seam side down in the bannetons. Let rest for a few minutes on the counter and then put to bed in a cold (38F) fridge overnight. I try to keep this between 10 and 11 hours.


Baking Day 

1. Preheat the oven and the pots to 475F for an hour. Place parchment rounds in the bottom of each pot and carefully place the boules seam side up. Cover and bake for 25 minutes at 450F. Uncover and bake for a further 20 minutes at 425F. Final internal temp should be at least 205F.

Anyone have an idea what happened? 

YourLocalLesbrarian's picture
YourLocalLesbrarian

Hello, All!

Hello! I'm an amateur baker located in the PNW and I'm very happy to have found this forum! I've finally gotten a job that gives me enough financial freedom to stock my kitchen and flex my baking muscles. I found this forum through a google search about making a baker's bench, but I can already tell I'll learn a lot more here. Looking forward to baking with you all :)

wlaut's picture
wlaut

Q on Flaking Mills. Are they worth it?

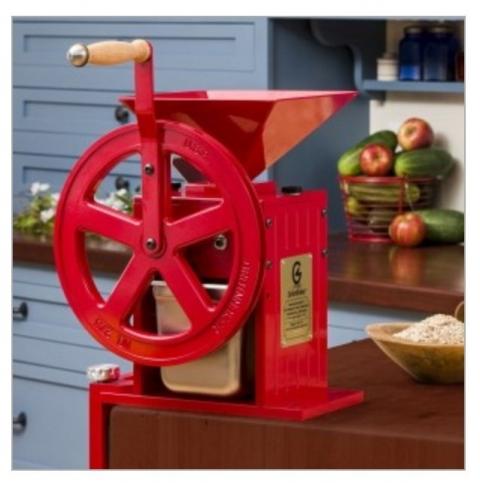
As everyone here knows, I am an extremely happy and satisfied owner of a GrainMaker model 99 mill.  Something the Bitterroot Co also sells is a "Flaking Mill," shown here.

I'm trying to understand the uses of a flaking mill.  I get that I can crush oats for making oatmeal.  Can I run wheat and/or ancient grains through it?  Would I even want to do so?

I read it can be used in beer making and spirit distilling.  Does it have any application in bread baking?  What types of bread-making would having a flaking mill be useful?

Thanks in advance.

hopnoggin's picture
hopnoggin

steam

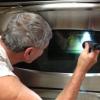
I am using a crude but effective method for producing steam during the first phase of baking sourdough. The steam is enough to fog my glasses when opening the oven door, so it seems adequate and I get pretty impressive spring in the loaves. But it made me wonder if I am producing enough steam to leave off the cover of the Dutch oven during first twenty minutes? How does steam penetrate a Dutch oven with the lid on? Seems to me like it doesn't. Do any of you bake sourdough in a Dutch oven without the cover?


DanAyo's picture
DanAyo

How does Oil and Honey affect Hydration

Today, I baked a new formula. I thought the dough would be too wet considering the hydration, including the milk, oil, and honey came to 72.5%. But the dough was very dry, actually IMO too much so. It felt like ~62-65%.

How do the following affect hydration?
   - NOTE - since hydration technically pertains to water content, I am more interested in how the actual dough feels. For example oil, it is 100% fat, but it does affect the “feel” of the dough. 

  1. milk 65%
  2. oil 5%
  3. honey 2.5%

Total Formula

  • 260 g 1% Milk* 65%
  • 6 g Instant Dry Yeast (about 1 packet) 1.5%
  • 8 g Diastatic Malt powder (optional) 2%
  • 400 g Bread Flour (all-purpose works too) 100%
  • 10 g Honey (or sugar) 2.5%
  • 20 g Olive Oil 5%
  • 8 g Salt 2%
SueVT's picture
SueVT

Camp Chef 14" Deluxe for 2 kg Miche, and Red Hen comparison

In my quest to make a perfect, consistent, large miche (~2kg), I have made a slow transition from partially yeasted to my current formula, which is sourdough only, 80% hydration. I'm learning that different flours behave very differently, and many of my experiments have resulted in mud, pancake-flat loaves, giant air chambers, flying saucers etc. 

I have a good formula; no question about it. Problems arise from things like shaping technique, insufficient folding, excess hydration for a specific flour, and a biggie: insufficient steam while baking. I've found that even if I do everything else right, lack of steam defeats me, sometimes turning the miche into a basketball, or a strained sofa-cushion shape. 

I just bought the Camp Chef 14" Deluxe Dutch oven, after many attempts with baking stones and steam pans, inverted hotel pan, Le Creuset, clay bakers etc.  Nothing gave me the results I was looking for.  This inexpensive dutch oven had two qualities that make it uniquely suited to my needs: it has a lid which is designed to be a frying pan surface, so it has a raised edge and flat interior. My largest banetton can be flipped into this lid with room to expand. Second, it has a relatively deep pot, which provides enough room for the expanding miche plus steam all around it.

I preheated the dutch oven for about 40 minutes at 450F. Handling with heat-resistant silicon-covered gloves, I put the base on the stove top, inverted the miche onto a peel, then slid it into the frying-pan-lid. Quicky slashed, covered (carefully) with the inverted hot dutch oven base, then back in the oven to cook for 20. Then removed the inverted base and baked for another 30 minutes.

Contrary to my usual practice I left the oven on Convection. My reasoning was that air can't get into the dutch oven, but the convection would heat the iron all over more effectively. This worked out well. I should mention that I put a flat baking sheet under the DO so that it could sit on the oven rack properly. This also helped prevent over-baking the bottom crust.

I got very good oven spring, similar to what I get with a 2 lb loaf in a clay baker or le creuset. Blistering, indicating steam, good secondary expansion in the slashes. Very caramelized crust due to keeping the convection on for the entire baking cycle. 

I am happy with the openings, I think they are good for a 45% whole wheat loaf at 80%. I compared to a Red Hen miche, which I consider to be excellent, and they are very very similar, except my loaf is twice as big. I've included a photo that shows side-by-side comparison with a Red Hen Vermont Miche. Difference in color and ingredient list indicates that they use less  ww flour %, and also lower hydration than my loaf.  

The ww flour I am using (Bronze Chief) is outstanding IMHO.


Pages