The Fresh Loaf

A Community of Amateur Bakers and Artisan Bread Enthusiasts.

Most bookmarked

Rosemary's picture
Rosemary

Just wanted to share my third attempt :)

Hi everyone

I wanted to share my third sourdough attempt and I'm always happy for suggestions so I can improve on my next attempts :)


My first two were with my first, rye starter in the previous year.
This year I've made a new starter, this time I'm feeding it with AP white flour (cca 21 days old - was really slow).

I had a lot of trouble with my previous attempts using AP flour - the dough at 70% hidration was very liquidy and wouldn't hold shape. Now, looking back, I think it was the rye starter that was too acidic, since the dough seemed to turn for the worse after adding starter, or it could be because I used AP flour that can't absorb so mich water.

Yesterday I made a new loaf with my new starter.
Ingredients:
350 g manitoba (14% protein)
150 g AP flour (12% protein)
390 g water (decided to push it a bit since I was using strong flour)
95 g starter (33 g mature starter, 33 g cheap AP flour, 33 g water - 4g evaporated apparently xD)
10 g salt
(Ambient temperature cca. 24°C)

Starter took around 8,5 h to peak. Autolyse for 3 h.
Then I did some slap&folds to incorporate the starter, 25 min later added salt and preformed 2 min slap&folds. I did coil folds every 30 - 60 min, about five times. The dough was really slack and didn't hold shape for long after folding. I think it started holding shape longer after the last coil fold. But because I was afraid of overfermenting my dough, I decided to do the final shaping after 5,5 h from adding starter.
It was left to cold proof 18 h at 5°C. From the pictures it looks like it puffed a bit during the cold ferment.
After shaping/before cold proof:

After 18 h cold proof:

I'm still unsure whether the dough has proofed long enough - I did the poke test once I took it out of the fride, but I couldn't decide whether it was done proofing or not - I made a video, please help me determine.
VIDEO
The dough loosened a bit after scoring - which must mean the gluten wasn't strong enough? Link to picture
Baked at max (230 + ventilation) in Dutch oven, lid on 20 min + 25 min at max without ventilation and lid off. (Probably could have baked longer?).
I was overall pleased with the loaf, it had a nice taste (although I'm not sure it tasted sour at all xD, but it was really good) with crunchy crust. I'm including some pictures of the dough in the proces and the final result.
I wish the crumb was a bit more even - I probably have to practice shaping more, or maybe I was too rough with coil folds or needed more time to bulk?

Last coil fold: 

Before shaping:


Happy baking everyone!
HeiHei29er's picture
HeiHei29er

What makes a “strong” starter? It may not be the feeding ratio…

If you read through a lot of the threads on starters, you’ll regularly read that to make a starter stronger, you need to increase the feeding ratio from 1:1:1 to something like 1:3:3 or 1:5:5.  I have done that very thing with my whole rye starter.  I’m very new to sourdough and by no means an expert on this topic.  Just throwing out a recent observation that has me questioning my past experience and methods.

Recently, I made a Nancy Silverton type grape starter that uses white bread flour.  One part of the method that was a big deviation from my previous starter experience:  the feedings I’ve been doing are roughly 1 : 0.55 : 0.45 (66g starter:36g water:30g flour), or a 1:1 ratio of starter to fresh water + flour at 120% hydration.  A refresh is three feedings of 6 hours, 6 hours, and 12 hours all at the same ratios shown above.  This starter leavens dough significantly faster and is far “stronger” than my whole rye.  This weekend, I used it to make a 125% hydration levain (50g flour, 62.5g water, 10g seed), and it was very frothy with really nice gluten formation after 12 hours at 72-73 deg F.

My methods may not have been the best with my whole rye.  Starter maintenance and when it was ready for another feeding was always something I struggled with prior to this.  I haven’t done anything with my whole rye lately, and this new starter experience has me questioning how I’ll keep my whole rye when I try using it again.  My understanding is that a strong starter has a high density of microflora with a good ratio of yeast to bacteria.  The question is how to create and maintain that…

HeiHei29er's picture
HeiHei29er

Your favorite rye bread recipe for reubens

I was asked to make a rye bread that would go well with reubens.  I’ve only made one rye bread, so I thought I’d ask the community for some direction.  I know this is probably an “ask a 100 people get 100 answers” type question, but here goes.

What’s your favorite rye bread recipe for making reubens (or other grilled sandwiches)?  

Thanks!

TangoDancer's picture
TangoDancer

Internal bread temp for the 2nd (lid removed) bake?

I'm cooking a lot of sourdough bread and while I know that the bread is done when the internal temp hits around 210, I'm not so sure when the right time is to take the lid off for the 2nd portion of the bake.  A generalized process might be to bake with lid on for 20 minutes at 450 and then 20 minutes with the lid off.  But sometimes, I find that I'm baking longer with the lid on to get a less gummy texture makes for a better bread.  Any thoughts on knowing when it's time to take off the lid?  Internal bread temp? Other?

Thanks.

idaveindy's picture
idaveindy

Fake vs Real Buttermilk

Has anyone else discovered the difference between "real" and "fake" buttermilk?

I first thought it was a matter of full-fat versus low-fat buttermilk, because the low-fat kind had locust bean gum and carrageenan.

But upon inspecting the label on Kroger whole-milk buttermilk, I discovered that it had modified corn starch, tapioca starch, locust bean gum, and carrageenan just like the low-fat kind.

No wonder my buttermilk pancakes and biscuits were sticky and gooey, even with the whole-milk variety.

Looks like I'll have to get the expensive organic kind, or search for real buttermilk at some other store.

Has anyone else had this experience, or might I be doing  something else wrong?


trailrunner's picture
trailrunner

t65 available again

Just checked L’Epicerie and they show back order with expected delivery date mid December. Same price as my last order the organic is the best price @ $41 for 22# plus shipping. For those interested wanted to post . It’s outstanding quality and very fast shipping when they get it in. c

Breadzik's picture
Breadzik

Using "solod" in Ginsberg's "The Rye Baker"?

Hi!

I procured some "solod" (fermented rye malt) and thought about using it in place of rye malt (1:1 substitution) in Ginsberg's recipes. I chose the "Slow-Baked Finnish Rye". The bread came out fine but a little bitter. I wonder if it could've been due to using the fermented rye malt? It also looks like this recipe calls for more rye malt than other recipes.

Before I use it again, does anybody know if any recipes from this book that call for any rye malt could work with solod? I'm thinking possibly breads from Russia or Belarus but I don't know enough to be sure. Can anyone more familiar with this chime in?

begoniabol's picture
begoniabol

First true sourdough loaf questions

Hello everyone,

Yesterday I baked my first true sourdough loaf. I followed instructions from a great breadmaker on Youtube, but somehow my bread did not turn out that well.

As you can see in the pictures the bread turned out as a pancake. The crumb is also very dense. It's quite tasty though.

This is the recipe I followed:


Day 1, morning: feed starter 1:5:5 - evening feed starter 1:5:5

Day 2, morning: feed starter 1:5:5 - evening feed starter 1:5:5. Mix 500 gr white flour with 350 gr water
Day 3, morning: add 100 gr starter (which doubled in size and looked airy and good) + 10 gr salt to the preferment. Mix it well. Extract a small sample and put it in a jar, add a marker to see how much it will grow. Protein in my flour is 14,9%, so I concluded it needs to increase about 70% in size. (it's around 11 in the morning)

I shape the dough into a ball and put it in a container. About an hour later I gently fold the dough. I let it rest and fold it again after an hour.

At 5 o clock in the afternoon the dough in the jar has reached about 70%. I fold once more and take the dough out of its container and try to shape it into a tightish ball and put it in the proofing basket. I proof it on the counter uncovered for 30 minutes and put it in the fridge overnight, covered.

The next morning I preheat the oven to 230 C with my Dutch oven in it. 45 minutes later I place the dough in the Dutch oven (it's 11:30 in the morning), bake it with the lid on for 25 minutes. I take the lid off, be disappointed at the pancake, let it bake lid off for like 35 minutes until it's nice and brown.


Does anyone have advise for me what I could've done better? I'm thinking of buying a different type of flour, maybe that will make a difference? Maybe the oven was too cold? I usually bake my bread at 245 C. Or maybe the starter was too sour?
Thank you so much in advance!

Greetings.

Benito's picture
Benito

Ciabatta ala Alfanso

You may have noticed that I haven’t posted much of anything lately, we’ve been in Florida on vacation so no baking for me.  However, we did get a chance to meet up with Mr and Mrs Alfanso while down here and guess what, they were kind enough to bake some treats for us.  Alan baked a 79% hydration ciabatta made with biga and Mrs. Alfanso baked delicious chocolate meringue cookies with chocolate chips and orange zest.  Both were outstanding.


Wow what a treat to get to eat one of Alan’s ciabatta.  It was so good my partner and I polished off all but two small slices of it with dinner tonight.  What wonderful clean wheat flavour, beautiful thin crispy crust and that beautiful glossy open crumb.  It was wonderful to meet in person with someone from whom I have learned a lot from on TFL.  Thanks again for the bread and cookies and the great afternoon of conversation.  

Benny

Kistida's picture
Kistida

Obi non, swirly loaves & mochi mini buns

While reading about types of flat breads (made just a few so far like naan, chapati, Barbari bread, puran poli and qatlama patir), I came across interesting ways to make obi non. Some of these use chopped onion in the starter as it boosts fermentation and provide a lovely flavor.

The articles can be found here: http://brotgost.blogspot.com/2017/02/obi-non.html
http://hlebinfo.ru/uzbekskie-lepeshki.html
They're in Russian but Google helped translate. :)

For my small batch of 3 or 4 breads, I decided to use some atta flour and more water was added in the dough to make it soft enough. Also, yogurt or soured milk add extra flavor to this bread :D

Obi non
Stiff starter (12 hours)
20g starter (100% hydration)
80g whole wheat flour
44g water
1g salt
10g onion, chopped fine

Dough
All of the starter
60g whole wheat flour
200g all purpose flour
10g sugar
110g water
80g plain Greek yogurt
1g instant yeast
6g salt
15g ghee

Topping
Milk wash
Sesame, caraway seeds

It took me 2 days to make these as I prepared the starter early in the day, the dough at night. After mixing the dough ingredients with the stiff starter, I left the dough to chill overnight as it was getting late. Preparing the starter at night would have been better. The first proof should take 1.5 to 2 hours (longer if using only sd) at 26-28°C

After the first proof, divide the dough to 3 or 4, shape into boules. Cover and let these rest for 15 minutes.

Final shape: gently flattened discs to about 15-20cm in diameter with wet fingertips. Then, gently press a circular indentation in the middle, so that the border is thicker and puffier.

Cover and let the dough discs rest for their final proof for 45 minutes. Preheat the oven to 180° or 200°C about 20 minutes into the first proof.

Lightly brush oil over the middle of the dough. Then, if the middle is puffy again, press with fingertips or base of a glass into the middle of each dough until a deep indentation forms (this prevents it from rising during the bake), followed by designs with chekichs, fork, spoon, cookie cutter, pinching with fingertips, or even a toothpick. Optional: score or leave light indentations on the border.

Cover and let the shaped dough rest for 10 minutes.

Brush with cream or milk and sprinkle sesame or caraway seeds.

Bake at 180°C with steam for 20 minutes, followed by 5 to 10 minutes without steam until the top of the loaf is golden brown. Or
Bake at 200°C with steam for for 15 minutes, followed by 2 to 5 minutes without steam until the top of the loaf is golden brown.

Brush baked loaves with melted butter or ghee and let them cool for at least an hour before serving.


The next bakes were honey-lemon loaves. I made 3 of these in a week while preparing candied citrus peels (I've yet to start on the fruit loaf). They had lemony scent and hint of honey that we enjoyed! Also, I wanted to see if I can create vertical lines with the swirls too! A bit tedious, but it was like making monkey bread. :)
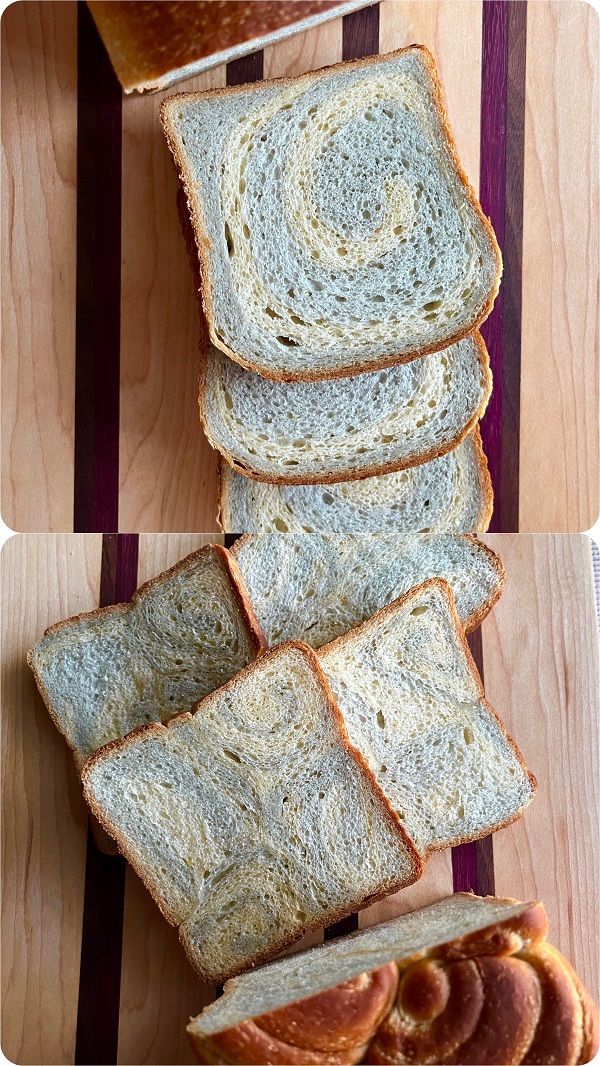


Honey Lemon sandwich loaf with butterfly pea swirls
(& lines!)
Tangzhong
20g all purpose flour
100g milk

Dough
All of the Tangzhong
40g cream
30g milk
35g honey
1 large egg
110g starter (100% hydration)
10g sugar
Zest of 1 to 2 lemons
1/4 tsp pure lemon extract (optional)
240g all purpose flour
80g Kamut flour
5g vital wheat gluten
2g instant yeast
6g salt
40g unsalted butter
10g light olive oil

Butterfly pea tea
3g butterfly pea petals + 100g freshly boiled water.
Steep 15 to 20 minutes while preparing dough.

For butterfly pea blue swirls:
Divide dough in half.
Plain dough: add 15g milk
Blue dough: add 14g butterfly pea tea


Honey Lemon sandwich loaf with matcha swirls
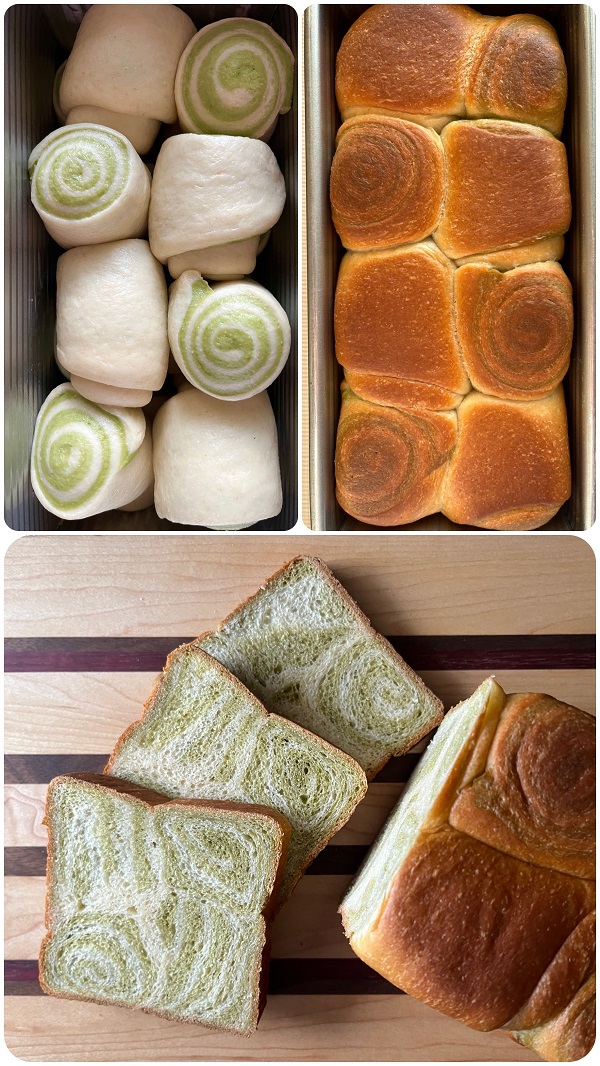

Tangzhong

20g all purpose flour
100g milk

Dough
All of the Tangzhong
40g cream
40g milk
35g honey
1 large egg
100g starter (100% hydration)
10g sugar
Zest of 1 lemon
1/4 tsp pure lemon extract (optional)
240g all purpose flour
80g Kamut flour
5g vital wheat gluten
2g instant yeast
6g salt
40g unsalted butter
10g light olive oil

For matcha swirls:
Mix 2g sifted matcha powder + 4g milk into a paste. Mix this into 350g of dough.

Divide each dough into 8 equal pieces. Roll each into dough balls, cover and let them rest for 15 minutes.

Roll each piece about 15cm/6". Overlay the colored dough over the plain dough. Roll the dough out to about 10cm/4" wide and 20cm/8" long. Roll each pair up, then divide them in two. Place them in alternate directions in 2 rows in greased loaf pan.

They were baked at 180°C with lid for 25 minutes, followed 25 minutes without. Loaf was tented with foil in the last 10 minutes


The next bake took a long time! All because I wanted to make bubble buns (from this post), with espresso mochi in them. These turn out bigger and less cuter than bubble buns though!
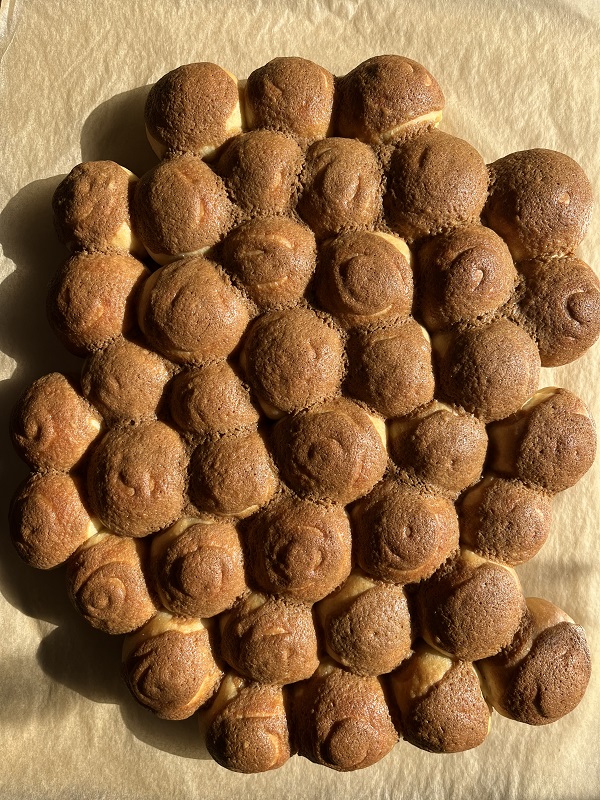
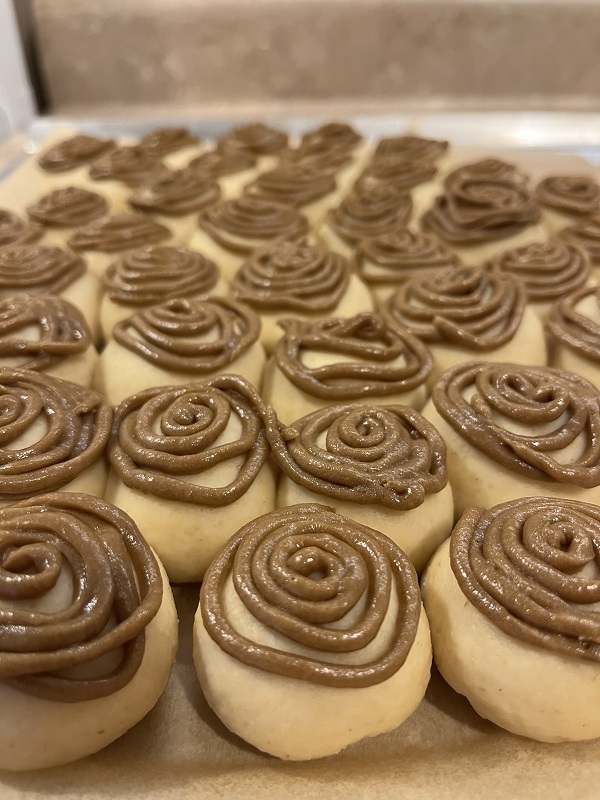
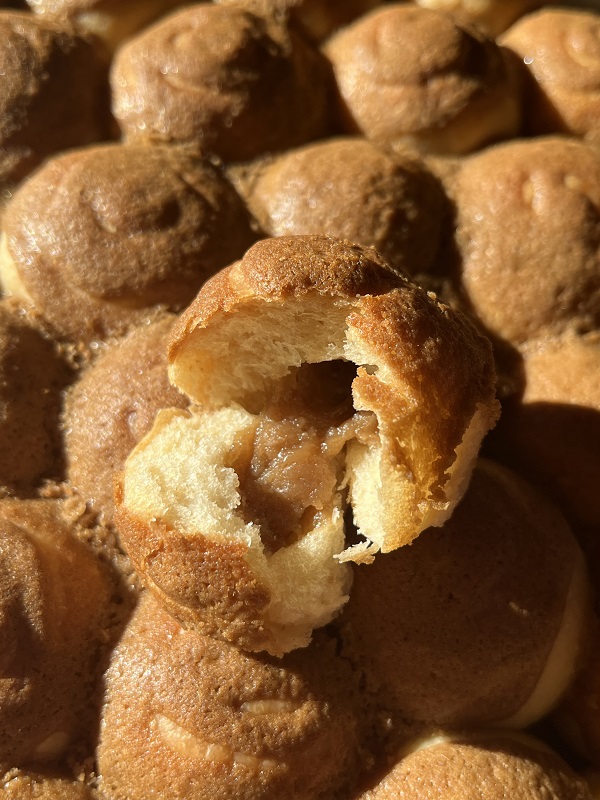


Almost-bubble buns with espresso topping and mochi filling (ha!)
The dough is from that recipe.

Small batch espresso mochi filling
80g mochiko/glutinous rice flour
20g tapioca flour
2g espresso powder
a pinch of cocoa powder
40g brown sugar
10g vegetable oil or melted butter
140g milk
For dusting: cornstarch

Bring water in a steamer to a boil while preparing the batter.

In a medium bowl, whisk together glutinous rice flour, tapioca starch, espresso powder, cocoa powder, brown sugar and milk.

Stir in oil or butter and mix until well combined and there are no lumps. Strain the mixture, if necessary to remove lumps.
Transfer the batter to a greased bowl and place this in the steamer.

Steam the batter over high heat for 20 minutes, making sure the lid of the steamer is wrapped tightly in a towel to prevent condensation from dripping into the bowl.

The mochi is done when the mixture changes from a solid color to slightly-translucent.

Remove from the steamer, and let it cool while covered for 5 minutes.

Then, transfer the mochi to an oiled counter and knead it (with gloved hands) for 2 minutes until it is smooth.
Wrap the mochi with plastic wrap and refrigerate for 30 minutes. Once chilled, slice the mochi into smaller pieces with a silicon dough scraper and dust each lightly with cornstarch to prevent sticking.

Skipping ahead of preparing and the first proof:
After dividing the dough into 40 equal pieces (20-30g each) and resting them, they were each filled with roughly a teaspoon of mochi and rolled into little balls. They were then arranged on parchment lined bake sheet with about 3cm/1" distance between them. Cover and let these proof at room temperature until they're puffy and are now stuck to one another. Pipe cooking topping over each bun (I managed to stick to one swirl this time). Bake at 180°C for 15 minutes until edges are golden brown and the internal temperature is at least 88°C. Turn off the oven, leave the oven door slightly ajar and leave the buns to continue baking in the cooling oven for 5 to 10 minutes. Then, remove the buns from the oven and let them cool completely on a cooling rack.


The latest bake was from last night using leftover syrup from making candied citrus peels. This bake felt rushed as I started preparing quite late in the evening. The baked loaf burst on one side during the bake - I believe I rolled the doughs a bit too tightly and should've used steam in the bake. (Lesson learned: do not make anything while half asleep!)
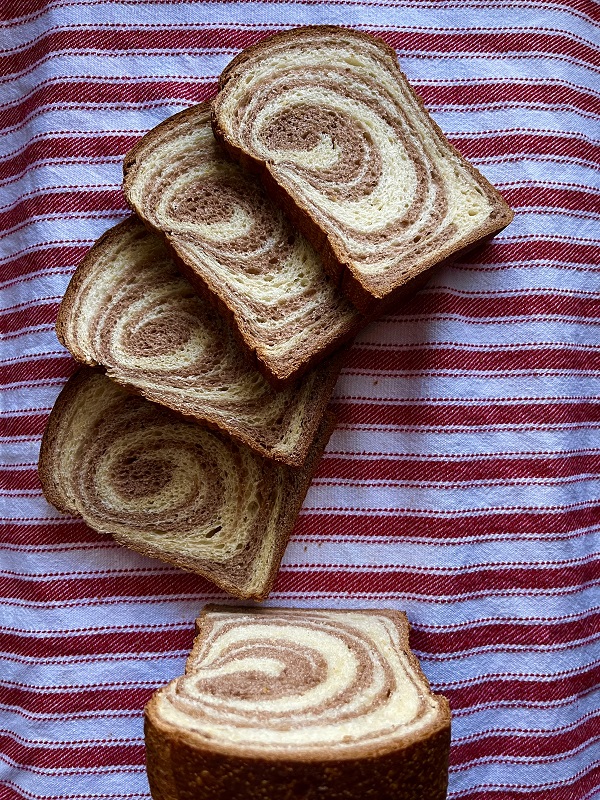


From the photo here, was the loaf under-proofed?

Orange and chocolate sandwich loaf
Dough
70g starter discard (100% hydration)
50g plain yogurt
80g milk
100g citrus syrup
250g all purpose flour
125g Kamut flour
2 tsp orange zest
2g instant yeast
6g salt
1 large egg
40g unsalted butter
10g light olive oil

Chocolate dough
15g melted dark chocolate
2g cocoa powder
120g dough

The chocolate dough was letter-folded with plain dough. Then, turned 90° and rolled out to about 20cm/8" wide and 46cm/18" long. The dough is then rolled into a log and left to proof a second time until it filled about 80% of the pan. Baked at 180°C 45 to 50 minutes. It was tented with foil in the last 10 minutes and reached an internal temperature of 98°C. Then, I left it overnight to cool on a rack.

That's it for now! :D

- Christi

30 Nov 2021 update: Made the orange chocolate loaf with SD discard. I added a lil bit of baking soda into the discard as this was a mixture of stiff and liquid starter from multiple feeds. The doughs were letter-folded once, sliced and braided to fit a 9x4x4 Pullman pan.
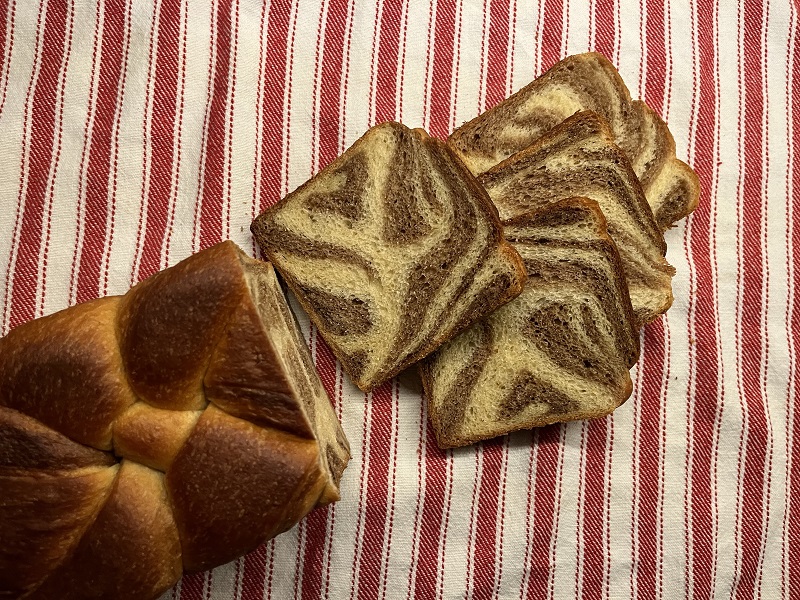


Tangzhong

20g all purpose flour
100g milk

Dough
All of the Tangzhong
30g cream
45g milk
1 large egg
120g starter discard with 1/8 tsp baking soda  (100% hydration)
235g all purpose flour
5g vital wheat gluten
80g Kamut flour
3g instant yeast
20g sugar
6g salt
40g unsalted butter
10g olive oil

Chocolate dough (to 1/3 of the dough)
15g dark chocolate, melted
2g cocoa powder

Pages