The Fresh Loaf

A Community of Amateur Bakers and Artisan Bread Enthusiasts.

Most bookmarked

Jshaw's picture
Jshaw

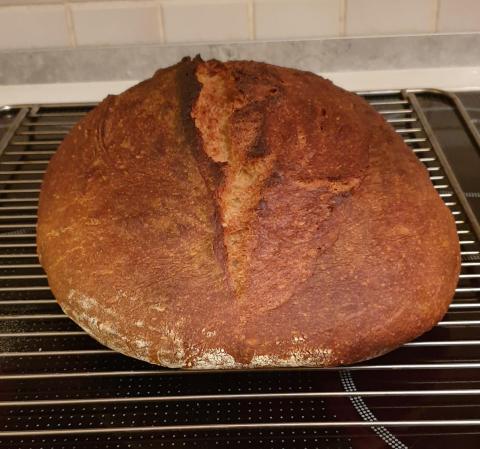
My loaves are good but not great - where can I improve?

Hello all, just found your site and have been reading - I think I've found my people!

My loaves are good, but I would really like to push onto the next level, so they are outstanding! I think that comes in part from flavour of the loaf and improving my crust.

Been baking sourdough for about 18 months and my loaves are very reliable. I use 900g of flour (700 strong white and 200 whole wheat) 200g of starter 620g of filtered water and 20g of salt.


I mix my dough, let it sit for 30 and then over the next 6 hours do three sets of stretch and folds. Pre shape, rest for an hour, shape then in the fridge over night to bake the next day.

Given that process and formulation, what tips would you have for improving the flavour of the loaf? Could I leave it to prove for a whole day and then bake on the following morning perhaps?

Thanks for any help advice or pointers, I will upload some pics to this post shortly.

Mr. Kingsbury's picture
Mr. Kingsbury

Recipe Adjustment

I just cannot seem to figure it out.

But enough about my intelligence.


But now that I mentioned not being able to figure things out, I could use some help with a bread recipe adjustment that I also cannot seem to figure out.

Before I submit my current recipe, let me describe the baking environment, and why I tried to change things.

I have a batch of sourdough starter that I have been feeding for 10+ years, using a ratio of 1 starter to 1/2 water and 1/2 flour. Back when I lived more comfortably, the recipe I had made the perfect loaf, made in a Dutch oven.

We had to down size our life when we lost our income. We now live in a dilapidated RV, with a wood burning stove for heat (it's hard to keep a constant temp in our home, especially in the dead of winter). Our tiny RV oven is too small for a Dutch oven, so we have to bake in a bread pan. As there are only the too of us, baking two loaves is just wasting one (though the chickens and deer don't complain about our not being able to eat the extra loaf before mold sets in).

I tried to adjust my tried and true bread recipe to just one loaf. And while it seemed to work somewhat o.k. during the summer, it just plain sucks in the winter. Too dense. No flavor. And fails once every four or so tries (hard to explain that last).

Unfortunately I can't seem to find the original recipe (I did mention my lack of mental abilities at least once before). So here is the current recipe, from starter to finish (with 'helper' notes for my Wife):

================================================================

Sourdough Bread

Starter:

1/2 cup of Starter floated in 1/2 cup Water in the same measuring cup at the same time (makes it easier to measure the starter; water levels, and the starter sinks). Add 120g of All Purpose Flour, and mix. Refrigerate until needed.

Ingredients:

(Activating Starter)

·         1/2 cup Water

·         1 cup Starter

·         120g Flour

Add water to measuring cup first; it will float on the added starter, making measuring more accurate.

(Dough)

·         1/2 cup Warm Water

·         1/6 cup Oil

·         1/3 cup Active Sourdough Starter

Add water first, then oil to the 2/3 cup mark, then starter to the 1 cup mark.

·         260g Flour

 After letting it set for 1-1/2 to 2 hours...

·         1 tsp Salt + ½ tsp. of water

Instructions:

  1. Activate starter at least 6 hours beforehand.
  2. To make the dough: Together in a mixing bowl, weigh out the starter, water, oil and bread flour. Mix everything together until all of the flour is just absorbed (should look like a shaggy ball). Let the dough rest for 2 hours.
  3. Add the salt + ½ tsp. of water. Mix (knead) for 8 minutes.
  4. Stretch & fold: Gather a portion of the dough, stretch it upwards and then fold it over itself. Rotate the bowl ¼ turn and repeat this process until you have come full circle. Do every 30 minutes for 2 hours (4 times).
  5. Bulk fermentation: Cover your bowl with plastic wrap. Leave it in a warm spot to rise. Your dough is ready when it no longer looks dense, and has increased in volume about 1½ - 2 times its original size (~12 hours).
  6. To shape: Remove the dough from the bowl, and place onto an unfloured surface. Gather the dough, one side at a time, and fold it into the center. Flip the dough over and place it seam side down. Cup the sides of the dough, gently pulling the surface tight, and rotate it, using quarter turns in a circular motion. Repeat this process until you are happy with its appearance.
  7. Second rise: Coat the bottom and sides of bread pan with shortening, and dust pan with cornmeal. Place the dough inside for a second shorter rise, about 2 - 3 hours. It is ready when the dough is again 1½ - 2 times its original size.
  8. Preparing the oven: When ready to bake, preheat your oven to 450° F.
  9. Place your bread into the oven and reduce the temperature to 350° F. Bake for 35 minutes.
  10. Cooling: Remove the bread from the oven, let rest in pan for 10 minutes, then cool on a wire rack for at least a half hour before slicing. Don't cut too soon or else the inside will have a gummy texture!

====================================================================


Well, there it is, and my overly long story.

Can anyone adjust this so that it again has body and taste, enough for a single loaf, in a bread pan, baked in a RV oven?

Please.

Thanks fer yer time.

~ John


BKSinAZ's picture
BKSinAZ

Tried New Flour, Got New Problems. Questions for the forum

I apologize if this is a bit wordy...

Costco had an unbelievable deal on CENTRAL MILLING AP flour, so I took the bait. I did notice after getting home that the new flour was only 10.5 percent protein compared to the 11.7 of KA AP White that I normally use.

Using the new flour and same recipe I am accustomed to https://www.thefreshloaf.com/handbook/san-francisco-style-sourdough, I made this mess... notice the rise is only about 1/4 inch higher than a shot glass.

OBSERVATION:  After mixing the dough (flour, salt, starter, and water) the dough seemed a tiny bit wetter than normal.  I took no steps in correcting this (did not add a little more flour).

OBSERVATION: Normally, with KA AP, I only need to do about 4 stretch and folds (about 2 hrs).  With this CENTRAL MILLING flour, I immediately noticed problems during my stretch and folding.... the development of gluten was slow and and what developed was very weak. Therefore I continued stretching and folding for another 2 hours (a total of 4 hrs, stretched and folded every 35 or so minutes). After my final 6th stretch and fold, the dough was barely pulling away off the tubberware proofing container without tearing. 

Which leads me to my first question: Can the strength of a dough or gluten development be reversed by too many stretch and folds?

After pre-shaping and final shaping I put it into a batard banneton where it sat on counter top for 2 hours. During the two hours, only about 3/4 inch rise in dough took place. After the two hours I placed it into the fridge over night for retard. Dough seemed to rise another 1/2 inch overnight.

The day before baking, I pulled my starter from fridge, portioned off 100gms and fed the 100gms with 100gms of new flour and 100gms of water (100 percent hydration). Newly fed starter sat on countertop for 15 hrs (it rose and peaked) before using.

I don't want to assume I did nothing wrong and do not want to judge the flour prematurely. but taking a look at my past picture posts, I have have produced some good loaves.  Are there any clues to what might have gone wrong? Was it the drop in protein content?

On a positive note, the bread tasted fine.


Creepsy's picture
Creepsy

Bread doesn't hold its shape after final proof

Every time I move the dough from my banneton to the baking sheet it flattens out into a ~ 2cm high puddle, but still has has a very good oven spring (triples in height), which luckily saves the bread! But this makes it really hard to score and the bread slices are also rather wide. Even though he crumb is relatively fluffy and open, the crumb seems not right to me.

Here some further crumb / bread shots:

And here my procedure:

Ingredients:

  • (80%) 600g Wheat flour (T550)
  • (20%) 150 Whole wheat flour
  • (78%) 585g Water
  • (0.5%) about 3.75g Instant Yeast
  1. 1h Autolyse with 75% Hydration
  2. 3:50h Bulk Ferment (1 Fold at 0:30; 4 Coil folds at 1:00, 1:30, 2:00, 3:15)
  3. Preshape; 20min Rest; Final shape into batard
  4. 1:20h final proof in banneton
  5. preheat oven to 250°C, bake at 230°C 20min with steam and 30min without

Some posts I have found suggested that this could be due to overproofing or bad gluten structure. But this doesn't really make sense because of the good oven spring, does it? Could underproofing or shaping issues be the cause of this? Does anyone of you have an idea what the issue might be?


Danni3ll3's picture
Danni3ll3

Olives, Sun Dried Tomatoes and Feta Sourdough

It was time to revisit this one after taking a break for the holidays. 


Recipe

Makes 3 loaves 


150 g Spelt flour (~150 g Spelt berries)

150 g Kamut flour (~150 g Kamut berries)

50 g rye flour (~50 g Rye berries)

700 g strong bakers unbleached flour

725 g of filtered water 

10 g Old Bay seasoning

15 g Pink Himalayan salt 

30 g yogurt 

250 g levain (procedure is in recipe and will need additional wholewheat flour and unbleached flour)


Add-ins

145 g of drained sliced mixed olives (50 g Kalamata, 50 g Manzanilla and 45 g Black)

130 g crumbled Feta 

72 g Seasoned Sun-dried Tomatoes in oil, drained and 25g of oil reserved 


The night before:

1. Mill the grains on the finest setting of your mill. Measure the Spelt, Kamut, and rye flours and place in a tub. 

2. Add the unbleached flour to the milled flours and reserve.

3. Take 10 g of refrigerated starter and feed it 20 g of water and 20 g of wholegrain flour. Let that rise at cool room temperature for the night.  


Dough making day:

1. Feed the levain 100 g of filtered water and 100 g of unbleached flour. Let rise in a warm place till double. This took about 5 hours.

2. Measure the feta, crumble if needed, and set aside.

3. Drain (save the oil) and weigh the sun-dried tomatoes, (slice if not sliced), measure out 25 g of the reserved oil, and add both to the feta. 

4. Drain the olives, weigh, and add to the feta mix.

5. An hour or two before the levain is ready, mix the water with the flours and autolyse. This takes a minute or two in a mixer. Let autolyse until

the levain is ready. 

6. Once the levain has doubled, add the Old Bay seasoning, the salt, the yogurt, the feta/olive/tomato mix, and the levain. Mix for a minute on low until the levain is integrated, then mix on speed 2 for 9 minutes.

7. Cover and let rest 45 minutes.

8. Do 2 sets of coil folds with 45 minute intervals and then 2 more set with 30 minute intervals. Let rise until you see lots of small irregular bubbles through the wall of your container. The dough should have risen about 30-40%.

9. Tip the dough out on a bare counter, sprinkle the top with flour and divide into portions of ~825 g. Round out the portions into rounds with a dough scraper and let rest 30 minutes on the counter. 

10. Do a final shape by flouring the top of the rounds and flipping the rounds over on a lightly floured counter. Gently stretch the dough out into a circle. Pull and fold the third of the dough closest to you over the middle. Pull the right side and fold over the middle and do the same to the left. Fold the top end to the center patting out any cavities. Finally stretch the two top corners and fold over each other in the middle. Roll the bottom of the dough towards you until the seam is underneath the dough. Cup your hands around the dough and pull towards you, doing this on all sides of the dough to round it off. Finally spin the dough to make a nice tight boule.

11. Sprinkle rice flour in the bannetons. Place the dough seam side down in the bannetons, cover, let rest for a few minutes on the counter and then put to bed in a cold (38F) fridge overnight. 

Baking Day

1. The next morning, heat the oven to 475F with the Dutch ovens inside for 45 minutes to an hour. Turn out the dough seam side up onto a cornmeal sprinkled counter. Place rounds of parchment paper in the bottom of the pots, and carefully place the dough seam side up inside. 

2. Cover the pots and bake the loaves at 450 F for 25 minutes, remove the lids, and bake for another 22 minutes. Internal temperature should be 205 F or more.

Nive's picture
Nive

Home ground flour

Hello ,

I am few months into making my own bread. I use store bought 100% whole wheat flour tombake my bread. 
This time I wanted to Mill my own flour and bake from it. I used Red wheat.

Rinsed, sprouted, dried and ground using grain mill.

I used the same proportion of water: flour as I always do, but my flour is kind of sticky and does not bounce back, I know  i am missing something but not sure what. Please help.

Miller's picture
Miller

Once again, what size Dutch oven for my sourdough?

This question must have been asked  a great number of times as I've seen by searching the Forum, but please allow me to ask it once more.

I usually bake batards of up to 500g (18oz) flour. What size DO would be suitable? I read that the space inside a DO is important to contain sufficient steam created from baking the dough and that too small a size DO would be detrimental to the loaf rising during baking.

Do you prefer a cast iron DO or an enameled one? Can an enameled DO be preheated up to say 500° F (260° C)? I read that preheating an enameled empty DO may damage it. On the other hand a CI DO needs some maintenance from time to time.

I would be most grateful for your opinion on this matter.

Benito's picture
Benito

100% Whole Wheat Four Grain Porridge Sourdough

I’ve not made a porridge yet to add to any 100% whole grain bread so thought it was high time to try.  I have a bag of the new Harvest Flakes from Anita’s Organic Mill that they sent me to try out.  You could easily replicate this blend by using organic flaked oats, sesame, flax and sunflower seeds. 

In the evening, sift all the stoneground whole wheat flour with a #40 sieve to remove the bran.  Put the bran and Harvest Flake Mix in a small pan and add boiling soaker water and cook until the oats are softened.  The final weight should be 190 g so you may need to add a bit more water than the 99 g if you have great loses from cooking.  However, using boiling water and cooking flaked oats is a quick job so you shouldn’t really have a lot of water loss.  Once cool place in fridge overnight.

Prepare the levain and ferment at 74°F so it is ready in 10 hours.  I find that a levain like this without sugar is at peak to use once the pH drops about 1.3.

In the morning add the sifted water, salt and levain to a bowl and break down the levain.  Then add the sifted flour and mix until no dry flour visible.  Rest for 15 mins to allow the flour to fully hydrate then either knead to moderate gluten development by hand or in a stand mixer.  I used the stand mixer because these porridges especially ones with flax seeds are a gloopy mess to mix into a dough.  Mix until well incorporated.  At this point the pH was 5.52.  So target for shaping is a drop of 1.0 so when the pH of the dough reaches 4.52 I’ll aim to shape and then a further drop of 0.3 for baking.

During bulk fermentation at 82°F I’ll do a bench letter fold followed by coil folds as needed at 30 mins intervals.  For this dough I only did 2 full coil folds and 1 half coil fold.  The pH of 4.54 coincided with an aliquot jar rise of 37% so shaping was done.  I tried a different shaping technique which seems to develop more tension.  If I get proficient at this in the future I’ll do a shaping video.  I rolled the shaping dough in the flake mix on the counter and then transferred the dough to a banneton (no dusting of rice flour needed given the coating of flake mix).  The dough was allowed to proof on the bench until the pH dropped to 4.22.  About 1 hour prior to the estimated time for baking the oven was pre-heated to 500°F and prepared for open steam baking.  So the cast iron skillet was set on the highest shelf so it would pre-heat with the oven.  30 mins later the Sylvia towel in a metal loaf pan was filled with boiling water and placed on the baking steel to pre-steam the oven.  Once the oven was at temperature, the dough was unloaded from the banneton onto parchment, scored and loaded into the oven on the baking steel.  250 mL of boiling water was poured into the cast iron skillet.  The oven temperature was dropped to 450°F and the steam bake was done for 25 minutes.  After 25 mins the steam gear was removed, venting the oven of steam and the temperature dropped to 425°F. The bread completed full baking after another 22.5 minutes.


chiaraweaver's picture
chiaraweaver

What’s wrong with my ciabatta

Hi, this is my first time making bread and I was wondering if someone could help me figure out how to make it even better!

I think the main problem is in the tighter crumb at the bottom of the bread and I was wondering what caused this (as from my knowledge ciabatta is meant to have quite large holes throughout). I’m aware the bread wasn’t shaped properly and needs to be flatter and longer - is this what causes it or was it something else? 

Thank you so much for any help or advice as I would love to get better and better!


The Roadside Pie King's picture
The Roadside Pi...

Raymond Calvel would have a stroke!

The opposite of artisan bread! Ramond Calvel would have a stroke. That being said I loved watching and hope to take a road trip to this spot! very cool automation! I love it!

Tomato pie sauce at 17:20

Automation

Pages