February 10, 2022 - 4:20am

Coffret Traité de boulangerie au levain?
Anyone have the book, Coffret Traité de boulangerie au levain? Your thoughts?
Share
Anyone have the book, Coffret Traité de boulangerie au levain? Your thoughts?


Here's another spiced loaf! On days when I feel like having a lil bit of rice, I usually make jeera, chicken or a simple biryani. Since I've already made a jeera (+cheese) loaf recently, I figured why not try making a bread version of biryani just to dip or drench the bread in some curry. :)
Biryani spiced sourdough with turmeric swirls
Dough
225-230g water
185g all purpose flour
70g atta flour
50g Kamut flour
5g vital wheat gluten
1/4 tsp garam masala
1/4 tsp ground cardamom
10g sugar
80g starter (100% hydration)
6g salt
5g onion oil (from caramelized onions)
50g caramelized onions
Caramelized onions
4-5 small to medium onions, thinly sliced
1/4 cup olive oil
a pinch of salt
1 bay leaf
3 cloves
- toss onions in salt. Cook over medium low heat with oil until onions begin to turn brown on the edges. Add bay leaf, cloves and cook until onions are golden brown. Strain onions and oil, allow to cool. Discard bay leaf / cloves.
The dough is split to about 60-40%. And *turmeric is added to the smaller portion. It's easier to just add turmeric to the whole dough and mixing just partially so a marbling effect can be produced during stretch and folds or coil folds.
Autolyse 1 hour
Dough temp after mixing: 24.5°C
Bulk fermentation 5 hours at 21-23°C; stretch & folds x 3, Caramelized onions were laminated in, followed by coil folds x 2.
Preshape, overnight cold retard
Score and baked at 230°C for 25 minutes with DO lid on, then 20 minutes without lid.
The baked loaf was then left to cool for about 3 hours before slicing (I read somewhere it's ideal to slice when the loaf is 32–43°C?).
*be sure to use oiled hands for this step, and have vinegar and baking soda nearby to clean any turmeric stains.
The next loaf is the black goji berry loaf. It's just a lil twist from a citrus loaf where the juice is now replaced by goji berry tea. 
Black goji berry sourdough with candied citrus peels
220g goji berry tea
218g all purpose flour
80g Kamut flour
15g sugar
5g orange zest
74g starter (100% hydration)
6g salt
6g coconut oil
50g candied citrus peels, chopped
The bakes below were lil snacks for the lunar new year. 
Nian gao (mochi cake) with coconut and candied citrus peels - I had to include more of those candied peels since I prepared so many!
Makes one 1/8 sheet pan
Dry ingredients
180g glutinous rice flour (Mochiko)
45g tapioca flour
1/4 tsp baking powder
1/4 tsp baking soda
100g sugar
1/8 tsp salt
Wet ingredients
2 large eggs
350g coconut milk
20g dark molasses
20g coconut oil, extra for brushing
Add-in
50g candied citrus peels, chopped
60g unsweetened desiccated coconut
Preheat the oven to 180°C. Grease a 1/8 sheet pan with coconut oil and line with parchment paper.
Melt coconut oil in a small pan and let it cool slightly. In a measuring jug, lightly whisk eggs, molasses and coconut milk. Whisk in coconut oil.
Whisk all the dry ingredients in a large mixing bowl. Make a well in the centre and pour in the wet ingredients. Mix the ingredients together with a spatula or whisk until a smooth, runny batter forms. Strain this batter to remove any lumps.
Stir in desiccated coconut and candied citrus peels.
Pour the batter into the prepared pan and gently tap the pan on the counter to remove large air bubbles.
Place the pan on a larger baking or cookie sheet and bake in the preheated oven on the middle rack for 20 minutes. Remove the pan from the oven and gently, brush the top of the cake with coconut oil.
Return the cake to the oven and continue baking for 15 to 25 minutes until the middle of the cake has set and the edges are golden brown. A toothpick inserted into the middle of the cake should come out clean.
Remove from the oven and let the cake cool for at least 30 minutes before transferring it to a cooling rack. Let the cake cool completely before slicing. Like the cassava cake, this cake should be kept at room temperature for its chewy texture. It should be refrigerated after 2-3 days, but this makes the cake less chewy and slightly dry.
Butter cookies (plain, coffee, matcha) - I lack piping skills so it was hard to make these into uniform shapes. Fun to make, even more fun to eat! :D
Makes about 40 to 50 3cm cookies
120g unsalted butter, room temp
1g salt
45g icing sugar
1/4 tsp vanilla extract
45g cornstarch, sifted
95g all purpose flour, sifted
Optional: 1-2 tsp milk, or liquid add-ins
Add-ins:
Coffee version: 1 tsp instant coffee/espresso powder and 1/4 tsp cocoa powder bloomed in 1 tsp boiling water or, 1 tsp espresso + 1/4 tsp cocoa powder
Matcha version: 3g sifted matcha powder + 1 tsp hot water
Whip butter with salt and sugar for 8 to 10 minutes until fluffy. Mix/fold in vanilla and cornstarch. Gradually, fold in flour in 2 additions. Fold in add-ins and transfer the dough into a piping bag.
Pipe cookie dough onto parchment lined cookie sheets, each cookie about 2-3cm circles. Bake at 150°C until the edges are lightly brown, about 20-30 minutes, depending on the size of the cookies (mine took about 25 minutes)
Pinwheel cookies - a variation of the butter cookies, easier to make of course, just roll, freeze, slice and bake!
Plain dough
220g unsalted butter
150g sugar
1 large egg
1 tsp vanilla extract
350g all purpose flour, sifted
10g cornstarch
1/2 tsp baking powder
1/2 tsp salt
Chocolate add-in
20g dark chocolate, chopped
1/2 tsp cocoa powder
1/4 espresso powder
1 tsp heavy cream or milk
Matcha add-in
1/2 tsp matcha powder, sifted
1 tsp heavy cream or milk
Prepare the plain dough like any cookie dough. Divide the plain dough to 4. Use a portion to mix with the chocolate mixture and another with the matcha mixture.
Wrap and flatten each portion into discs, chill for about 30 minutes. Then, the portions between two layers of parchment before rolling them out into nearly the same size (approx 12" x 6"). Stack the dough rectangles on top of each other and then roll the layers starting from the longer edge into a long, tight spiral. Wrap the dough tightly and chill for about 1 hour (or freeze up to 3 months!)
Preheat the oven to 180°C. Slice the cookie dough into 1/2" thick slices, rolling the dough log during the cut to maintain the rounded shape. Should the dough soften too much after slicing, chill the sliced cookie for about 15 minutes before baking.
Bake for 10-13 minutes, until each cookie is slightly puffy and the edges are just starting to brown. Cool the cookies completely before storing in airtight containers.
That's it for now, enjoy! :)
- Christi

A pullman loaf pan with the dimensions 8.3" x 4.8" x 4.7" would fit how much dough?
Do you think it's a 2lb loaf pan? I'm not convinced.
Thank you.


Today I baked a couple loaves of Hamelman's Oatmeal Bread with Cinnamon and Raisins. It was my third bake of this recipe. The only modification I made was, while I had used AP flour before, this time I used King Arthur Baking "Bread Flour." The higher-gluten flour was naturally a bit thirstier, and it ended up with a more open crumb. It was a bit chewier, but the flavor was unchanged.
One glitch was that the loaves were about 3/4 proofed when I had to leave for a dental appointment, so I stuck them in the fridge. When I got home about to hours later, I thought the loaves were borderline over-proofed, but after baking, cooling, slicing and tasting, I find no fault with them.
This is a very nice toast bread. We'll have it for breakfast spread with home-made almond butter. Yum!
Here's the formula and process:
Oatmeal Bread with Cinnamon and Raisins
from Jeffrey Hamelman’s “Bread,” 3rd Edition
Ingredients | Baker’s % | Wt for 1 large loaf | Wt for 2 large loaves |
Bread Flour | 75 | 208 | 416 |
Whole Wheat Flour | 25 | 69.3 | 138.6 |
Rolled Oats | 16.5 | 45.76 | 91.52 |
Water | 62.5 | 173.3* | 346.6** |
Milk | 11 | 30.5 | 61 |
Honey | 7.5 | 20.8 | 41.6 |
Vegetable Oil | 7.5 | 20.8 | 41.6 |
Salt | 2.2 | 6.1 | 12.2 |
Instant Yeast | 3.5 | 9.7 | 19.4 |
Cinnamon | 1.5 | 4.16 | 8.32 |
Raisins (soaked and drained) | 33 | 91.5 | 183 |
Total | 245.2 | 679.92 | 1360 |
Note: For 8x4 “ pans, scale loaves to 510g. For 9x5” pans, scale to 680g.
Procedures
* 45.8g water to soak the oats. 127.5g water for the final mix.
** 91.5g water to soak the oats. 255.g water for the final mix.


Enjoy!
David

Gas ovens are very unpopular with bakers, but this seems due to the standard vented design, which is presumably the simplest and cheapest. It seems a baking friendly oven design that uses a gas fuel source should be possible. At minimum, one would want steam trapping sealed chamber design that is heated externally by gas. I'm assuming there are some challenges with this approach. Does anyone know if these are made? Do they make steam injected consumer gas ovens? My initial attempt to formulate key word searches didn't turn up anything. I would be interested in 24 inch slide in models.

I am a newbie baker (started 2021) So my baking failures are definitely due to me and not my equipment (similar to golfers - that doesn't stop me from buying new equipment). I love the Fresh Loaf and have found all of the info posted to be so helpful (thank you all for sharing). I am posting this only because of the lack of info here on the Fourneau and not because I actually know what I'm doing (but I'm having fun).
Why Fourneau?
After using Dutch ovens I was looking at what else existed for the home baker that did a good job retaining moisture and heat. After sliding down the internet bread rabbit hole I found the Challenger and the Fourneau. The Challenger really intrigued me because of the larger enclosed space and heat retention. The Fourneau is a slightly different functional concept - more like an front loading oven. I eventually decided to get the Fourneau instead of the Challenger. This is because the Challenger has a very large & heavy top which could prove unwieldy for me, particularly when its super hot.
What is the Fourneau like?
It does fit in my oven front to back with hatch facing the oven door. Which makes it easy to access to open, load and unload.
I like the stone base with water channels - it is well designed to generate and retain steam. Although I continue to fail to get holy grail oven spring and large ear, for the first time ever I got lovely blistering on the loaf surface. Prior to this I have tried ice cubes, water, spray top of loaf (like with baguettes) and never got the surface I got with the Fourneau.
When loading or moving the bread I found the front door (hatch) very easy to remove. It is small and light, I just placed it on my lower oven rack when not on the Fourneau.
It's pretty easy to get the hang of using the loading trays and tray tool. They function surprisingly well. I thought it would be wobbly or awkward but it's not.
The trays come with silicone mats. I have read that some people find just using parchment works better for them. The bottom of my loaves were not to dark or burned (may actually have been a bit light). I did have burning with parchment in my dutch oven. I may try parchment just to see what the difference may be.
For second half of bake, Fourneau recommends either removing the door or taking your bread out of the Fourneau and put it in oven. I placed the Fourneau in the middle of the rack and there was not enough room to move the loaf. So I wound up doing whole bake in Fourneau. I could move it to one side - this would facilitate work flow for folks doing multiple loaves. (I'm still at the one loaf at a time phase till I get it right)
What is the downside?
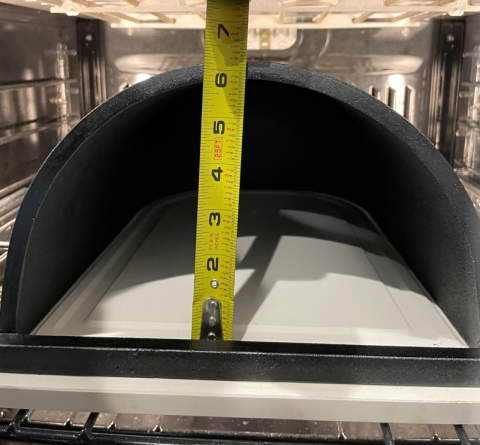
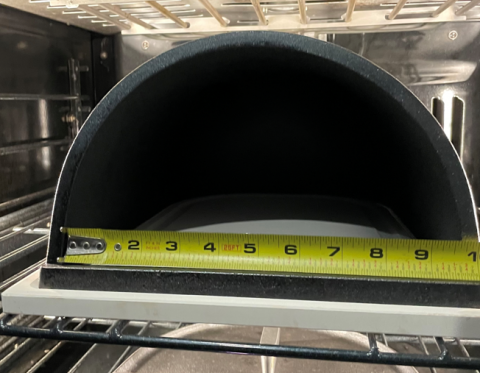
Fourneau size may be a downside for some. The Fourneau works for 500g loaves and all their recipes reflect this. So anyone who wants large loaves - this would not work. Or anyone who gets really great oven spring may find the aprox 5 3/4"H x 9.5"W clearance to be tight.
Where to store the Bread oven when not in use may be a challenge.
Other Misc stuff:
I have only used a recipe from Fourneau so far and tomorrow I am going to bake FWSY overnight white.
I struggle with oven spring and being a geek I am deep into calculations for hydration and protein content. I use all KA AP flour or a mix of KA AP and KA wheat in a 70/30% mix. I use protein calculations to substitute gluten flour to bring protein up to total of 14%.

Hello Everyone!
I have searched this site for awhile, but this is my first time posting. I’ve gotten hooked recently on making panettone, and with each failure, my loaves have gotten better. I originally started with the formula from Suas, which turned out well, though took forever to proof (it calls for a firm starter fed 3x, but didn’t really go into much more than that). I recently got the “Panettone and Sourdough Viennoiserie”, and have made three separate batches from that, 2x the formula from the International Baking School, and 1x Roy’s.
This batch was the International Baking School’s formula, with a few tweaks to the flavors (this had vanilla powder, orange paste and milk chocolate). I’m really disliking the novacart thin molds vs the corrugated as they don’t offer much support, but each batch is getting better. Any recommendations on cooling apparatuses? Definitely struggling to find the best place to hang while cooling. Otherwise I really appreciate any feedback, and am excited to post some more.
thank you!
Amy


3 cups whole wheat flour (I used local flour from a feed mill; it's relatively coarse, with big flakes of bran)
3 cups all purpose flour
3 cups of cold tap water
1 tablespoon of salt
¼ teaspoon of dry yeast
1 teaspoon of diastatic malt
Afternoon before baking mix the ingredients into a lumpy dough. Keep it covered at room temperature and give it a little stretch and fold now and then. No need to do it at any regular intervals. When the dough feels nice and springy and it formed a smooth ball leave it to expand a little and then refrigerate overnight
In the morning toss on the board, form a loaf, place in a basket, let proof and then bake in preheated clay pot
Hi! This is my first post. I just baked The Food Geek's Jewish Rye Sourdough. He's got a great video turtorial, and I followed it up until it came time to shaping the dough. I have a wood countertop, so I oiled it a bit to keep the dough from sticking. Other than that, I wouldn't change a thing. Highly recommend it!
-Monica from Breademic Baking.

The dough mention was an enriched sandwich loaf by TX Farmer. The only tweak was a 5% PFF was added to the formula.
FYI
The Final Dough Flour was kept overnight in the fridge (~38-39F)
The Tangzhong was also refrigerated overnight
Final Dough liquid was cold milk
And the whole eggs were are cold
The above was mixed intensively for 28 minutes at various speed. Estimate average speed at 5-6 on a ten speed Famag Spiral Mixer. The final DT after mixing was 73.4F.
I'm not sure how this would compare to a planetary mixer such as a Kitchenaid, but thought this info might be of interest to others.
By the way - according to TX Farmers instructions, the dough could have gone a bite further. The gluten was extremely well formed and beautiful. One day I really need to push the machine kneading to completely over worked. Won’t know how far you can go until you go too far.
HERE is the link to Bread. One loaf baked with the cover on the other with cover off.