The Fresh Loaf

A Community of Amateur Bakers and Artisan Bread Enthusiasts.

Most bookmarked

Martadella's picture
Martadella

Scrappy rye with fruits and nuts

Incredibly soft and delicious. It's slightly sweet, slightly acidic and very gently bitter from things that I used to make it.

Grandma style, which means non measuring or using volume units. With some normal and some a little weird add ons: old flour scraped from board and dried, old oats and poppy seeds that fell off a previous loaf, some roasted grains of rye, barley and wheat, a big handful of rye altus, dried apricots,  prunes and walnuts. Leavened with stiff rye preferment,  while store bought whole wheat (I think it was Gold Medal) is in the dough

The procedure can be summarized as follows:

Stiff preferment: (2 cups rye, 2 tablespoons old starter, enough water to make a stiff dough) let ferment 12-16 hours at rt

Old scraps: dried bits and pieces  scraped from the working board, burned flour from baking stone, also stuff that fell off of other loaves, like oats etc.,  kept  dry in a jar; ground roasted grains , add lukewarm water and a pinch of starter, let ferment 12-16 hours at rt

Altus (large handful of dried rye bread cubes) let soak in water until very soft, then squeeze and add to the dough 

Mix preferment, altus and fermented scraps together with their liquid,  add 4 cups of whole wheat flour, regulate hydration to your liking. Autolyse 20-30 min, then salt to taste. Let ferment some time then add chopped fruit and nuts (I don't laminate, I just knead them into the dough) Proof until nice and puffy, place in banneton,  wait until nicely expanded then bake

cord8418's picture
cord8418

Sourdough starter smell

Hello, 


I have been feeding my starter for around 2 weeks now. At around the 10 day mark, the starter began smelling like acetone/nail polish remover. I feed it everyday at the same time, and the smell goes away after feeding. The starter gets a lot of rise everyday, but I am afraid to use it. I successfully kept a starter going last summer as well for several months, and I never experienced this smell. I am doing nothing different. Saying this, I have two questions: 

1. Is it safe to use this starter that has an acetone smell? 
2. Is it possible to get rid of this smell? My thought is to start feeding it twice a day. 

Any help would be greatly appreciated! 

-Jonny

louiscohen's picture
louiscohen

Unusual Technique in Brod & Taylor Country Sourdough

I got the Brod & Taylor proofer, which so far seems to work well.  No more checking temps and flipping the over light on and off, or opening and closing the oven door.

 There is an usual technique in the Country Sourdough recipe that comes with the machine B & T Proofer Instructions/Recipes.  After mixing the levain and letting it ferment for ~12 hrs, they say to mix the flours and water for the final dough and then:

Make a well in the dough and add all the sourdough leaven from above. Without mixing the leaven into the dough, draw the sides of the dough up and over the top of the leaven to encase it. Let sit for about 30 minutes in the Proofer. 

I don't think I've ever seen this before.  Usually the instruction is either mix everything, or mix the flour and water, autolyse, and then add the levain (and usually the salt).  

Why bury the levain inside the final dough without mixing?

Thanks

StevenSensei's picture
StevenSensei

Swedish Limpa Sourdough by Reinhart Whole Grain Breads (Modified)

This is a modification of the recipe originally published in Reinhart's Whole Grain Breads - (Bread Calculator / Recipe)


This week it was time to try another whole grain bread. The spiced Swedish Limpa bread looked like a winner. I was a bit hesitant given the use of fennel and anise seeds along with cardamom and cumin. More on this later.


I decided to modify the recipe to a more traditional 3 day bread and dropped the use of commercial yeast. Opting instead for a 100% rye starter for any leavening. With this change the bread is actually 50% rye and 50% whole wheat. This is a heavy and dense bread without a lot of gluten development. In fact, bringing this bread together reminded me a lot of doing a 100% whole grain rye. The lack of gluten means working the dough a bit and just trying to get it to come together. I added a little bit more water when the dough first came together because it felt quite dry. That addition made the dough a bit too sticky…but it’s fine…like a 100% rye we are not going to get a nice smooth dough and taught skin.


I measured and lightly ground the spices in a motor and pestle. Wow! What an amazing smell. I was super pleased with the anise and fennel combination. I was afraid it would be too much like licorice but it was fine. They really complement one another and stand up as a subtle flavor against the strength of the rye.


The bulk went fine and I did see a 50% growth as I wanted in a reasonable amount of time which also let me know that the refresh of my starter a few weeks back has worked just fine. After a very rough shaping of the dough and a healthy amount of rice flower on the banneton liner it was into the fridge for the night. The next morning the bake went fine and as expected there was not much rise to the bread. This one is quite flat, which is exactly what I expected given the rye content. The outer loaf isn’t super pretty because of how I brushed off the rice flour…but the inside…oh my! This is the kind of moist dark complex rye that I love. I need to try to slice it super thin and toast it till it snaps like a cracker. 


Sensei's Report Card

Tasting Notes: This has a strong sourdough tang from the high percentage of rye flour. The smell is amazing and complex with all of the spices. I love cumin in most things, and was careful to dial the amount in this bread back as warned in the text from the book. That said the bites that do have cumin in them the cumin is quite forward and gives a more savory note which does not go as well with all of the other flavors. If I do this bread again I would drop the cumin and increase the anise to 3g. Every bite of this bread is an adventure in the best way.


Time/Effort: Not a lot of effort for this other than dealing with a difficult to work with low gluten dough. If this isn’t your thing you could easily drop the whole wheat in favor of a strong bread flour and likely be just fine.  


Would I make it again: For sure! The flavors are great. In fact I could see using the seed mix in just a normal sourdough, or even using these in a whole rye instead of caraway (which is also a great flavor for rye bread). I’m pretty sure that there is a recipe for this style of bread in the Bread Bakers Appetence as well that might be worth looking at.


Benito's picture
Benito

Black and White Sesame Semolina Sourdough Hokkaido Milk Bread

I have several bags of semola rimacinata sitting in my closet that I almost forgot about. So although I have been baking a lot of whole grains I have in the back of my been thinking that I’d like to see what an enriched semolina bread might be like, hopefully it is good.

Instructions

Levain

Mix the levain ingredients in a jar or pyrex container with space for at least 300% growth. 

Press down with your knuckles or silicone spatula to create a uniform surface and to push out air.

At a temperature of 76ºF, it typically takes up to 10-12 hours for this sweet stiff levain to be at peak.  For my starter I typically see 3-3.5 times increase in size at peak.  The levain will smell sweet with only a mild tang.

Tangzhong 

Put about 1” of water sauce pan set on medium high heat. In the bowl of the stand mixer stir the milk and flour until blended. Then place the bowl on the sauce pan to cook the tangzhong (Bain Marie) for several minutes until well thickened, stirring regularly with a spoon or heat-resistant spatula. Theoretically it should reach 65ºC (149ºF) but I don’t find I need to measure the temperature as the tangzhong gelatinizes at this temperature.  Let cool in the bowl and then refrigerate until the next morning.


Dough

Into the bowl of a stand mixer with the tangzhong, add the milk (consider holding back 10 g of milk and adding later if this is the first time you’re making this), egg, salt, sugar, diastatic malt (optional) and levain.  Mix and then break up the levain into many smaller pieces.  Next add the flour and vital wheat gluten.  I like to use my spatula to mix until there aren’t many dry areas.  Allow the flour to hydrate (fermentolyse) for 20-30 minutes.  Mix on low speed and then medium speed until moderate gluten development this may take 5-10 mins.  You may want to scrape the sides of the bowl during the first 5 minutes of mixing.  Next drizzle in the melted butter a little at a time, or alternatively add room temperature butter one pat at a time.  Slow the mixer down to avoid splashing the butter at you. The dough may come apart, be patient, continue to mix until it comes together before drizzling or adding in more butter.  Once all the butter has been added and incorporated increase the speed gradually to medium.  Mix at medium speed until the gluten is well developed, approximately 10 mins.  You will want to check gluten development by windowpane during this time and stop mixing when you get a good windowpane.  You should be able to pull a good windowpane, not quite as good as a white flour because the bran will interrupt the windowpane somewhat.  This is a good time to add inclusions such as my favorite black sesame seeds, that way they do not interfere with the gluten development.  If you add inclusions mix until they are well incorporated in the dough.


On the counter, shape the dough into a tight ball, cover in the bowl and ferment for 2.5-3.5 hours at 82ºF.  There may be some rise visible at this stage.


You can next place the dough into the fridge to chill the dough for about 1.5 hours, this makes rolling the dough easier to shape.  Remember, if you do so the final proof will take longer.  Alternatively, you can do a cold retard in the fridge overnight, however, you may find that this increases the tang in your bread.


Prepare your pans by greasing them or line with parchment paper.  


Lightly flour the top of the dough. Scrape the dough out onto a clean counter top and divide it into four. I like to weigh them to have equal sized lobes. Shape each tightly into a boule, allow to rest 5 mins. Using a rolling pin roll each ball out and then letterfold. Turn 90* and using a rolling pin roll each out to at least 8”. Letterfold again from the sides so you have a long narrow dough. Then using a rolling pin, roll flatter but keeping the dough relatively narrow.  The reason to do this extra letterfold is that the shorter fatter rolls when placed in the pan will not touch the sides of the pan.  This allows the swirled ends to rise during final proof, this is only done for appearance sake and is not necessary.  Next roll each into a tight roll with some tension. 


If you are applying seeds to the crust, either brush the top of each roll with water or flip the roll of dough onto a wet cloth to dampen the surface.  Place the roll top down into a bowl with the seeds rolling it until there are a lot of seeds on the dough.  


Arrange the rolls of dough inside your lined pan alternating the direction of the swirls. This should allow a greater rise during proof and in the oven.


Cover and let proof for 6-8 hours at a warm temperature.  I proof at 82°F.  You will need longer than 6-8 hours if you chilled your dough for shaping. I proof until the top of the dough comes to within 1 cm of the top edge of the pan.


Preheat the oven to 350F and brush the dough with the egg-milk wash.  You do not need to use the egg wash if you are seeding the outside of the dough.  Just prior to baking brush with the egg-milk wash again.


Bake the loaves for 50 minutes or until the internal temperature is at least 190ºF, rotating as needed to get even browning. Shield your loaf if it gets brown early in the baking process. After 50 mins remove the bread from the pan and bake a further 10 mins by placing the loaf directly in the oven on the rack with the oven turned down to 325ºF. You can brush the top of the loaf with butter if you wish at this point while the bread is still hot to keep the top crust soft.

My index of bakes.

Abe's picture
Abe

Brainstorming a Rye Recipe

Ole and Steen is a Danish Bakery in London (and i'm sure in other parts of the UK too) which sells a variety of rye breads. Bought a Carrot Rye the other day which, as well as being absolutely delicious, has an excellent texture. That would be the role of the carrots. Thought I'd post a picture and description to see if we could brainstorm a recipe. 


CARROT RYE

Made with rye and wheat flours, rye kernels, carrots, seeds and covered with oats.


Moist without being gummy. One would think there's malt in it but isn't listed in the description. I would think that is all in the bake. More salty than your usual wheat breads but only compliments it and really makes lovely toast. 

idaveindy's picture
idaveindy

Biblical bread, Passover, feeding 5000, Last Supper.

This being the season of religiously connected bread (hot cross buns, Colomba/Pascua bread)... 

Interesting video on 6,000 years of bread history by Eric Pallant:

https://www.youtube.com/watch?v=vYqjBxQhe8o

40+ minutes long.  Goes back to Egyptians, Romans, etc.

At time mark 17:55,  it goes into bread in the Bible, with interesting parallels that I hadn't thought of before.

Here's the same link with a time-mark to go to the Bible connection:
https://www.youtube.com/watch?v=vYqjBxQhe8o&t=17m55s

The Bible snippet does seem a little bit misinterpreted because Passover bread (the Last Supper was a Passover meal) is unleavened, not sourdough.  But, whatever...

 -----------

And... links to Colomba Pasquale bread:
https://www.thefreshloaf.com/search/node/mwilson%20colomba

Enjoy!

Carrot-Cake-Guy's picture
Carrot-Cake-Guy

Lightly Used Ankarsrum 6230 in excellent condition

In April 2021 I purchased an Ankarsrum 6230 from Pleasant Hill Grain Company as pandemic gift for my wife. As my wife put it, "I tried to love it", but it just isn't for her. She prefers a conventional style mixer. For that reason I am putting it up for sale.

It has been used in the range of about 15-17 times over the past year, and only with the roller. The plastic "mixer" attachments have never been used.

As a result, it is in overall excellent condition. For anybody who is interested in buying it I can send several photos of the actual mixer/accessories, but meanwhile I attached a generic web photo of this model (it is the AKM 6230 JS - meaning it is in Jubilee Silver).

We still have the original box, so I can repack it into that box. Glad to answer any questions, but the essential story is that my wife makes lots of non-bread stuff (scones, muffins, cookies) and generally prefers using the conventional mixer for those to point where she thought it made sense to sell this to somebody who makes lots of bread.

As for the price -- I'm asking $500 given that it is only a year old and so lightly used.  Can ship anywhere in the USA or will drop the price for anybody who can pick-up locally in the Boston area.

Ilya Flyamer's picture
Ilya Flyamer

Rus Brot "yeastless" sourdough bread series

Last year Rus Brot posted a series of videos in an attempt to reproduce and demonstrate how bread was, or at least could have been baked, "in the old times" in Russian villages: https://youtu.be/meVg13NtnPw. "Yeast-less" refers to a fad in Russia about how using commercial yeast is bad for you, and sourdough bread is marketed as "yeast-less", which is of course absurd (and he's made fun of this multiple times on his channel). For a long time I couldn't be bothered to try following these instructions, except for using his proposed way of creating a liquid rye sourdough starter ("kvass"). That worked exceptionally well for me back in Moscow, to create a very strong starter within two days.

Now that I am sort of settled here in Basel and got all my equipment including the heating pad for temperature control, I finally decided to try and follow all instructions from the start (create a new starter again) and actually bake some bread with that technology. It did seem interesting: instead of maintaining the starter, a little portion of mature dough is dried by rubbing 1:1 with flour to preserve for a long time. Then this dry starter crumbs are used to inoculate a liquid starter "kvass", which is used for pre-dough and dough. And again a small portion of the dough is dried up for the future.

Unfortunately, for some reason, my attempt to make the starter here didn't work out, my suspicion is the water I used was too hot (normally for refreshing a starter this temperature would have been perfectly fine, but perhaps to start a new one it was too much). To be on the safe side in case actually it was the flour, when repeating I used rye schrot mixed with barley malt instead of whole rye flour, and some raisins, and then everything went perfectly.

Bread Nr 1

The first bread he recommends baking is 100% whole rye. Which I did. On the outside it looked great!

And it tasted nice too, just simple robust whole grain rye. But it had these weird cracks inside, I've never seen this before, very curious where it could have come from...

The bread was huge (from 1 kg flour), and quite dense, so best eaten in thin slices, so it's been three weeks and I still haven't finished it, since I am temporarily here on my own. While it's a bit dry on the outside under the crust now and hard to cut, inside it's still moist, and no signs of any mold are visible. Today toasted some small peaces in olive oil with salt, pepper and garlic powder, they were great as croutons in a salad.

Bread Nr 2

Now after almost three weeks of no bread baking I was bored and although I still haven't finished this bread, I decided to bake the next bread following his instructions. Dry dough is resuspended in warm water with flour and malt extract, and left to ferment for 20-24 hours at 25-26C. I mixed it in the morning before work, and when I came back home the starter was already bubbly and frothy - but not at all sour yet. So I just stirred it vigorously, and then once more before bed. Then it had a bit of acidity and more complex smell. In the morning about 23 hrs later it must have overfermented, because there were no bubbles at all! Must have consumed all the food and gone quiet.

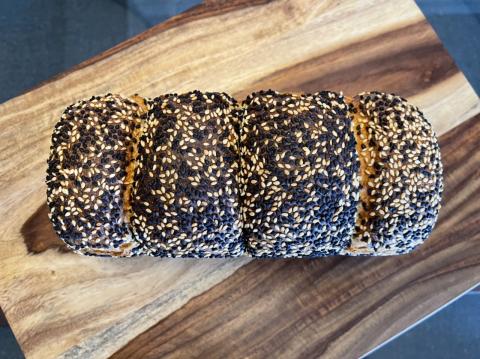
I assumed the yeast and bacteria were all still there, and just proceeded with the pre-dough (5.5 hrs at 28-29C - I gave it extra 30-40 min to account for the sleepy starter, and also I tend to like a touch more sour bread than his default recipes), and the final dough (1.5 hrs at 30C), shaping and final proof. Like in the video I used some high extraction wheat flour in this recipe (I used ~17% Ruchmehl, in place of his 15% grade 2 flour). The dough was very pleasant to work with, easy to shape and I had a good feeling about it - the only second thought I had was it didn't seem quite as airy as . I final proofed for 40-45 min above a tray of hot water, air temperature was around 35C. Then applied liquid dough, docked and baked - all just like in the video. Just this time I split the dough into to loaves, planning to give one away, so I don't end up eating it all again on my own for three weeks.

The loaves looked good, the only thing they had these back spots, which from experience I know show bubbles just under the crust. But what does the presence of these bubbles mean about the dough? I don't know.

Then net day (today) I cut into one of the loaves. And was greeted with this crumb:

Had it been a wheat bread, I would have assumed it was underfermented, with denser areas between large holes. But I've never seen anything like that in rye bread! Would one expect the same crumb structure defect from underfermentation? Or is that another issue? The crumb is not sticky, and not crumbly, can be cut with a serrated bread knife without leaving any marks on it. But the caverns are a clear issue... Tastes good - just like I remember simple mostly rye bread tasting in Russia. Nothing too special, just sturdy with a prominent taste.

Curious what other might think about the issues with these breads, and what could have caused cracks in the first bread, or caverns in the crumb in the second bread.

Pages