The Fresh Loaf

A Community of Amateur Bakers and Artisan Bread Enthusiasts.

Most bookmarked

CalBeachBaker's picture
CalBeachBaker

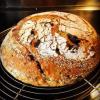
Rouge de Bourdeaux & White Whole Wheat Sourdough

Today's Bake

Rouge de Bourdeaux & White Whole Wheat Sourdough

Based on: Tartine - Book No. 3 by Chad Robertson - White-Wheat Blend (Ode to Bourdon)

I've become interested in milling my own flour but before I took the plunge I purchased some Rouge de Bourdeaux freshly ground flour from Barton Spring Mill (https://bartonspringsmill.com/products/copy-of-rouge-de-bordeaux) to check it out.

This is a dense mostly whole wheat bread that I am quite happy with and will put into my regular rotation.

Tasting Notes

Crumb - sour dairy with notes of plain yogurt

Crust - toasty with notes of nuts and malt

Grain Character - moderate with a slight taste of cooked oatmeal

Recipe and Process are below for those that are interested.

Rin's picture
Rin

Fresh Yeast

Does anyone have a recipe on how to make fresh yeast or what the ingredient list is on the packaging of fresh yeast includes? I have tried to make fresh yeast once, but the results failed and the amount was too much for my ability to use as a home baker.

breadmad's picture
breadmad

Advice for milling buckwheat and durum wheat?

Hi everyone, 

Half a year ago I finally pulled the trigger and got myself a Grainmaker 99 and have been happily milling wheat, spelt, rye and corn every week ever since. However I now want to try and branch out a bit and my eye fell on buckwheat and durum wheat. A while ago I found a 1kg bag of durum wheat in an international supermarket very cheaply and happily brought it home, but was kind of discouraged when I read somewhere that it might not be good to grind up and use as pasta flour? I read somewhere that there were some issues when it comes to grinding durum wheat (aside from being a really hard grain to grind) and was wondering if anyone could tell me more about it or could give me some advice or information about it? It's sometimes really hard to find information on specific grains when it comes to milling them.

The same thing goes for buckwheat. I love making buckwheat noodles and since I have a grainmill at my disposal I wanted to grind some buckwheat for this purpose. I found a website from a nearby farmer that sells unhulled buckwheat and would love to support it, however I don't know if it's ok to just grind up unhulled buckwheat or if I should rather opt for buckwheat that has been hulled? I can easily find small bags of the latter in the supermarkets, so it would be good to know which of the two would be best suited for my purpose. I would love to hear all your thoughts!


Grigio's picture
Grigio

Don't be a Bread Hostage

I've seen a few posts here regarding a King Arthur recipe detailed in Don't Be a Bread Hostage which was developed by Maura Brickland and then modified by Martin Philip.  I've used it successfully recently but am thinking of branching out to see how it could be further modified: mixing in black olives or longer time in the fridge.  I'd love to hear from others who have modified the recipe and any Do's or Don't's.  

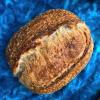
Above is one of four loaves I made last week using 750g APF, 200g Hard Red from Wildcraft and 50g WWF plus 750g water, 20g S and 100g starter.


Rivers Rising Bread's picture
Rivers Rising Bread

Garage Bakery, Anyone?

Hello all!

I am a cottage food baker in California, meaning I legally bake bread in my home kitchen and sell it at a local farmer's market. I am currently maxed-out on production...I'm baking 100-140 loaves at a time plus baguettes, cinnamon rolls, ciabatta, dinner rolls, english muffins, etc. Everything I bake is sourdough. Baking this much bread in my home kitchen and in my home oven plus 1 Rofco B40 is... a lot. I'm loving the baking but struggle with some of the logistics of doing without having a dedicated space just for baking.

This has my partner and I considering other options, including building out a two-car garage into a bakery. It was a machine shop until recently so has electrical capacity for ovens, fridges, etc., I'm told. We are rural so aren't burdened by zoning. From what I have gathered so far, big hurdles for a project like this are: electrical needs, installing a hood, plumbing, etc. I'd like to get a clearer picture and see if this is a realistic idea for us, so I'm looking for advice from other bakers who have built out their own space for a small bakery.

Has anyone here in California specifically gone through the process of converting a garage into a licensed bakery? If you have, I'd love to chat about unexpected costs, env health dept requirements you weren't expecting, or anything else you find relevant.

If you'd like to check out what I'm up to and see more of my bakes, see my website rivers-rising.com or follow me on instagram @riversrisingbread . 

Thanks so much for any help!

Kelsey, Rivers Rising Bread

Maria Morando's picture
Maria Morando

Adding Honey and olive oil to my sourdough

I have been recently adding a tablespoon of honey and a tablespoon of Olive oil to my sourdough bread. My starter is made up of bread flour, rye flour, and whole wheat flour. My bread has been fermenting faster and rising better in the oven since I started adding the honey and oil. I also add a teaspoon of diastatic barley malt. My total flour is 975 grams, including what is in the starter for two loaves of bread. But it is lately getting a little gummy in the middle. The flavor has improved and the fermentation has improved as well with the additions but I sometimes think I am adding a little too much honey and oil lately, since I really don't measure it. Is there a point where you can add too much honey? I love what these additions do for the bread, but can I take it too far with them. Should I leave out the malt? 

Thanhnguyen's picture
Thanhnguyen

Pasta madre

Sorry I'm not sure which forum topic this should be under. Also, I might not use the right terminologies so please correct me.
I have been maintaining two pasta madres. They both seem very healthy and strong. Both Ph are similar before and after conservation. Have not attempted Panettone yet.
Caputo Pasta madre, I feed with Caputo's Saccorosso (13% protein, W300/W320, P/L 0.50/0.60). She consistently gives me lots of beautiful elongated and opened holes (is that the right word ? or alveoli?). When I manage to get a bag of Agugiaro e Figna's Lievitati (14% protein, W400/410, P/L 0.50/0.60) from a local bakery that made amazing panettones I decided to make another pasta madre using that flour. Although Agugiaro pasta madre is also strong and healthy, it does not seem to be as big as the one I feed with Caputo's flour after storage. There are lots of alveoli but they are small and not as open.
I feed both the same. Twice a day, dry method, 6am at 1:1:0.4 at 27C, Ph 4.1, then night rest 1:1:0.4 at 17C, Ph range from 4.00 to 3.90.

These are my questions:

1. Does the size and shape of the alveoli of the pasta madre matter in making Panettone? Ideally, I don't want to keep two pasta madre. but which one should I keep?
2. I like the look of Pasta madre 1 with Caputo but Im not using caputo flour to make panettone, or can I? 

3. If I use the Caputo pasta madre to make panettone, but using Agugiaro's flour to make panettone, will it impact the end result? should the same flour be used in feeding the pasta madre and making panettone?

4. I have been feeding both twice a day for the last month or so without refreshments because I have not used them in production. I have not put them in long storage because I collect the discard and make sourdough and other baked goods with it and really like the results so I stopped using liquid starter. Does long conservation weaken the pasta madre? does it need to rest? should I do 3 refreshments every once a while even if i dont make panettone?

5. Im considering using Giorili's recipe, I studied it carefully, it said the first dough Ph needs to be 5.1 and triple in volume. What if the Ph is 5.1 and it's not tripled? do I wait? and what happens if i wait until it tripled but the Ph is below 5?

Thank you in advance

HeiHei29er's picture
HeiHei29er

Hiivaleipa with Sunflower and Pumpkin Seeds

This is my take on a Finnish bread.  I've changed it up quite a bit from the original, so I'm not sure I should even call it that anymore.  For the most part, the ingredients are true to the recipe.  However, this uses a 2-stage pre-ferment, a yeast water for leavening, and a mash.  The original is a straight dough yeasted recipe.

Levain 1
22.5g   Whole Rye Flour
22.5g   Barley Flour (I used fresh milled Hulled Barley)
56.3g   Yeast Water (recently refreshed and active)
1)   Combine ingredients and ferment at 78-80 deg F for approximately 12 hours or until flours are bubbly and doubled

Levain 2
90.0g    Bread Flour
25.2g    Water
1.6g      Sea Salt
1)   Combine ingredients with all of Levain 1 and lightly knead into a dough.  Ferment at 78-80 deg F until 2-3x in volume (6-8 hours)

Mash
22.5g    Cracked Rye or Rye Chops
22.5g    Barley Flour
22.5g    Toasted Sunflower Seeds
22.5g    Toasted Pumpkin Seeds
135.0g  Whole Milk
1)  Pre-heat Crockpot with 1-2" of water in it to 150 deg F using Inkbird Controller with probe in the water.  Cover the Crockpot with two large towels to insulate it.
2)  Combine dry ingredients in a bowl that has a tight cover
3)  Warm milk in the microwave to 165 deg F.  Keep it covered as much as possible to avoid evaporation.
4)  Pour hot milk over dry ingredients, stir until fully wetted, cover tightly and place in Crockpot.
5)  Allow ingredients to cook at 150 deg F for 3-8 hours (I went for about 6 hours overnight)
6)  Set the Inkbird temp to 180 deg F and let cook until mash temperature reaches 180 deg F (1.5-2 hours)
7)  Remove from Crockpot and let cool to room temperature
(Alternative:  Replace sunflower and pumpkin seeds with 1 tsp of crushed fennel seed)

Final Dough
135g   All Purpose Flour
135g   Bread Flour
56.3g  Yeast Water
109.8g Water
6.5g     Sea Salt
1)   Combine flours, yeast water, water, and Levain 2.  Mix until flours are wetted.  It will be on the dry side and stiff.  This is needed to accommodate the mash hydration.
2)   Fermentolyse 15-20 minutes
3)   Fold in salt and mash in 4-5 increments.  Thoroughly mix in the salt and mash using pinch and squeeze method.  Rest 10 minutes.
4)   Perform 4 sets of bowl kneading with 10 minute rests between sets.  Bassinage in additional water as needed to get a supple dough.
5)   Bulk ferment in an oiled bowl at 74-76 deg F.
6)   Fold every 45-60 minutes until dough is feeling puffy.  Allow the dough to bulk 80-100%.
7)   Pre-shape and rest for 20-30 minutes
8)   Gently shape and perform final proof at 78-80 deg F until jiggly and roughly doubled.
9)   Pre-heat to 465 deg F; Bake in steaming oven for 1 minute at 465 deg F; 19 minutes at 425 deg F; vent oven; 20-25 minutes at 425 deg F or until a hollow thump

I made both the fennel and seeded versions for this bake.  I wasn't able to get a crumb shot for either, but the fennel loaf was what you would expect for a loaf with 20% low gluten flour.  Reasonably airy with an evenly distributed crumb and no large open areas.

Benito's picture
Benito

Kamut Semolina Sourdough Hokkaido Milk Bread

I ran out of bread, hard to believe since I’m semi retired with more time to bake, but it happened.  I found a bit of whole kamut in the back of the closet so that gave me the idea of combining it with some semola rimacinata (semolina) since they are related and both have a great yellow colour.  I decided to try doing a cold retard after shaping.  I’ve never done this with a milk bread that I can recall.  This is the reason for the blisters on the crust, which for this type of bread I’m not a huge fan of.  The bread ended up being super soft and fluffy with a gorgeous yellow crumb and buttery crisp crust.  Really perfect for sandwiches which is what we did with the first slices for dinner tonight.

For 1 9x4x4” Pullman pan


Instructions

Levain

Mix the levain ingredients in a jar or pyrex container with space for at least 300% growth. 

Press down with your knuckles or silicone spatula to create a uniform surface and to push out air.

At a temperature of 76-78ºF, it typically takes up to 10-12 hours for this sweet stiff levain to be at peak.  For my starter I typically see 3-3.5 times increase in size at peak.  The levain will smell sweet with only a mild tang.

Tangzhong 

In a sauce pan set on medium heat, stir the milk and Whole Kamut flour until blended. Then cook for several minutes until well thickened, stirring regularly with a spoon or heat-resistant spatula. Let cool in the pan or, for faster results, in a new bowl.  Theoretically it should reach 65ºC (149ºF) but I don’t find I need to measure the temperature as the tangzhong gelatinizes at this temperature.  You can prepare this the night before and refrigerate it, ensure that it is covered to prevent it from drying out.


If you plan on using a stand mixer to mix this dough, set up a Bain Marie and use your stand mixer’s bowl to prepare the tangzhong.


Dough

In the bowl of a stand mixer, add the milk (consider holding back 10 g of milk and adding later if this is the first time you’re making this), egg, tangzhong, salt, sugar and levain.  Mix and then break up the levain into many smaller pieces.  Next add the flours.  I like to use my spatula to mix until there aren’t many dry areas.  Allow the flour to hydrate (fermentolyse) for 20-30 minutes.  Mix on low speed and then medium speed until moderate gluten development this may take 5-10 mins.  You may want to scrape the sides of the bowl during the first 5 minutes of mixing.  Next add room temperature butter one pat at a time.  The dough may come apart, be patient, continue to mix until it comes together before adding in more butter.  Once all the butter has been added and incorporated increase the speed gradually to medium. Mix at medium speed until the gluten is well developed, approximately 10 mins.  You will want to check gluten development by windowpane during this time and stop mixing when you get a good windowpane.  


On the counter, shape the dough into a tight ball, cover in the bowl and ferment for 2 - 3 hours at 82ºF.  There should be some rise visible at this stage.


You can next place the dough into the fridge to chill the dough for about 1.5 hours, this makes rolling the dough easier to shape.  Remember, if you do so the final proof will take longer.  Alternatively, you can do a cold retard in the fridge overnight, however, you may find that this increases the tang in your bread.


Prepare your pans by greasing them with butter or line with parchment paper.  


Lightly oil the countertop and your scraper. Scrape the dough out onto the oiled clean counter top and divide it into four. I like to weigh them to have equal sized lobes. Shape each tightly into a boule, allow to rest 5 mins. Using a lightly oiled rolling pin and hands, 4roll and each ball out and then letterfold. Turn 90* and using a rolling pin roll each out to at least 8”. Letterfold again from the sides so you have a long narrow dough. Then using a rolling pin, roll flatter but keeping the dough relatively narrow.  The reason to do this extra letterfold is that the shorter fatter rolls when placed in the pan will not touch the sides of the pan.  This allows the swirled ends to rise during final proof, this is only done for appearance sake and is not necessary.  Next roll each into a tight roll with some tension. Arrange the rolls of dough inside your lined pan alternating the direction of the swirls. This should allow a greater rise during proof and in the oven.


Cover and let proof for  4-6 hours at a warm temperature.  I proof at 82°F.  You will need longer than 4-6 hours if you chilled your dough for shaping. I proof until the top of the dough comes to within 1 cm of the top edge of the pan.


Preheat the oven to 350F and brush the dough with the egg-milk wash.  Just prior to baking brush with the egg-milk wash again.


Bake the loaves for 50 minutes or until the internal temperature is at least 190ºF, rotating as needed to get even browning. Shield your loaf if it gets brown early in the baking process. After 50 mins remove the bread from the pan and bake a further 10 mins by placing the loaf directly in the oven on the rack with the oven turned down to 325ºF. You can brush the top of the loaf with butter if you wish at this point while the bread is still hot to keep the top crust soft.

My index of bakes.


Sid Post's picture
Sid Post

Bread for hiking/camping using a steamer?

I camp and hike a lot and would like some biscuits and bread occasionally.  I can steam with some of my Titanium cookware and wonder if that would be an option for some biscuits or breads on the trail.

I am pretty flexible on the specific bread or biscuit type as long as it is reasonably easy to make from a backpack.  Quick yeast breads?  Or, only yeast in the mornings after a long night?  Biscuits with baking powder?  Or anything similar ...

TIA, Sid

Pages