The Fresh Loaf

A Community of Amateur Bakers and Artisan Bread Enthusiasts.

Most bookmarked

louiscohen's picture
louiscohen

Rye Miche - "Bread" 3rd edition

I baked the Rye Miche from "Bread"  3rd edition.  100% rye, half whole rye, half medium

Rye Miche Photos

It's nothing if not hearty with a tight but not super-dense crumb. I like the flavor with smoked fish, cheese, and veg spreads. 

At the start of the sourdough rye chapter, Hamelman writes, "For small home-sized batches, increasing the percentage of mature culture in the sourdough build (by 25 to 50% or so [compared with the percentage for large commercial batches]) may be a good way to improve the ripening of the final dough, especially if there is no commercial yeast in the formula"

I forgot to try this, and just divided the metric quantities by 10 for a 1.6kg finished loaf. I've noticed a mass effect before with commercial yeast and especially sourdough before. I wonder if the additional culture would result in more volume and/or a more open crumb as well as speeding up the bulk fermentation and proofing. My dough pretty much followed the timings in the formula but I used warmer temps - 75℉ for the sourdough and 85℉ for bulk and proofing. My San Diego whole rye culture likes warmer temps.

Rye Miche Formula

Isand66's picture
Isand66

Guinness Harvest Grain SD Porridge Bread


    I have not baked a porridge bread in a while and it was time to try a new one. I love the malty flavor adding Guinness to bread imparts. I decided to use some of the Harvest Grain mix I had purchased during my last trip to King Arthur Flour in Vermont.  It’s a mix of whole oat berries, millet, rye flakes, and wheat flakes and four seeds (flax, poppy, sesame, and sunflower).

I made the porridge with the Harvest Grain mix and added some yogurt in place of some of the water to add some additional creaminess to the dough.

I used some KAF bread flour and some fresh milled and high extraction whole wheat and green corn flour.

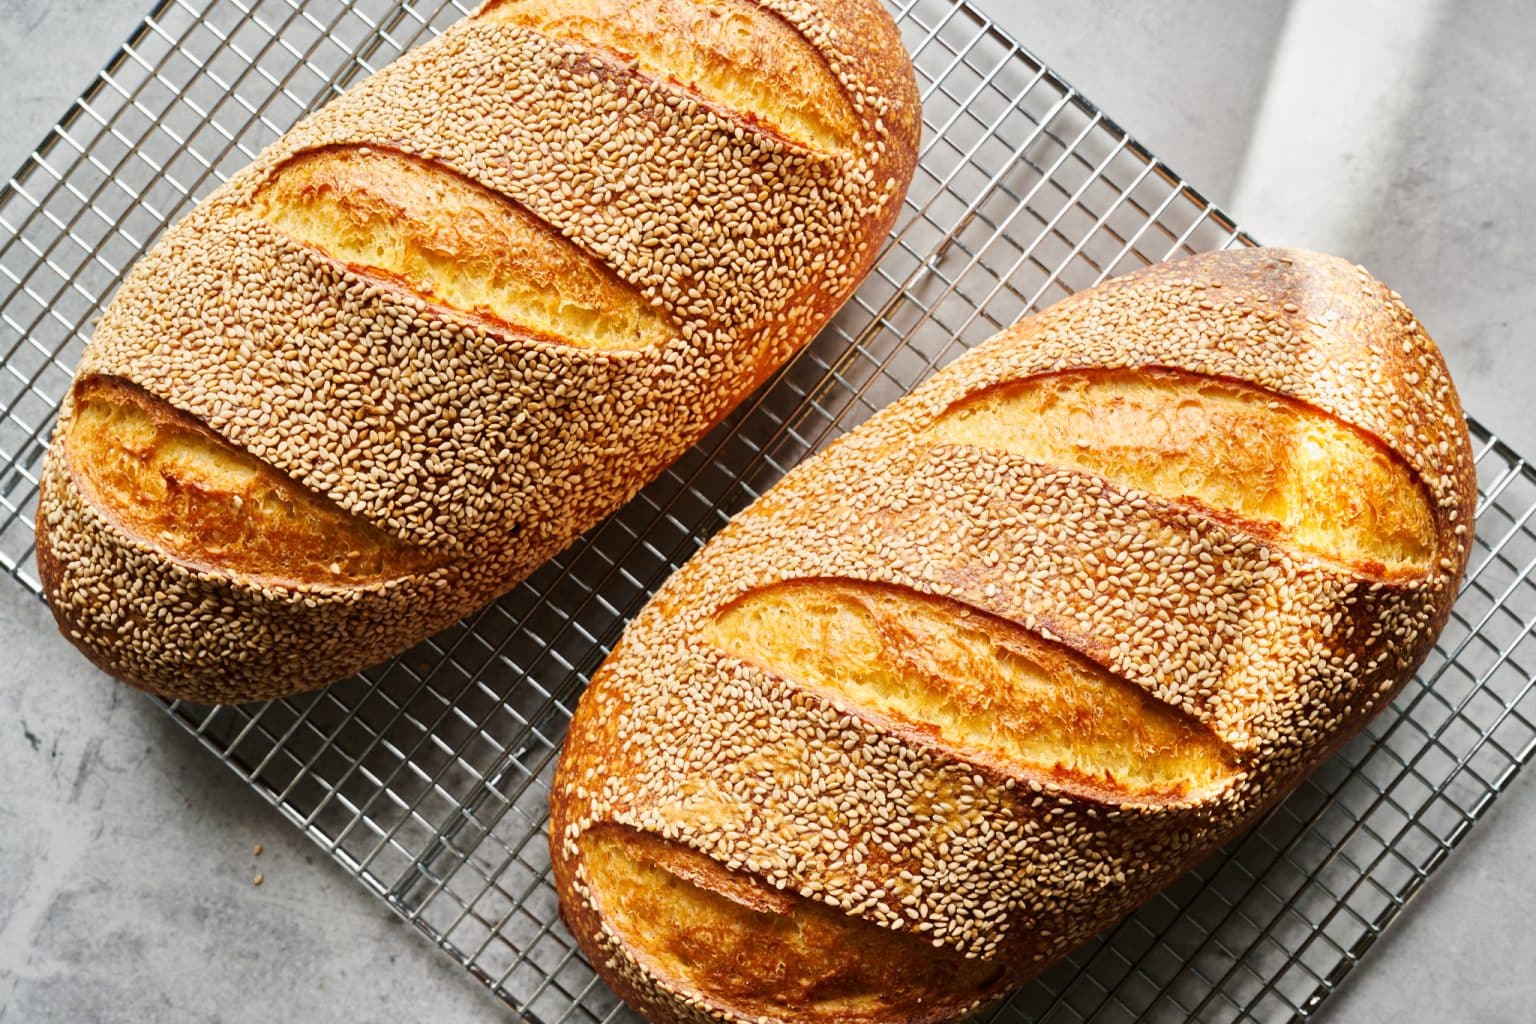
I was quite please with the final bread.  It had a nice malty flavor with a moist and crunchy crumb from the porridge.


Levain Directions

Mix all the levain ingredients together  for about 1 minute and cover with plastic wrap.  Let it sit at room temperature for around 7-8 hours or until the starter has doubled.  You can use it immediately in the final dough or let it sit in your refrigerator overnight.

Porridge Directions

Add about 3/4’s of the water called for in the porridge to the dry ingredients in a small pot set to low and stir constantly until all the liquid is absorbed.  Add the remainder of the water and the yogurt  and keep stirring until you have a nice creamy and soft porridge.  Remove from the heat and let it come to room temperature before adding to the dough.  I put mine in the refrigerator and let it cool quicker.

 Main Dough Procedure

Mix the flours  and the Guinness for about 1 minute.  Let the rough dough sit for about 20 minutes to an hour.  Next add the levain, cooled porridge, and salt and mix on low for 4minutes.  (Note: If you are using the Ankarsrum mixer like I do, add your Guinness to the bowl first then add in the flours).  After your autolyse add in the salt, remaining water and mix on low to medium low for 15-20 minutes.  Remove the dough from your bowl and place it in a lightly oiled bowl or work surface and do several stretch and folds.  Let it rest covered for 10-15 minutes and then do another stretch and fold.  Let it rest another 10-15 minutes and do one additional stretch and fold.  After a total of 2 hours place your covered bowl in the refrigerator and let it rest for 12 to 24 hours.  (Since I used my proofer I only let the dough sit out for 1.5 hours before refrigerating).

When you are ready to bake remove the bowl from the refrigerator and let it set out at room temperature still covered for 1.5 to 2 hours.  Remove the dough and shape as desired.

The dough will take 1.5 to 2 hours depending on your room temperature and will only rise about 1/3 it’s size at most.  Let the dough dictate when it is read to bake not the clock.

Around 45 minutes before ready to bake, pre-heat your oven to 545 degrees F. and prepare it for steam.  I have a heavy-duty baking pan on the bottom rack of my oven with 1 baking stone on above the pan and one on the top shelf.  I pour 1 cup of boiling water in the pan right after I place the dough in the oven.

Right before you are ready to put them in the oven, score as desired and then add 1 cup of boiling water to your steam pan or follow your own steam procedure.

Lower the temperature to 450 degrees.  Bake for 35-50 minutes until the crust is nice and brown and the internal temperature of the bread is 205 degrees.

Take the bread out of the oven when done and let it cool on a bakers rack for at least 2 hours before eating.

altafkw's picture
altafkw

Rugbrød

Last summer i visited Scandinivia, and it was an chance to explore nordic breads.

And the most common daily bread was Rugbrød the famous danish rye bread. 

It's a healthy nutritious bread, rich in protein and dietary fiber.

And Buttered rugbrød is essentially the base for Danish open sandwich smørrebrød.

when i went back home, i started reading and watching tutorials to learn how to bake it.

So i tried the rye starter recipe but the outcome didn't meet my expectations, a strong un desirable sour taste. And i kept searching until i found a hybrid version of global baker Dean Brettscneider in his BREAD cookbook. It consist of both sourdough and dried yeast, rye and bread flour with a touch of coco powder and carrots.

Truly, i liked it!

BURNETTdl's picture
BURNETTdl

Begging for croissant help

My croissants are dense and do not have a full honeycomb. I'm on my 50+ try over the last 6 years and have made every mistake possible.

 I'm using 82% butter fat and king Arthur's flour and rolling by hand.

Just after a envelope and book fold it's almost impossible to roll out without hours of resting. Also the butter layers seem to merge somewhat just with these folds, i can't tell. I couldn't imagine trying to fold it any more by hand.

 Also my edges crack a bit on the last fold and when I fold in half to rest on the second or third fold it cracks in the middle where it's folded damaging the outer layers.

My recipe use 450g flour, 280ml milk and 55g sugar, 11g instant yeast, 12g salt, 40g butter.

I mixed the initial dough until i could stretch the dough so it was transparent thinking that would solve my problem but it was so hard to roll out after the first fold.

They are rising now. I have them in the oven around 76 degrees with bowls of water and towels at the bottom. I figure I'm going to let it go for 4 hours before i cook them.


Everyone i see rolls out the dough so easy, I just don't know what I'm doing wrong. Initially the recipe called for 500g flour so I cut it back to 450 thinking maybe there was too much flour yet it's the same problem every time.

I don't leave it on the counter for more than two minutes and put even pressure on the dough when rolling out and do not press hard.


BURNETTdl's pictureBURNETTdlFeb 13 2023 - 3:52pm


Also my edges crack a bit and when I fold in half too rest on the third fold it cracks in the middle where it's folded damaging the outer layers.

I use a similar recipe but with 450g flour, 280ml milk and 55g sugar

CrustyJohn's picture
CrustyJohn

Polenta Loaf

Basically a second go-round with my loaf earlier this year except that I was lazy with the polenta- instead of doing the whole saccharification process, I just microwaved it.  

King Arthur bread flour- 360g (80%)

Bob's Red Mill whole wheat flour- 90g (20%)

water- 340g (75%)

starter- 50g (11%)

-------------

salt- ~3 tsp

-------------

45g Cateto Orange polenta from Redtail Grains

150g water

tbsp Rag & Frass Farm cane syrup

~~~~~~~~~~~~~~~~

Mix starter & water, add flours, mix until incorporated, "autolyse" 1 hr. (~65 deg.)

Stretch and fold + "lamination" folds over next 3 hours

incorporate cooked polenta about midway through stretch and fold process

bulk ferment ~8.5-9 hours @ ~65-67 deg.

pre-shap, shape, retard for ~11 hrs. @ ~40s? deg. 

Bake (use pre-heated pizza stone and overturned dutch oven) 22 min @ "500" (I think the oven runs about 25 degrees low, so the real temp might be more like 475), uncover, bake another 10 min. drop temperature to 450 for 20 min., turn off oven and let bread cool on rack in hot oven.


I really like this one.  I'm really enjoying using the pizza stone to bake on as it allows the loaf to spread a bit more organically than when I bake in a small dutch oven.  It's also avoids handling the dough after turning it out of the proofing basket.  I think this is up there with some of my favorite loaves I've baked.  I really like the deeply browned crust contrasting with the really soft, sweet polenta-enriched crumb.  The polenta was a little blob-y rather than smooth and creamy, but cooking it in the microwave was really quick and easy.  


Any though on why the left side of the loaf seems to be a bit more consistently open than the right?  Shaping?

BCbreadbaker's picture
BCbreadbaker

Sourdough english muffins-first attempt!

I used King Arthur's recipe here, and they turned out pretty decent I think! They were a tad undercooked inside, and I don't have one of those metal rings to help shape them, so I just free-formed it. But even though they were kind of oblong, they were super delicious! I have sliced and frozen a bunch too and am excited to be able to pull them out of the freezer, so much tastier than those from the grocery store. If anyone has any other sourdough english muffin recipes they have tried and like, I'd be keen to hear ;) 


Yrivergirl's picture
Yrivergirl

New TARTINE SD Bread Baker

1.  I'm maintaining a 60% Hydration Starter.  I Accidentally FED my starter 50g of warm water & 60 g of each of the flours, ...INSTEAD of 25 g water & 25g of both flours.  What should I expect?  Will it need feeding in the same 24-48 hr time frame, or will it not need feeding for 24 hrs longer?  Or?

2.  My Stretch & Pull is very thick & stiff to handle.  Is this normal?  I've only done 2 stretch/pulls & I am lifting it out of the bowl trying to stretch it with Both Hands!  Is this normal?

3.  Can I use a pyrex baking dish for baking?  I don't have a small cast iron enameled dutch oven, ...yet.  What would the outcome be?  Downsides?


PLEASE 🙏 ADVISE.


Yrivergirl's picture
Yrivergirl

Stretch & Pull SD

  • 2 ND question..., I've done my 2nd stretch & pull.  The dough seems "tough/thick" & difficult to stretch already!  I'm lifting it up trying to stretch it!  I have 5 more to go!  What am I doing wrong?  I can imagine how hard it's going to get?

I've weighed everything correctly.  I dispersed very well.  I mixed the salt with the warm water b4 adding & mixing well.  I'm not sure where I went wrong?  

Unless EVERYTHING is really ok?

Abe's picture
Abe

Pane Siciliano (Semolina and Sesame Sourdough Bread)

If you are subscribed to The Perfect Loaf's newsletter this recipe should have landed in your in-box. For those of you who are not, thought I'd post it here. Durum flour breads are very popular on this site for good reason. Then add in some olive oil plus sesame seeds and you have the trifecta. 

Thank you Maurizio. 

misha's picture
misha

Sourdough low innoculation recipe tradeoffs

Hi all - love this forum and just joined after reading it for many months. I've read through Debra Wing's posts that I could find and a majority of others and it's been super informative to learn the microbiology of sourdough fermentation. 

I noticed in the past year or two there have been a few recipes posted by what I consider respectable folks where instead of using an active/strong starter, you just stick yours in the fridge once it's rising/peaked and then use it within the next week right out of the fridge at a low innoculation %. These recipes are marketed as "same great loaf with less fuss!" and basically the idea is you don't have to maintain a daily starter feeding and the only downside of this method is a longer fermentation time. 

https://www.kingarthurbaking.com/blog/2022/05/17/how-to-bake-sourdough-bread-without-feeding-starter-first this one is 4% innoculation
https://newsletter.wordloaf.org/p/thursday-recipe-the-loaf?s=r 6% innoculation

My understanding is this: 

Once you inoculate your flour, fermentation is a race between yeast and bacteria. So having a "strong" starter gives the yeast get enough of a head start such that the bacteria don't get ahead and make the dough too acidic for the yeast to achieve maximum peak.

In other words (and I'm totally making up numbers assuming a 1:100 ratio of yeast to LAB cells)

If you do a 20% inoculation, for a weak starter you might come in with 5 yeast microbes and 1k LABs. Strong starter you could be, let's say, at 20 yeast vs. 10k LABs. So with the weak one, the ratio of LABs:yeast is way higher and thus the LABs reproduce/generate acid at a faster rate and don't give the yeast a chance to hit max peak, assuming constant temp, let's say 80F. 

So if you're doing a 5% inoculation, isn't it the same concept but it just takes longer for the same things to play out? Meaning, ok maybe you're starting out with 1 yeast and 200 LABs (weak) vs. 4 yeast + 200 LABs (strong). But assuming same flour, same temp, it will take longer but the LABs still have the same *relative* head start as the 20%? 

Another way of asking my question: when it comes to maximizing oven spring, is there really no trade-off besides the fermentation time when we're talking about something like a 5% unfed inoculation out of the fridge vs a 20% strong daily fed starter? It just seems too good to be true, at least for a home baker that's not concerned with fermentation timing as much. 

Thanks in advance for input. 

Pages