Close friends of our send us rhubarb every spring so I wanted to make something to bring them when we were visiting last weekend. I came up with a sweet bun with a sour cherry and rhubarb filling along with a lemon icing. They turned out quite well.
Filling (this wasn’t enough, make another 50%)
2 cups/216 g chopped rhubarb, fresh or frozen, in 1-inch pieces
171 g or 6 oz. fresh or frozen sweet cherries, pitted
½ cup/81 g granulated sugar
1 to 2 tsp. lemon juice
¼ tsp almond extract
Pinch salt
1 tsp. pure vanilla extract
1. In a medium saucepan over medium heat, combine the rhubarb, cherries, granulated sugar, almond extract, lemon juice, and the salt, then simmer, stirring often, until the cherries have broken down and the jam is thick enough to coat a wooden spoon, 20 to 30 minutes.
2. Remove the pan from the heat, stir in the ½ tsp. vanilla, and allow to cool to room temperature. Taste the jam. If it is a little flat, you can add more lemon juice, ½ tsp. at a time, to brighten the flavor.
Icing.
Lemon juice 1 tbsp (adjust to get the thickness of the icing as you wish)
¼ tsp vanilla
¾ cup (90g) confectioners’ sugar
Instructions
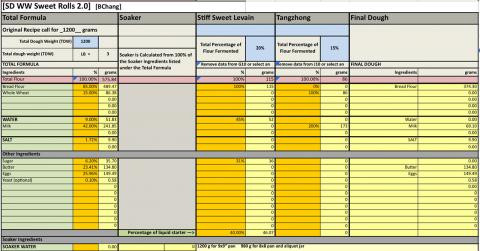
Levain
Mix the levain ingredients in a jar or pyrex container with space for at least 300% growth.
Press down with your knuckles or silicone spatula to create a uniform surface and to push out air.
At a temperature of 76ºF, it typically takes up to 10-12 hours for this sweet stiff levain to be at peak. For my starter I typically see 3-3.5 times increase in size at peak. The levain will smell sweet with only a mild tang.
Tangzhong
In a sauce pan set on medium heat, stir the milk and flour until blended. Then cook for several minutes until well thickened, stirring regularly with a spoon or heat-resistant spatula. Let cool in the pan or, for faster results, in a new bowl. Theoretically it should reach 65ºC (149ºF) but I don’t find I need to measure the temperature as the tangzhong gelatinizes at this temperature. You can prepare this the night before and refrigerate it, ensure that it is covered to prevent it from drying out.
If you plan on using a stand mixer to mix this dough, set up a Bain Marie and use your stand mixer’s bowl to prepare the tangzhong.
Dough
In the bowl of a stand mixer, add the milk (consider holding back 10 g of milk and adding later if this is the first time you’re making this), egg, tangzhong, salt, sugar and levain. Mix and then break up the levain into many smaller pieces. Next add the flours. I like to use my spatula to mix until there aren’t many dry areas. Allow the flour to hydrate (fermentolyse) for 20-30 minutes. Mix on low speed and then medium speed until moderate gluten development this may take 5-10 mins. You may want to scrape the sides of the bowl during the first 5 minutes of mixing. Next add room temperature butter one pat at a time. The dough may come apart, be patient, continue to mix until it comes together before adding in more butter. Once all the butter has been added and incorporated increase the speed gradually to medium. Mix at medium speed until the gluten is well developed, approximately 10 mins. You will want to check gluten development by windowpane during this time and stop mixing when you get a good windowpane. You should be able to pull a good windowpane, not quite as good as a white flour because the bran will interrupt the windowpane somewhat. Next add the zest of two oranges, that way they do not interfere with the gluten development. Mix until they are well incorporated in the dough.
On the counter, shape the dough into a tight ball, cover in the bowl and ferment for 2-4 hours at 82ºF. There will be some rise visible at this stage.
Optional cold retard overnight or just 1.5 hours to chill the dough for easier shaping.
Prepare your pan by greasing it or line with parchment paper.
This dough is very soft. Act quickly to roll, spread the filling, and cut before the dough warms and softens further. If it begins to soften, place it in the fridge to firm.
Remove your bulk fermentation container from the fridge, lightly flour your work surface in a large rectangle shape, and the top of the dough in the bowl. Then, gently scrape out the dough to the center of your floured rectangle. Lightly dust the top of the dough with flour, and using a rolling pin, roll the dough out to a 15″ x 15″ square or larger rectangle.
Brush melted butter on rolled dough. Then spread warmed sour cherry rhubarb jam onto the dough, then sprinkle flour on top. The flour will help absorb any water drawn out of the dough by the sugar in the yuzu tea.
Starting at one of the long sides of the rectangle in front of you, begin rolling up the dough as you move across. Be sure to tightly roll the dough by gently tugging on the dough as you roll.
Once finished rolling up the dough, divide it into nine 1 1/2″ pieces using a sharp knife. Transfer the pieces to the prepared baking pan and cover with a large, reusable bag, place in a warm spot. I use my proofing box set to 82°F. Final proof may take 3-6 hours, be patient and wait until the dough passes the finger poke test. Using my aliquot jar the dough should reach a total rise of 120-130%.
Be sure to start preheating your oven about 30 minutes before you feel the rolls will be fully proofed. For me, the final warm proof time was about 3 hours at 77°F (25°C).
Bake
Preheat your oven, with a rack in the middle, to 400°F (200°C). After the warm proof, uncover your dough and gently press the tops of a few rolls. The fully proofed rolls will look very soft. The texture of the dough will be almost like a whipped mousse. Be sure to give them extra time in warm proof if necessary. If the dough needs more time to proof, cover the pan and give the dough another 15 to 30 minutes at a warm temperature and check again.
Once your oven is preheated, remove your pan from its bag, slide it into the oven, and bake for 30 to 35 minutes rotating partway through.
The rolls are finished baking when the tops are well-colored and the internal temperature is around 195°F (90°C). Remove the rolls from the oven and let the rolls cool for 5 to 10 minutes in the pan.
Once fully cooled drizzle the icing onto the rolls.
These are best the day they're made, and certainly fresh from the oven, but can be reheated in a warm oven a day or two after.
My index of bakes.