The Fresh Loaf

A Community of Amateur Bakers and Artisan Bread Enthusiasts.

Most bookmarked

martino's picture
martino

Translating: Kitchen Aid to Ankarsrum

Preamble: 

Bought an Ankarsrum a while back.

I’m using the roller and scraper, adding water first, etc. I’m pretty happy with it.

Some of the breads I’ve made have been really fine. 

But some—notably enriched breads, like dinner rolls—have been tough. And that only sometimes. Thanksgiving rolls were maybe the best I’ve ever made. Christmas—same recipe—tough.

I made the (sourdough) dinner rolls from THE PERFECT LOAF the other day. The rise was beautiful, and the rolls are too. But they’re so, so dense. They taste wonderful; they’re just dense.

That recipe of course gives guidelines for mixing with a Kitchen Aid or similar. So I had to wing it. I went with about 6 o’clock for 10-12 minutes, I think.

I then shaped as you would a pizza dough ball and baked.

Am I mixing too long/too fast/toohard?

Or is it all in the shaping?

Is there somewhere a conversion guide from KA-Ank? Such a thing sure would be helpful. 

Integralista's picture
Integralista

Questions about bread machine belt replacement

I have a bread machine, make Unold, model 68511 "Backmeister". I suspect, but am not certain, this is in fact a re-branded Zojirushi BBCC-V20 "Home Bakery Traditional". Zojirushi doesn't sell in the EU.

The machine is broken. I had to buy a 3mm three-wing screw-driver (like a Phillips screwdriver, but with only three wings, just like the Mercedes star) to unscrew the two screws that are on the bottom only to make our life more difficult, and after unscrewing the four rubber "supports", which are kept by normal Phillips screws, and taking away the bottom, I had access to the gear box. Overall, and if we except the three-wings screws, the machine is very easy to open to have access to the gear.

This machine has two paddles. As it is usual, the paddle on the right, near the motor and the keyboard, takes the motion from the motor. Coaxial to the gear of the right paddle is another gear, and this gives the motion to the left paddle.
The picture shows the opened bottom of the bread machine, the left side of the machine is on the left side of the picture.

I removed both gears with a 8mm wrench. I got rid of the remnants of the two belts, which decomposed in some twine and some goo. They were easy to get rid of, but I still have to clean well the goo in the grooves of the left gear.

I found online some replacements belts, which cost €17 the large belt, and €16 the small belt, and are sold for this specific model.
So far, so good, the machine appears to be repairable.

My questions are:

a) Are the transmission belts "standard" for bread machine in general, or is it really adviceable to buy specific belts for the specific model?

The larger gear is marked: XBM638-T5 >PA66+30%GF< 2
The smaller gear is marked: XBM638-T4  >PA66+30%GF< 2

What do these numbers mean exactly? Can I use them to buy the belts at a generic hardware store?

b) If by visual inspection the teeth on the gears appear OK, should I reuse the same gears, or does it make sense to always change the gear together with the belts (I ask just for doubt's sake).

c) Is there a nice and practical way to eliminate the goo? It seems something like melted rubber. I think I am trying with softening it with some hot water and then cleaning with a toothpick.

OK, these are the questions. My main motive in any case was to make the future forum readers with the same problem aware that opening an Unold 68511 Backmeister is not big fuss and repairing it should be fairly easy, but maybe there are cheaper options. This might also apply to Zojirushi BBCC-V20.

jo_en's picture
jo_en

rusbrot's Thermophi-SD Starter w/Zoji BM

It takes only 55 g of rusbrot's Thermophilic-SD starter to produce a 100% whole grain (freshly milled)  loaf of bread based on 500 g of flour. Note that the suggested amount is 100-120 gr of starter.

The bread pan is WINCO's square steamer (7x6.5x3.875 in3). It fits perfectly in the Zojirushi. (Ending Dough Temp-205F)

Making a loaf takes only 4.5 hr from assembling ingredients and milling to a loaf out of the Zoji! This loaf includes solod that is scalded and cooled prior to mixing the main dough.

The slices will be nice and wide- perfect for those who love to cut a sandwich in half before eating it. :)

The foodgeek recipe is here.  (The 12 gr of AP flour due to a mistake in my water measurement; the old dough ball is optional- I just had a leftover piece).

Thermophilic Sourdough Starter (400% hydration) takes only 24 hr.

In a jar, mix

40 gr  crushed diastatic rye malt (I mill the whole rye malt berries from a hobbyist brew supplier)

10-15  gr of solod (fermented red rye malt; get the real thing!)

200 g water (60C)

Hold this in a water bath at 50-53C for 24-30H. 

You don't have to put plastic film over the surface as the YT shows. Just shake the contents of the bottle every few hours.

(1/17/24  Edit-   Note comments below on size of jar- choose a jar with limited airspace above solution surface  or use the  plastic film as suggested in the YT. The mixture did not overflow the jar over the 24-30 h process.)

See it done here.


The Roadside Pie King's picture
The Roadside Pi...

Gaging bulk fermentation/ dough strength continued. The aliquot method.

Advanced sourdough baking techniques.

Until now I haven't had the inclination to move from the "grandma method" to more precise and advanced techniques. First let's look at the simple everyday grandma method. Why has this method stood the test of time, and to this day is able to produce excellent results? From my vantage point, consistency is the key. Using the same formula (recipe) under the same conditions day in and day out account for the success. 

Before I delve into the advantages of the more scientific aliquot method. I want to learn exactly what the "aliquot method" is. My extensive research (eye roll) trace the invention of the aliquot method Kristen of Full proof baking. The tutorial on the implementation, and use of the method come from a post at Breadtopia authored by our own Benny. Benny's background in scientific methods and meticulous attention to detail are evidence by his consistency in results. Who better to learn from but the best?

What is an aliquot anyway? 

The simple definition, appropriate for this discussion is:

Aliquot - a portion of a larger whole taken as a sample.

What are the advantages of using an aliquot sample to judge bulk fermentation (% rise) and even the final proof if so desired?

Precisely measuring the aliquot sample using a graduated vessel and a digital scale allow us to gage the % volume increase with great accuracy and ease. Having this very important information at our fingertips enable us to make small changes in timing or temperature to achieve greater control on the finished product. 

What are some of the limitations of using the aliquot jar method?

A. The small sample will change temperature according to ambient room temperature much faster than the larger mass of the whole. 

B. Higher hydration doughs are better suited to produce accurate results.

For today's hands-on laboratory exercise I will be using the same 100% AP flour 72% hydration sourdough formula that I see used in part one of gaging bulk fermentation section.

Aim: 

1. To gain prophecy in the use of the aliquot jar method

2. To examine and understand the effects of more or less % volume increase 

3. To use the precise % volume increase information to manipulate the consistency of the final product in a consistent and replicable manor. 


monroe_girls's picture
monroe_girls

Bread shape

First time, making a loaf of bread in my zojirushi…. The bread looks good, smells delicious, and seems to be a great texture, however, with the double paddles in the machine, it seems to keep it separated and almost make two loaves connected to each other. How do I make it look like one big loaf? 

WatertownNewbie's picture
WatertownNewbie

Lithuanian Bread

A year or so ago, Troy (aka HeiHei29er) posted a recipe for a Lithuanian bread.  At the time I baked it a few times, but it had been awhile, and I felt that a revisit was needed.  Besides, we have some neighbors down the street from Lithuania, and I wanted to bake them a loaf (but after baking one for my wife and me to reacquaint myself with the recipe).

A simple preferment (starter, rye flour, and water) sits overnight, and a scald the next morning combines several of the ingredients (red rye malt, rye flour, caraway seed, ground coriander, blackstrap molasses, and water) that give the bread its distinctive flavor.  The final dough contains the preferment and scald along with more rye flour, some whole wheat flour, a little salt, some honey, and water.

After mixing, a bulk fermentation, and a final proofing in a loaf pan, the bread baked for 45 minutes at 465F.  Here is a top view of the loaf.

The crumb is somewhat dense, but very soft and easily chewable.  The flavor is impeccable.

If anyone wants the full recipe, please simply ask.  I found a Brod & Taylor proofing box helpful for maintaining a constant temperature during the stages. and I lined the loaf pan with parchment paper after learning the hard way that this dough wants to stick to the sides.

Happy baking.

Ted

Mangia Pane's picture
Mangia Pane

VWG - Works Wonderfully, Most of the Time

Hello fellow bakers!

For the past year, I have had really good luck with the addition of vital wheat gluten (VWG) to my whole spelt flour bread dough. Today, I found the batch came out with a hard crust which I guess means there was too much VWG added. Whcih is odd because I do not recall using that much more than usual but the loaves are rather like rocks. I use about one tablespoon for every two cups of spelt flour. I don’t think I measured incorrectly this time but it is possible I guess.  Proper proportions are important to get it just right. Another factor beyond my control is the finicky spelt flour which can have wildly different levels of gluten content depending on the batch. Have any of you had experience with VWG and what would you reccommend. Any comment would be most appreciated. Thank you!

fitzgen's picture
fitzgen

Onion-Cheese-Curry Sourdough Loaf

This one was inspired by the Cheeseboard Collective’s delicious Hobrot, but has been adapted to be more similar to my usual sourdough loaves (eg the original recipe called for an egg and this has none). Love a worker-owned co-op <3

Ingredients:

  • 95% T85 flour (I used cairnspring mills trailblazer)
  • 5% whole dark rye
  • 80% hydration
  • 20% levain
  • 15% coarsely grated cheese (I had cheddar and pecorino Romano on hand)
  • 15% diced onion
  • 3% neutral oil
  • 3% curry powder
  • 2.5% salt

Method:

  • sauté onions in oil till translucent, dump in curry powder, take off heat, and mix into a paste
  • dissolve salt into water
  • add levain into salt water and break up into pieces
  • add flours and mix until no dry flour clumps are left
  • rest for 45 minutes
  • 4 stretch and folds every half hour. Mix in the cheese and the onion-curry paste after the first set of folds.
  • bulk till 1.5x in size
  • preshape and rest 30 minutes
  • shape and place in banneton
  • cold ferment overnight
  • bake at 450F in dutch oven with lid closed for 30 minutes
  • remove lid and bake for another 15-20 minutes

Benito's picture
Benito

Baguette Noir au Levain

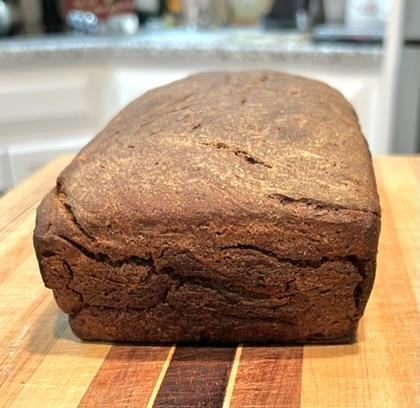
I felt like baking baguettes this week and decided to do something just a bit different, so I present sourdough baguette noir.  So the colour and flavour of these baguettes do not come from charcoal like baguette au charbon vegetal.  No the colour comes from ground toasted black sesame powder that is added to the well developed dough at the end of mixing. This brings an interesting colour to both the crust and the crumb.  The fat from the sesame seeds also cause the crumb to be softer and the crust to be thinner and super crisp compared to my usual SD baguettes.  The nutty scent is evident as soon as the ground sesame seeds are added to the dough.  Each time I did a coil fold I enjoyed that lovely scent.  There is a nice subtle sesame flavour in the baguette.
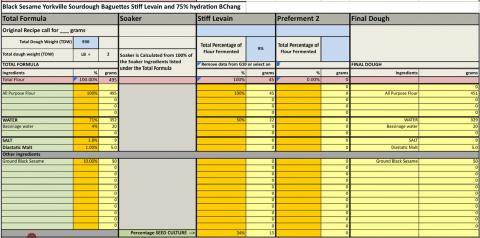
Levain 

starter 15 g

Water 22 g

AP flour 45 g


Final dough

AP flour 451 g

Water 329 g

Bassinage water 20 g

Salt 9 g

Diastatic malt 5.0 g

Ground Black Sesame 50 g


To make 50 g of ground black sesame add 7.1 g sugar and 42.9 g of black sesames to a grinder and grind until a paste develops.  Can make extra but use about 6:1 ratio of toasted black sesame seeds to sugar since black sesame has a drying effect in the mouth that the small amount of sugar can balance out.


Overnight Levain build ferment 75°F 10-12 hours

78°F 9 hours to peak


In the morning, to your mixing bowl add water and diastatic malt  to dissolve, then add levain.  Use your spatula to cut the levain into small pieces.  Next add AP flour and mix to combine.  Allow to fermentolyse for 10 mins.  Slap and fold x 100 then add salt and hold back water gradually working in until fully absorbed by massaging and then Rubaud kneading the dough, then slap and fold x 200.  Once gluten well developed add ground black sesame, knead until well incorporated.  Can also use your stand mixer.


Bulk Fermentation 82*F until aliquot jar shows 20% rise.

Do folds every 20 mins doing 3 folds

Could do cold retard at this point for  up to overnight. (Aliquot jar 20% rise)


Divide and pre-shape rest for 15 mins

Shape en couche with final proof until aliquot jar shows 60% rise then (optional) cold retard shaped baguettes en couche for at least 15-30

 minutes for easier scoring.  I often do this for convenience as the oven is pre-heating.


Pre-heat oven 500*F after 30 mins add Silvia towel in pan with boiling water.

Transfer baguettes from couche to peel on parchment

Score each baguette and transfer to oven, bake on steel.

Bake with steam pouring 1 cup of boiling water to cast iron skillet dropping temperature to 480*F. 

The baguettes are baked with steam for 13 mins.  The steam equipment is removed venting the oven of steam.  Transfer the baguettes from the baking steel to next rack completing baking directly on a rack to minimize the browning and thickening of the bottom crust.  The oven is dropped to 450ºF but convection is turned on and the baguettes bake for 10 mins rotating them halfway.  The baguettes are rotated again if needed and baked for another 3 mins to achieve a rich colour crust.

My index of bakes

Icy's picture
Icy

Need some help

I’ve tried devolping gluten but it wont form in my pan de cristal

Pages