The Fresh Loaf

A Community of Amateur Bakers and Artisan Bread Enthusiasts.

Most bookmarked

tpassin's picture
tpassin

Uzbek Bread

Uzbek breads are fascinating.  There is a large variety, mostly yeasted flatbreads, but one of the best known is called "non" or a number of variations of it (related to the Indian "naan") and has the form of a disk with a thin central portion usually docked with decorative stamps.  There are quite a few  videos of how these breads are made and it's worth watching a few of them.  The craftsmanship and skill of the bakers is remarkable.

I have tried my hand at making this kind of bread a few times, but it's never been very satisfactory.  For one thing, all the articles say you can dock with a fork instead of a proper bread stamp, but my fork holes always closed up, leading to undesired ballooning where the bread was supposed to be flat. Also, it was hard to understand what hydration to use - basically, how sticky or dry the dough should be.

I just received my bread stamp, straight from Uzbekistan, and here is the first result.  I think it's actually pretty good. In the pictures, note that I slashed half the perimeter with vertical slashes.  Some styles slash the rim, some don't, so I tried it on half to see which I like.  I liked the slashes.

This yeasted bread used 200g of flour, of which 20% was graham flour and the rest Gold Medal AP.

The dough is a straight yeasted dough of about 60% hydration, fermented in two stages,  After proofing, the dough was stretched out into a disk much as you would a pizza shell, pressing with the fingers and doing some stretching around the perimeter.  In most bakeries I've seen videos of, the bakers use a special wooden tool to compress the center.  This can be roughly approximated by the back of a soup ladle, though it's not as good.  When the the center has been compressed and the rim worked into a more definite shape, the center is docked using the bread stamp.

Usually these breads are coated with seeds and sometimes are given a wash (egg, milk, or oil seem to be common) before baking, but for this first try I didn't do either.

Traditionally these breads are baked in a tandoor oven - there are many variations on the spelling and pronunciation but they all seem closely related to the familiar Indian word.  I baked my bread in a conventional US oven on a baking steel at 450 deg F/232C with initial steam for 15 minutes.

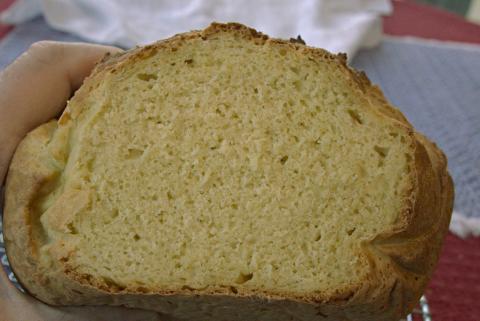
The crust came out only slightly crusty - maybe it should have been baked longer?.  The crumb is moderately open, soft and chewy.  The whole wheat flavor of the graham flour comes through but not aggressively.  Two of us ate around half or more of this bread with dinner, with a dish of olive oil for dipping.

This project was a lot of fun.

TomP

rafaelwa's picture
rafaelwa

ROFCO B40 - Rofco Brick Bread Oven - NEW

Hello Bakers,

 About 3 weeks ago I bought a Brand new Rofco B40 from ISCA, for my cottage Bakery, Due to particular problems, I will have to sell the oven and postpone this upgrade for another time.

 Price is $4.000,00 (OBO)


The oven is still in the box, sealed, never opened, in Warranty

It comes with 3 steam trays.

Please leave your email or phone number and I will get in touch.

Serious buyers only please.

I'm in Dallas, Texas - USA.

rff000's picture
rff000

New availability of Russian Fermented Red Rye Malt (ржаной солод для жителей США)

I just was able to order two packages of Russian fermented red rye malt after looking all over. It has been hard to find for residents of the United States. I first saw it last week on the gastronomusa.com website but it was listed as out of stock. So, I phoned the store and asked them when they would have it. They asked if I wanted liquid or dry and they told me to wait for the weekend for dry. I just found it and ordered two packages.

Not cheap but a much better deal than the ridiculous prices on Ebay. Each package of Pudov brand 300 gr. costs $4.50, but the the delivery charge is another $3.80 each for the two I ordered. So, I wound up paying a total of $8.30 for each 300 gr package, a bit over 10 ounces each. By the way, when this was available near my house several years ago, I paid $6 for each package and, of course, no shipping charge. So, I'm actually paying only $2 more per package now. I'm not sure what the shipping charge would be if I only ordered one, but I assume it's a better deal to get two or maybe more.

The website offers a choice of English or Russian. Just go to https://gastronomusa.com/

XohacCybersax's picture
XohacCybersax

My troublesome Lievito Madre journey (aka i need some help)

TL;DR: 40+ DAYS CONSTANT FEEDING ; FIRST 20 DAYS NO RISE AT ALL ; DAY 20-40 LITTLE RISE ONLY AFTER 6 HOURS

This forum has been the main source for Lievito troubleshoting that I found, so I want to track my actual problem in a way to make it public, so someone else with the same issues could have it easy in their journey. I have the first 30 days literally recorded in my camera, with the pH's info for each day and after each feeding cycle.

I already had some very nice results doing panettone, bu I was using a lievito that Roy Shrapnelsincoksanuria (i will never memorize his name, but you know who it is) gave in a workshop here in brasil.

I'm using mineral water and Molino Pasini Panettone flour. The photos are from right now, the measurement was made with a droplet of deionized water inside a litle hole i made with the spear pH meter.

Photos from today, 6h after feeding.


How i made the lievito

Following giancarlo montanari 4.1, but instead of using rye i used organic whole wheat, panetone flour and diastatic malt flour. Was not able to follow the exact schedule he suggests in the book because I was not getting enougjh activity to turn to the "production mode" (2 lactic feedings, 1 long acetic tied, milanese method). All the feedings until day 35 were done following 1:1:43% (Lievito, flour, water)

First 7 days: no leavening at all, but sharp decrease on pH, ending at somewhere aroound 3.8 after 20h. Normal consistency.

Days 8-14: Still the decrease on pH, but not as sharp, but the texture changed a lot. It got really sticky, the voices in my head told me that since the colony was not yet stabilized it should've been proteolitic bacteria that where not yet "purified" by the acidity. The pH would take at least 12h to drop below 4.2

Days 15-20: The stickyness decreased slowly, until it got to a point of getting to the pH dropping to the lowest point in "only" 6h. Then I started feeding more regularly, 2 x 6h at 27C and then a 16h+ at 17C. Day 20 was the last day using diastatic malt flour.

Day 21-37: First day with visible yeast activity, I was about to start over. From that day on I started feeding it when it reached the max volume, after 6h to 8h. The pH would be somewhere around 4 to 4.1, sometimes a little higher. At night it would go to acetic fermentation for 16h to 32h depending on my schedule. Sometimes if I felt that it was too lactic i would make 2 straight acetic fermentations, with notable differences on smell and texture at the end of them. If the pH was lower than 3.9 i'd made a bagnetto. 


Day 37-now: I started to research everywhere in the net, including here, possible causes and therefore possible solutions.

Possible issues (source: my head and some posts) and how I dealed with them:

1 - TOO MUCH ACID IN THE LIEVITO / TOO MUCH OLD CELLS

I tought that maybe there was a acid carryover from all the days of previous fermentation, so I fed the lievito in a 0,5:1:45% and made the acetic fementation at 17C for 24h using the piemontese method (under water). After 16h the pH of the water was 3.9 and the inside of the lievito was 3.8. 

I then fed the lievito at 0,5:1:40% at 28C, then 1:1:43%, smells nicer but still slow.

2 - TOO LITTLE YEAST POPULATION

This is the most probable one, for sure, so since I''m liking the smell a little more I will feed it at 28C several times a day, until pH drops to 4.0, and then feed and store in the fridge, meaning, doing only lactic fermentation until I have enough rise.

3 - MAYBE NOT USING VAN-OVER METHOD?

Since i work with little ammounts of lievito, I'm using a little food processor to mix the water and lievito first, and then the flour. I tought of it because my stand mixer needs a at leat 5 times the ammount of dough to properly homogenize it. Right now I'm making 23g water, 50g lievito and 50 water. The gluten ends up ok and after laminating the dough is pretty smooth, I've seen this kneading technique for the first time in Modernist Baking, from america test kitchen, but maybe it is not ideal foir lievito? Over oxidation of the lievito + water mixture?


This is my approach right now and I would love to know if anybody have any suggestion, like, should I change flower? feeding habits? I would love to hear something different. And I can provide media from any of the stages of the feeding journey if you guys think it would help to understand better my situation.


TracyF's picture
TracyF

Stretches and folds vs KitchenAid

Hi there!

I routinely make a loaf pan sandwich sourdough for our family. I always have about a 30-60 minute autolyse, add starter and hand-mixed the dough, add salt 15-30 minutes later, and then do a few stretches and folds over the course of the next few hours.

The other day I was doing two batches of two loaves each and decided to try running one batch in the KitchenAid (after autolyse/initial mix/salt addition). I wanted to see how much difference the KitchenAid made for gluten formation.

Well, I was doing other things and probably left the KitchenAid running too long, and the dough turned pretty soupy. (It is 80% hydrated, so already very wet, but it got much more slack and soupy.) But I proceeded anyway. I treated both batches of bread pretty similarly from this point until baking, with just a little added proofing time for the KitchenAid loaves.

The picture shows the KitchenAid bread on the left and the stretched /folded bread on the right.

The KitchenAid bread actually has such beautiful even crumb, but it is very short! The crumb is lovely for my kids' lunchbox sandwiches, though.

I'm wondering, if I did a shorter mix in the KitchenAid, and/or left it to either bulk ferment or proof longer, do you think it would still have that crumb? I'm mystified by how soupy it got and did not expect it to look so great inside and wouldn't mind replicating that!

Sour_Baker's picture
Sour_Baker

Bulk fermenting light enriched and fully enriched

Usually if the starter is small enough or if it’s cool enough you could get away with bulk fermenting on the counter overnight.

but what if the dough has either milk or butter or a combination? Would the dough not ferment as well? Meaning does the added fats and such go bad?


Thank you all for easing my mind!

Bronze's picture
Bronze

Troubleshooting Berliner/Kreppel/Krapfen ; Old-School German Jelly Doughnuts

I've got an old recipe straight from Germany for Berliner or Kreppel or Krapfen or whatever your German friend calls them. A thick jam is actually added to the center of the Kreppeln before frying. Problems: mine were 1) absorbing the jam  during proofing and therefore coming out as raw dough on the inside, and 2) splitting themselves in two, opening up in the oil to become an open clam shape rather than, well, a closed-clam shape. Maybe my oil needs to be hotter to prevent the splitting. Maybe if my dough was wetter they would fuse at the seam rather than split. Or if I try to proof them a little less maybe it will give the jam less time to soak into the dough. I'll try to find the "dryest" jam I can, but I'm trying to think if there's another possible solution besides "your jam was too wet". Thoughts?

Dough's's picture
Dough's

2X Tom Chandley Pico Plus Ovens plus stand ($5500)

I have two Tom Chandley Pico Plus Ovens for sale. They are less than a year old and I used them moderately for my micro bakery. I am selling them because I recently bought a Polin Stratos oven.

I am in Bellingham, Washington and am only interested in pickup right now. I would prefer to sell them as a set and I'll throw the stand in for free (it is not the official stand sold by Tom Chandley, just a little metal table that I bought and adjusted the legs.). 

I paid over $8000 when all was said and done (taxes and shipping). I am looking for $5500 for both ovens. 

rondayvous's picture
rondayvous

Lievito Madre, Beer, anerobic and aerobic environments

I've made beer, wine, and sourdough bread, and it has always struck me how similar the process is for all three. They all rely on single-celled fungi and, to a lesser degree, bacteria.

When brewing, your nemesis is Acetobacterial fermentation, which converts  alcohol into the decidedly acidic acetic acid. To prevent your wine or beer from turning into vinegar, we use airlocks, which create an anaerobic environment that Acetobacteria don't like.

Before we start, there are two things you need to know about yeast.

#1. In order to reproduce and multiply, it needs Oxygen.

#2. If there is no Oxygen, Yeast doesn't die; it simply changes gears and starts producing CO2 and alcohol.

As we learned above, Acetobacteria LOVE alcohol and quickly turn it into Acetic Acid (vinegar); the only way to prevent this is to keep Oxygen away from the Acetobacteria.

This brings me to Lievito Madre and why we might want to incorporate some of the procedures used to make it into our sourdough startup routine.

Part of every Lievito Madre routine involves either submersing the dough in water or tightly wrapping it. Both of these measures keep oxygen away from any alcohol-loving Acetobacteria that might be lurking in the dough, leaving only the anaerobic-loving Lactobacteria around to help acidify the dough.

The end result is a yeast rich dough with some happy lactobacteria.


tpassin's picture
tpassin

High-rise Soda Bread

Like many others I have tried my hand at Irish soda bread from time to time.  I've never been happy with the results. The loaf has usually been flat, dry, crumbly, more scone-like.  Usually I have baked the loaves free-standing, a few times in an open skillet, and I usually have used baking powder instead of baking soda because it's more tolerant and why not?

I've read up on the history of Irish soda bread, and I even received a bag of King Arthur's Irish-style Whole Wheat flour for Christmas.

Then I found this story by Stella Parks on Serious Eats that has changed everything -

https://www.seriouseats.com/real-irish-soda-bread-recipe

Digging deeply into how people actually made soda bread in the 19th century, she learned three things that make an enormous difference:

1. The dough should be *very* soft - as soft as can possibly be handled;

2. The dough needs to be alkaline, not acidic.  So you need enough baking soda to neutralize the buttermilk's acidity (baking powder is fairly neutral and won't do that).

3. The bread was mostly baked in an iron pot with short legs and a cover, set over coals and with coals heaped on top.  IOW, a Dutch Oven. Even when baked in a skillet, the skillet would have been covered.

Ms Parks tried it out, and she says the results were a revelation.  No more crumbly, dry bread with little taste.   To quote her,

Before digging in, I let the soda bread cool on a wire rack for about 15 minutes, a completely arbitrary time determined strictly by my own impatience. The sound of it was glorious, accompanied by a shower of crispy shards that flew out with every pass of the blade until my knife sank into a pillow crumb that gave way as cleanly as any sandwich loaf.

My first slice was without butter or salt, yet it tasted moist and rich, with an aroma something like that of a bakery-style pretzel—mild, but distinct. My second, third, fourth, and fifth slices were consumed in a blur of butter and honey

So I tried it and got pretty much the same result.  That was with white AP flour.  Then I made a loaf with 50% Irish-style WW, and that was wonderful too.  Both these loaves were rather flat because my dutch oven is too big across to provide any real containment.

For today's bake, I used a smaller, ceramic pot (2.5 qt) to contain the dough, and I added some baking powder to get more lift.  Wow! Look at that lift!

Here's what the loaf looked like before slicing:

 Today I'm a happy camper!

TomP

Pages