The Fresh Loaf

A Community of Amateur Bakers and Artisan Bread Enthusiasts.

Most bookmarked

dstroy's picture
dstroy

Orange, Almond, and Olive Oil Cake


A very tasty cake which earns extra bonus points for making the house smell wonderful and for staying moist for days.
It uses whole oranges and lemon rinds, and almonds and barely any flour for a really interesting taste. Goes great with tea.

Orange, Almond, and Olive Oil Cake
Ingredients:
2 small oranges
1 lemon
1 cup all-purpose flour
1 Tablespoon baking powder
4 eggs at room temperature
1/2 teaspoon salt
1 1/2 cups sugar
1 1/2 cups (6 ounces) almonds, toasted and finely chopped
2/3 cup olive oil
some Confectioners' (powdered) sugar for dusting

- Put the oranges and the lemon in a large pan and add enough water to cover them. Bring to a boil, then simmer and cook uncovered for 30 minutes. (That's the instant air-freshener aspect)
- Drain and let cool so that you can handle them without burning yourself.
- Cut the lemon in half and throw out the pulp and seeds.
- Cut the orange in half and throw out the seeds (but not the pulp).
- Put the citrus into a food processor/blender and chop it up finely, then set aside.

-Preheat oven to 350
-Sift flour and baking powder together into a bowl and set aside.
-In a large bowl, combine eggs and salt, beat until foamy.
-Gradually beat in the sugar.
-Gently fold in the flour mixture.
-Stir in chopped citrus, almonds, and olive oil until just incorporated (The recipe book states here "Do not overmix.")

-Pour the batter into a 10-inch springform pan.
-Bake for about 1 hour and 15 minutes, or until center of cake is set (toothpick comes out clean.)
-Let cool completely in pan on wire rack, then unmold, place on a serving plate, and dust the top with confectioners' sugar.

dstroy's picture
dstroy

Sour Cream Sugar Cookies

Sour Cream Sugar Cookies

1/2 cup butter
2 and 1/2 cups flour
1 cup sugar
1/2 cup sour cream
1 egg
1 teaspoon baking powder
1 teaspoon vanilla
1/4 teaspoon baking soda
dash salt
1 teaspoon finely shredded lemon peel

Glaze:
2 cups powdered sugar
1/2 teaspoon vanilla
milk

- Mix ingredients and chill for 1 to 2 hours.
- Roll out and shape cookies.
- Bake at 375 for 7-8 minutes.
- Glaze.

croissantsSo, how'd you spend your Bastille Day? You did celebrate Bastille Day, didn't you?

I made croissants that day. Croissants seemed like the perfect thing to make on the French national holiday because, like the French, they are a big pain in the butt to deal with.

What's that? Oh yes, I guess they are French too.

Click "Read More" for a recipe and more.

Croissants are basically a big slab of butter with dough wrapped around it which is rolled out and folded, rolled out and folded, then rolled out and folded again. The difficult part isn't the rolling or the folding: it is getting the temperature of the dough and the butter just right. You want them fairly cold, so that the dough is fairly stiff, but not so cold that the butter cracks.

From what I've read the ideal temperature for this is around 65 degrees. I didn't quite hit it right and just about gave up on making them (you'll notice a lack of photos of the cutting and the shaping... the dough was getting sticky and I thought I'd have to throw the whole thing in the garbage) but they came out quite good, so perhaps the recipe is more forgiving than it at first seems.

The recipe I used is from Bernard Clayton's New Complete Book of Breads. I prepared them over 3 days, with the butter step on the evening of the first day, the rolling on the second day, and the slicing, shaping, and baking on the third day.

Clayton recommends using a mix of cake flour and all-purpose flour. If you don't have any cake flour in the house you certainly can substitute in more all-purpose flour. You could even try whole wheat flour, if you are bold (Beth Hensberger has a whole wheat croissant recipe in her Bread Bible. I've never tried making them, so I can't tell you how they taste, but she swears they are good).

There are very few times that I think it really matters whether you use unsalted or salted butter, but there is so much butter in these that I suspect it would make a noticeable difference using salted butter. I wouldn't recommend using margarine either, but I have to admit that I've never tried it.

Croissants

Makes 20 to 30 pieces

1 1/2 cup unsalted butter, softened
3 tablespoons flour

Dough:
3 cups all-purpose unbleached flour
1 cup cake flour
2 teaspoons salt
2 tablespoons sugar
2 teaspoons instant yeast (or 1 packet instant or active dry yeast)
2 cups very warm milk (120-130 degrees)

Glaze:
1 egg plus 1 egg yoke and a pinch of salt

Combine the 3 tablespoons flour with the softened butter. Spread it out on aluminum foil to make a 6 to 8 inch square. Wrap the square in foil and refrigerate 2 to 3 hours or overnight.

Combine the flours and salt in a large bowl. Combine the warm milk, sugar, and yeast. Make a well in the flour, pour in wet ingredients, and stir them into the flour. Add additional flour or water as neccessary to make a soft dough (it will stiffen when chilled).

The dough should only be hand kneaded or mixed for 5 minutes or so to prevent the dough from toughening up. Cover the bowl with the dough and cool it in the refrigerator for at least an hour, until it is approximately 65 degrees (or place it in the refrigerator for longer and remove it to take the chill off before moving on to the next step).

Remove the butter and dough from the refrigerator and allow to warm until they are both around 65 degrees. At the proper temperature the dough will be fairly firm, the butter will be firm enough not to make your hands greasy when touching it but soft enough not to crack when bend.

(I've heard using a chilled marble work surface is a good way to keep the dough cool, but I don't have one so I didn't try it. If you have one though, it might be worth a shot.)

Stretch the dough out into a large square, roughly 10 inches per side.

butter on dough

Place the block of butter on it diagonally and fold the corners of the dough over the butter, forming a large packet.

butter packet

Roll the dough out into a long thin rectangle. Fold it in thirds like a letter, then rotate the dough 90 degrees and repeat this process.

rolling dough

Wrap the package of dough in a cloth that has been soaked in cold water and wrung dry (I also placed this package in a plastic bag). Place the wrapped dough in the refrigerator for at least an hour.

dough on cloth

Unwrap the dough from the towel and roll it out and fold it a third time. Wrap it back in the towel and refrigerate it overnight.

The next morning, roll the dough out into a large rectangle. The dough should be extremely thin, approximately 1/8 inch thick. Cut the dough into a series of triangles, approximately 5 inches on each of the short sides and... quick... the third side is.... A squared + b squared = c squared... the square root of 50... just over 7 inches. (My high school geometry teacher would be so proud!)

Roll the triangles up from the long side toward the tip. Tuck the tip under the center and slightly stretch and curve the ends to make the crescent shape.

Place the croissants on a baking sheet and cover lightly with plastic wrap or wax paper. I just place the entire baking sheet in a clean garbage bag.

Set the croissants aside to rise until they've doubled in size, roughly 1 to 2 hours.

When they are close to risen, preheat the oven to 425. Remove the plastic from the baking sheets and gently glaze the croissants with the egg wash.

egg washing croissants

Bake the croissants for approximately 20 to 25 minutes. It is difficult not to burn them: because they contain so much fat they basically fry themselves when they get hot. I was surprised to find that the ones that came out most evenly browned but not burnt were the ones I baked on the double layer cookie sheet (shown in picture above) on the middle rack. They came out even better than the ones I baked on a standard baking sheet on the top rack. So watch them carefully, and adjust their location in the oven as necessary.

Croissants freeze very well. To reheat them, simply remove them from the freezer and place them in a toaster oven for 5 minutes. Good as new!

croissant and coffee

Advice on how to make croissants? Please share your experiences by adding comments below.

Croissants

buttermilk bread

Recently I've wondered, short of getting up at 2 AM to begin making the dough, what is the best way of having a fresh, hot loaf of bread ready first thing in the morning?

I've experimented with delayed fermentation techniques a couple of times in the past week, and been pretty successful with it. Read more for info on the techniques I've tried as well as the recipe for this wonderful buttermilk bread.

Time & Temperature Redux
As I talked about in Lesson Three, two of the most important variables the baker has control over are time and temperature. Longer, slower rises using less yeast result in a more flavorful loaf of bread. Refrigeration is the most common way to retard the rise. Most bakers agree that rustic bread doughs with few ingredients beyond flour, yeast, salt, and water benefit the most from being allowed to rise in the refrigerator overnight, though other breads may benefit as well.

Aside from the benefits to flavor, bakers also use refrigeration to control the baking schedule. My recollection is that in the commercial bakery I used to work in large batches of dough were made in the morning and allowed to rise through the day. In the afternoon the dough was shaped into loaves and panned. After being allowed to rise for an hour or so in the pans, the loaves were placed in a large walk-in refrigerator for the evening. The bakers arrived in the bakery around 2 AM, pulled the pans of bread out of the refrigerator, and put them into the hot oven with little delay.

My thought is that this technique works well enough for professional bakers, so why not try it at home?

My First Try

The first evening I tried this, I made up a simple buttermilk bread recipe (and didn't keep very good notes, so if you try this one at home the proportions may need to be adjusted a bit. I'd recommend the second recipe in this article over this one anyway):

3 cups flour (I did 2 cups all-purpose unbleached and 1 cup whole wheat)
1 cup warm buttermilk
2 teaspoons instant (AKA rapid rise or bread machine) yeast
1 teaspoon salt
2 tablespoons honey

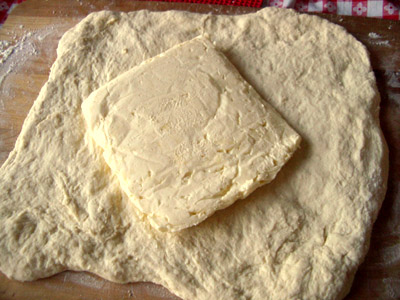
I mixed everything together, adjusting the flour and water until the dough was tacky but not sticky. I then poured the dough out onto a floured cutting board and kneaded it for approximately 10 minutes. I put the dough back into a greased bowl, covered the bowl with plastic wrap, and then let it rise until it had doubled in size, approximately 90 minutes.

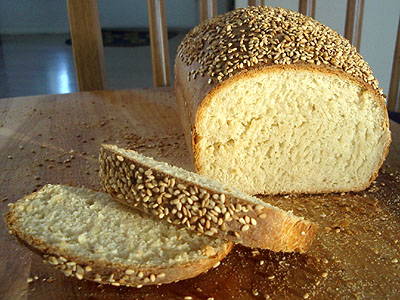
At that time I shaped the loaf and placed it into greased pan. I like sesame seeds, so I misted the top of the loaf with a little water and sprinkled sesame seeds on top. I enclosed the bread pan in a plastic shopping bag and put it into the refrigerator overnight.

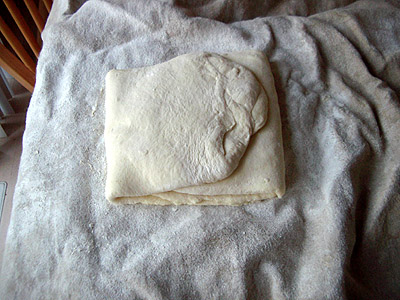
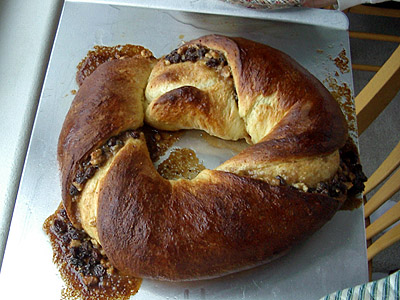
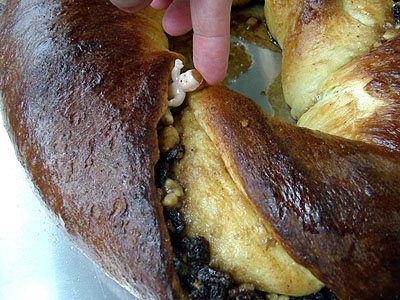
As you can see below, the dough continues to rise in the refrigerator overnight:


In the evening, before putting into the refrigerator


First thing in the morning, right before going into the oven

As soon as I got up, I pulled the dough out of the refrigerator and preheated the oven to 350 degrees. When the oven was hot, about 10 minutes later, I placed the bread in the oven and baked it until an instant read thermometer inserted into the center read 185 degrees. This took about 55 minutes.

"A Learning Experience"

For a first try, this wasn't bad, but it wasn't as good as I had hoped. The bread ended up fairly heavy. Not as bad as some bricks I've baked in the past, but not quite as light as I was shooting for.

I learned something though. I noticed that, because the loaf was so cold inside, it really didn't rise in the oven until about 15 minutes into the bake; It simply took that long to take the chill off the loaf so the yeast could reactivate. Unfortunately, by that time the crust on the outside of the loaf was starting to form, so I really didn't get the rise I was hoping for. My thought was that next time I would set the dough out for a while and allow it to warm up to room temperature before putting it into the oven.

I also learned that a cold loaf takes about 10 minutes longer to bake than a loaf that goes into the oven at room temperature. Not surprising, but good to know.

I also learned that, for a honey buttermilk bread, one third of the total flour being whole wheat flour was too much for my taste. I decided to scale back on the next try.

Take Two

This time I used the honey buttermilk bread recipe from Beth Hensperger's Bread Bible. Despite my dislike of the typography and a few of the other aspects of this book, there are some solid recipes in it. This one is top knotch.

The recipe as printed in the book but not quite as I baked it, as I discuss below:

3/4 cup warm (105-115 degree) water
1 tablespoon (1 package) active dry yeast
1 teaspoon sugar
1 1/2 cups warm buttermilk
2 tablespoons melted butter
3 tablespoons honey
1 tablespoon salt
6 cups flour (I used 1 cup bread flour, 1 cup whole wheat flour, and 4 cups unbleached all-purpose flour)

Beth says to mix the active dry yeast with the water and sugar and let it sit for 10 minutes until it becomes foamy. I didn't have active dry yeast around, so I used bread machine (instant) yeast, which doesn't need 10 minutes to activate. I simply mixed the water, the yeast, and the sugar together and then proceeded to add the buttermilk, melted butter, and honey. When they were thoroughly mixed I added the salt and 3 cups of the flour.

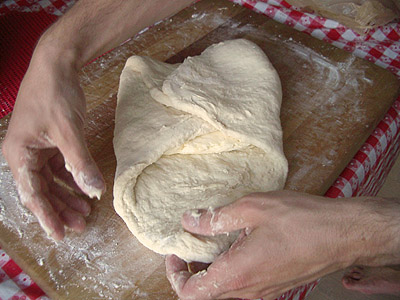
I continued adding flour, a half a cup at a time, and mixing it together until the dough reached a kneadable consistency. At this point I poured the dough onto a floured cutting board and kneaded it for about 10 minutes, sprinkling on a little bit more flour each time the dough started to stick to my hands or the cutting board.

I put the dough back into an oiled bowl, covered it with plastic wrap, and set it aside to rise. I let it rise long enough to watch a movie (The Wild Ones, starring Marlon Brando, if you must know). The run time was 79 minutes, which was about long enough to allow the dough to double in size.

I split the dough into two pieces. One piece I shaped, panned, and covered with a plastic bag, just like the previous loaf. The second piece I punched down but did not shape: I just put it into a greased bowl and covered the bowl with plastic. I intended to shape and pan this one in the morning to see how well it would rise the next day. I put both pans into the refrigerator until the following morning.

The next morning I was surprised by what I found: the dough had risen much more than last time. The shaped loaf was pouring over the top of the pan, the unshaped loaf was over double its original size.

Due to this unexpected development I made some adjustments to my plan. I had thought I would wait an hour or so, until I saw evidence that it was really starting to rise, to put my shaped loaf into the oven, but I decided to put in the oven after only being out of the fridge for 30 minutes since it was already large enough. I baked it at 350 until an instant read thermometer inserted into the center read 185 degrees, about 55 minutes again.

The unshaped dough I punched down, shaped, and placed into a greased pan. I sprinkled on more water and sesame seeds instead of the egg wash that Hensperger recommends on this bread, covered it with plastic it, and set it aside to rise.

Because it was cold, this loaf took close to two hours to rise to the top of the pan. Baking it took about 50 minutes, since it wasn't as cold as the previous loaves.

buttermilk bread

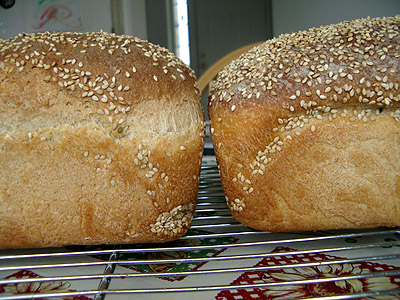
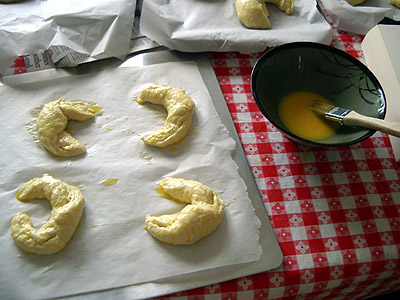
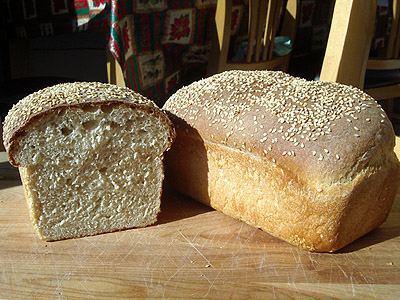
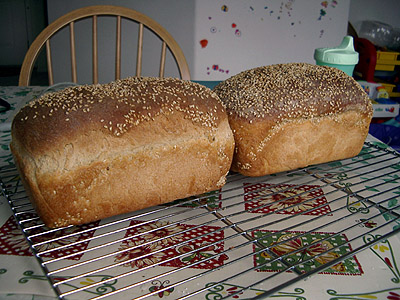
The loaf on the left is the one that I punched down and allowed to rise again for two hours in the morning, Notice how it has stretch marks right under the crown. The yeast was active so it definitely got a pop when I put it in the oven.

The loaf on the right is the one that I only set out for half an hour. It didn't get any oven spring, but it was sufficiently risen that it still ended up being adequately risen.

While I was baking them I remembered that instant yeast is more potent than active dry yeast. When modifying a recipe and replacing active dry yeast with instant yeast, you can cut the amount of yeast by around 25 percent. I didn't, which probably accounts for why my loaves rose so much overnight. But it is hard to say that that is the only reason this batch rose so much more than the previous batch. I may have done a better job kneading the dough or had the buttermilk a little bit warmer when I was getting started. It's also possible I placed the loaves in a warmer spot in the refrigerator. Having replaced some of the whole wheat flour with higher protein bread flour may have also been a factor.

Changing from one third to one sixth whole wheat flour definitely improved the flavor of these breads. At least it got me closer to what I was shooting for: a light, slighty sweet buttermilk bread with enough whole wheat flour to make it taste hearty, not heavy.

buttermilk bread

I never quite succeeded in having a loaf of ready by 8 AM, but I did manage to have a couple of loaves baked in time for brunch. Using the refrigerator to delay fermentation is definitely something I am going to continue to experiment with and would encourage other home bakers to tinker with as well.

Have any tips on using temperature to delay fermentation? Do share by posting a comment below.

Fresh Bread by 8 in the Morning?

Editor's note: I wrote this recipe last year, before hurricane Katrina devastated New Orleans.

Baking a King Cake is still a fun way to celebrate Mardi Gras, but at least North American readers may want to consider ordering one from a bakery in Louisiana as a way of helping those folks get back on their feet. Many of the ads that appear at the top, side, or bottom of this page are for bakeries that will bake and ship them to order. Consider clicking though and ordering one!


Although not as popular a method of celebrating Mardi Gras as drinking excessively and pressuring young women to remove their clothing, making a King Cake is a fun, festive way of taking part in a centuries old tradition of excess.

Below is a bit about the history of Mardi Gras and instructions on making this sweet, rich, festive bread.
History of Mardi Gras

The origins of Mardi Gras are obscure: it is possible that many of the traditions predate Christianity and were adapted from the Roman celebration of Lupercalia. What we do know is that by the Middle Ages Christians throughout Europe celebrated the period between the end of the Christmas Season (the Twelfth Night, January 5th) and the beginning of Lent (Ash Wednesday) as a period of merriment and excess.

Mardi Gras, as the final day of this period of festivities known as Carnival (believed to be derived from Latin carnem (meat) + levare (lighten or raise), literally "stop eating meat," since Lent will be a time of fasting), became the pinnacle of this period of self-indulgence. Think about it: it is the last evening that you are going to be able to eat meat, butter, and eggs for over a month. What are you going to do?

Laissez les bons temps rouler!

As you probably know, "Mardi Gras" literally means "Fat Tuesday." In the English speaking world it was known as "Shrove Tuesday," derived from the old English word "shrive" which means to hear confession of, assign penance to, and absolve.

Throughout the Christian world the tradition developed of using up all of the extra eggs, milk, and butter in the house by baking rich cakes and pastries. The Brits often celebrated Shrove Tuesday by eating pancakes. The Scots also celebrate Pancake Tuesday, the Aussies Pancake Day. The Swedes and Poles also celebrate the day with rich regional baked goods.

Which brings us back to the King Cake.

The King Cake

The King Cake is a rich, sweet, yeasted bread that is eaten in celebration of Mardi Gras. It is believed to have been originally baked in 19th century France to honor the three kings who visited the newborn baby Jesus. The round shape of the cake is believed to represent the unity of the Christian community. The tri-colored sugar represents the three kings and also symbolize justice (purple), faith (green), and power (yellow).

Hidden in the cake is a small toy baby. Whoever gets the slice of cake containing the toy baby is crowned the king or queen of the celebration (and also gets a lesson in the Heimlich maneuver, if she isn't careful about removing the toy from her slice before putting it in her mouth... let this be a warning).

My King Cake

Let me begin with the disclaimer that I live in Oregon, about 2,000 miles from New Orleans. I have only been to New Orleans once and it was not for Mardi Gras. Everything I know about King Cakes I've learned from the internet and a disreputable liturgist I work with, so my interpretation of the King Cake may not 100% accurate. If you are worried about accuracy, take a look at some of the other recipes available online (here or here or here or here), or order one online from here. However, this was a blast to make and everyone who tasted it enjoyed it. I believe it captures the spirit of the season.

I found quite a bit of variety in King Cake recipes. Some were filled with sweet cream cheese, others with nuts and raisins, and others were unfilled. Some were completely covered with colored sugar and others were just lightly iced. They all were rich, but while some were merely artery-hardeningly rich, others were stroke-inducingly rich. I opted for nuts and raisins and a less rich cake: were I having a party and having many people help me eat it I'd consider making it richer, but as it is only myself, my wife, my son, and perhaps a few close friends eating it, I thought the less heavy recipe gave us a better chance of completing it.

To begin, I mixed together the dry ingredients:

4 cups flour
2 tablespoons instant yeast
1/2 cup white sugar
2 teaspoons salt
1 teaspoon grated nutmeg
1 teaspoon lemon zest

To that I added the following wet ingredients:

5 egg yolks
1 cup warm milk
1/2 cup (1 stick) melted butter
1/4 - 1/2 cup room temperature water

I mixed everything together, adding a little more flour as I mixed until I had a nice moist (but not wet), waxy dough to knead. I kneaded the dough for around 10 minutes and then put it in a greased bowl, covered it with plastic wrap, and set it aside to rise for an hour.

While it was rising, I created a simple filling:

1/2 cup raisins
1/4 chopped walnuts (pecans would be more appropriate, but I didn't have any around)
1/2 brown sugar
1 teaspoon cinnamon
1/4 cup (1/2 a stick) melted butter


When the dough had risen to twice its original size, I removed it from the bowl and stretched it into a long skinny strip.


I spread the filling on top of it and then picked the sides of the dough together, creating a long, skinny tube of filled dough.


I carefully lifted the tube of dough onto a greased cookie sheet.


Then I twisted the dough and brought the ends together, creating a loop.


I covered the dough with a kitchen towel and set it aside to rise again.

Approximately an hour later I preheated the oven to 375. Just before placing it in the oven I brushed the outside of the dough with an egg wash (I used some of the egg whites left over from the 5 yokes that are in the dough). I put the dough in the oven and baked it for 30 minutes, rotating it once so that it would brown evenly about half way through.


After the cake had cooled a bit, I slipped the toy baby into one of the seams that had burst open when the cake was baking.

insertion of The Lord
We found the toy baby in the baby shower section of a local party supply store. Resist the temptation to use a toy troll, Smurf, or army man if you cannot find a toy baby: some of your guests may take offense. Using a crucifix is also probably inappropriate: discovering Christ on the Cross in your cake is not nearly as festive as the baby Jesus.


I coated the cake with a simple powdered sugar and lemon juice glaze (approximately one cup of powdered sugar mixed with the juice of half a lemon).


Then I sprinkled colored sugar over the top.

I made the colored sugar by putting 1/4 cup white sugar in a Ziploc bag with 5 or 6 drops of food coloring and shaking well. I was a bit concerned about where we were going to find purple food coloring when my wife reminded me that you can make purple by adding an equal amount of red and blue, two of the four colors in your basic grocery store food color kit (the other two being green and yellow, the two other colors needed to decorate this cake). I guess it is rather obvious which one of us thought about being an art major and which one has never painted in his life.

Aftermath: The Glucose Hangover

The cake turned out very good. The cake itself was rich and yellow and had a nice, subtle spiced sweetness.

The icing and the filling were a bit much for me. Three hours after eating a couple of slices my teeth started throbbing and I felt let down like a kid who just ate his whole bag of Halloween candy. Perhaps if you are raised on a Southern diet of Krispy Kreme Donuts, Pecan Pie, and Goo Goo Clusters you can handle this much sugar, but for me it was too much. My wife sufferred no ill effects, but she exercised more restraint, choosing to have only one slice of cake with her tea.

But perhaps that is the point, isn't it? Indulge yourself in such excess on the final day before Lent that you won't miss all of the treats you can't eat again until Easter. Well, at least not if you are Catholic.

Happy Mardi Gras, all.

Mardi Gras King Cake

Cottage Baker's picture
Cottage Baker

Oven Choices for Cottage Baker

I just got my cottage license and am considering a larger oven purchase to expand my production capacity. Would love something electric, as I will be adding solar to the house to offset the usage, and have read about the Rofco and the RackMaster but wanted to hear if anyone has had experience with both!! (My very first post!! Thanks ☺️)

louiscohen's picture
louiscohen

Useful Tips in Hamelman's "Bread"

The book is just packed with information for all its audiences, from home bakers to professionals, It might not be ideal for absolute beginners because there is just so much information there.

I have been using the book (2nd and now 3rd editions) since I started baking bread, well before COVID.  Every now and then I browse some of the general information, and I usually learn (or often re-learn) something useful.

Here are a couple of things that are relatively inconspicuous but are very helpful:

  • The mixer timings are based on big commercial mixers making commercial-size batches of 12-15 loaves.  If you scale the formulas down to home size and mix in a Kitchenaid stand mixer, use the same time for first speed as the book says.  For second speed, double the time for the KA compared with the book.  This is based on the page early in the book about mixers, and approximate times for each type of mixer.  As always, the mixer timings are always approximate based on how the dough develops.  But until you get a good feel, if you use a KA stand mixer, double the book time for mixing at 2nd speed.
  • The book usually shows 3 versions for each formula (commercial size batches in lbs/oz and metric, and a home-size batch in lbs/oz).  If you scale the metric batch down to home size (I divide by 10), then increase the amount of sourdough culture by 25% (50% more brings me pretty close to the fermentation and proofing times in the book).  This is buried in the book on a page with tips for home bakers.  I have seen references to this mass effect elsewhere, but I'm damned if I understand what causes it).  
BlackCatBreads's picture
BlackCatBreads

Crumb Diagnosis

Hello,

I'm hoping to receive some feedback on my crumb structure in an effort to make it more consistent and open. Ive been making four to six loaves a week for the last few months and have been struggling with both consistent oven spring and open crumb structure. Any feedback or input would be greatly appreciated. 


712g (75%) H2O @ 90F

190g Leaven (20%) 

855g White Flour (90%) (Cairnspring Trailblazer 13-14% protein)

95g Whole Wheat (10%) (King Arthur)

19g salt (2%)


Starter is fed twice daily at a 1.2.2 ratio. Leaven is created night before bake at a 1.6.6 and is used when very active and healthy at around 12hrs. 

Autolyse for 40min with starter.

Mix in a Kitchenaid for 3-4 min on low when adding salt and 50ishg additional water. 

Bulk for a total of 31/2 hrs with to stretch and folds during the first hr. Dough temp fluctuated from 74F of 78F and rose by about 30-40%.

It felt good during pre and final shape (not too sticky and nice and extensible and buoyant)

Directly into 37-39F fridge after shaping for 18hrs. 

Baked directly from fridge in a preheated DO. Baked with lid on at 450F for 20 min and with lid off for an additional 20-25min or until desired darkness achieved. 

JonJ's picture
JonJ

Hybrid sourdough bagels

When I'm in the mood nothing beats a fresh chewy bagel and for me this can be one of the most satisfying breakfast or lunch breads. I know some people aren't so into bagels, but I just think that (maybe) they've never had a great boiled bagel that came out of the oven a few minutes ago.

So, I bake a lot of bagels and thought it might be good to write a bit about my preferred recipe here. First a disclaimer - it isn't really mine - it is mostly Jeffrey Hamelman's "Bagels with Pâte Fermentée" recipe!

Where I make it differently is that I think using a regular hydration (100%) unsalted sourdough starter plus a little wholemeal flour brings with it a lovely flavour and freshness, and that this makes for a great replacement for the pâte fermentée from the original recipe.

Dough then becomes:
   
    690g bread flour
    76g  wholemeal flour
    200g levain (100% hydration, made with bread flour, usually from overnight ferment)
    397g water at around 30°C
    18g  salt
    1 3/4 teaspoons instant yeast
    1 1/4 teaspoons diastatic malt powder

Also, instead of sprinkling the baking sheet with semolina or cornmeal as Jeffrey does, what works well for me is a quick spritz of water and a sprinkling of brown rice flour which makes it easier to pick up the bagels for the boil. I've also figured out that I like bagels with a slightly shorter bake - so about 15 minutes at 230°C for the nice chew and softness.

This hybrid version, and Jeffrey's original pâte fermentée, are such lovely go-to recipes for bagels.

louisemmcandrews's picture
louisemmcandrews

Starter with fresh milled rye wheat berries

Greetings,  I have been baking sourdough for several years and recently had to make a starter because mine died.  That said,  I milled fresh rye and mixed it with filtered water.  Everyday, i get hooch, and maybe a few bubbles.  Should I not use the whole rye?  Is it feeding too quickly with the full grain?  It used to be so easy to make up my barm.  Help please. 

Pages