The Fresh Loaf

A Community of Amateur Bakers and Artisan Bread Enthusiasts.

Most bookmarked

Damp Patch's picture
Damp Patch

Drying a starter. Is it possible?

Hi,

I've recently discovered this website and think it looks fantastic.

I've just been wondering recently if it is possible to dry, and therefore keep indefinitely, a soughdough starter.

If you were to spread some starter out on a baking tray, let it completely dry out for a few days and then flake it into an airtight bag, would you then be able to bring it back to life at a much later date?

Has anybody tried this as I'm tempted to give it a go in case I ever kill my starter.

Thanks, and I look forward to learning a lot more from this site in future.

Tom

Devon, UK.

MadAboutB8's picture
MadAboutB8

Krantz (yeast) Cake with peanut praline and chocolate filling


I found this recipe in Dan Lepard’s Exceptional Cake cookbook. Given that it was book about cake, I didn’t expect to see baked goods with yeast in there, especially not for the dish called Krantz Cake.

Apparently (quoting Dan Lepard) yeast cake is a feature of German baking. I was curious to find out how yeast leavened cake would be     different from baking powder or soda.

I expected the cake to have texture of soft bread, like brioche, something soft but still feel like bread. It actually turned out to be quite cakey soft, which I think resulted from the mixture of butter, egg yolks, cream cheese and sour cream in the dough. However, it wasn't as crumbly and fluffy as the typical cake. It still got some chewy texture in it which was rather nice. 

The recipe called for walnut, sugar and chocolate for bread filling. I replaced ground walnut and sugar with crushed peanut praline I made some weeks ago. The crushed peanut praline went well with the recipe. It gave caramelised crust and lovly flavour. The cake shape is similar to babka (cut-side-up plaited bread). 

Full post, more photos and recipe can be found here

Sue

http://youcandoitathome.blogspot.com


breadbakingbassplayer's picture
breadbakingbass...

6/4/11 - Latest Bakes - Invisible Pizza, Baguettes, and Olive Oil Brioche with Dried Pears and Toasted Walnuts

Hi All,
Just wanted to let you all know I'm still baking even if I'm not posting as often...  Here's the latest from my kitchen:
1.  Invisible Pizzas (We forgot to take pictures)
2.  Baguettes
3.  Olive Oil Brioche with Dried Pears and Toasted Walnuts

This recipe makes 2 pizzas, 2 baguettes, and 2 olive oil brioches...  Bear with me through all the madness:
Recipe: (Makes approx 3000g of base dough)
Stiff Levain:
400g @ 50% hydration

Sponge:
200g AP
200g Water
1/2 tsp instant yeast
402g Total

Final Dough (approx 65% hydration):
1196g AP
52g WW
36g Rye
808g Water
38g Kosher Salt
1 1/2 tsp Instant Yeast
402g Sponge
400g Stiff Levain

For Olive Oil Brioche with Dried Pears and Toasted Walnuts
180g Extra Virgin Olive Oil
175g Dried Pears
175g Toasted Walnuts

Tools:
Digital Scale
Large Stainless Steel Mixing Bowl
Measuring Spoons
2 - 4L Plastic Tubs with Covers
Rubber Spatula
Plastic Scraper
Bowl with Water
Large Plastic Bag
Baking Stone
Steam Pan with Lava Rocks
Oven Thermometer
Instant Read Thermometer
Peel
2 Loaf Pans
Baker's Linen

Method:
1.  Prepare stiff levain, mix, let ferment for up to 1 hour, and refrigerate for 24-48 hours.

2.  4:45pm - Mix sponge, cover and let rest for up to 1 hour.

3.  5:30pm - Mix base dough by hand in large mixing bowl. Add wet ingredients, and then dry ingredients on top.  Mix from bottom up with rubber spatula.  When shaggy dough forms, mix dough with wet hands for a few seconds to work out all lumps.  Place in bag and let rest for 1 hour.

4.  Roughly cut up dried pears, and toast walnuts in pan and let cool.  Lightly oil 2 tubs with olive oil.  6:30pm - Stretch and fold dough and divide into 1600g and 1200g portions.  Place 1600g gram portion into oiled tub, cover and let rest.  7:00pm - Turn baguette dough, and in the mixing bowl with the 1200g portion, add 180g of olive oil and slowly mix by hand until olive oil is combined completely into the dough.  This takes about 10-15 minutes.  Then add the toasted walnuts and dried pears.  Mix until combined evenly, place into plastic tub, rest for 45 minutes.

5.  7:45pm - Turn baguette dough, and brioche dough, rest for 1 hr 15 minutes.

6.  9:00pm - Arrange baking stone in oven on 2nd rack from bottom.  Preheat with convection until oven thermometer on baking stone reaches 600F.  Divide baguette dough into 4 pieces at 400g.  Preshape 2 baguettes.

7.  9:15pm - Final shape baguettes, place on bakers linen couch, cover and let proof for 60-90 minutes.  Oil 2 loaf pans with olive oil, divide dough into 2 equal portions (900g approx), shape brioche, brush tops with olive oil, cover with plastic wrap and leave to proof until dough reaches top of pan, then refrigerate.

8.  9:45pm -  Prepare pizza as you like, turn off convection and oven temp down to 550F, and bake for 6-7 minutes directly on stone.  Boil some water in a pot for steam pan.

9.  10:30pm - Turn oven down to 475F, Pour boiling water into steam pan, and place on top rack of oven.  Turn baguettes out on to flipping board, slash and place in oven.  Bake 10 minutes at 475F with steam, then 15 minutes at 450F without steam.  Cool completely before cutting.  Take brioche out of refrigerator.

10.  Turn oven down to 400F, remove plastic wrap from brioche, place in oven in pan directly on baking stone.  Bake for 45 minutes until internal temp reaches 190F to 200F.  Turn oven off.  Remove from pan, return loaves to oven directly on baking stone for 10 minutes.  Cool completely before cutting.

Whew!

Enjoy…

Tim

Grandma Dawn's picture
Grandma Dawn

Fun Buns Tools and Techniques

Several years ago I embarked on research and development of fun shaped buns.   The doughs I use are:  whole wheat, sweet roll, cheese, oatmeal, and caraway rye.  For the eyes I use currants, raisins, olive slices, a date slice filled with a craisin.   For fins and feet I sometimes roll out and cut pieces, other times I make a ball and cut toes in.  I use an egg white for the glaze and for some designs sprinkle with sesame seeds. 

Here are the tools I use: 

Dough cutter to divide the loaf, rolling pin, two scissors, bamboo skewer, chopstick, exacto knife, miscellaneous cookie cutters, and individual cue cards.

After the dough has risen the first time, I cut it into the number of wedges according to the number of buns I am making that day.  I found that working with wedges helped immensely to get the proportions correct for each bun.  I made a cue card for each design to show me how many pieces each design required and how to best cut the wedge to get the pieces.  I also added helpful notes from previous attempts. 

I like to make several different designs in one session.  That's where the cue cards come in handy.  Since you are working with a living organism working quickly is necessary.  I found it best to make a mix of easy and difficult designs so as to fit within the time frame I had.  I kept all pieces covered with lightly oiled clear wrap so as to prevent a crust from forming.  I found that making the bodies first then adding the smaller pieces worked the best.  I would shape the body, press it down to secure it on the pan then move on to the next body.  I would then start adding the smaller pieces, then the eyes and slash in details.  The bamboo skewer blunt end is used to make indents in the dough for the eyes and noses.  The chopstick is good for larger designs and also for cupping the ears of the bear.  The scissors are for the hedgehog and cat. 

 The cookie cutters are for the fish, grape cluster, and rose. 

Right up until the time they go in the oven I continue to check on them and push the dried fruit in, etc. if they start to fall out of the rising dough. 

At first I thought I had to pinch the pieces together but found that simply tucking them under slightly held them together just fine.

Just before baking I continue to make small adjustments, redefine slashes if necessary, then brush on the egg white.  If any egg white pools in the eyes I dab off the excess with a corner of a paper towel.

My failure rate is very small.  It seems that with a little diligence the eyes stay put and the pieces stick together.


RonRay's picture
RonRay

Apricot Yeast Water Pullman Loaf

Apricot Yeast Water Pullman Loaf

Previously, I posted a short Pullman loaf leavened with Potato Yeast Water (PYW). Link:

http://www.thefreshloaf.com/node/23793/potato-yeast-water-pullman-loaf-shorty

In that post, I concluded that “Although, I found PYW worked well, and made a good loaf, I decided that the making of the levain, and creating another YW seems unjustified just to introduce potato flakes and sugar into a loaf.” In this post, I simplified the process by introducing the sugar and potato flakes in the Final Dough, and used a strong Apricot Yeast Water (AYW) culture as very nearly the total water used in the loaf. The only other water was the approximate 3.8g contained in the unsalted butter used.


The formula above provides the Baker's Percentages of the ingredients, as well as the weight of ingredients actually used for the reduced sized Pullman pan, which only required 482g of dough. The percent hydration level was about 62.2%HL.


A fuller account of the formula, Apricot YW (AYW) 2-stage levain builds, method, and observations can also be found in a PDF of my baking log at this link:

D-b_110529_Apricot YW Pullman 482g_[Photos]_110602-1635 .pdf - https://docs.google.com/viewer?a=v&pid=explorer&chrome=true&srcid=0B_MScoZfDZkwMWFjMWNiMzktYjNjMy00MzU1LTkxNjQtOTAyZjM5ODQzMThm&hl=en_US


Actually, a 3-Build Levain had been planned, but in a hectic kitchen moment, I started the Final Dough with only the first two levain builds. Fortunately, I caught my error in time to simply add the remaining 100g of AYW and 100g of AP flour into the Final Dough mix and all worked well.


The short Pullman loaf measured (5-5/8” x 4” x 4”)/(14.3 cm x 10.2 cm) and the 482g batch size managed to fill the pan with a 9 hour rise at 82ºF ( 27.8º C) . For additional details, see the notes in the above mentioned PDF.


The crumb texture was soft, but firm, moist and quite flavorful, with a very pleasant fragrance, however, there was no discernible taste of apricot that I could detect.


It worked very well as both a sandwich bread and for excellent toast.


It has survived three and one half days, as of this writing (I had a loaf in front of it to eat, too). I just had another sandwich made from it and it seems as moist and fresh as it did when first cut. The flavor enhancement resulting from the Apricot YW, rather than just the Potato YW used in some previous loaves, is a fine improvement of the formula. I do think, however, that I will do the Build-#3 as a levain build on the next loaf, rather than mixing the 100g of AYW and AP flour in the final dough. On the other hand, this accident demonstrated that a great loaf can be made this way, as well.

Ron

codruta's picture
codruta

hamburger buns

I was in a search for the perfect hamburger bun for a long time. When I say "perfect", I mean perfect for my personal taste. I've tried Peter Reinhart recipe from BBA, I've tried different recipes form diferrent sites, I've tried Tangzhong method, all with wonderful results... but not perfect. Recently, I took hamelman's ingredients from page 258 (soft butter rolls) and Susan's pate-fermentee method link here , followed by these modifications: I've decreased the quantity of yeast, taking as refference the quantity given by susan, and I adapted for my quantity of flour, I've used milk instead of water, and remove the dry milk from the ingredients list and I did not used steam when baking. The buns came almost close to perfection. Next step is to use sourdough instead of old dough, but I'm not sure about how to substitute one to another (the old dough can be replaced using the same quantity and hydration by sourdough?? -can it be that simple??)

More pictures and complete recipe (written in romanian, but translator available on the sidebar, although, the automatic translation it's kind of funny) can be found here Apa.Faina.Sare

Codruta

davidg618's picture
davidg618

You know you're a foodie when...

...you return from a wonderful weeklong boat trip on the Rhine river, through Germany and France, with only one souvenir: a Kugelhopf baking pan.

Today, I baked my first ever Kugelhopf. The original recipe came from here http://www.thefreshloaf.com/node/19577/gugelhupf. I modified it slightly.

Kugelhopf  (recipe from TFL; Hezi, IsrealiBaker :modified)

Ingredients:

500g Flour (at least 60% AP)

7g Osmotolerent  IDY

50g sugar

3 large eggs

100g water

200g whole milk

zest of 1 lemon

10g salt

200g unsalted butter, well softened

Brown sugar to dust pan

For post-bake sugar glaze:

            100g water

            120g sugar

            2 or 3 lemon peel strips

Directions:

In mixer bowl, combine flour, sugar and yeast; whisk to combine.  Add eggs, water, milk and lemon zest.  On low speed (KAid speed 1) combine until well incorporated; increase speed (KAid speed 2) for 2-3 minutes. Cover and rest for 20 minutes.

Add salt and continue kneading (speed 2) for seven minutes. Scrap bowl occasionally.

Add butter in thirds, combining each third on low speed until butter disappears.

Increase to moderate speed (KAid speed 4) and knead, scraping bowl occasionally, until dough just begins to clean the bowl’s sides (about 10 mins.).

The dough will be very wet and sticky, but satiny. Collect into a coherent mass in the mixer bowl, cover and rest in refrigerator for 1 hour. Stretch and fold in bowl, degassing vigorously.

Return dough to refrigerator, covered for one-and-one-half to two hours, until it doubles in bulk.

Preheat oven to 375°F.

While dough rises prepare the pan by liberally coating inside with soften unsalted butter, sprinkling brown sugar of entire inside. This brown-sugar and butter mixture will caramelize, giving the cake’s exterior a delicious color.

Also, mix the glaze sugar, water and lemon peel in a small saucepan. Bring to a boil and simmer for about five minutes. Set aside to cool

Transfer dough to Kugelhopf pan, or Bundt pan, filling to slightly more than half. Cover, and allow cake to rise until slightly below the pan’s top edge.

Bake on lowest shelf until top ( the cake’s bottom) is deep brown, and internal temperature reaches 195°F to 200°F

Remove from oven, and let cool in the pan for about five minutes; then remove from pan. Let cake cool completely.

Brush the cooled cake liberally with the sugar glaze. Let it dry until tacky; then sprinkle with granulated sugar or powdered sugar.

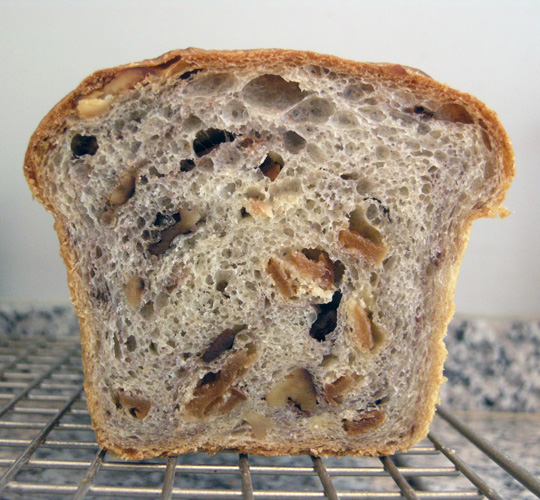
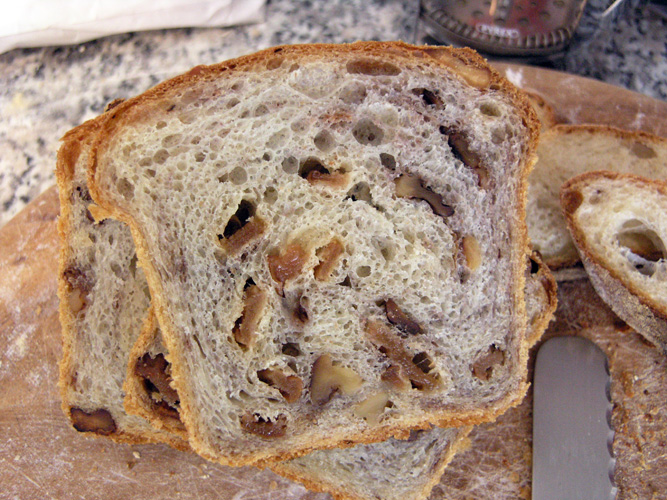
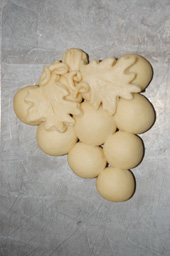
Overall, I'm pleased with the result. I had a little dough left over that I baked in a tube pan, glazed it like the one pictured, and tasted it.  Crumb is moderately closed, light and airy, with a nice spring but no chewiness. flavor not overly sweet.

I made the dough entirely with King Arthur AP flour. I didn't want to run the risk of a "chewy" loaf. The picture loaf is going to a dinner party tonight, so no crumb shot. I'm going to do another in about ten days, for another dinner party,  but will do a 60% high gluten flour, 40% chestnut flour, and incorporate brandy soaked currants, and chopped, roasted chestnuts. Since the party's at my house I'll post a crumb shot of that version.

David G

breadbythecreek's picture
breadbythecreek

Inquiring Minds Must Know!! Can Blueberry Yeast Water be Pushed to the Limit?

The question I had is what would happen if you fed a Blueberry Yeast Water/Bread Flour levain additional Blueberry Yeast water, using seeds from previous levain builds.  Namely, what is the effect of increasing population of blueberry yeast over a series of builds while holding the overall volume constant.  Would there be an improvement or degradation in rise times or volumes?  Would there emerge a limit as to how quickly a doubling or peaking would occur?  Would it explode into a new black hole? These were the questions that I just had to answer for myself.

Methodology

I started with 10g blueberry yeast water (BYW) and 10g Bread Flour (BF). This was left to rise to its maximum height and plateau, whereupon it was chilled for the night.  The next morning 7 grams of this levain was fed 7g BYW and BF, and again left to rise to it’s maximum height and plateau, then chilled or refreshed.  Using time-lapse photography (thank you RonRay), I was able to track the level of growth for each build on 15- minute intervals. I intended to continue this refreshment pattern and observe the action until the growth/plateau cycle was found to closely resemble the previous builds or something else happened to draw my attention away. 

 Findings

 The following graph shows the results. 


Just looking at the doubling times, clearly the more iterations of builds shortens the time required for the levain to double.  R1 took almost 7 hours to double, whereas R2 took 5 hours, and R3 took 2.5.  Most of the trials R3-R7 in this 2-2.5 hour range to double. By far the fastest doubler was R8, at just 1.5 hours.

There is also interesting phenomena with respect to the period of growth before plateauing.  R1 took about three hours take off, presumably adjusting to the new food/environment, and didn't fall off until almost 8 hours after the first feed (5 hours of active growth).  R2 took an hour get going, but fell off an hour quicker than R1, (six hours of active growth.  R3 didn't lag at all. It grew from the time that it was fed and continued steadily for almost 6 hours.  R4-R6 all took off from the get-go, and enjoyed a solid 4-4.5 hour growth stage before plateauing.  The standouts were R7 and R8, which both not only took off from the start, but also, grew for an astonishing 6 hours before exhaustion.  So something about more yeast in the culture allowed for a longer growth stage, despite a finite and constant supply of food.

The peak volumes also varied with the yeast concentrations.  The lowest amount of yeast, R1 was barely able to double (2.3X) before giving up.  R2 was slightly better at 2.5X. R3 and R4 made it just to 3X. R5 and R6 got to 3.5X, but again, look at R7 and R8. They got to an impressive 4X! It took them a long time, but they never lagged, they just kept going, and going and going.

From a temperature perspective, there is apparently an outside, uncontrolled effect.  As we can see, the cycles R3-R8 closely track each other.  The cycles of R7 is very similar to R5, both of which were started first in the day, from seed chilled overnight in the refrigerator.  R8 proves to track closely with R6, indicating a typical afternoon pattern. So there may be a distinct positive effect from room temperature (it gets hot in the afternoon here now (86*F+).

In conclusion, I believe a YW builds should be fed subsequent builds with more active YW until a doubling can be achieved within about 2 hours and the capacity of growth is around 3x or more, usually by the third build.  Given the time and desire for even stronger levains, subsequent builds using active yeast waters will not have a detrimental effect on your doughs, although some care should be taken to avoid overproofing.

An aside... In a separate experiment, I discovered that this Blueberry Yeast Water is the least effective of my collection, bested by far by the Cherry Yeast Water.  I intend to repeat this analysis using the Cherry Yeast Water instead.

Again Stay Tuned...

-Pamela

codruta's picture
codruta

four or five grain levain

I don't know why I've waited so long to make this bread, after buying hamelman's book. I've done it before, from intructions giving on this blog, which were very helpful, btw. For grains, I used a mix of fennel seeds, flaxseeds, spelt berries and oat bran. I retarded the dough overnight, omitted the yeast as instructed, and I baked it directly from the fridge. For the final fermentation, the instructions weren't very clear to me... in case I opted for retarding the dough overnight, it still gets an hour of fermentation on room temperature, or after shaping goes directly in the fridge??

Final fermentation. Approximately 1 hour at 76 degrees. [The dough can be retarded for several hours or overnight, which case the bulk fermentation should be 2 hrs with 1 fold, and the yeast left out of the mix.]

Not knowing what to do, I let it stand 45 minutes at room temperature (78F), but I still don't know if that was good, or this step shoud have been skipped. Maybe someone can clarify this.

Also, I don't know if baking directly from the fridge was the right decision, I wonder if it would have risen more if I let it stand 1 hour at room temperature before baking?

Anyway, I'm extremely pleased with the result, the taste is absolutly amazing.

More pictures and the addapted recipe (recipe in romanian, translator on the sidebar) can be found here, at my new blog  Apa.Faina.Sare

breadbythecreek's picture
breadbythecreek

Survival of the Fittest – Which Fruit Yeast Water to Keep?

I’ve been experimenting with various types of yeast water for several weeks now.  I now have five separate jars percolating on the counter or in the refrigerator.  Since I’ve discovered that very little if any fruit flavor is discernable in baked breads made from these waters, it makes sense to me to keep only one.  It also makes sense to me to keep the one that is the most effective.  I have heard that raisin yeast water is the strongest and most active.  When I first started experimenting with these waters, I made a raisin/apricot yeast water, but the color and murkiness was not appealing, so I threw it away shortly after it was created.  Today I am making a new jar with just raisins and another with just apricots.  These will be tested against the winner of this trial.

To see which of my active yeast waters are the more effective, I created test waters containing 30g each of peach, blueberry, strawberry and cherry.


 To these amounts I added 90g fresh water and one sugar cube. These jars were left out overnight to activate the yeasts.  This morning I took 3 grams from each of the jars and 3 grams of AP flour. These were mixed together and placed in identical test-tube like glasses (tall and very narrow).

9:30am, roughly 3 hours since start time

 Now it is four hours into the test.  Gauging from my ongoing work on the blueberry yeast water, this first build will take approximately 7.5 hours to plateau.  Halfway through, it seems that the growth pattern of the testers matches too closely to the order in which the tests were prepared, lagging perhaps by no more than 5 minutes from the first (cherry) to the last (peach).  Also, both the strawberry and the peach were slightly more hydrated than either blueberry or cherry.


At 12:31pm, roughly 6 hours later, it appears that the cherry levain is far stronger than either the blueberry or the peach. The strawberry levain is only slightly behind the cherry in growth.

At 2:09pm, roughly 7.5 hours later, it is still cherry in the lead.  At this point I noticed that the glasses are not identical – some are deeper than others.  This accounted for, the cherry is still slightly more effective than the strawberry.  Also, approximately at this same time, cherry had reached its maximum height, approximately double the start level.   Strawberry went on to double at approximately 8 hours, as did peach.  Blueberry, interestingly enough, did not achieve more than a 50% growth over the entire period.


So there you have it. In terms of overall effectiveness for a first level build, cherry is the strongest of the test set.  The rest are not as effective for raising culture in a given period of time.


Next trial, Cherry against raisin and apricot.  Stay tuned.


Pages