The Fresh Loaf

A Community of Amateur Bakers and Artisan Bread Enthusiasts.

Most bookmarked

jefekefe's picture
jefekefe

Doors and WFO bread

Hi friends,

Some have asked for some pictures of my oven and door.  So, here you go...

I LOVE baking bread in this thing, almost more than I do pizza.  Yesterday's batch came out nice, but I noticed that only the ones that I really pushed in the oven got the hard crust I was aiming for.  I think I may have overdone it with the steam (cast iron skillet with water, plus mister).  Is there any way to have to much steam?  Is that the cause of my softer, yet dark crust?  Thanks for the help!  Love this forum!


Jeff

codruta's picture
codruta

very stiff dough for golden raisin bread

hello everybody! Last evening I began to make "golden raisin bread" from hamelman book, page 172. I increased the amount of water with 5 % (from 69% to 74%), after I read on this forum that the hydration given in the book gives a dough that is too stiff. I omited the yeast from the recipe. I did 2 S-F at 40 min interval, with a bulk fermentation of 2 hours. I shaped a small boule and a small batard and I put the doughs in the fridge overvight. The dough was stiff when I shaped it, and it didn't raise in the fridge (maybe just 10%). When I press the batard with my hand it's like a rock, I don't feel air trap inside. I start to thinking that I didn't use the right "rolled oats". I used old fashioned rolled oats, should I have used quick cooking rolled oats instead?

I removed the loafs from the fridge this morning, and I'll wait to see if they raise at room temperature. I don't know what to do, is so hot here, I don't want to use the oven if the dough is bad. Two hours of intensive heat and sweat, just to have 2 doorstops- can be very frustrating.

Overall formula was 348 g bread flour, 87 g whole wheat flour, 325 g water, 9 g salt, 44 g old fashioned rolled oats, 110 g raisins. (The prefermented flour was 15% from the total amount of flour, and the levain was liquid, at 125% hydration).

What did I do wrong? Or this dough is suposed to be dry and stiff?

codruta


freerk's picture
freerk

a boston brown quick fix

I don't even know what it was I wanted to do; I just ended up fascinated by the fact I had just purchased two tin cans of cookies, and, when flipping open Glezer's book, there was that picture of  that bread sticking out of tin cans; the Boston Brown Bread! So, sometimes if not all the time, a man's gotta do what a man's gotta do:

I didn't have nearly enough dough to make it out of the tin cans, but once removed you could never tell the difference:

The bread was... interesting. It's got light molasses in the formula, and all I had was dark molasses. Even though I downed the amount in the formula in favor of some extra milk in the very stiff and dry dough, the end result is still very....molasses. The dried cranberries work wonders in it!

There were some odd discrepancies in trying to recreate the formula. The dough I ended up with wasn't nearly enough to fill 3/4 of the tin cans, even though they had the exact recommended measurements. Maybe I dozed off for a second, maybe the rye was extremely thirsty today, I'll never know.

So, a bit on the dry side for my taste, but very comfy and x-massy to eat (dutch summer sucks anyway), I'm sure when the northern winds return I'm going to give the Boston Brown Bread another spin!


greetz

Freerk

 P.S. You would do me a big favor endorsing my BreadLab iniative. Every "like" will get me closer to realizing a 6 episode documentary/road movie; chasing the best bread Europe has to offer. Thanks in advance!

ananda's picture
ananda

Inspirational Stories

Here's a fine tale from one of the many inspirational people driving forward the demand for good, honest bread!

http://sourdough.com/blog/tasting-bread

Best wishes

Andy

breadman_nz's picture
breadman_nz

Hobart N50 restoration experience

As  a followup to my original N50 thread: http://www.thefreshloaf.com/node/23049/n50-arrivednow-refurb

I'm reporting my experiences stripping down and refurshing my recently-acquired second-hand Hobart N50 mixer (which now will sit alongside my DLX2000). Hopefully it will be useful to anyone else taking this (not too difficult) project on. Unfortunately I didn't take any before pictures (lazy me!), but it was in somewhat beaten-up shape with well-worn paint over most of the base. A nice collection of photos of another person's strip and rebuild can be found here: http://www.flickr.com/photos/zug/sets/72157622051782719/

Parts were missing - the rubber feet, attachment cap and thumbscrew, no dough hook or beater attachment. The Hobart logo sticker was worn. The gear cover plate was warped. The bowl latch spring was broken. She did run, and run smoothly in all gears, but I had always bought it with the goal of a full tear down, repaint and rebuild.

The N50 service manual helped a little, but it is definitely doable without it. It has some useful tips, such as how to split the motor and transmission housings from each other and also how to adjust the transmission for smooth, quiet operation. The pictures/photos are also helpful. It's worthwhile having in additon to the parts diagrams freely available from Hobart.

Firstly, I ordered all of the missing / worn / broken parts. So far so good. As discussed in the thread above, I ordered some Morey synthetic 'blue' food grade grease (expensive - and incorrect - see below). During the strip down, which is mostly a methodical and logical process assuming you have the usual basic tools, patience and a modicum of mechanical knowledge, all went well. You will need some pin punches to drive out the various shaft pins. Other than that, no special equipment needed. The technique in the service manual of hitting the accessory hub attachment with a hammer in order to separate the motor housing from the gear housing is very worthwhile.

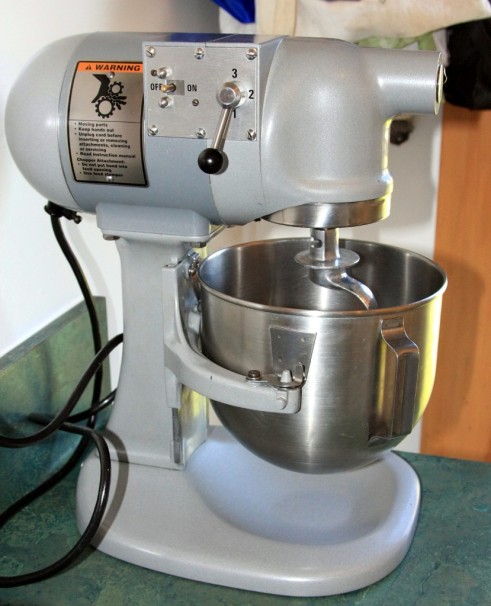
The most major problem in the rebuild occurred at this stage: having removed the motor from the housing, I accidentally dropped the housing on the concrete floor! It was immediately obviously dented - ouch! I completed the tear down, removed all of the old (brown, discoloured) grease from the gear housing and took all of the paintable parts to the powder coaters. There, we discovered that the motor housing wouldn't mate properly to the gear housing due to the dent. Popping across to the engineering shop, I thought all was a relief, as they managed to gently tap the housing back into what looked like was the correct shape, as it aligned and fitted once more to the gear housing. Whew (or so I thought). Got the bits back from the powder coaters, and the bowl lift handle back from the metal re-platers (it's nickle, in case you're interested). Also got some new decals printed using a Hobart logo online: http://en.wikipedia.org/wiki/File:Hobart_logo.svg

I then reassembled the gears and transmission and packed it with the Morey synthetic blue... some disgustingly sticky, tacky stuff. Now the real pain - the stator wouldn't fit into the still-distorted motor housing - arrrrgh! It's such a tight fit with no tolerance for variance. I tried filing the fins off the inside of the motor housing - and did get it to fit - but of course the rotor then wouldn't line up within it, while still rotating freely with the starter housing on. Realising that I would need a new stator housing was painful in the extreme - but that's what you get for dropping the most expensive piece of the mixer! Determined to see the project through I bit the large bullet and ordered a new housing which arrived in due course. I finally refitted the the motor and connected it all up. Hit the start switch to test... A loud "hummmmmm", but no rotation!! It turns out two problems were occurring:

1) The blue synthetic morey grease was just too tacky. Although it's a NLGI grade 2 viscocity (the correct one), it is extremely tacky stuff. Changing to a different synthtic but soapy-type grease (similar to the original stuff, but synthetic) - hooray!

2) The contacts on the start switch (not the on-off switch, but the switch at the rear of the housing) were not being adequately compressed. I'm not sure why this is, but I have managed to shim between the rotor and switch so that it turns on and off. It's a fine balance between the mixer turning on properly and having the contacts too close so they're shorting. One day I might take it to the local mixer service agent for a quick look, but for now it's working just fine.

 [UPDATE 26/12/15: the problem with the starter motor was eventually traced to needing a shim (metal washer) on the shaft of the rotor, in the motor housing. Finally working this out had two advantages as the rotor is now correctly positioned a few mm's further to the rear of the mixer. One, the starter works first time, every time without shims. Two, the (17T) drive pinion doesn't strip the (49T) main gear. Don't ask how I found out this was the problem, except know that it cost two replacement main gears to figure out. To assist, the location of the shim sits at part #18 on this diagram: http://thesmartpartsestore.hobartservice.com/category/7939/motor-parts and is listed as "spring, loading" (SL-005-10).

For older model N50's, the location of the shim is at part #14 & 15 on this parts diagram: http://thesmartpartsestore.hobartservice.com/category/7926/motor-parts. Part numbers are WS-007-21 and/or WS-007-19.

I made the first batch of pizza dough and a sourdough bread with it yesterday - and it is a fantastic mixer. It's less work than my DLX2000 - in fact it's no work at all, in that I don't have to babysit the initial process to ensure ingredients are properly incorporating, or ensure the dough is still rotating around the bowl properly. I look forward to trying it out with drier pasta and bagel dough later this week.

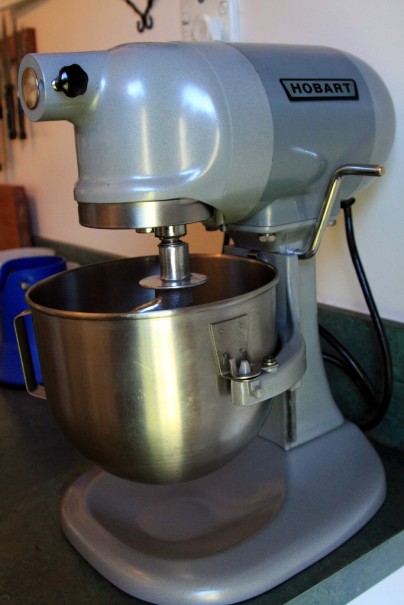
As you can see from the photos below - it's a custom two-tone colour, since I couldn't be bothered getting the new motor housing poweder coated in the same colour as the other bits I'd gotten done. I like the effect, I've decided! The new motor housing also came with the warning plate attached, and has a larger bolt at the front corner - visible in the first picture - holding it onto the column (which necessitated tapping a larger 3/8th" hole into the column).

Overall, it's been a fun project (dropped housing notwithstanding). I've learnt a lot - and can now pull the mixer to bits in about 5-10 minutes.


diverpro94's picture
diverpro94

Question About Malt Syrup!

I am thinking about buying some malt syrup, but I don't know much about it or have ever used it. For baking exclusively what do I need to look for in malt syrup? Also, recommend me some specific brands. Thanks!

freerk's picture
freerk

Pain aux Céréales, based on Erik Kayser's formula

Hey fellow TFL-ers

Erik Kayser's formula's and breads are quickly gaining popularity in my baking ball-book. After giving his Buckwheat Paline a spin earlier, I went for the Pain aux Céréales this weekend, pointed to Don's formula here by Andy (Ananda). It was a great success from start to finish. A great dough to work with, a wonderful balance of flavours and, not unimportant, a great looker!

The seeds

The loaves

 A detail of the crust

and the crumb of course


Happy baking, thank you Don for the formula, and Andy for the pointer!

Freerk

P.S. You would do me a big favor endorsing my BreadLab iniative. Every "like" will get me closer to realizing a 6 episode documentary/road movie; chasing the best bread Europe has to offer. Thanks in advance!

ananda's picture
ananda

Pain de Mie with Wheat Levain, Exploding Mixed Leaven Pain de Campagne and a 90% Rye Sourdough made with the Three Stage Process

Pain de Mie with Wheat Levain, Exploding Mixed Leaven Pain de Campagne and a 90% Rye Sourdough made with the Three Stage Process


1.    Pain de Mie

I made 3 loaves in pans, varying sizes as noted below, using only a wheat levain to raise the bread.   There is a basic amount of enrichment in the formula.

I built the leaven in 3 stages, beginning with 40g of stock on Thursday lunchtime and ending up with over 1300g of ripe leaven for Saturday morning baking session.

Material

Formula [% of flour]

Recipe [grams]

1. Built Leaven


Carrs Special CC Flour

25

350

Water

15

210

TOTAL

40

560


2. Final Dough


Wheat Levain [from above]

40

560

Carrs Special CC Flour

70

980

Bacheldre Organic Dark Rye Flour

5

70

Salt

1.5

21

Milk Powder

2

28

Organic Butter – lightly salted

2

28

Water

50

700

TOTAL

170.5

2387

FACTOR

14

-

% pre-fermented flour

25

-

% overall hydration

65

-


Method:

  • See leaven build
  • To mix, combine all the ingredients slowly to form the dough.   Rest for 10 minutes, then develop for 10 minutes, rest a further 10 minutes, then develop a final 10 minutes.   DDT is 28°C.
  • Bulk proof in a covered and lightly oiled bowl for 2 hours.   Give one “stretch and fold” half way through.
  • Scale and divide as follows, moulding each piece round:

One Pullman Pan needs 4 pieces @ 285g each; total 1140g

Large Loaf Pan, 4 pieces @ 195g each; total 780g

Small Loaf Pan, single piece @ 467g

  • Pan the large loaves as “four pieces”, and use a single piece for the small tin.
  • Final proof 3 hours
  • Bake profile: I made the small loaf as a “Split Tin”, floured top with single cut along the top of the loaf.  Pullman is baked with the lid on throughout.   I set the bread in the oven at 220°C, with a reasonable amount of steam used for the first 10 minutes of the bake.   The small loaf baked in 25 minutes, larger loaf in 35 minutes, and the Pullman loaf was ready after 45 minutes.   Each loaf recorded a probe temperature reading of 96°C at the core.
  • As ever, cool on wires.


2.    Exploding Pain de Campagne

This only ever seems to happen to me in the following situation: baking at home using my Baumatic Fan Oven with dough pieces which have been retarded to any extent.   The reactions seem to kick in after 5 – 10 minutes in the oven and the spring is too great, so the dough explodes at the most convenient spot……here, at one of the cuts; just one, of course!   I cannot believe the dough has not been properly fermented, but I have not cracked this problem yet.   I ended up with 2 loaves proved in bannetons, scaled as described below.

The bread is raised with 2 leavens, both built with 3 refreshments.   The wheat levain is described above.   The rye sourdough was refreshed at the same times and I began with 40g stock and ended up with a kilo of built culture.

Material

Formula [% of flour]

Recipe [grams]

1. Wheat Levain


Carrs Special CC Flour

12.5

150

Water

7.5

90

TOTAL

20

240


2. Rye Sourdough


Bacheldre Organic Dark Rye Flour

7.5

90

Water

12.5

150

TOTAL

20

240


3. Final Dough


Wheat Levain [from above]

20

240

Rye Sourdough [from above]

20

240

Carrs Special CC Flour

80

960

Salt

1.75

21

Water

48

576

TOTAL

169.75

2037

FACTOR

12

-

% pre-fermented flour

20

-

% overall hydration

68

-


Method:

  • Build the leavens as above
  • Autolyse flour, water and rye sour for 1 hour
  • Add salt and wheat leaven and develop using slap and fold technique for half an hour with 2 rests of 5 minutes within that time.   DDT is 28°C.
  • Bulk ferment for 1½ hours ambient, then 1 hour chilled.
  • Scale and divide @ 1237g and 800g pieces.   Mould round, place in bannetons and proof in the chiller for 2 hours.
  • Tip out of the banneton, cut the loaf top and bake with plenty of steam in a hot oven.
  • Cool on wires.


3.    90% Rye Sourdough made with the Three Stage Process

Building on the theme explored with Borodinsky in the previous post, this recipe uses the same 3 stage process, but the “scald” is very much a “mash”, as opposed to a “boil up”.   I have called this a “zavarka”, as this is the term we used at Village Bakery where we made a “boil up” as part of the Pane Toscano breads.   This is a “mash” much more akin to the techniques used by Peter Reinhart is his “Wholegrain Breads” book.   Where the “boil up” seeks to fully gelatinise the starch, and thereby encourage maximum water take up, the mash is seeking to create optimum amylase activity by holding the mix at the ideal temperature to expose the sugars, and to engender the enzyme reactions.   It is the process used in brewing beer/ale/lager, which I enjoyed experimenting with way back in the 1980s as a student.

For the rye sourdough, I used the mature culture from the previous bread giving it one more refreshment.   However, this time I refreshed in a way which altered the hydration level from 100:167 to 100: 113.   This was a means to achieve the lower hydration I plan to use in the final formula at 78% rather than 85%.

Material

Formula [% of flour]

Recipe [grams]

1a] Built Sour


Bacheldre Organic Dark Rye Flour

30

300

Water

43

430

TOTAL

73

730

1 b] Zavarka - mash


Red Malt

5

50

Bacheldre Organic Dark Rye Flour

20

200

Water

35

350

TOTAL

60

600


2. Sponge


Built Sour [from above]

73

730

Zavarka – mash [from above]

60

600

TOTAL

133

1330


3. Final Dough


Sponge [from above]

133

1330

Bacheldre Organic Dark Rye Flour

40

400

Carrs Special CC Flour

10

100

Salt

1.5

15

TOTAL

184.5

1845

FACTOR

10

-

% pre-fermented flour

30 + 20 = 50

-

% overall hydration

78

-


Method:

  • Prepare the final refreshment for the rye sour and set to one side for 5 hours.   Make the zavarka by combining the red malt and the dark rye flour with water @ 85°C to give a mix temperature of 65°C.   Hold the mash between 55°C and 65°C for 5 hours.
  • For stage 2, combine the rye sour and the zavarka and leave to ferment overnight.
  • Add the remaining flours and salt to the sponge to form the final paste.
  • Bulk ferment for 1 hour
  • Line a Pullman Pan and smooth the paste into it for final proof.
  • Final Proof 3 hours
  • Bake for 2 hours in an oven at 160°C with a steady source of steam.
  • Cool on wires.


Sorry no crumb shots of the Pain de Mie; had to get the bread to the freezer whole for future projects.

Next week it’s the UK TFL Course in College on Tuesday and Wednesday; then, I’ll be on my way….

Best wishes to all

Andy

dmpiccolo's picture
dmpiccolo

Hot Dog Buns

Does any body have a hot dog bun recipe that I can use to make New England style buns? The one on the KA site is to rice and buttery for me. I'm looking for something simpler.

robin.masters's picture
robin.masters

Skipping yeast from books

Hi,

I'd like to ask for your help. I'm a beginner bread baker, making my own sourdough (Reinhart recipe) at home and baking 100% whole wheat bread (from Reinhart's Artisan Breads Everyday) on a regular basis. I'm quite satisfied with the results. To make it a bit complicate i'm on a candida diet, can eat only whole grain flour and not allowed to use yeast. So sourdough is a natural choice. But that's the only recipe i know where i can bake without yeast. 

I've recently bought Reinhart's Whole Grain Breads and the Hamelman Breads book as i would like to try new recipes. I'm a bit disappointed as almost all of the recipes are with yeast (but they are great books of course). I know that's not that easy to just leave yeast. Is it any way to increase the sourdough or any other method to leave yeast somehow? 

In the Artisan Breads the yeast is only optional, so maybe there is some way to use those recipes.

Any advice would be helpful.

Thanks in advance,


Csaba


Pages