The Fresh Loaf

A Community of Amateur Bakers and Artisan Bread Enthusiasts.

Most bookmarked

mwilson's picture
mwilson

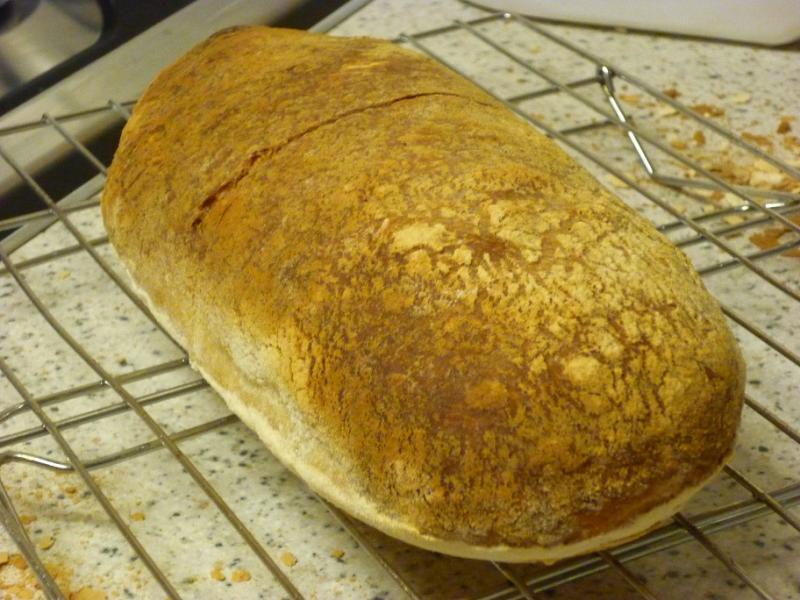
Sourdough Ciabatta Experiment

Biga acida

  • 20g lievito naturale
  • 200g '00' flour
  • 80g cold water

Lievito dissolved in water first then mixed with flour to create a very dry dough. Pin rolled until smooth. Rolled flat, ~4mm thick, wrapped in cling film and refrigerated for 2 days before removing and left overnight until mature.

Final dough

  • 175g biga acida
  • 35g '00' flour
  • 86g water
  • 3g salt

Cut biga into pieces and mixed with 35g of water. Added flour to combine. Added salt. Adjusted the mix with remaining water to achieve a total hydration of 85%. Very minimal kneading. A few s&f's performed.

Crumb

Observations

The biga was wonderfully strong after fermentation. Stronger than I ever felt a biga to be, really nice to feel. Fruity alcohol smell and characteristics reminiscent of a yeasted biga but accompanied with an acetic acid taste. 

The biga contributed vast strength, the final dough at 85% handled like it was 70%!

Final dough didn't rise as swiftly as I expected. The biga was probably not fully mature.

Baked loaf has wonderful flavour in the crust and some sourness in the crumb. Super light.

-Michael

SylviaH's picture
SylviaH

Bread Crumbs and then there are Panko Bread Crumbs

I just love those crunchy, flaky, best for coating fried things Panko bread crumbs :)

Making homemade Panko Bread Crumbs.  Fun easy and fast.

Recipes are posted all over the web.  But I've never actually seen one here.  So here goes.

Pre-heat your oven to 300F

The secret weapon.......The Food Processor Shredder Disk : )  little did I know :/

Assemble your food processor with the largest sized shredder blade

Panko is usually made with a very shreddable, soft fluffy type plain white bread.  I like my sourdough stale leftover bread of coarse

Simply remove all the crust

Process the bread in your food processor with your largest shredder disk

Place the crumbs onto a cookie sheet.  

Bake in a pre-heated 300F oven for aproximately 6 minutes..till dry and crispy.   Do not brown

Done, just about..........unless of coarse you want some of those delicious seasoned bread crumbs.  My favorite are Italian.  Add whatever seasoning you like..toss.   

Place into storage bags and freeze for later if you like.


Store bought or homemade breading???  Answer at the bottom on the photo.

storebought Italian Panko...made this eggplant parmesan yesterday with the last of my Italian style panko.  Now I'm a day older and wiser...where have I been.  

Sylvia


HappyHighwayman's picture
HappyHighwayman

Do you line your proofing basket?

The other day I was baking two loaves, and I only had one proofing basket so I took a wicker basket and lined it with a dish towel which I floured and used as an impromptu basket. Ironically I hadn't properly floured the proper basket near the edge of the top and when I turned the basket over the dough stuck a little, while the dough in the lined basket came out easily. 

I note some people line their proofing basket anyway with what appears to be either a dish towel or cheesecloth. Do you line your baskets before flouring and introducing the dough?

You can see the bread on the left was baked first and was the one with issues, while the one on the right used the line wicker basket and came out better.

I'm also having issues properly scoring the bread. I find it just doesn't cut well even though I got a scoring knife though perhaps I should just buy some razor blades?

Song Of The Baker's picture
Song Of The Baker

Sourdough Starter - How Much is Too Much?

Hi all.  I had a previous post on here with my first sourdough bread - Vermont Sourdough from JH.

As mentioned before, I was happy with most aspects of the bread, just wish it had a more sour flavour.  It was barely detectable.

Now, I have seen recipes with all different amounts of starter, ranging from a teaspoon, to a half cup - for a 1 - 2 lb loaf.  My question is, which ratio would produce a more sour flavour?  The ones with more starter, or less?  I understand that most of the sour is developed in the method of retarding the proof, usually 16-18 hours at 5 - 10 degrees.  But would using more starter in a recipe enhance the sour even more or not at all?


kefirchick's picture
kefirchick

help needed for soft Kosher hamburger buns

Unlike chewy crusty flavorful sour dough breads eaten for their  taste and texture, a good hamburger bun needs to be soft, mild and even a bit fluffy in order to function as the perfect platform for a hunk of char grilled meat.  Most hamburger buns are made with milk and butter to achieve the correct texture.  However, for those of us who keep kosher, we can't mix meat and milk products.  Does anyone have a recipe and/or technique for making a good soft kosher hamburger bun?  (Most kosher store bought hamburger buns are small,hard, dry cardboardy things that taste of too much potato flour.)

I have tried a variety of tricks including water roux, non-dairy milks , parve margerine, potato flakes etc, and keep ending up with flat hard bisquit like rolls instead of puffy bread. Embarrasingly, my best results were when I increased the yeast, and added vital wheat gluten, barley malt, and liquid soy lecithin.  They puffed up, and looked like decent buns, but the tops were still a little too hard.  I ended up cramming them into a plastic bag for 48 hours, and that softened them up a bit, but I feel like a traitor for having to use all of the dough conditioners, and breaking all of the bread baking rules I have learned on this forum.

This is the final recipe I used, which is a modification of a King Arthur  Seeded Hamburger Bun recipe I found on their web site.

Ingredients

2 ¾ C KA Bread Flour (fluff and loosen before measuring)

2 TBS sugar

2 Tsp kosher salt

1 TBS INSTANT yeast

½ Tsp vital wheat gluten

½ Tsp barley malt

¾ C lukewarm water (100 degrees F)

1 large egg

2 TBS canola oil

1 TBS liquid soy lecithin

  1.  Mix dry ingredients in large bowl (flour, sugar salt vwg, barley malt)
  2. Add wet ingredients: egg, oil, H20, lecithin
  3. Knead by hand to form soft dough
  4. Allow to rise in warm place, covered til it doubles, or place in fridge until you are ready for it (I did fridge overnight).  Remove from fridge, and allow to warm to room temp.
  5. Gently degass, and divide into 6-8 pieces.  Place in ramikins or other ceramic dish of the size needed . Paint w egg  and sprinkle with sesame seeds. Cover with saran and towel and place in warm area
  6. Allow to double.
  7. Bake 15 mintues at 375. Check browning and re-arrange and tent if necessary.   Finish baking another 5minutes. Temp of dough should be 180-200 degrees F.

Any advice or proven kosher recipes are welcome. Thanks in advance for your help.

Hank Gurdjieff's picture
Hank Gurdjieff

Cottage Food Acts in various states; California's Homemade Food Act awaiting gov's signature - please consider supporting

Thanks to the previous question by  Niashi about a similar law in Washington I learned about the the California Homemade Food Act, AB 1616, which has passed both Assembly and Senate and is awaiting the Governor's signature. I probably won't be in any position to take advantage of this myself, but others here might. Like other similar laws (Cottage Food Acts and the like) it would make it reasonably easy and affordable to become a licensed food producer at home, in part by making sure you take a short class on how to avoid making customers sick, by restricting the types of foods you can cook for sale in a home kitchen (seem like reasonable restrictions: various things like meat and dairy fillings are not allowed, stuff more likely to harbor bugs.) Considering it is currently not legal to bake and sell most anything this would be a big step up. 

Something like 33 other states have similar laws, your state might well have one. 

More information on this law, cottage food laws in general, a link to a pdf listing the laws in other states, and lots of resources for small food startups can be found at 

http://www.theselc.org/cottage-food-laws/ 

and 

http://www.theselc.org/programs/food/

Thanks

SylviaH's picture
SylviaH

Butternut Squash Ravioli and Dill Pickles :)

Yesterday I picked up some nice pickling cucumbers.  Since mine were a total flop trying to grow them in my tiny garden space...it's just gotten to shady with my pepper tree.  I'd rather have the shade and stick to the farmer's markets..we have so many.  I don't know why I even attempt to grow anything with all the locally available produce.  Well, I really do know why..it's fun to grow things.  Even my tomatoes were a flop this year...but not the tomato worms..yikes..I cringe at those things and will pick them off sqirmming more than they do.  

I also picked up some other nice organic veggies.  Among them were a nice butternut squash for the fresh ravioli.  I have been wanting to make it with my fresh supply of Caputo Italian 00 flour.

This recipe makes a lot of pasta.  Just for the fresh Ravioli for two.  I use 2 Organic Eggs, 200g C Tipo 00 flour, about a teaspoon of E.V.O.O and a pinch of salt.  

I mix it all in my food processor, until I get a nice texture that comes together in a ball and is not sticky..comes away from my fingers nicely.  I use extra flour while kneading the dough and making the pasta on my Artisan King Arthur (oops edit) thats a Kitchen Aide Mixer using, my pasta roller attachment.

Fresh Pasta Made With Italian Caputo Tipo 00 Flour

6 Organic Eggs

600 G Caputo Tipo 00 Flour

pinch of salt to taste

1 TBsp. Extra Virgin Olive Oil

For the Butternut Squash Filling and Cream Sauce.  

I used Fabio Vivani.com recipe.  He has a video making it.  He is so fun and entertaining to watch with many wonderful recipes.  I only changed the cookies that were added and made 1/2 a recipe.  I used some wonderful Italian Lady Fingers from Italy I picked up a Sprouts.  They are dry crispy with a slight sweetness...just delicious.

Dinner was delicious.   Light, Butternut Squash Raviolies, perfect for a hot summer day.


It's hard to get a photo before things get eaten


Easy Dill Pickles-  Great for just making a few jars at a time as your pickling cucumbers ripen.

I like Cold Packed pickles and peppers.  They are the firmest

Wash, slice, pack pickling cucumbers into Sterilized jars.  Use approved canning jars and rims with new seals for safe processing.

In a pot add 3 cups water, 2 cups 5% white vinegar/ or you can use apple cider vinegar, 1/8 cup pickling salt more or less to taste.  More is your making a lot of jars.  Bring to boil..turn down heat and keep hot until ready to ladle into jars.

I added a couple peeled garlics, lots of  fresh dill..I didn't have it so used dried.  Some pepper corns, a small amount of dried red pepper, pinch or two,  mustard seeds to each jar according to your taste...about a teaspoon per jar.  Fill to 1/2 head space with vinegar mixture. 

Remove bands and lids from hot water and skew into place.

Process in a hot water bath for 15 minutes.  

Remove and let sit several hours until cooled and you'll hear a 'pop' they've sealed..or press cooled top and if it pops..it didn't seal..just refrigerate and eat after allowing at least 2 weeks to full flavor.  Store 'sealed' jars in a cool place for at least 2 weeks for full flavor to develope.  Refrigerate before eating..they always taste better that way.


Sylvia


timko's picture
timko

The Taste of Bread by Dr. Raymond Calvel

I was wondering if anyone has this and could offer a recommendation / review for a regular and very interested home baker?

best

Tim


MANNA's picture
MANNA

Almond - Honey Tart

Here is my attempt at the Almond - Honey Tart from Nick Malgieri's Perfect Pastry.

It is very rich and flavorful, absolutly wonderful.

mwilson's picture
mwilson

Soft & Voluminous Loaf

Whenever I make bread my main goal is volume. Admittedly this isn't the most rewarding feature of bread but I am a technical junkie and love taking things to the limit. Not to mention, I love super-light bread.

This loaf is somewhat akin to the improved loaf I made a few months ago but uses acidity from sourdough to boost volume. Milk and diastatic malt are used to soften the crumb.


Ingredients:
320g Very strong Allinson flour (High gluten)
200g Water
200g Skimmed milk
153g 00 flour
~77g Italian sourdough (~45% hydration)
55g Wholemeal flour
22g White spelt
22g Red malt
10g Salt
6g Diastatic malt
2g Instant yeast

Method:
Mixed dry to wet. Fermented 3-4hrs @ ~30C until tripled. Kneaded by hand until satisfied, 5-10 mins á la Bertinet.

Rounded and left to rest for 20-30 mins at which point it was significantly swollen.

Shaped tightly and placed in the tin.

Proved for 45mins-1hr. Baked with steam, oven off for first 8 of a total 45mins.

Crumb:


Pages