The Fresh Loaf

A Community of Amateur Bakers and Artisan Bread Enthusiasts.

Most bookmarked

BazF's picture
BazF

Best way to steam a deck oven with no steam injection?

Hi...

I have just bought a 3 deck, 2 tray Tom Chandley Oven c.1990 with stone floor but no steam injection.  This is my first commercial oven and I am self taught now baking for Farmers Markets.

I am trying to replicate the excellent results I have been obtaining baking artisan style loves for the past 8 years in our Aga.

Can anyone give me some advice on the following:-

1. How best to steam the oven? I have been using a small garden sprayer but the results are erratic and the loaves still look dull and lifeless! Is a large, pressurised sprayer the way to go?

2.  How much steam do I try and introduce and when?

3. How do I best handle the 'top' and 'bottom' heat settings? I am getting lots of spring in fact to much with many of the loaves losing their shape and distorting. Is this because there is too much 'bottom' heat? I am baking directly on the stone floor usually at 225/230C.

I would really appreciate your help.

Thanks

Barry

dabrownman's picture
dabrownman

Thanksgiving Multi-Grain Marble Chacon

After the difficult and tedious Not So Stollen bake earlier in the week, we decide to continue our Thanksgiving bake list with something much simpler, less stressful even if not as enjoyable.


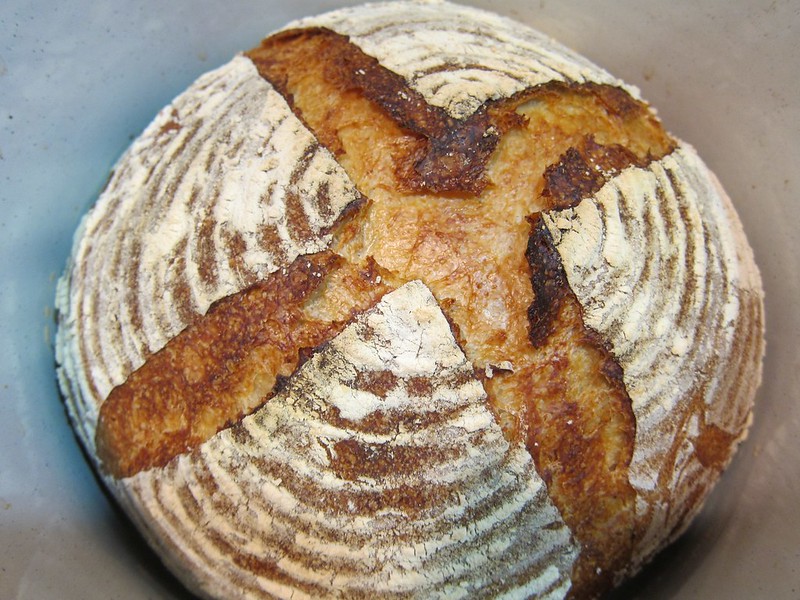
After seeing Toady Tom’s fantastic large miche bake and the excellent crust he managed to put on it, we decided to do a large loaf too only using the chacon shape we love to make since it too can produce a beautiful crust if it naturally splits where we would like as it springs and blooms in the oven heat.


We also wanted to try out a toasted wheat germ, soft white wheat extract and oat bran component similar to Toad’s to see what it tasted and looked like in the chacon.  All but 10g went into the dark side.


Instead of using our recent 1  starter and 24 hour counter levain development we went back to our roughly 20% seed levain for the SD starter required for this bake.   One levain was Rye Desem combo SD for the heartier darker portion of the loaf that has 2all of the whole grains listed for the starter. 


The other levain was a YW one that was fed with cake meal, another new ingredient for bread making for us.  Many folks use this ground matzo altus for their lemon, poppy seed walnut cakes or possibly a chiffon cake of any number of possible flavors.  We decided to try it out in the whiter portion of this bread only to see what it tasted like and how it performed in two different kinds of bread.


The instant coffee and the cocoa were only used in the dark portion to, you guessed it, make it darker than the light colored portion.  We also used some yogurt whey water for some of the liquid in both portions with 2/3rds of it going into the dark side.  The sprouts were also split between the two sides in the same proportion as the whey water - 2/3rds to the dark. 


In order to finish the breakout, the white portion ended up being 500 g with 100 g of the AP and bread flour and 80 g of the whole grains in the bread flour and 10g of the toasted bits.  Total flour and toasted stuff was 290 g and the liquid was 210 g (42 g whey) for a little over 72.4% hydration not counting any of the 1/3 of the sprout total that went into it.


With the malts, oats, and potato flakes on in the dark side the hydration of it was 82%.

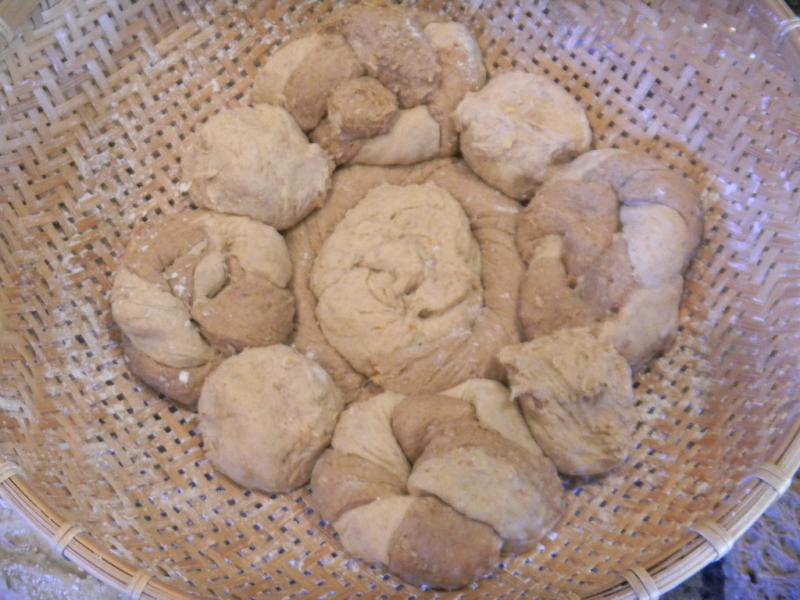
The fun part was putting together the largest chacon we have ever made.  The center knotted roll is made from the light side and the side going down into the basket is sprinkled with rice flour.  It was surrounded by a twisted rope from the dark side.   The 4 other knotted rolls, on the cardinal direction points, were made from equal portions of dark and light that were ropes twisted together to make one rope.  The 4 little balls between the 4 twisted knotted rolls were from the light side.  Remember to rice flour anything that will touch the basket so it doesn't stick - and don't rice flour anything else so it sticks together.


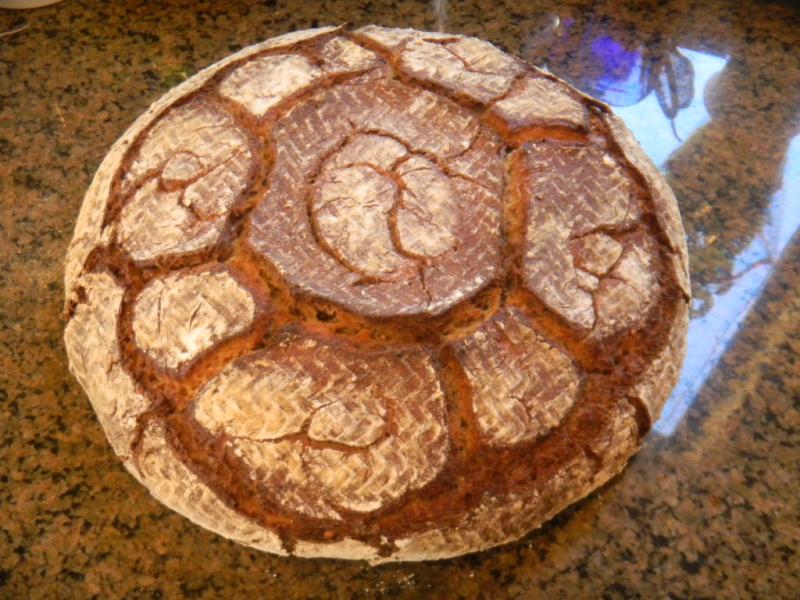
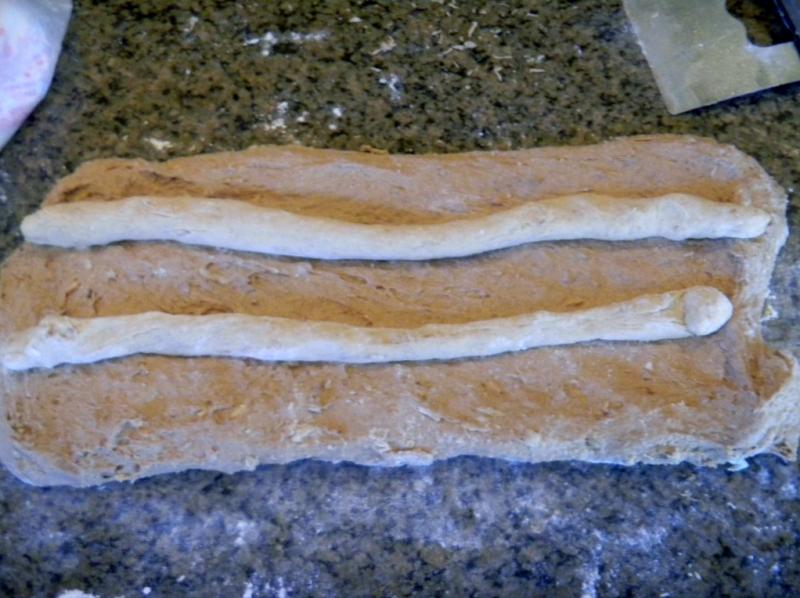
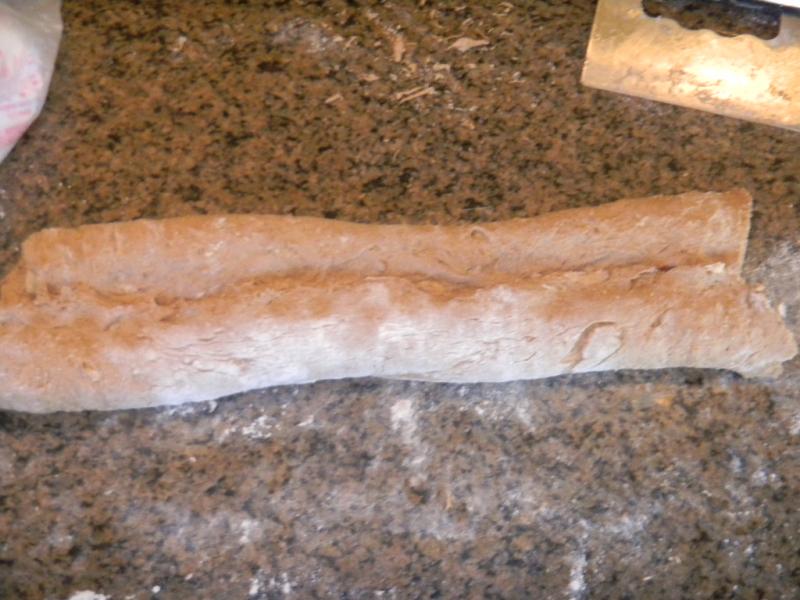
What was left over was two light ropes that were placed on the spread out remaining dark side.  The long sides of the dark were folded over the light ropes to encapsulate them making a long rectangle.  The shot sides of the rectangle were folded over to the middle making a near square where the corners were folded into the center making a circle that was quickly shaped as a boule.


This boule was pressed out gently into a large bialy with the center indentation equal in size to the circle of knotted rolls, ropes and balls already in the basket.  The large bialy was floured around the edge that would contact the basket with rice flour and flipped over so the indentation covered the knotted rolls and the assembly was basically flat on top when finished. 

We hope this assembly will make a very pleasing marbled look when the chacon is cut.  Otherwise it was a waste of time and effort…something every baker is well used to if they have been baking more than a couple of minutes with an apprentice that is nearly all paws, bark and ankle bite.

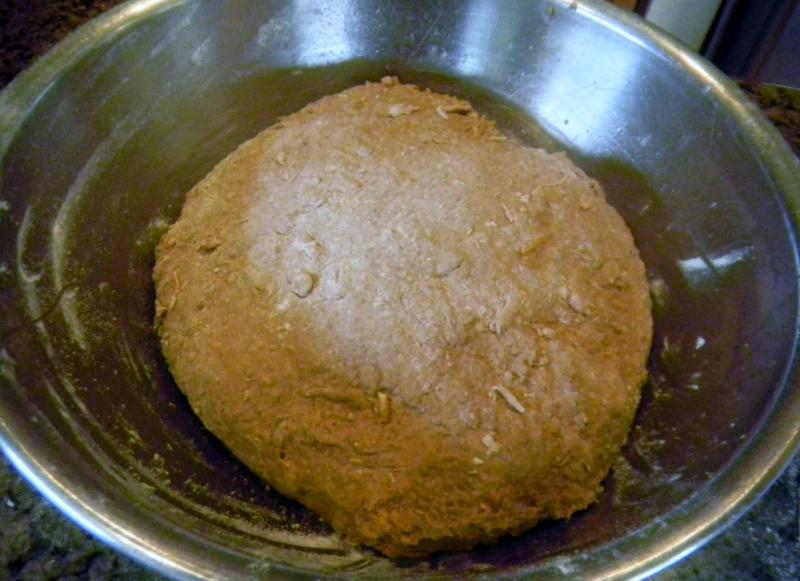
The levains were formed by mixing, letting them double over about 4 hours or so and then chucking them in the fridge for 24 hours to build the labs while suppressing the yeast.   The flours and toasted bits were autolysed with the liquids and the salt for 2 hours as the levains came back to room temperature a day later.

Once the autolye and the levain were combined for each, the gluten was developed with 15 minutes of French slap and folds.  Then 4 sets of S&F’s wee done fpor each where the sprouts were incorporated on the 3rd set.  The dough’s were allowed to develop for 1 ½ hours on the counter before being retarded in a36 F fridge for 15 hours.


They were allowed to warm up for 1 ½ hours before being formed into the chacon and the allowed to proof at room temperature for 2 hours before firing up old Betsy and her16”round stone,  to preheat at 500 F for 20 minutes before 2 of Sylvia’s steaming pans were added.

After 45 minute of total pre-heat the chacon was un-molded easily from the basket using parchment and peel.  It slid into the oven off the peel when a 1/2 C of water was thrown into the bottom of the oven for extra initial steam and the door closed.  The temperature was turned down to 450 F the steaming was done at the 20 minute mark when the pans were removed and the temperature turned down to 425 F, convection this time.

In another 20 minutes the bread was exactly 205 F in the middle and beautifully and evenly brown from rotating it 90 degrees on the stone every 5 minutes after the steam came out.  At the 40 minute total mark, we turned off the heat and left the oven door ajar as the chacon continued to crisp on the stone for another 10 minuets before removal to the cooling rack.

The chacon didn't spring all that much and might have been a little over proofed but it did bloom and crack as expected.  It is a very pretty large chacon and we can’t wait for it to cool down and rest for awhile before we cut it ....   and see if anything interesting happened inside.

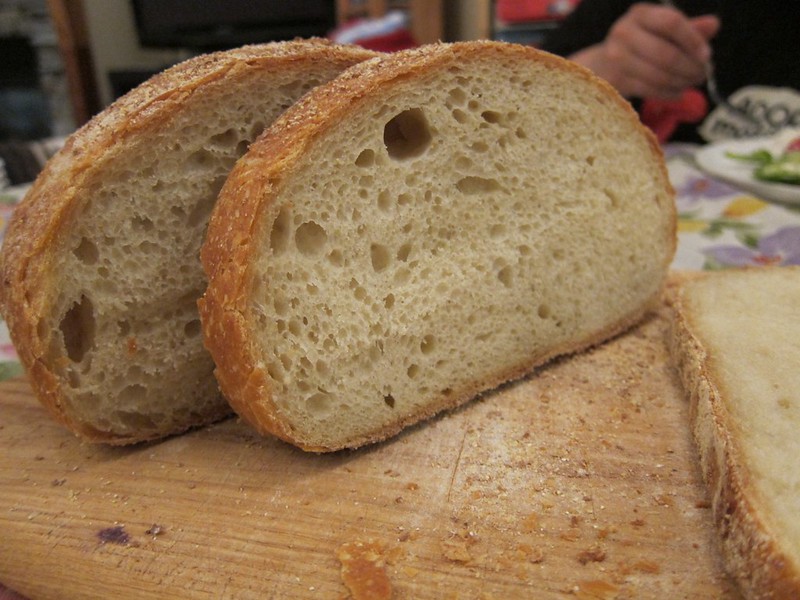
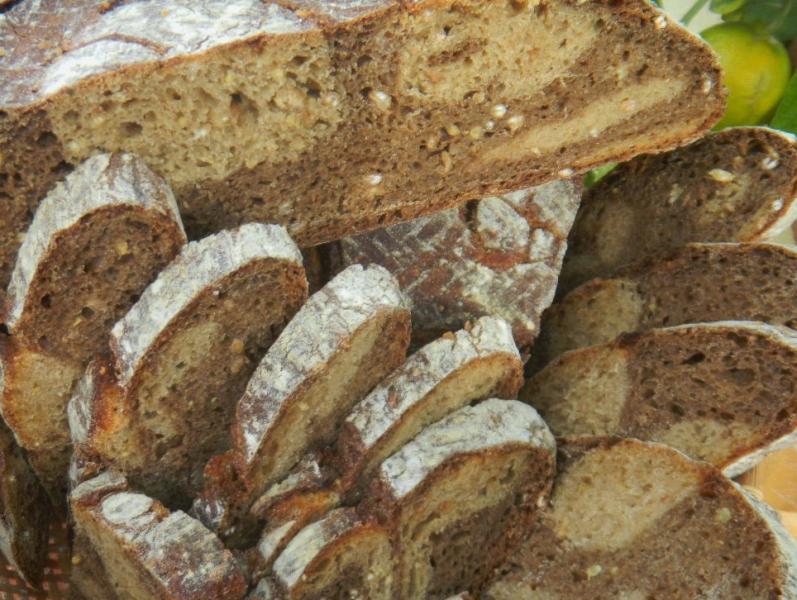
Now that it is cut..... the light and dark did learn to play well together.  We are pleased that it is so pretty on the inside and fitting for such a gorgeous outside.   The crumb is fairly open for so many add ins and whole grains.  The dark is tangy sour while the white is a little sweet, maybe sue to the Cake meal, has no tang and is a little moister as YW tends to impart in crumbs everywhere.  A very nice combination of two tastes.  The toasted bits tend to come through more on the dark side and the millet crunch is prevalent throughout.  This bread will have to to to the top of the chacon list and into the top 15 of our all time top 5 favorites.  I'm glad we made a big one.

Formula

Combo Starter

Build 1

%

SD Desem & Rye Sour

30

3.01%

Bulgar

20

2.56%

Dark Rye

20

2.56%

Kamut

20

2.56%

Buckwheat

20

2.56%

Spelt

20

2.56%

Whole Wheat

20

2.56%

Yeast Water

60

7.69%

Ground Flax

20

2.56%

Cake Meal

80

10.26%

Water

140

17.95%

Total Starter

450

39.74%


Starter Totals


Hydration

97.25%


Levain % of Total

17.88%


Dough Flour


%

Whole Spelt

25

3.21%

Dark Rye

25

3.21%

Whole Wheat

25

3.21%

Whole Kamut

25

3.21%

Bulgar

25

3.21%

Buckwheat

25

3.21%

Cake Meal

50

3.21%

Oats

20

2.56%

Instant Potato Flakes

20

2.56%

Bread Flour

245

31.41%

AP

245

31.41%

Dough Flour

730

93.59%


Whey 125 and Water

610

78.21%

Dough Hydration

83.56%


Total Flour

998


Total Water & Whey Water

822


T. Dough Hydration

82.36%


Whole Grain %

43.19%


Hydration w/ Adds

78.94%


Total Weight

2,517


Add - Ins


%

Red Multi-grain Malt

3

0.38%

Barley Malt

20

2.56%

White Multi-grain Malt

3

0.38%

Total

26

3.33%


Multigrain Sprouts


%

WW

25

3.21%

Rye

25

3.21%

Quinoa

25

3.21%

Buckwheat

25

3.21%

Millet

25

3.21%

Bulgar

25

3.21%

Spelt

25

3.21%

Total Sprouts

175

22.44%


Toasted Bits


%

Toasted Germ, Oat Bran & Extraction

50

6.41%

  10 g each of instant coffee and cocoa went into the dark side only.

Skibum's picture
Skibum

NY Deli Rye with garlic and rosemary

I have been for the last couple of weeks using a nearly pure rye sourdough starter and have baked nothing but the New York Deli recipe from P. Reinhart's BBA.  I love the addition of the fried onions.  So far I have added the onions to the final dough and at some pont I will try adding them to the starter to see if it makes a difference.  For my last bake, I reduced the fried onion and added garlic to cook lightly, but not brown.  With the heat off, I added the caraway seed and fresh rosemary.

This bread has a really nice subtle garlic, onion and rosemary flavour and just screams out for a large pile of corned beef or pastrami lathered with both hot and grainy mustard.  Darn, that could have been an apres ski dinner, but the deli is closed . . .

I had incredible oven spring from this loaf.  Next bake I will also include a post proof, pre-bake photo.  I have now had 3 consecutive success's baking with my rye sourdough and will share what has worked very well for me.  Pre bake I refresh the mother rye starter as follows:

25 g seed

50 g light rye flour

40 g water

This is mixed well in a measured container and left to at least double.  This has taken anywhere from 4 to 28 hours depending on when the mother starter was last refreshed -- I do it weekly now.  After the initial build had doubled or more, I went to a second build:

115 g first build

60 g light rye flour

60 g strong bread flour

96 g water

The second build has consistently doubled or more in about an hour.  For this bake I had to put it in the fridge after a half hour as it was a ski day.  Six hours later, I removed the second build from the fridge and it had nearly overflowed the container.  Time to get baking!

NY Deli Rye w/ garlic and rosemary

151 g second starter, (it is hard to hit 150 perfectly and decided not to be anal about things.  bread is so forgiving in that way!)

50 g light rye flour

151 g bread flour

30 g greek yogurt, full fat

30 g whole milk

100 g water

1 Tbs brown sugar

1 tsp caraway seeds, pounded in a mortar and pestle, they didn't reduce much

90 g finely chopped onion, fried, weighed before cooking

20 g coarsly chopped garlic, fried, weighed before cooking

1-11/2 tsp fresh minced rosemary, less than 1 g, my scale only weighs to full grams, not fractions and I should have spent the extra 5 bucks . . .

1 Tbs canola oil for frying the savourys

1/2 Tbs EVOO for the main dough mix

11/4 tsp salt

I have been adding the salt in the final couple of S&F's of late, thanks to reading Carol Field's The Italian Baker.  So mix well, rest for 5, mix well again, rest 10, then 4 S&F's with 10 rest.  After a 1 hour bulk rise this dough had more than doubled.  This starter works faster than commercial yeast!  Pre-shaped, rested 5 then shaped a loaf.  After 30 minutes it was oven on to my 500F max, then another 30 minutes proof.  Scored and baked with steam for 20 turning and removing the steam pan at the half.

This was a fun bake I was able to fit around my schedule and am enjoying the whole sourdough leavening process.  The sourdough preferments add great flavour, I find the final dough develops strength quickly and the finished bread keeps surprising well on the kitchen counter.

BakeON!  Brian

LisaE's picture
LisaE

My Starter (Culture) smells like paint thinner! HELP!

Hi there! I am trying to start a starter, and I desperately need some help and encouragement. I will give you a little history.

I started this with a recipe from a site other than this and I don't want to give a link cuz after smelling the starter after 4 days I was disgusted! Any way I started with 50 grams WW flour and 50 grams bottled water. Within 24 hours, it rose and bubbled so I thought I might have something going (from reading Sourdough Lady's Blog I now know it was not yeast yet). I fed it the same amounts flour and water, and waited, nothing, just goop. That went on for 4 days or so, and nothing, just smelly goop.

So I looked for some info on this site (great site by the way!) and found some advice that bwraith or Bill gave so I took 2 Tbsp starter and mixed in 2 Tbsp water, 3 Tbsp unbleached organic white (Bob's Red Mill) and a pinch of whole Rye (Bob's Red Mill Organic Dark Rye). It began to become less smelly, almost yeasty maybe, had bubbles in it, but never rose. I am on day 10 from beginning the whole mess and it has never risen, has bubbles but smells like I could strip some paint off a door with it.

By the way, it's at room temperature now, 72 - 75 degrees, I tried the oven light trick but the culture became a very warm 88 degrees and I thought that would be too hot.

I am about to throw it out and start again, using Sourdough Lady's recipe but thought I'd ask you all if you know what the heck. I read that the acetone smell is common if the yeast are starving but I have a hard time believing that since it hasn't risen since day 1. Any advice is very much appreciated and Thanks!

Lisa

Floydm's picture
Floydm

Average Joe Artisan Bread Kit

I frequently receive offers to review products. I turn most of them down because they typically don't seem like a good fit for TFLers, but an exception was the Average Joe Artisan Bread Kit, which I baked with today.  

If you are looking for a way to turn friends or families on to baking and don't have time to give them a personalized tutorial, the Average Joe Artisan Bread Kit is a good way to go.

The Average Joe Artisan Bread Kit is the brainchild of Joe Bellavance and is based on the no-knead bread approach.  Different editions are available on the website, some fancier and more "gifty," others plainer and more practical.  At its core the kit contains everything you need except the water to bake your first three no-knead loaves.

Bread flour, yeast, "bread dust", sea salt, a dough scraper, a lame, and a baking booklet.  Also available, an enamel pot to bake it in.

The spiral-bound book included with the kit is really nice, and I really enjoyed the tone and approach he uses which you can get a feel for from his blog. Glossy and color printed, it includes a FAQ and a number of variations on the basic no-knead loaf.  There is also a laminated cheat sheet with the "golden standard" on it, the core no-knead recipe that everything else here is based on.

My first pass I tried to "play dumb" -- something that comes naturally to me ;^) -- and rely as much as possible on the instructions rather than my intuition.  I prepared the dough as directed in the afternoon, covered it, and waited to bake it until the next day. 

My dough the next morning:

As directed, in the afternoon I shaped the loaf into a ball, let it rise for another 45 minutes or so, and then baked it in the pot. My final loaf:

As you can see, this isn't the best loaf I've ever made, but if I were a new baker and ended up with this my first pass I'd be ecstatic.  It was extremely simple to make and did not require any gear or knowledge outside of what was included in the kit.

Later in the day I baked a second loaf in the pot.  This one was a sourdough, and this time I relied more on my intuition as far as determining when and how long to bake it.  It turned out lovely.

Joe says up-front that there is no "secret sauce" in the Average Joe Artisan Bread Kit that you can't get elsewhere and, yes, one of us could put together a kit like this on our own, but Joe Bellavance has done a great job of putting everything together here.  Even in the Cook's Edition the kit feels very professional and complete to me -- a breadboard and a nice bread knife are about the only other things I can imagine telling someone they should get when getting started baking, but they aren't essential to baking one's first loaves.  I'm sure the gift editions are even nicer in their presentation.  So if you are looking to introduce someone to baking this holiday, the Average Joe Artisan Bread Kit is a great way to do it.

The Average Joe Artisan Bread Kit is available on breadkit.com.

petercook's picture
petercook

sponge vs. poolish

I am interested in getting opinions on the differering flavors of a sponge vs. that of a poolish. In my bread baking books the authors talk about a sponge (at a 64% hydration and a fermenting temp of 40- 55F) which is supposedly more acidic than a poolish (at a 100% hydration and a fermenting temp of 55-70 F.  Both preferments I let develop for 14 hrs. I a NOT expecting a real serious sour, like a sour dough. I am, however, expecting a very subtle sour flavor. I have tried both preferments numerous times but I can not taste a bit of difference.  Any idea why? thank you

Sjadad's picture
Sjadad

PIZZA SUCCESS!

I have been on a quest to make truly great pizza in my home oven. A decade ago I bought a pizza stone and my results were dramatically improved. A few years later I figured out that finishing the baking under the broiler yielded better results still. Well, I found something called a "baking steel" when I was reading posts on the "Slice" section of seriouseats.com. It has changed my life (: I put my old baking stone, inverted, one level above the shelf with the steel and heated everything to 550F for a good hour. The results speak for themselves.

dabrownman's picture
dabrownman

Prune & Brazil Nut Sourdough with Bulgar Scald, Pumpkin & Sunflower Seeds

Continuing our experiment with 1% SD seed and long counter top ferment and proofing we tried out several new ideas with this bake.  The average kitchen temperature over the 24 hours was 77 F degrees.


First we upped the whole grains to 17.5% to try to improve the flavor and sour further and we changed to prunes and brazil nuts, one of Andy’s favorite combination that we like very much, while keeping the pumpkin and sunflower seeds.  We added a bulgar scald to improve the flavor and texture of the bread and also upped the hydration slightly to compensate for the slightly more whole grains.


We combined and mixed everything except the nuts, fruits, seeds and bulgar scald and let it autolyse for 30 minutes.  Then we did 13 minutes of French Slap and folds before adding in the rest of the ingredients and doing another 2minutes if slap and folds to incorporate the add ins.


The dough was then left on the counter top for 21 hours to ferment and develop.  We learned from out last bake that 20 hours was better with another 4 hours on the counter after shaping to proof.  But we didn’t get up in time so we have what we have – just like always - no worries.


We shaped and panned this bread as a loaf this time with a few seeds on top and let it proof for 4 hours on the counter before going into the 450 F oven with 2 of Sylvia’s steaming pans to steam for 12 minutes.  At the 12 minute mark the steam was removed and the oven was turned down to 425 F, convection this time.


It baked for another 10 minutes after being turned 180 degrees after 5 minutes and removed from the pan.  When it registered 205 F we turned the oven off and let the loaf crisp for 10 minutes before being removed from the oven to the cooling rack. This bread tastes as amazingly sour as the fig and pistachio bread did but it has a deeper flavor thanks to the bulgar scald and the extra whole grains.  The crust was so crunchy and stayed that way even after it cooled - very nice.  The crumb is  not as open as the previous bake but it is just as soft and moist.   We also like the extra seeds with the fruit and nuts too.  Much better bread all the way around.


Formula


Starter

Build 1

%

SD Desem & Rye Sour

6

1.15%

Total Starter

6

1.15%


Starter Totals


Hydration

66.67%


Levain % of Total

0.55%


Dough Flour


%

Whole Wheat

20

3.85%

Whole spelt

15

2.88%

Dark Rye

15

2.88%

Whole Wheat

15

2.88%

AP

440

84.62%

Dough Flour

520

100.00%


Salt

9

1.73%

Water

385

74.04%

Dough Hydration

74.04%


Total Flour

523.6


Total Water

387.4


T. Dough Hydration

73.99%


Whole Grain %

17.57%


Hydration w/ Adds

72.74%


Total Weight

1,095


Add - Ins


%

Red Multi-grain Malt

3

0.58%

VW Gluten

3

0.58%

White Multi-grain Malt

3

0.58%

Total

9

1.73%


Add Ins - Nuts Fruits and Seeds

%

Brazil Nuts

50

9.62%

Sunflower 20, Pumpkin 20

40

7.69%

Prunes

50

9.62%

Total

140

26.92%


Scald


Whole Bulgar

20

3.85%

Total Scald

20

3.85%


SFSD Total Weight

1,095


Song Of The Baker's picture
Song Of The Baker

Vital Wheat Gluten - Why Do I Feel Like I'm Cheating??

I will be using vital wheat gluten for the first time in this weekend's bake.  Doing Jeffrey Hamelman's 5 Grain Levain, which calls for a bit of this stuff.  Why do I feel like i'm cheating a bit using it?  Is this ingredient looked down upon at all in the bread baking world or a necessary item? 

John

pambakesbread's picture
pambakesbread

the last rise and no big holes

Help!! I have a great starter and it will lift the bread but there are no large holes and it kind of lays there spreading out and not going up. the crumb is good I use Harvest King Commercial flour and get a reasonable sour taste  and a great crust the only thing I do not get is a significant lift either in the last rise or in the oven. It is definately eidable even though it is kind of flat but What is with the damn holes. I bake other breads and have reasonable success for a home baker but this is pissing me off big time. Pam

Pages