The Fresh Loaf

A Community of Amateur Bakers and Artisan Bread Enthusiasts.

Most bookmarked

neilc's picture
neilc

No knead rye: "flat" (pancake-like) loaf

The last few times I've made rye bread (using Jim Lahey's recipe for no knead rye from his book), I've been quite happy with the crust, crumb, and taste, but the shape hasn't been perfect: rather than a boule, the loaf came out wide, thin, and almost circular. The loaf is maybe 1.5-2 inches tall, versus 6 inches wide and 8 inches long.

Can anyone suggest what I'm doing wrong? When I place the dough into the dutch oven to be baked, I've just been scraping it out of the bowl with a spatula -- would it help to form the dough into a ball in my hands first, and then place the ball into the oven? Or is it more likely that the lack of height caused by something else? Right now I just let the second rise happen in a mixing bowl -- would it help to get a proper proofing basket/brotform/etc?

BTW, rough outline of my technique: 300g bread flour, 100g rye flour, 2g yeast, 300g water, 8g kosher salt. Mix and let rise overnight in a mixing bowl, then refrigerate for 3-4 days. Fold dough and place back in the mixing bowl, let it come to room temperature and do the second rise over 4-5 hours. Then bake in preheated 475F dutch oven for 30 mins covered, 15 mins uncovered.

Thanks in advance for any suggestions!

Neil

FlourChild's picture
FlourChild

Pandoro

This is my first go with Maggie Glezer's Pandoro (from Artisan Baking), and all things considered I'm quite pleased with it.  There are two amazing things about this bread.  The first is how something with that much sugar and butter can be so light and ethereal-  I'm stunned by the texture.  The second is the balance of flavors.  It doesn't come across as too eggy, it doesn't taste only of butter or vanilla, and it isn't obviously a sourdough.  But put them all together in just the right balance, and they add up to a beautiful, rounded, perfumed and complex flavor.  I was so very happy when this bread was baking, I don't think I've ever smelled something quite that good from my oven.

The dough largely followed the schedule in the book, with the exception that the first build took about 50% longer (6hrs vs 4) than it was supposed to, but I attribute that to my tendency to feed starters a little too early, so it needed a bit of time to catch up.  Once it did, the rest of the stages proceeded right on time.  I used my folding proofer set at 78F.

The only other issue I had was that my paddle attachment was just not capable of mixing this super-sticky yet strong dough.  I have a KA 600, and this dough only worked when I switched to the dough hook.  With the paddle, it just wrapped around and would not come off for anything, not with a spatula, not with high speeds.  I finally had to slice it off with a sharp knife.  

I used a large tube pan (16 cups capacity) instead of two eight cup pandoro molds, as I wanted to see how the bread was before buying more pans.  Looks like I'll be in the market for some star-shaped molds this season:)  

The final proof takes the dough up by more than quadruple, from the picture above to the one below.  Not bad for a naturally-leavened bread with just 0.2% yeast.

I don't want to post Maggie Glezer's recipe, but Artisan Baking is a lovely book to read or check out of the Library.  This bread was the reason I made a starter last year, and though it's taken me a while to collect all the ingredients (like cocoa butter, high-gluten flour and osmotolerant yeast), I'm glad I finally got around to making it.  

The top is prettier than the bottom, if I make it in the tube pan again I think I'll keep it right side up.

The ethereal crumb, so soft and light.  It even had a bit of shreddability.  Next time, I'll try a bit longer/slower mixing to see if I can get more shredding.

This would be the perfect seasonal viennoiserie for anyone who isn't crazy about the fruit in a panettone, or who appreciates light textures.  The bread has 17% of its flour pre-fermented, more  than 42% butter/cocoa butter, 0.2% osmotolerant yeast, 68% eggs/yolks, more than 41% sugar/honey, and hydration of 73% (taking into account the water content of eggs, honey, butter, etc.).  

sourdoughnut's picture
sourdoughnut

Bosch mixer question

Hi all, just blew through my 3rd Kitchen Aid artisan POS mixer in under 2 years, and the good folks at whirlpool have offered my $$$ back. Hobart is out of the budget (even old,used ones in ontario are in the $800 range), so was thinking about a Bosch based on the positive reviews from so many on this site. Here's the question; can it do anything else? I make bread, but my wife is more of a sweets baker. Noticed that a paddle is not part of the set up, so was wondering how it does with cakes, cookies, and other batter based things. Thanks in advance.

greedybread's picture
greedybread

Scrummy Yummy Yeasty Karisik Pide:

putting this on here as its definetly a yeasty product:)

Not sure completely yet of the fresh loaf's definitions of what is and isn't allowed:)

Taken directly from my greedybread  blog... ENJOY!!

Mmmmmmmmmmm

Karisik means mixed grill in Turkish, err I am lead to believe so I just hope it doesn’t actually mean something terrible:).

So delish, I have to show you straight away before making you wait till the end.

Now this one below is not the one i made today but one i made in Istanbul. All the other photos are from today 

Mmmmm Pide

My lamb mince filling was just so scrumptious, it was gorgeous. I suppose working in the garden all day and being VERY hungry helped but this truly was divine!! Not quite to the standard of my friend above BUT very very close.

So let’s get Yeasty beasty.

Just like to say , this is very similar to a pizza dough, so you could make pizza with it or calzone or even a Cornish pasty type thing. You also can make double to dough and freeze it. A friend rolls out the dough and freezes like that, all ready to go for next time. Great time saver:

Scrummy Karisik and Karsarli (cheese) Pide:

Makes 8 Pide.

For the Pide you need:

  • 3 cups of strong bread flour or all-purpose(if no strong).
  • 1/4 cup vegetable oil.
  • 1 egg beaten.
  • 1 cup milk warmed.
  • 2 tsp sugar.
  • 3 tsp dried yeast.
  • Pinch of salt.
  • 1 egg beaten for egg wash.

Pide dough ready to go into hot water cupboard (please note, this is double the recipe!!)


For the filling you need:

  • 350g lamb mince.
  • 3tsp garlic.
  • 2 chillies (medium heat)
  • 1 tsp sweet paprika.
  • 2 tsp cumin.
  • salt and pepper.
  • 1-2 cups of grated cheese (your choice but a strong cheese is best as you use less).
  • 2 tomatos diced.
  • 1 capsicum.
  • 1 red onion (but white is ok).
  • 4 slices bacon cut up or sausage cut up.

Mince filling

  • Warm milk and stir in sugar until dissolved and stir in yeast.
  • Cover and place in hot water cupboard until creamy ,usually 20 mins.
  • Place dry ingredients in a bowl and stir through.
  • Mix egg and oil together and stir into yeast mix when ready.
  • Slowly pour into dry ingredients and form a dough.
  • Turn out on (or do in bread maker on knead cycle).floured area and knead for 5-6 minutes until smooth and elasticy.
  • Place in lightly oiled bowl , cover with gladwrap (loosely) and a tea towel and place in warm place until doubled in size. Usually 60-90 minutes.

Meat Filling:

  • Place lamb mince in hot fry pan.
  • Cut up chilli, onion and garlic and place in with mince when 1/2 cooked.
  • Stir mince. Make sure you separate the mince so it’s not all clumpy.
  • You can drain off fat if you wish, if any but i have to say it adds to the over all taste.
  • Add in cumin and sweet paprika and stir lightly.
  • Add salt and pepper to taste.
  • While this is cooking, dice tomato and capsicum and place in a  little bowl and put to side.
  • Cut up bacon into small pieces.
  • When mince is cooked, leave to cool. DO NOT place on dough whilst hot/warm.

Dough risen and ready to chop!

  • Remove dough from warm place and turn dough out on floured area.
  • Cut dough into 8-9 pieces

Dough ready to roll out

  • Roll out to oval-shaped dough. Not too thin, but not too thick.

Ready to Fill!!

  • Place dough on tray with baking paper on it.
  • Pre heat oven to 220 Celsius.
  • Put lamb filling, tomatoes, bacon ,capsicum and cheese on the oval dough.
  • Roll the edges in so it resembles a boat (see below)
  • You can also do bacon and cheese fillings.
  • You can do what ever filling you like. A spicy beef or chilli chicken would be nice too  You are only limited by your imagination or what you think tastes great!!

Ready to cook , just needs egg wash

  • Give a brush of the edges with the egg wash.
  • Place in oven and bake 20-25 minutes or until golden brown and gorgeous!!

Scrummy Yummy!

More scrummyness………

Enjoy, enjoy and enjoy.

Some special treats coming up this week.

A NZ bread and a new fruit brioche i am testing ( a new recipe i made up) …..All looking very good so far….. and i think I am almost ready to use the sourdough starter that i have been brewing for a lovely Levain style bread.

Lots to do and look forward too……………..Mmmmmmm warm brioche…

Direct link to recipe

http://greedybread.wordpress.com/2012/06/02/scrummy-yummy-yeasty-karisik-pide/

Thanks to i love lucca tours and http://www.ilovelucca.co.nz/2012/04/running-i-forgot-to-say/ and http://www.ilovelucca.co.nz/about-me/recipes/ for the recipe which i adapted 

dabrownman's picture
dabrownman

A Chacon for Eric

This chacon is a tribute to Eric Hanner.  His gifts to the world were many and his passion for balking was great.  His fine character attributes included his generosity that made him willing to help and teach others what he knew.  Eric’s legacies are many and this bake commemorates them.  He was a giant and this chacon is especially large to recognize his largess.

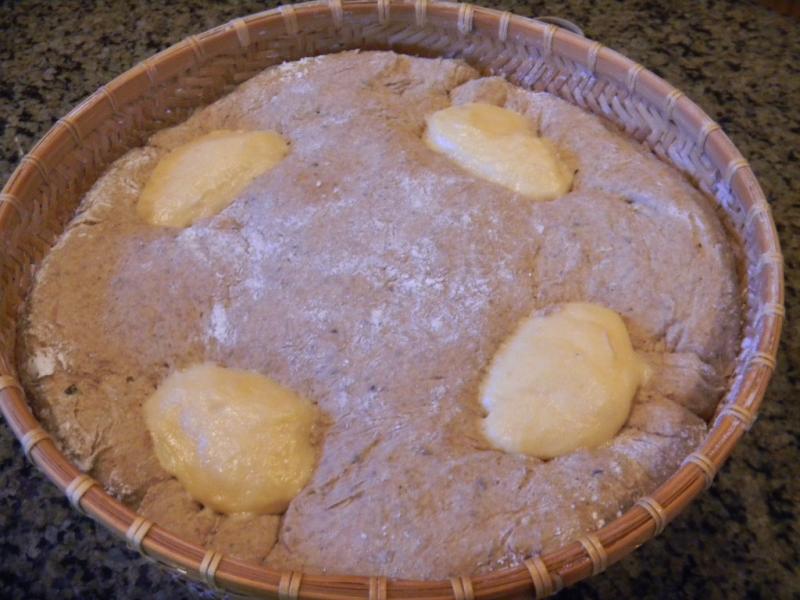
The white portion of the dough is a 6 strand zolablue SD Challah that we converted to a poolish from SD.  The 4 braided ends were not tucked in to give the chacon more of chance to crack making a pretty design on the top.


The dark portion is Eric’s Favorite SD Rye – his Jewish Deli Rye was used as a monster bialy to cover the braids of the challah in the bottom of the basket.  This is the largest bialy we have ever attempted and flipping it over was sight to be seen.


The 5 recipe changes I made to Eric's Favorite were minor ones.  First one was to use 95 g of the challah poolish in place of yeast in Eric’s dough.  We only had 2.5 g of caraway so I added a like amount of coriander.  We added 1 g each of red and white rye malts to improve enzymatic action, the rye flavor and color – while Eric wasn't looking.


My apprentice used caramelized onions and the water from it and the deglazed pan instead of re-hydrating minced onions as Eric recommended.  The flavor and color of caramelized onion should make this as exciting as Eric wrote about using onion and the water from it in this bread.  He wanted everyone to give this option a go!


I also didn’t have any first clear flour and have never seen any, so we tried to replicate it using David Snyder’s ideas on how to do so from another thread by using some WW mixed with AP and bread flour.  We don’t know what it should look like but David’s advice is usually spot on.  I don’t think Eric would have minded theses changes.


Method changes included using French slap and folds for both of the breads - for about 12 minutes.  Eric’s Favorite Rye was a two slaps and one fold process since the dough was so stiff and required the extra slap to stretch it out enough to fold over.  Eric was the one who got me doing French slap and folds and my breads have been greatly improved as a result.


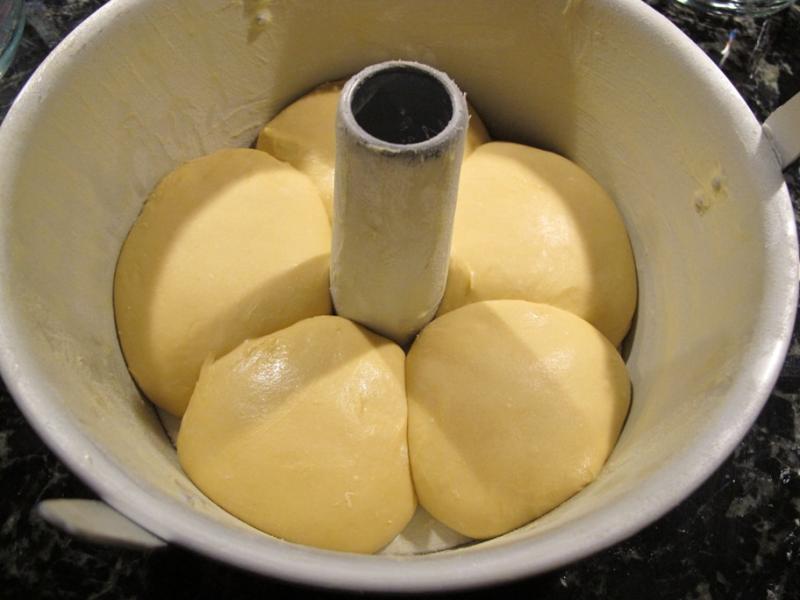
2 sets of (4) S&Fs were also performed on 30 minute intervals for the first hour of development and then the dough was rested for an hour.  After shaping and putting the dough in the rice floured basket ,we let it proof for an hour before putting it into the fridge for a 15 hour retard.


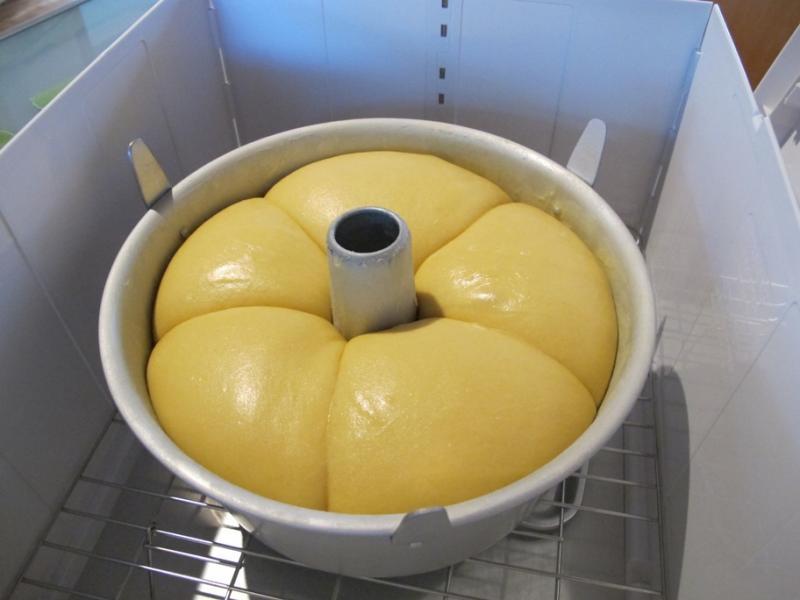
This is not part of Eric’s method but we just ran out of time to bake it off and this was the best we could manage.  We fired up Old Betsy to preheat at 450 F with 2 of Sylvia’s steaming pans and a 12” iron skillet with lava rocks inside like David Snyder  sort of uses- while the dough warmed upon the counter for 40 minutes.  This is huge lump of dough, 3.8 pounds of it and it need lots of steam.


Once the dough went in and we threw a half a cup of water on the lava rocks as we shut the door and turned the temperature down to 370 F.  We decided to steam for 20 minutes instead of 10.  At the 10 minute mark the cracks had barely opened on the huge loaf and more steam was needed.


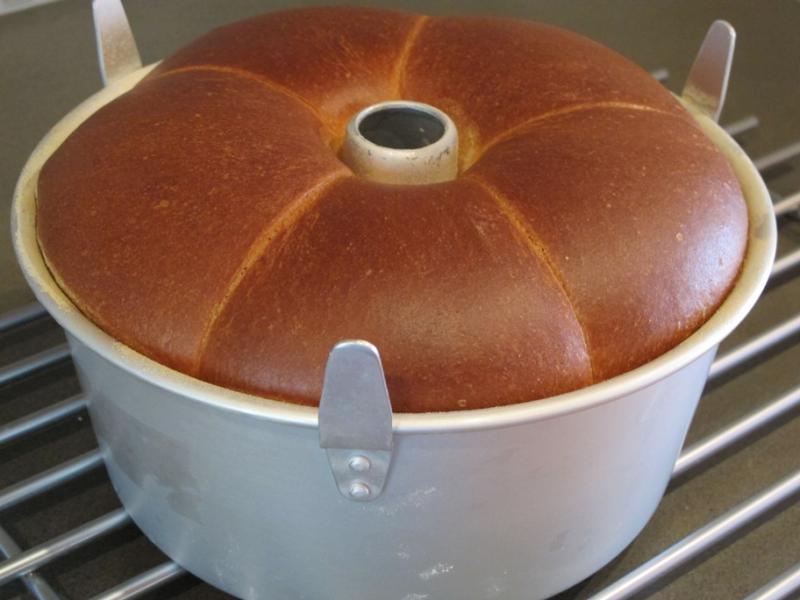
At the 20 minute mark, the steam was removed and the bread continued to bake at 370 F, convection this time, for an additional 26 minutes rotating it 70 degrees every 7 minutes until it registered 190 F in the center.  We left it on the stone for another 10 minutes with oven off and door ajar to crisp the skin before removing it to a cooling rack.


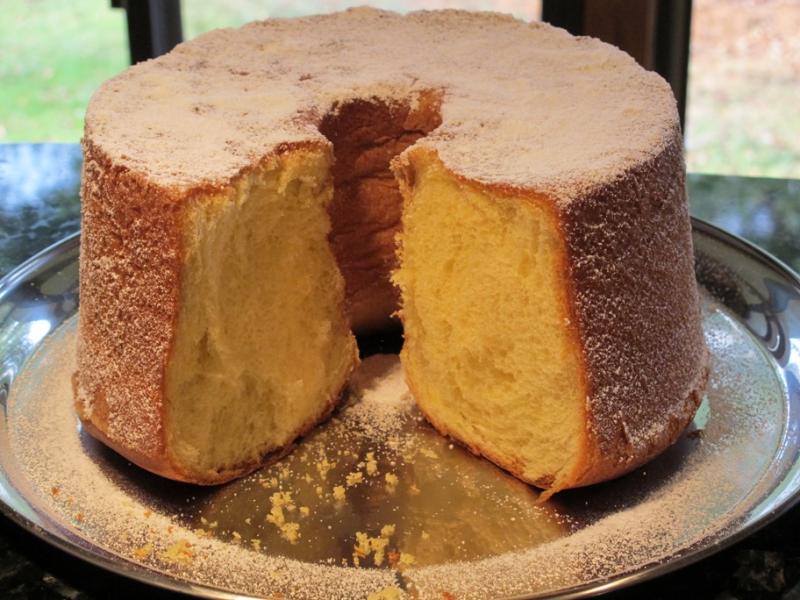
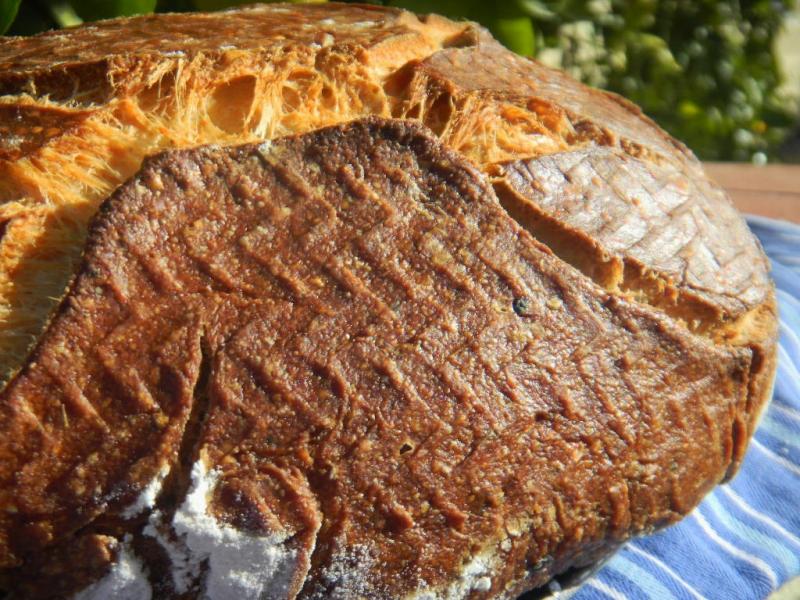
It browned up a dark mahogany color that was so nice I decided not to coat it with the corn starch and water mix.  Even the challah portion was the same color.  It blistered very well on the challah portion but not on the rye side for some reason?


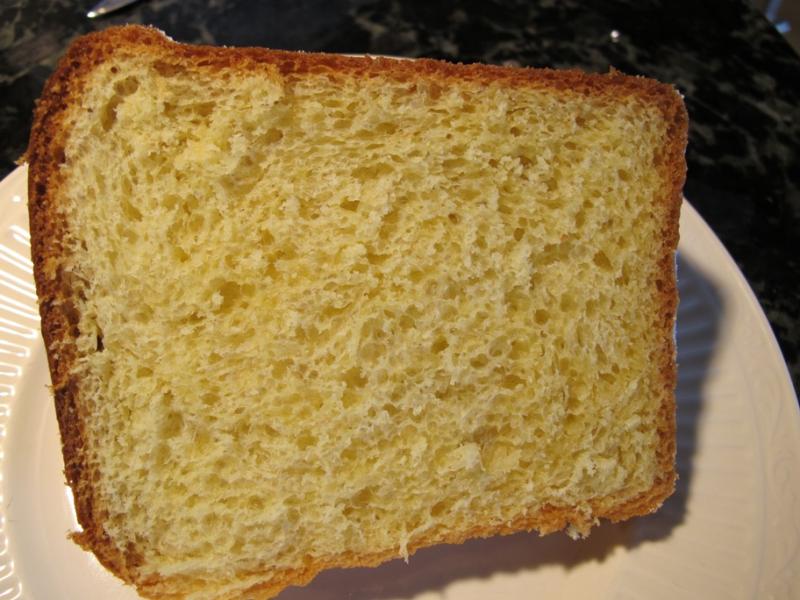
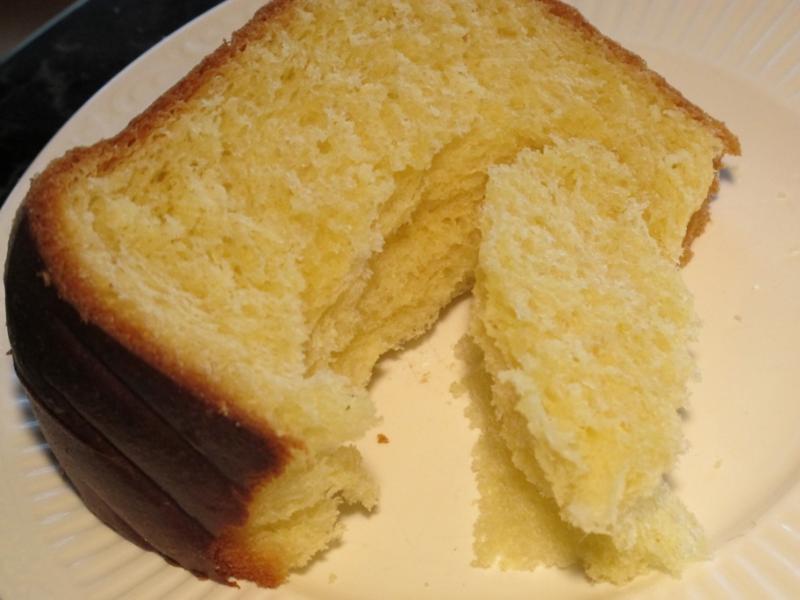
It bloomed while cracking beautifully and at least looks the fitting tribute to Eric that we had hoped to achieve - at least on the outside.  Well, coundn't wait 24 hours to cut into it since showed promise and smelled tantalizing.  The crumb was soft nice and moist and medium open especially on the rye side. 


The taste would be straight Jekyll if there wasn't a Hyde Side.  One bite is a fine Jewish Rye with subtle caraway and coriander hints, the next a straight Shabot Challah and then comes a half and half combo bite.

Here are the formulas should you want to make a Chacon for Eric.  I sure enjoyed doing so and we learned much from this baking experience. It was great time to reflect, day dream a little and think about the past, present and future.

The sunset was very niuce the day we baked this bread.  I think someone really important knew a nice one for Eric was in order.

Poolish Challah


 Poolish or SD starter

Build 1

%

Active Dry Yeast

0.1

0.03%

Bread Flour

41

12.85%

AP Flour

41

12.85%

Water

82

25.71%

Total Starter

164.1

51.44%


Starter Totals


Hydration

199.81%


Poolish % of Total

24.31%


Dough Flour


%

Bread Flour

187

58.62%

AP

132

41.38%

Dough Flour

319

100.00%

Salt

5

1.57%

Water

40

12.54%

Dough Hydration

12.54%


Total Flour

360.06


Water

122.04


T. Dough Hydration

33.89%


Total Wet Weight

675


Hydration w/ Adds

62.64%


Add - Ins


%

Soy Oil

36

11.29%

Eggs (2)

110

34.48%

Honey

42

13.17%

Total

188

58.93%


Eric’s Jewish Deli Rye – Eric’s Favorite Rye

Poolish SD starter

Build 1

%

Active Dry Yeast

0.1

0.03%

Poolish AP flour

45

11.42%

Poolish Water

45

11.42%

Rye Sour Starter

50

8.25%

Dark Rye

137

34.77%

Water

137

34.77%

Total Starter

324

82.23%


Starter Totals


Hydration

100.00%


Levain % of Total

39.37%


Dough Flour


%

Bread Flour

172

43.65%

WW

50

12.69%

AP

172

43.65%

Dough Flour

394

100.00%

Salt

10

2.54%

C. Onion Water 242 & Water

242

61.42%

Dough Hydration

61.42%


Total Flour

606


C. Onion Water 242 & Water

454


T. Dough Hydration

74.92%


Total Wet Weight

1,077


Whole Grains

53.81%


Hydration w/ Adds

74.67%


Add - Ins


%

Red Multi-grain Malt

1

0.25%

White Multi-grain Malt

1

0.25%

Caraway & Coriander Seeds

5

1.27%

Total

7

1.78%


2 Tbs of Caramelized Onion


jkbff's picture
jkbff

YAKASMT (Yet another Kitchen Aid stand mixer thread)

Hello All!

I've been lurking for a while, and actually joined when I started my research on my upcoming KA stand mixer purchase... I have been wanting a KA ever since I started cooking/baking, and realized I would use one more than I ever thought possible when I worked for a catering company. We used our row of KAs as our extra hands, we could put together meat loaves, breads, puddings, gravies and all sorts of other stuff when we were feeding people by the hundreds. In my search and from the experience I've had, I know that I want a bowl-lift. Now here's where the questions come... 

I was thinking that I would purchase a refurbished mixer. I have never had problems buying anything refurbished and I don't expect this to be different. I've worked in a few repair shops and can understand what the machines go through when they are rebuilt.

I was looking at getting the Pro 600, seeing how every once in a while it will hit 229 for an over stocked color, but I began digging around more and am wondering if the metal gear case has had as many issues as the plastic case had, or if I would be fine with the new metal design..

My alternative would be to go to the 7 quart, because supposedly there is a new design all together and it sounds like it would last. What I have not been able to find out is if the 7qt refurbished ones (assuming they are Williams-sonoma) are the same as the 7qt NSF refurbs or not? For the price that they are asking for these machines brand new, refurb is the only way I can afford to go. 

Now, my usage isn't going to be a lot at first. I manage a pizzeria and work at a vacuum repair shop.. An odd combo I know. I am 25 years old and I love to cook, I love cooking for people. I want to get into bread making, but I don't like how my breadman ultimate kneads the dough. I also love making pizzas at home, and want to break down my 30+lb dough recipie that I make at work to something I can make at home and freeze portions of the dough. I also plan on using the KA as a meat grinder and pasta maker, but I'll have to get the attachments in time. 

I know several people are going to say 'Get a Bosch or a DLX' but I do not want either right now. My Grandmother has a KA bowl lift (hobart, she used it daily to make bread) that was bought for her as an anniversary gift when she wasn't even married 10 years (Shes been married 50), my mother has tilt neck that she uses for quick breads that she bought when she remodeled her kitchen in her second house (post whirlpool takeover). I am set on having a KA Stand mixer. I do, however, see a DLX in my future as I get bread making under control.. I love the concept of that machine.

So, after the lengthy rant, is the new 7 qt machine's design worth the price, or is settling for a 6 qt machine with the new metal gear housing going to endure a long life of somewhat heavy usage and possible abuse?

Song Of The Baker's picture
Song Of The Baker

Tutorials Needed on Shaping Rye Breads

I will be attempting my first rye bread tomorrow.  I have searched the internet, trying to find some video tutorials on making rye breads and found very little out there compared to sourdoughs, etc.  Tuorials helped me a great deal when trying sourdough, multi-grains, ciabatta breads for the first time.

Does anyone have any photos, videos that can help me in the shaping process of this particular type of rye bread?  Below is the recipe to give an idea of how wet/dry the dough I will be working with:

German Mischbrot (Mixedbread)

Here the recipe : Mischbrot 30/70 (30%Rye / 70% Wheat/Bread flour) . 2 loaves 860g. Color of the bread will be brighter if you will use medium rye or darker if use dark rye flour.

Sourdough: ripen for 14-18 h at 21°c/70°F

Medium Rye or Dark rye(better medium)......  160g (100%)

Water...... 128g (80%)

Rye Starter (100%)....... 8g (5%) If you like more sour taste use 10% starter (16g)

Total weight ...... 296g


Final dough:

Bread flour...... 700g

Medium rye(or Dark rye)...... 140g

Salt....... 21g

Fresh yeast....... 22g

Water....... 540g

Sourdough....... 296g

breadforfun's picture
breadforfun

Rosemary Meyer Lemon, take 2


A while ago, I tried to make a loaf that resembled one of my favorites, Della Fattoria's Rosemary-Meyer Lemon bread.  It turned out pretty well, although it didn't exactly measure up to my memory of the bread.  On my last flour run to Central Milling in Petaluma, I decided to make a slight detour and stop at the Della Fattoria bakery to remind myself what it tasted like before I attempted to make it again.

It was a disappointment.  My memory was probably clouded, but it was nothing like I remembered it.  The crust was soft, the crumb was dense as if it had little oven spring, and the taste was generally flat.  It seemed as if they tried to squeeze in just one more bake in their WFO before it cooled too much, but the timing was off.  Or maybe, now that I am more happy with my own bread baking, I just like the taste of what I make better. One thing that I learned, though, was that their bread included olive oil, something that I missed the first time.

I decided to make another attempt at a Rosemary-Meyer Lemon bread of my own.  I modified the sourdough recipe I have been using lately (already a modification of David's SFSD).  Instead of spelt flour, I used 10% rye.  The addition of 4% extra virgin olive oil changes the flavor to something reminiscent of a focaccia, but the crumb is more sourdough-like.  The results were pretty satisfying.

My standard starter is 100% hydration, wheat only starter.  It is fed with Central Milling Artisan Baker's Craft (ABC) flour and is refrigerated between bakes.  Before use it is warmed to RT and fed at least twice in 24 hours until very active.  For the final build I used about 11.5B-% rye and kept the hydration at 77%.  The overall hydration is 67%.  Just after scoring I sprinkled some Maldon salt (the flakey kind) into the spreading scores and peeled into the oven.

It has a nice sourdough tang, and the flavors of the rosemary and the lemon are evident but not overpowering.  The crust is dark golden and chewy.  I tried to avoid a very bold bake by slightly lowering the temperature because it might overwhelm the lemon.  The formula for this bread is:

I have become fond of using bran instead of corn meal or semolina on the peel to transfer loaves into the oven after learning about it for Genzano Country Bread in Local Breads by Daniel Leader.

Here are some photos of the crumb.  The loaf was very airy and much less dense than it seemed considering the size of bread.  The mouth feel was a bit less creamy than I was looking for, and the sourdough tang was too much for the other flavors, so no doubt there will be another iteration.


San Francisco is having a very warm fall this year.  After the rains in the early part of the week, it has been warm and sunny.  When I went to pick the lemons for the bread, the buzzing of bees was all around, no doubt responding to the wonderful fragrance of the blossoms.  I managed to capture one of our fertilizing friends starting the 2013 crop of lemons.

Thanks for reading.

-Brad


Franko's picture
Franko

Last and First Loaves


In the first week of October we began a complete renovation of our kitchen with the idea that should the local real estate scene ever return to a seller's market, an up to date kitchen would be necessary if we wanted to list the house and draw acceptable offers for it. The other side of the coin was that if we opted to stay put, at least we'd have a kitchen that would serve us well for the next 10 to 15 years. The reno took just a shade over 4 weeks to finish, the end result we feel was well worth the inconvenience of doing without a kitchen for what seemed a very long month.

 Before we sold the old oven I managed to get one last bake in to tide me over for at least some of the time while the renos were in progress. Jeffrey Hamelman's Vermont Sourdough from “Bread”, my go to loaf of late, produced two good loaves for me and I was happy to see the old oven go out on a high note of sorts. I love the classic flavour of this bread with it's subtle rye and sour notes giving it just the right flavour to enjoy as Hamelman suggests, everyday.

 That oven turned out a lot of bread, pastries and cakes over the years and had always preformed reliably for my wife and I so I was a little sorry to see it go...but only just a little. The new oven we selected is from the same Sears Kenmore line as the previous one but with a convection function and a few other whistles and bells included that the old one didn't have. Besides having convection, one of the features this oven has is a top range of 550F/287C whereas the old one topped out at 500F/260C. For pizza and some breads I like having the option of using the 500F+ temps for a short period to maximize the jump and/or for crust colouration.

 The very first item baked in the new oven was a pizza made from approx. 220-250 grams of dough that went in at 525F, lowered to 460F and baked in convection mode. The pie baked off in just under 9.5 minutes coming out with a little char around the edges but leaving the bottom crust an even coloured light brown, something I rarely managed in the old oven and never in less than 10 minutes.

This looks promising I thought, but knew I'd have to keep a close eye on things until I became familiar with this much stronger oven.

A few days and feedings later my rye starter had come back to life after it's month long hibernation and  put to work making a levain for another loaf of Vermont Sour. As with the pizza I started the bake at 525F but kept it going for the first 10 minutes (with steam) before lowering the heat to 440F with convection on and removing the steam tray. I stayed in the kitchen for the entire time monitoring the bake as it progressed and it's a good thing I did. The loaf coloured up rapidly, probably 5-10 minutes faster than what I'm used to. I found I had to lower the heat down to 400F and change it's position several times to get an even colour during the final 10 minutes while the internal temp of the loaf came up to 210F. In total the entire bake time came to 40 minutes for the 1,050 gram loaf, roughly the same time it took the old oven to do at a steady average temperature of 460-470F.


For the next bake I wanted to try something different and settled on Hamelman's Potato & Roasted Onion Bread from “Bread”, one I've been meaning to make but hadn't gotten around to yet. It seems I've been missing out on a real treat for all this time. The bread is a joy to eat, very moist for a lean bread and with great flavour from the roasted potatoes, and with roasted leeks that I substituted for the onions. I've made two of these loaves in the boule shape so far, attempting to get the Fendu style loaves shown in photo # 12 of “Bread” with no success. I've come to the conclusion that the doughs I've made are too large for the brotform I have. Next time I'll try it in my large banneton and hopefully the extra room will allow the crease to open up the way it should.

Earlier in the week I'd made some Maple and Black Pepper cured bacon that I thought would go nicely with toasted Potato Leek Bread in a BLT....

and it turns out I was right! 

The recipe below is my adaptation of Jeffrey Hamelman's Potato Bread with Onions -Pg- 120 of “Bread A Baker's Book of Techniques and Recipes 

Link to Procedure *Here* 


There is another bread that I've made recently but I think I'll save it for another post, this ones become an epic. 

Cheers to all and a very happy Thanksgiving Day to all my fellow TFL members in the US

Franko


volvik's picture
volvik

Seed Culture not Doubling?

First time poster and baker here  <gulp>

I followed Peter Reinhart's instructions for the Seed Culture however I'm at Day 4 and my product has only increased 50% in size as opposed to the double he recommends.  I told myself patience and waited another 24 hours however no cigar.

I read that perhaps aerating (stirring) the culture may help....not.  So I just added a couple of tablespoons of rye flour and a bit of water to the culture and am letting it sit now.

Is this last step supposed to work or should I chuck my initial effort and start all over again?

Thanks in advance for any help...

Ron

Vancouver Island BC

Pages