May 12, 2013 - 8:03am

Sunday morning Bagels
Lazy Sundays call for fresh home made bagels – I couldn’t decide which ones to make “Jalapeno and Cheddar” or “Cinnamon and Raisin” – so I made both :)
A link to full recipe on my blog here

Share
Lazy Sundays call for fresh home made bagels – I couldn’t decide which ones to make “Jalapeno and Cheddar” or “Cinnamon and Raisin” – so I made both :)
A link to full recipe on my blog here


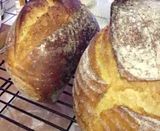
After years of just sitting around, I decided to do some work on my horno. Being from the southwest, I wanted to keep it as traditional as possible with using adobe; mud, straw and water. Here it is after some work and finishing putting the second layer of "stucco". One more thinner layer and I will fire it up.


After reading blogs of Dabrownman, Ian & Khalid in last few months, I was waiting to get my hands on whole spelt flour. Some time back, I found Bob's Red Mill's whole spelt flour in a supermarket and jumped to buy it. As it is not cheap, I wanted to make sure that every bread made from it was worth the price. So the flour had been lying in my freezer for quite some time now. Finally in the last week, I managed to make 3 breads from the whole spelt flour.
First one I tried was Hamelman's Honey Spelt Bread, with Pate Fermentee. It has 75% whole spelt flour. The changes I made from original formula were using agave nectar instead of honey and making pate fermentee with RYW instead of instant yeast. I don't really bother about results while making Hamelman's breads as there is hardly any chance of bad outcome. This one also remained true to form. A perfect bread to intoduce my household to whole spelt. Light, airy & tasty, the bread gave all the flavour of wholegrain flour, without the denseness. Here are the crust & crumb. The crumb shot is grainy, but it still shows the character of the bread.


Now that I knew we all liked spelt, the next step was to make it part of my children's daily bread. So once again I turned to Hamelman and the bread much loved by my kids - Pain De Mei. Changes I made to the PDM - Used 60% whole spelt flour & 40% bread flour, made tangzhong with 8% flour (used bread flour) and used levain made from my SD & RYW instead of instant yeast. Hydration had also to be increased from 60% to 68% to get the right dough consistency. My son ate half of this bread without anything on it. So another winner on hand.
Bread out of oven :

I was too impatient to wait, so cut the first slice within 20 minutes while still warm :

This is thelast slice after 4 days. I hid it to see how long it stays soft. Still pretty soft, with an added slight (pleasant) tang from sourdough.

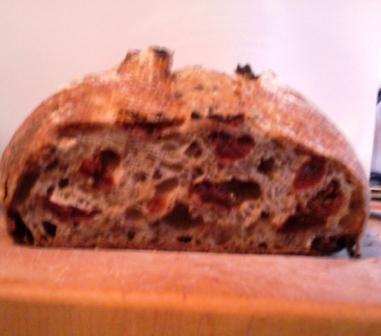
After 2 very nice results from spelt, I was contemplating the next one yesterday, when I read Floyd's post about Ken Forkish's FWSY winning the James Beard Award. My choice was obvious - Harvest bread with poolish. This one uses minimum whole spelt (10%), but it still comes through. I changed whole wheat flour to whole spelt flour and used Apple Yeast Water levain instead of poolish & skipped instant yeast in final dough. I also toasted the wheat germ (5%) and oat bran (2.5%) , thanks to dabrownman's toadies. It came out of my claypot DO with a great oven spring and have just cut one slice to taste and for crumb shot.

The crumb

A bite of this bread is a testimony to the well deserved award!
After reading a lot about baking bread it can start to sound more like science than baking:
The overwhelming amount of equipment used: cloches, stone baking sheets, banetons, lames, couches, pump sprays, peels, scrapers etc;
The numerous varieties of flours & yeasts, starter recipes, and kneading techniques.
All this and more but having come from a technical background I can handle that, just.
But then, when you start in, the science goes out of the window and bad magic enters. You follow a recipe to the letter, you go as far as using a thermometer to check for correct conditions, you follow all the advice you can find (there’s a lot & it’s often conflicting) and then what comes out of the oven? A concrete cow-pat!
So, thinking you must have missed a trick, you start over and go through the whole process again. You follow the exact procedures again and this time the result is OK.
What changed? The direction of the wind? Thw waxing of the moon? There is no precise answer.
For the beginner there’s certainly great scope for confusion from reading too many books & articles on the subject.
To start off with, quantity measurements for ingredients can trip you up. Units range from cups, teaspoon/tablespoons, fluid ounces, millilitres, grams, dashes, drops, pinches and drizzles & of course US & Imperial weight systems.
Then there’s yeast: There are currently 3 kinds available here in the UK.
Easy-blend/Fast-action/Instant/Bread Machine/Rapid Rise. Depending on the recipe it can be called any of these names. Helpfully, this comes in standard 7gm sachets. I weighed the contents of one today: 5gms!
Dried/Regular/Granulated/Active dry. Apparently this has to be dissolved or proofed before use but I’ve seen recipes where either this isn’t mentioned or it’s stated that it’s not necessary. Proofing directions also differ in that it either has to froth madly or that just a few bubbles will do. Some say just add water, others say add sugar too.
Fresh/Cake/Compressed. Not easily obtainable in the UK. Some say dissolve it, others not.
Recipes use either of these yeasts but to convert from one to the other by weight is not always straightforward. It depends on how much flower is in the recipe apparently.
Here are a few nuggets of advice I found:
Oh, I forgot to add an essential piece of equipment to the list: a calculator!
Personally, I much prefer to stick to grams, partly because my scales don’t cater for spoons and it’s kinda neat that that 100ml of water weighs 100gm.
However, none of the above helps me to bake a decent loaf so I’ll just keep practicing until I can casually toss about 500gm of flour, some water, a pinch or two of salt and roughly enough yeast into a bowl and start mixing & kneading, because that’s what I like most about this bread malarkey: a damn good knead.

Hi folks
I'm currently half way through a 12 hour course (2 sessions of 6 hours on consecutive Sundays) in a small village hall in deepest, darkest Somerset (England), with up to 12 very keen students (although 2 have already given their apologies for next Sunday):
http://nobreadisanisland.blogspot.co.uk/2013/04/breadmaking-at-hornblotton-somerset.html
As is my usual practice on any course, I plan the first session meticulously, so I know exactly what we're doing, and when. However, for subsequent sessions I want to bake what the students choose - with perhaps a few suggestions from me. But I try and accommodate all requests.
Normally, I'm pretty well on top of my brief, but not this time!
They all want to make a sourdough loaf next Sunday. I've got a reasonable idea of how I would go about it, but I just wanted to tap all that expertise I know is out there.
I've made many starters in my time - this is perhaps the easiest part of the whole process. I gave them some basic instructions, and I've heard back that one or two have begun the process.
I began making my starter on Monday, by Tuesday evening it was active, and I've been dividing and feeding it ever since.
ATM I've got 1.3ltrs of active starter - which I could easily double by Sunday. I'm not sure, as I write, how many students will turn up with their own starter on Sunday, so mine may have to suffice for all.
My gut feeling is that I should refresh the starter on Saturday evening, then, on the Sunday we should go for a small loaf for each student, comprising 50% starter.
1.32kg of starter (2:1 water to flour), refreshed with 440g of flour and no liquid, would give me 1760g of starter, at a ratio of 1:1, wouldn't you agree?
This amount divided by 10 students = 170g of starter. To make a loaf with a 62.5% hydration (normal 1lb flour to 10fl oz water), we'd need to add 115g flour and 40g water.
It's only a small loaf, I know, but I've only got 1 domestic oven and 5 small (size of a microwave) ovens to work with.
I figure if we make up the sourdough first thing on Sunday morn, then leave it through the day, it may well be ready to bake sometime in the afternoon. If it's not, then the students would have to take it home to bake it.
One further question - between now and Saturday, would you recommend me refreshing the starter (and discarding half?)
What do you guys think?

Ok, I've been debating a cold retard of my sourdough, but getting all kinds of conflicting info on which to retard... the bulk ferment or the final proof. Anyone have any opinions on which is better (or not) and the effects of the final product based upon which step it's retarded?


A video short of my bread just as it comes out of the oven.

A better crumb on this batch of Baguettes.....

Cheers,
Wingnut
PS... Makes a nice toastie with Pulled Pork, Dijon and aged Cheddar.


Lapsang Souchong iced tea with a splash of tart cherry juice is one of my favorite drinks. I think the smoky tea and the cherry play very nicely together. This bread is my first attempt at recreating that combination in bread form. I guess I'm on a bit of tea bread kick....
Cherry Lapsang Souchong Sourdough
225g Water
1 Tablespoon Lapsang Souchong
51g Stiff Levain
300g AP Flour
75 g Dried Tart Cherries
6 g Salt
I ground the tea in a mortar and pestle and then mixed it with warm water and the levain. I tried letting it "steep" for 5 minutes, but I don't think the water was hot enough. Next time I might use tea + cherry juice for the liquid, I'm not sure. Anyway, I added the rest of the ingredients and did stretch and folds every 30 minutes for the first two hours and let it bulk ferment for a total of 3 hours at 82 F. Then I shaped as a batard and let it rise for 2 hours at 82F in a towel lined paper basket that once held tomatoes. I've been meaning to get an oval banneton but haven't got a round toit yet.
I preheated the oven to 500 F and baked at 450 for 35 minutes with a stainless steel bowl covering the loaf for the first 20 minutes.
The cherries are just right and I get just a whisper of the smokiness which I think I'd want to boost with the next iteration, but overall I really like the flavor of this one.
Submitted to Susan's YeastSpotting


Hi bakers everywhere,
this is my first bake in my temporary kitchen here in Perugia, Italy. I saw the recipe on Paul Hollywood's Bread on the BBC and, as he had stuffed it with Italian flavours, it seemed a suitable thing to try. I was dubious of the little oven I have here, which looks to be older than I am (and my oven therometer is still in transit) but, on the whole, I was happy with the result. It's pretty easy to make, and as light as a feather, dripping in melted cheese and salty prosciutto. Well done Paul Hollywood!
I slightly scaled down the recipe as his seemed to produce something far larger than I wanted. All measurements in grams.
strong white flour 300 (I used farina manitoba, which is like a very strong white in UK)
salt 6
fresh yeast 12 (fresh yeast is easy to find here in supermarkets, but instant yeast almost impossible - the reverse of UK! I'd use 6 of instant if that's what you have)
whole milk at room temp 102
whole eggs 120 (this worked out luckily as exactly 2)
unsalted butter at room temp 150 (83% fat)
parma ham 6 - 8 slices
buffalo mozzarella 250 - 300
a bit of fresh basil
grated parmesan
egg for glazing
Dissolve the fresh yeast in the milk and leave until it becomes bubbly (or use instant yeast and skip this step). Add the flour, eggs and salt. This is a soft dough so it's best done in a machine. I wouldn't want to try this one by hand! Work it until the dough is formed and then slowly add the butter. The dough is ready when it starts to come away from the side of the bowl and has a shiny surface. It's important to add the butter quite slowly. I think in total it took my about 10 minutes, but I had left the dough to autolyse for 15 minutes or so before I began working it. Leave in a warm place (I put it next to a lamp) until it has at least doubled in size - tripled is better. For me this took about 4 hours.
When it's ready, dump it out onto some clingfilm, flatten it (careful, it's quite soft!) and put in the freezer, well wrapped. I found after about half an hour it was ready to be rolled. It ought to be firm to the touch. Roll it out on a lightly floured surface into a rectangle twice as wide as it is long, to a thickness of about 5mm. Keep moving it because it warms quickly and becomes sticky!
Place the parma ham across the surface and then rip the mozzarella and cover, like you were making a pizza. Then some basil and a healthy handful of grated parmesan. Roll it up (starting from the long axis) until you have a good long tube, with the filling tight inside. Trim the ends. Then take a good sharp knife and cut it down the middle, along the length of the long axis. Don't simply cut it in half!!! This done, turn the long pieces cut-side up, next to each other, and twist, one hand moving one way, the other in the other. This braids them. Stick the ends together to form a circle. This sounds more complicated than it is... it ought to look something like this when done:

You can see the filling where the dough has been cut. This melts wonderfully in the oven.
Leave that to rise, well covered to stop it forming a skin, for about 2 hours. It needs to double in size. Brush with eggwash, add more grated parmesan, and then put in the oven at 200C (without fan according to Hollywood - I couldn't turn the fan off, so I settled for somewhere in the region of 185 if the dial is to be trusted) for 25 minutes. It's best eaten warm or cold, but not oven hot.
A really tasty brioche recipe this, and I'd happily make it again now that I know the oven isn't as terrible as it looks :)
David


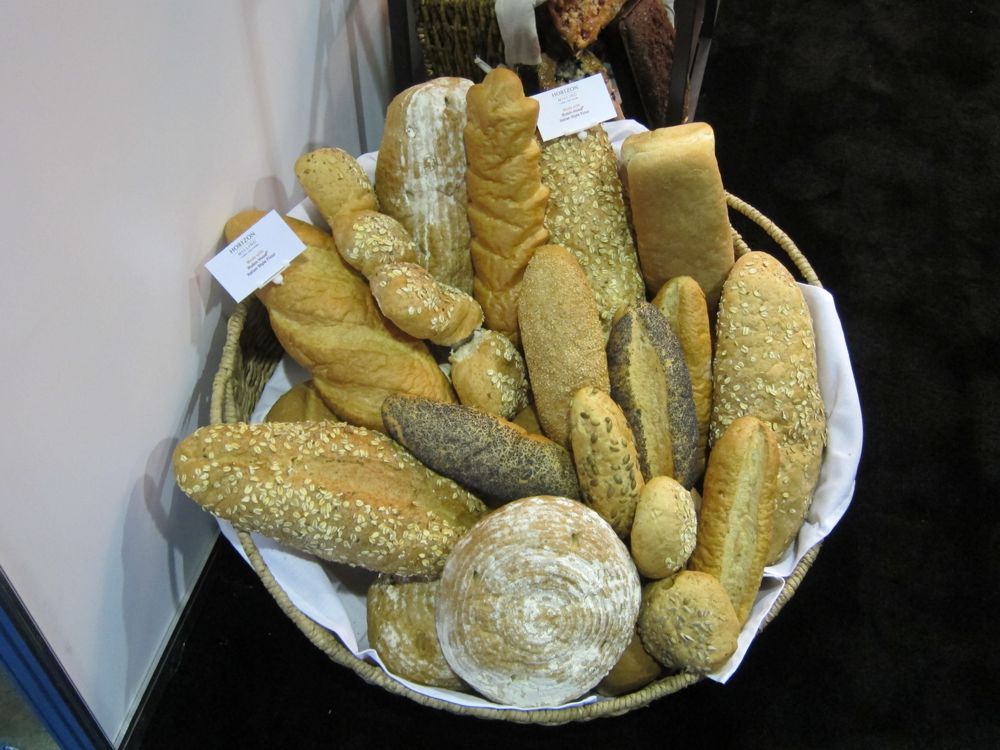
As Breadsong already posted about, this past weekend the Bakery Congress 2013, the largest annual baking industry event in Western Canada, was held in Vancouver, BC. As tradeshows go it was cheap and I was looking for an excuse for a bike ride on a beautiful sunny day, so I pedaled over to the PNE to take a look.
The minute you walked in the door you could smell that this wasn't just any tradeshow.
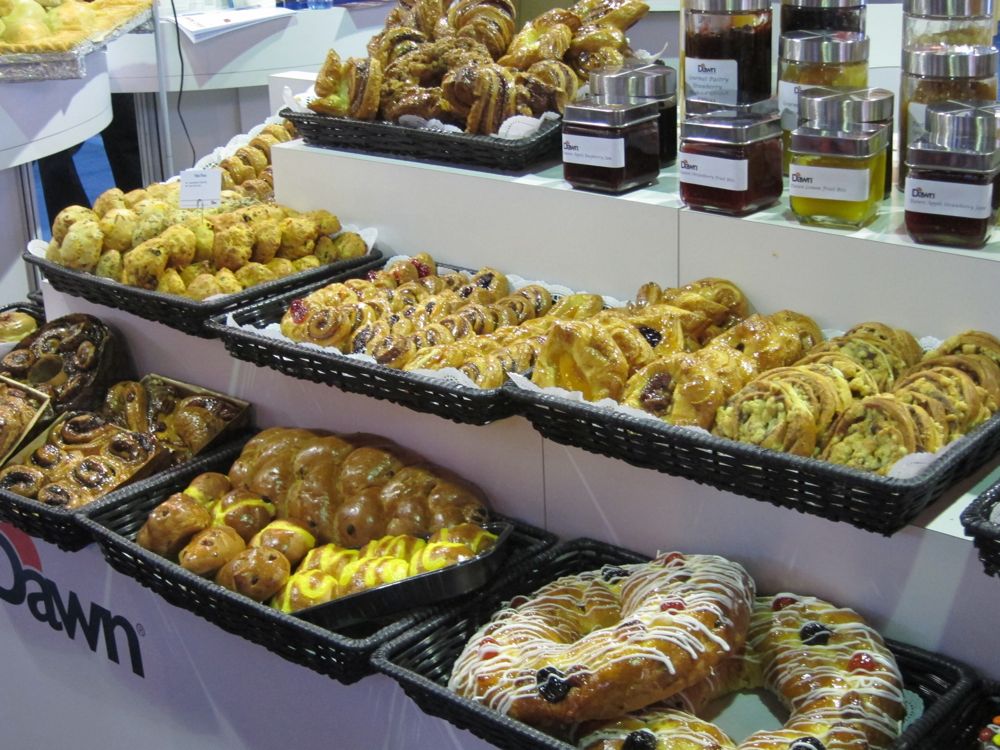
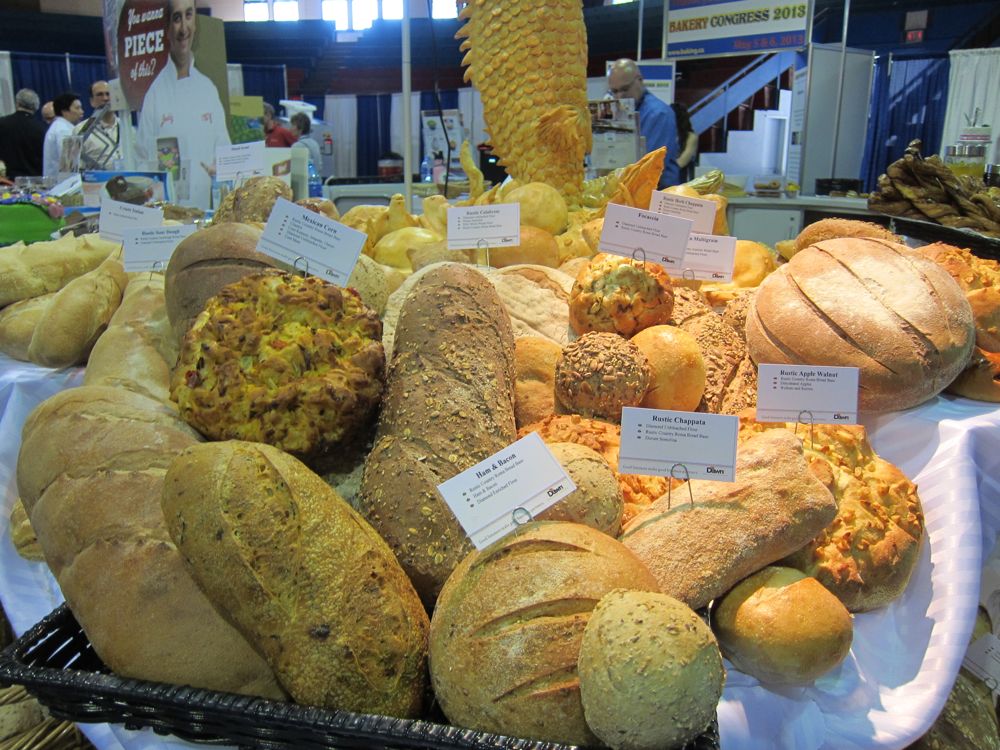
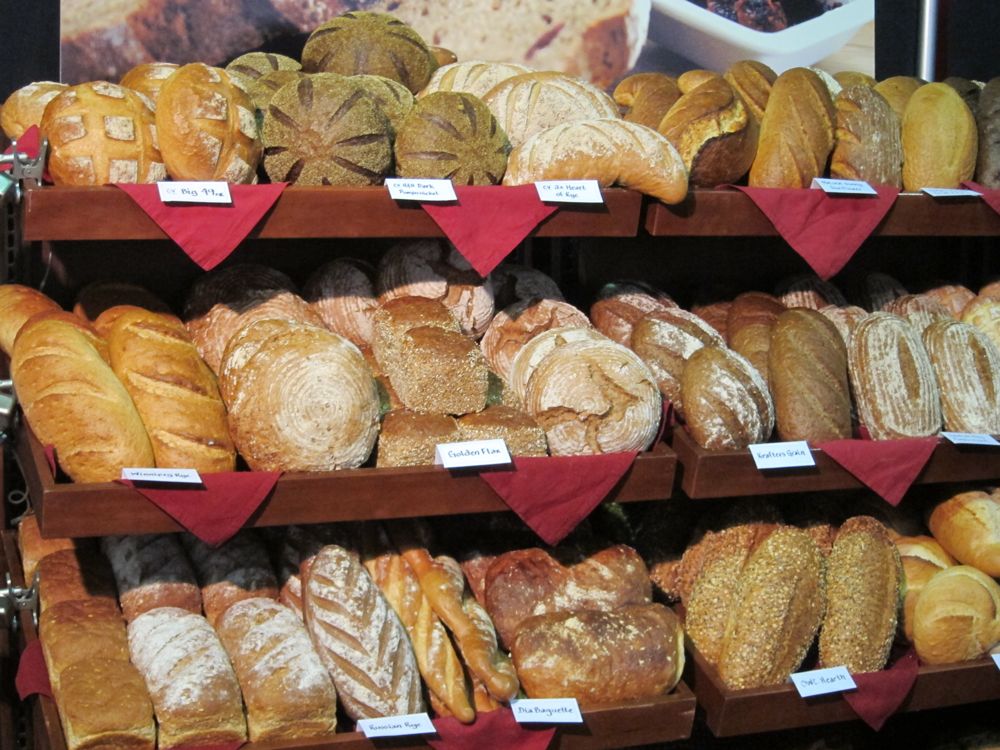
Breads and sweets everywhere!
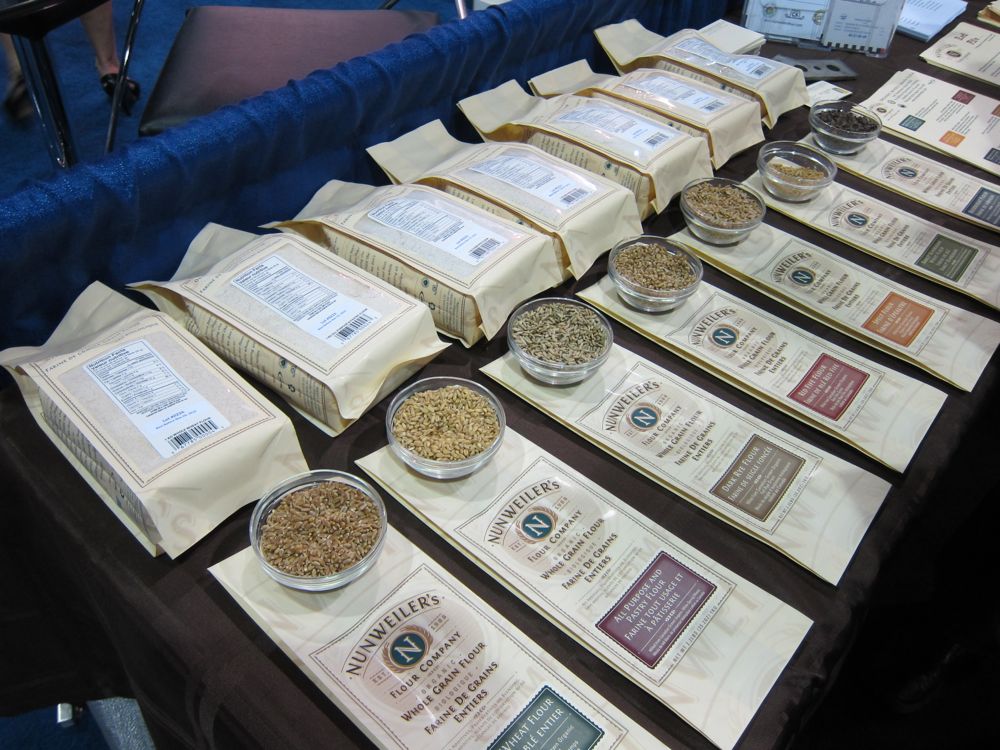
I chatted with Ross from Nunweiler's Flour Mill quite a bit and picked up a couple of bags of their organic flour, including their Red Fife Flour. I'm looking forward to giving it a try!

Lest we forget we are in Canada: hockey-themed giveaways.

Ah, the slicers. Do those every bring back memories...
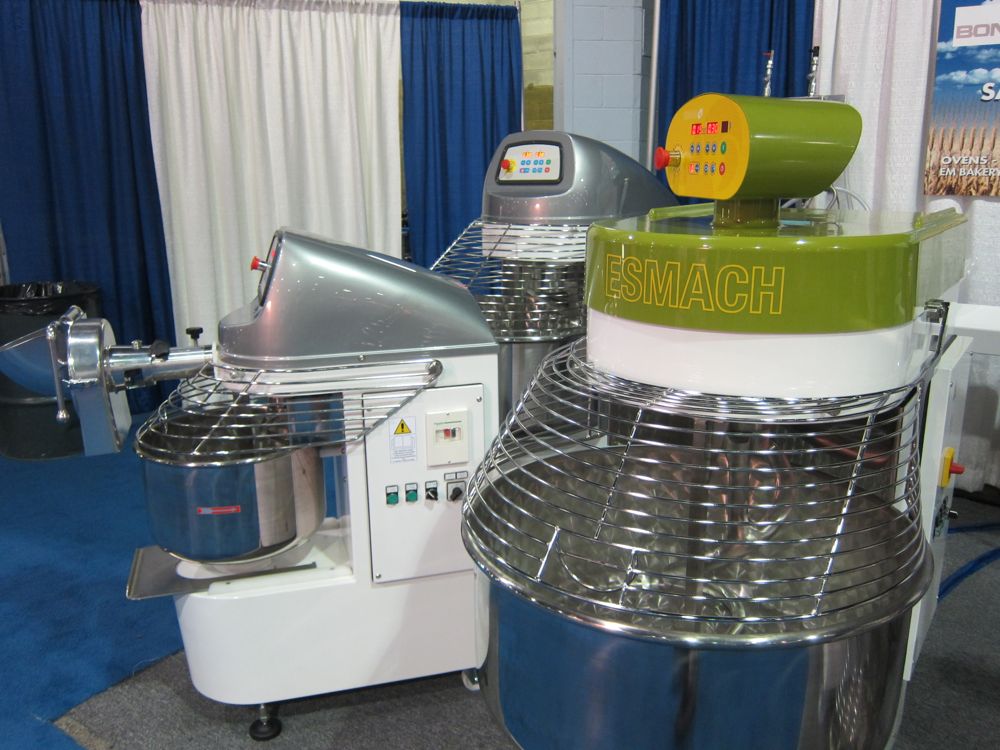
Need a mixer, anyone?
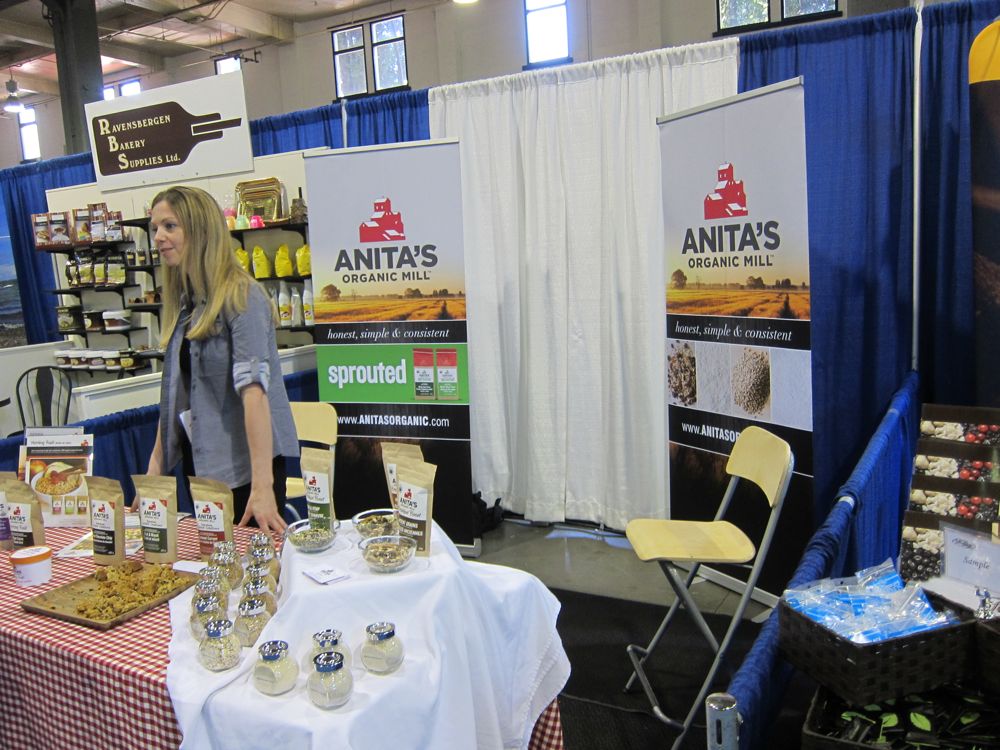
This picture I took for Song of the Baker, who is always telling me about how great the flour from Anita's Organic Mill in Chilliwack is. I will get out there to check out their store, one of these days.
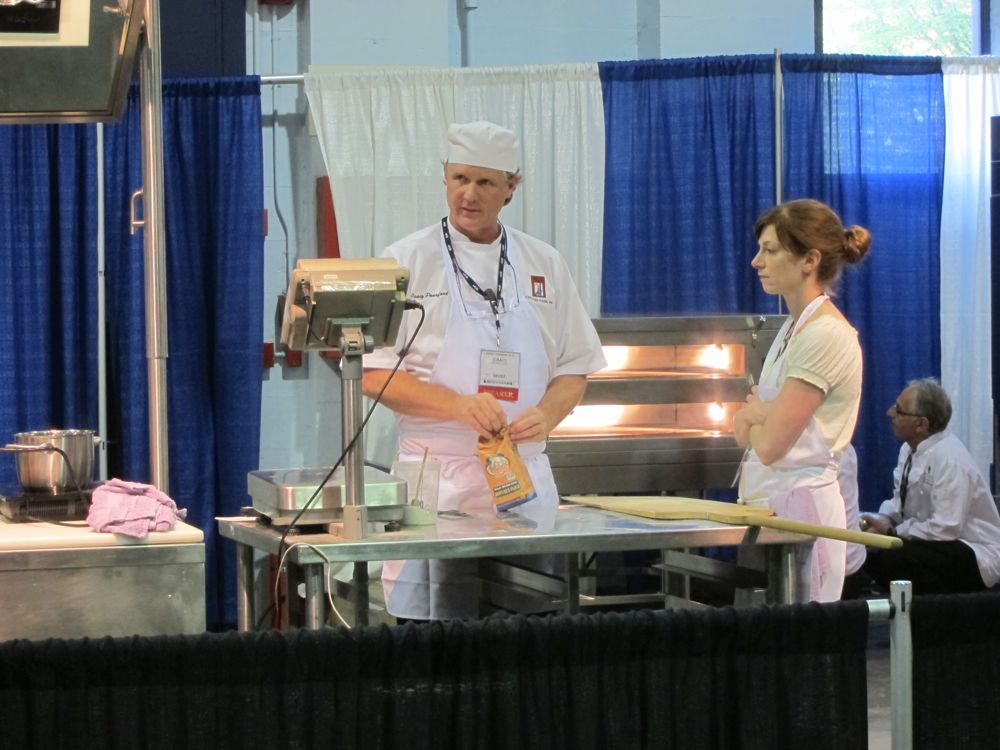
Baking presentations were running throughout the day. Here Craig Ponsford, former BBGA chairman and part of the Gold Medal winning Team USA at Coupe du Monde de la Boulangerie, and Tracey Muzzolini, from Saskatoon and who has also competed in the Coupe du Monde de la Boulangerie with Team Canada, prepare to present on making whole wheat baguettes.
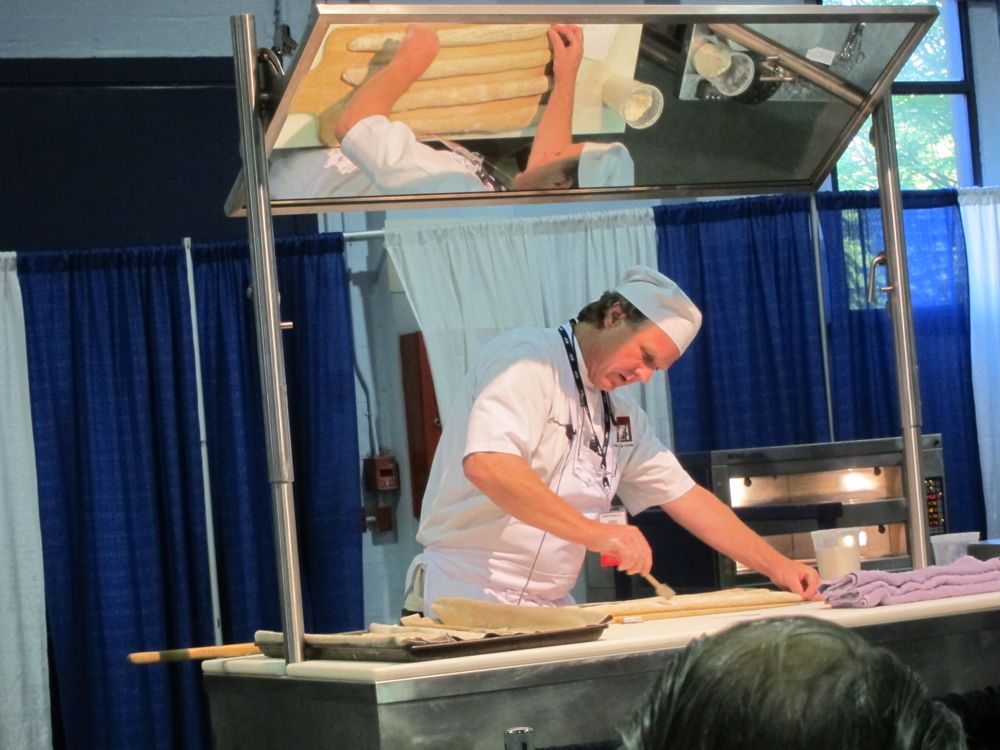
Scoring the loaves.
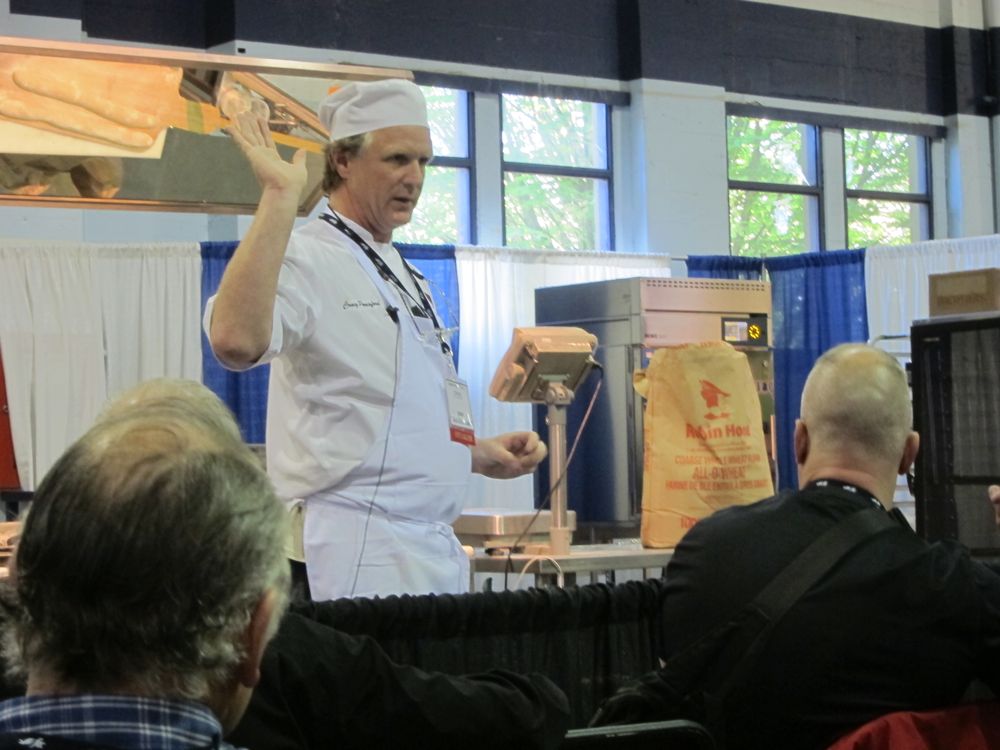
Craig asks "How many of you are getting asked by your customers about gluten free?" He then went on to talk a bit about the benefits of "whole-milled" whole wheat flours as opposed to whole grain flours that are actually reconstituted from white flour.

Back on the floor, you can see that there were a lot of vendors and attendees here. Vendors were selling ingredients, machines, packaging, ...

Errr.... probes too. I think this was to measure the volume of the loaves? A bit over the top, IMO, but if you bake tens of thousands of loaves a day that kind of precision matters, I suppose.
I had an enjoyable time and was able to snack on enough samples of sweets that I was thankful for the long bike ride home to work off some of it!