The Fresh Loaf

A Community of Amateur Bakers and Artisan Bread Enthusiasts.

yeast water

dabrownman's picture
dabrownman

This is another take on a multi-grain bake we did not s long ago that you can find here;

60% Whole Grain SD / YW Bread With Caraway, Rye Chops, Coffee and Cocoa


This time we upped the whole grains to 75% and the hydration to a little over 85%.  We dropped the chops and added multi-grain sprouts.  The whole grains and sprouts were rye, spelt and whole wheat.  A combination we like very much as long as the rye equals the other two grains.


We also decided to make this bread a little more Russian by using their Baltika #6 Porter for a majority of the liquid in this bread and all of the dough wetness if you overlook the barley malt.


We were overcome by guilt and also knowing that The Hempster would not be her kindly self if we left out the seeds so we tossed in some caraway and coriander to perfume this dark bread in a traditional way - but not too much.


Hanseata, probably in a fit of non-hempness, is also the creator of her very fine wild rice bread that we like so much.   Thinking she would still be upset that there are no hemp seeds in this bread, we plunked in some cooked wild rice hoping to appease Her Hempness with one last gesture of jester.


Keeping with the black theme this bread was calling out for, we also added in some caramelized onions, quite a lot actually, with its deglazed reduced juices as Eric, Andy, Ian and so many TFL bakers are wont to do out ofa  honed professional education and experience for many of them that know what they are doing and a playful, inquisitive wonderment of the strange for Ian and myself.


One last shot at anti-establishment went to the Combo YW and SD rye and Desem starter and levain we cooked up over two builds.  As we contemplated the dark path we were about to trip along, in total disregard of anything sane or normal, my apprentice became edgy, quite uncomfortable really and took on the look of one sick puppy. No, it wasn’t Toady Tom’s Toasted Tidbits at fault here even though we put 15 g of them in the mix.


It is a look that I see most often right before she upchucks - which she did... then murmuring under her lowly growl something about death to all dark baking masters or another…….. It seemed she got sick after noticing that the bread lacked nuts.  She recovered quickly after the upheaval when she realized there were already plenty of nuts out of their shells in the kitchen as it was - so no extra nuts were required for this Holiday bake.  


After all of what would pass for bread 101 on Empress Ying’s home planet, we hoped that this bread would be a shade darker than a dark one should be and also one that we could be proud to pair with the fine Pate Maison that we had baked and smoked up for the Holidays the day before.  Hopefully, both will pair well with a nice Malbec from Argentina, if one could afford it and a plate of various exotic cheeses from other places even more expensive.


Hey, it’s the Holidays and who needs another pair of Santa socks, snowflake ties and Snowman stocking caps anyway.  So, as an option, save enough bread by not getting those things and splurge on some foreign hooch and cheese to share with family and friends instead - all while making the bread and pate that much better.

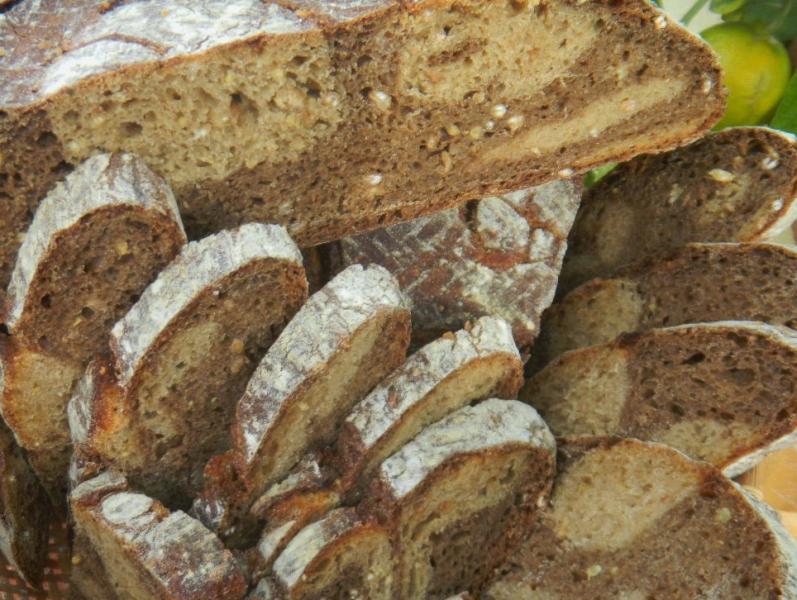
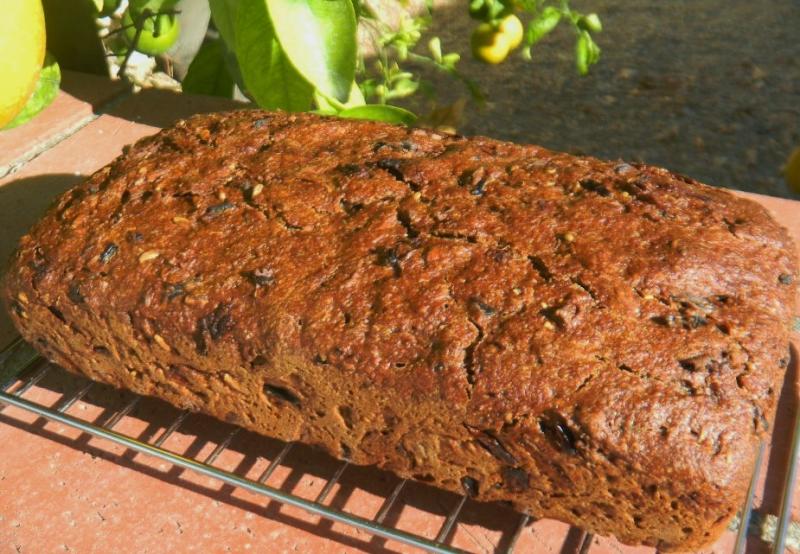
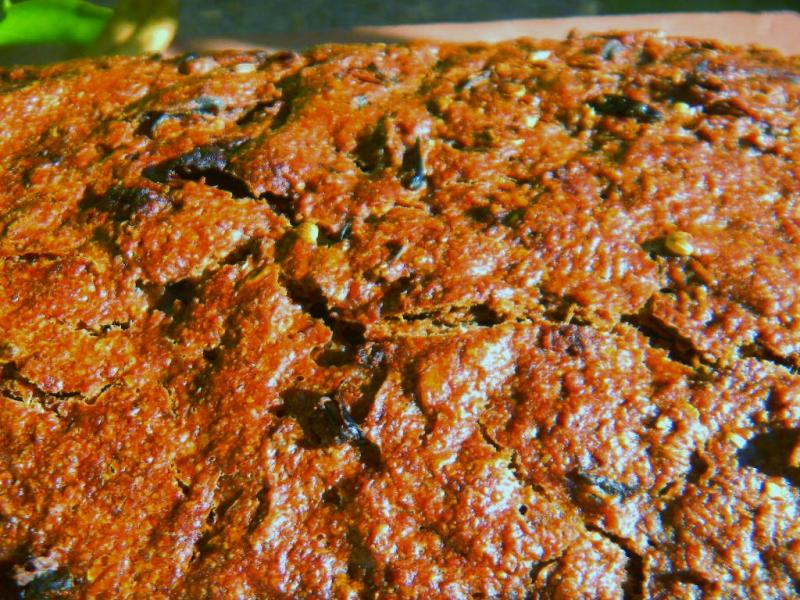
The crust came out dark, shiny and crispy but, after a 24 hour wait before slicing, it went soft with a slight chew.  This bread cut ¼” slices easily without crumbling.  The crumb was not heavy, slightly open, soft and very moist with little gloss.


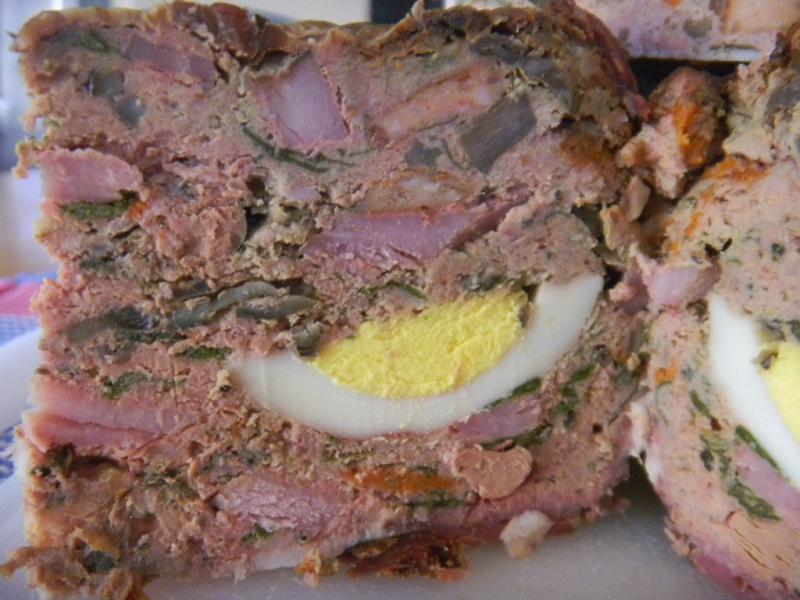
The taste was where this bread really shines.  Subtle coriander and caraway flavors combine with a stronger caramelized onion taste and the chew of the wild rice and sprouts to go with the complex flavors of the porter, cocoa and coffee.  Very tasty indeed. 


We have now eaten it plain, toasted with butter, as a sandwich and toasted with pate – just delicious and the perfect pate platter mate.    


Method

The method was straight forward if you remember to start the WW sprouts a day before the spelt and rye sprouts since they take 48 hours to chit instead of 24.  The levain was built over (2) stages of 8 and 4 hours each with an overnight retard of 12 hours following the 12 hours on the counter

The flours, salt, Toady Tom’s Toasted Tidbits, ground flax seed and the red and white malts were autolysed with the Baltika  #6 Porter for 1 hour after my apprentice had tasted about 205 ml of the 500 ml bottle to make sure that it wasn’t a covert left over cold war poison of a 3rd kind.

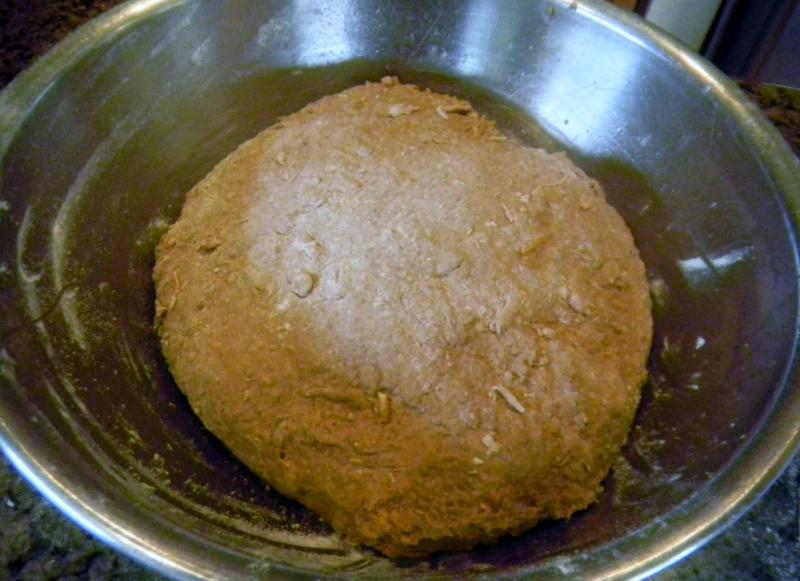
Once the autolyse and levain came together, we did 10 minutes of French slap and folds and then 3 sets of S&F’s on 30 minute intervals where the seeds and rice were incorporated in the 2nd set and the sprouts on the 3rd set. 

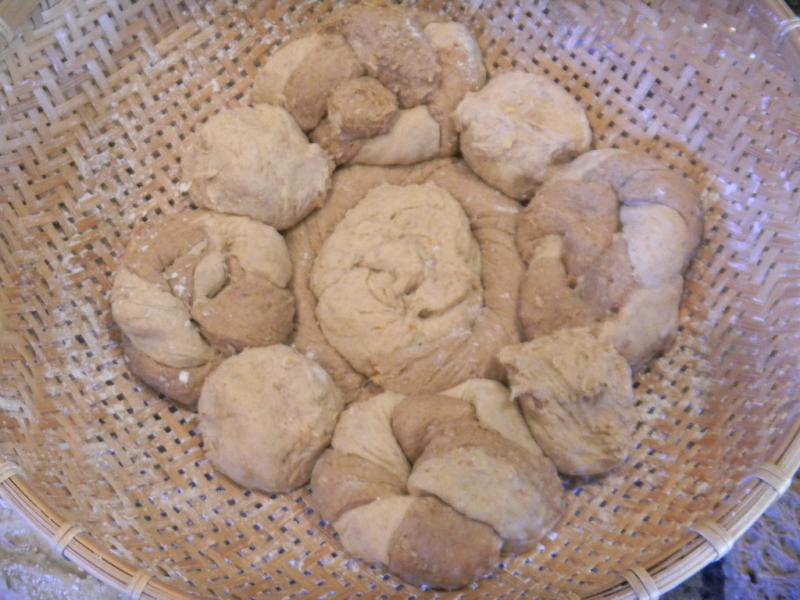
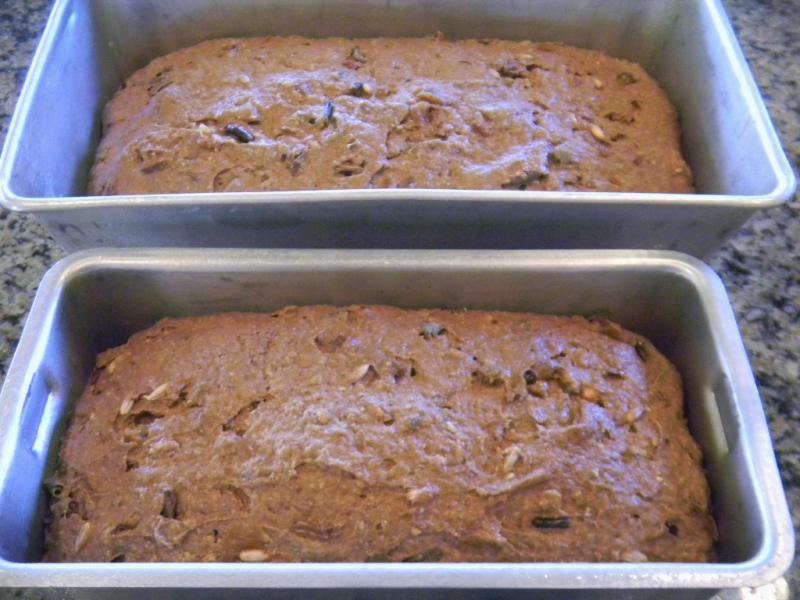
The dough was allowed to ferment and develop for 1 hour before being shaped into an 800 g and one near 500 g loaf and panned. The dough was allowed to proof for 1 hour in a trash bag on the counter before being retarded for 12 hours in the fridge. 

Once out of the fridge the small loaf was allowed to proof for 4 hours on the counter.  The larger one proofed for 4 hours on the counter at 65 - 68 F and an additional 1 ½ hours at  85 F in the make shift microwave proofer that had a cup of boiling water in it. 

Both of these should have been baked in the mini oven but Big Betsy was preheated to 500 F instead with 2 of Sylvia’s steaming pans and a 12”cast iron skillet full of lava rocks on the bottom rack.  The stone was put on the very top rack of the oven to project radiant heat downward to the top of the loaves.

As soon as the small pan went in the temperature was turned down to 450 F for 15 minutes of steam. When the steam was removed the temperature was turned down to 350 F, convection this time.

After 5 minutes the bread was removed from the pan and finished baking directly on the oven rack.  The bread was turned 180 degrees every 5 minutes until the internal temperature reached 190 F. Total baking was 30 minutes when the bread was removed to the cooling rack.

The larger loaf was baked the same way through steam but took an extra 15 minutes at 350 F to reach 190 F internal temperature.

Formula

Mixed Combo Starter

Build 1

Build 2

Total

%

SD Starter

5


5

0.99%

Yeast Water

10


10

2.63%

WW

10

15

25

6.58%

Rye

30

45

75

19.74%

Spelt

10

15

25

6.58%

Water

40

75

115

30.26%

Total Starter

95

150

245

64.47%


Starter


Hydration

100.00%


Levain % of Total

20.14%


Dough Flour


%


Toady Tom's Toasted Tidbits

15

3.95%


Whole Wheat

35

9.21%


Dark Rye

141

37.11%


Whole Spelt

35

9.21%


AP

154

40.53%


Dough Flour

380

100.00%


Salt

8

2.11%


Russian Baltika Porter

305

80.26%


Dough Hydration

80.26%


Total Flour

507.5


Water & Russian Porter 305

432.5


T. Dough Hydration

85.22%


Whole Grain %

74.58%


Hydration w/ Adds

85.51%


Total Weight

1,266


Add - Ins


%


Red Malt

5

1.32%


White Malt

5

1.32%


Barley Malt

20

5.26%


Ground Flax Seed

15

3.95%


Add- In Total

45

11.84%


Multigrain Sprouts


%


WW

10

2.63%


Rye

20

5.26%


Spelt

10

2.63%


Total Sprouts

40

10.53%


Other Stuff


Caramelized Onions.

100

26.32%


Cocoa

10

2.63%


Instant Coffee

10

2.63%


Caraway Seeds

8

2.11%


Coriander Seed

5

1.32%


Cooked Wild Rice

100

26.32%


Total Other Stuff

233

61.32%


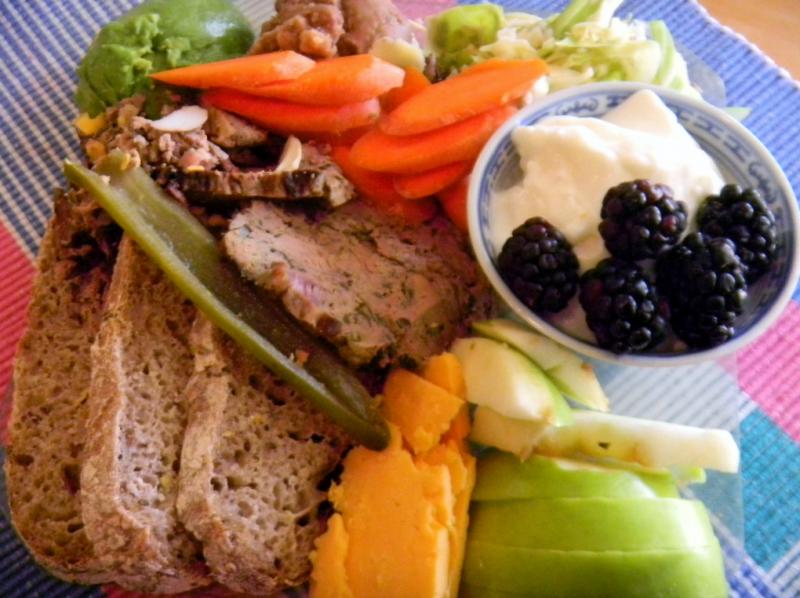
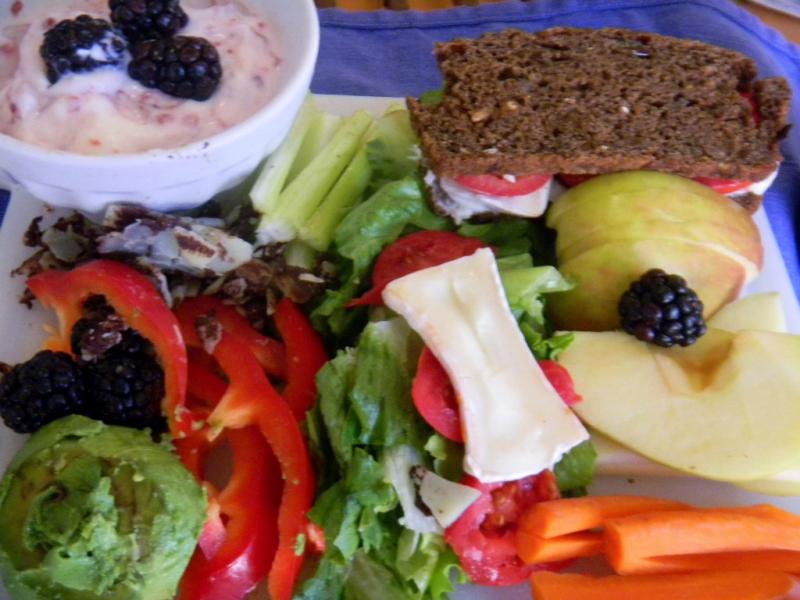
This lunch plate has some thin sliced sliced pate with 100% whole spelt bread, aged super sharp crumbly cheddar cheese, a pickled Serrano pepper, half a Granny Smith apple, some carrot coins, half an avocado, black and pinto re-fried beans, cabbage salad with black raspberries on non fat yogurt. 


dabrownman's picture
dabrownman

After the difficult and tedious Not So Stollen bake earlier in the week, we decide to continue our Thanksgiving bake list with something much simpler, less stressful even if not as enjoyable.


After seeing Toady Tom’s fantastic large miche bake and the excellent crust he managed to put on it, we decided to do a large loaf too only using the chacon shape we love to make since it too can produce a beautiful crust if it naturally splits where we would like as it springs and blooms in the oven heat.


We also wanted to try out a toasted wheat germ, soft white wheat extract and oat bran component similar to Toad’s to see what it tasted and looked like in the chacon.  All but 10g went into the dark side.


Instead of using our recent 1  starter and 24 hour counter levain development we went back to our roughly 20% seed levain for the SD starter required for this bake.   One levain was Rye Desem combo SD for the heartier darker portion of the loaf that has 2all of the whole grains listed for the starter. 


The other levain was a YW one that was fed with cake meal, another new ingredient for bread making for us.  Many folks use this ground matzo altus for their lemon, poppy seed walnut cakes or possibly a chiffon cake of any number of possible flavors.  We decided to try it out in the whiter portion of this bread only to see what it tasted like and how it performed in two different kinds of bread.


The instant coffee and the cocoa were only used in the dark portion to, you guessed it, make it darker than the light colored portion.  We also used some yogurt whey water for some of the liquid in both portions with 2/3rds of it going into the dark side.  The sprouts were also split between the two sides in the same proportion as the whey water - 2/3rds to the dark. 


In order to finish the breakout, the white portion ended up being 500 g with 100 g of the AP and bread flour and 80 g of the whole grains in the bread flour and 10g of the toasted bits.  Total flour and toasted stuff was 290 g and the liquid was 210 g (42 g whey) for a little over 72.4% hydration not counting any of the 1/3 of the sprout total that went into it.


With the malts, oats, and potato flakes on in the dark side the hydration of it was 82%.

The fun part was putting together the largest chacon we have ever made.  The center knotted roll is made from the light side and the side going down into the basket is sprinkled with rice flour.  It was surrounded by a twisted rope from the dark side.   The 4 other knotted rolls, on the cardinal direction points, were made from equal portions of dark and light that were ropes twisted together to make one rope.  The 4 little balls between the 4 twisted knotted rolls were from the light side.  Remember to rice flour anything that will touch the basket so it doesn't stick - and don't rice flour anything else so it sticks together.


What was left over was two light ropes that were placed on the spread out remaining dark side.  The long sides of the dark were folded over the light ropes to encapsulate them making a long rectangle.  The shot sides of the rectangle were folded over to the middle making a near square where the corners were folded into the center making a circle that was quickly shaped as a boule.


This boule was pressed out gently into a large bialy with the center indentation equal in size to the circle of knotted rolls, ropes and balls already in the basket.  The large bialy was floured around the edge that would contact the basket with rice flour and flipped over so the indentation covered the knotted rolls and the assembly was basically flat on top when finished. 

We hope this assembly will make a very pleasing marbled look when the chacon is cut.  Otherwise it was a waste of time and effort…something every baker is well used to if they have been baking more than a couple of minutes with an apprentice that is nearly all paws, bark and ankle bite.

The levains were formed by mixing, letting them double over about 4 hours or so and then chucking them in the fridge for 24 hours to build the labs while suppressing the yeast.   The flours and toasted bits were autolysed with the liquids and the salt for 2 hours as the levains came back to room temperature a day later.

Once the autolye and the levain were combined for each, the gluten was developed with 15 minutes of French slap and folds.  Then 4 sets of S&F’s wee done fpor each where the sprouts were incorporated on the 3rd set.  The dough’s were allowed to develop for 1 ½ hours on the counter before being retarded in a36 F fridge for 15 hours.


They were allowed to warm up for 1 ½ hours before being formed into the chacon and the allowed to proof at room temperature for 2 hours before firing up old Betsy and her16”round stone,  to preheat at 500 F for 20 minutes before 2 of Sylvia’s steaming pans were added.

After 45 minute of total pre-heat the chacon was un-molded easily from the basket using parchment and peel.  It slid into the oven off the peel when a 1/2 C of water was thrown into the bottom of the oven for extra initial steam and the door closed.  The temperature was turned down to 450 F the steaming was done at the 20 minute mark when the pans were removed and the temperature turned down to 425 F, convection this time.

In another 20 minutes the bread was exactly 205 F in the middle and beautifully and evenly brown from rotating it 90 degrees on the stone every 5 minutes after the steam came out.  At the 40 minute total mark, we turned off the heat and left the oven door ajar as the chacon continued to crisp on the stone for another 10 minuets before removal to the cooling rack.

The chacon didn't spring all that much and might have been a little over proofed but it did bloom and crack as expected.  It is a very pretty large chacon and we can’t wait for it to cool down and rest for awhile before we cut it ....   and see if anything interesting happened inside.

Now that it is cut..... the light and dark did learn to play well together.  We are pleased that it is so pretty on the inside and fitting for such a gorgeous outside.   The crumb is fairly open for so many add ins and whole grains.  The dark is tangy sour while the white is a little sweet, maybe sue to the Cake meal, has no tang and is a little moister as YW tends to impart in crumbs everywhere.  A very nice combination of two tastes.  The toasted bits tend to come through more on the dark side and the millet crunch is prevalent throughout.  This bread will have to to to the top of the chacon list and into the top 15 of our all time top 5 favorites.  I'm glad we made a big one.

Formula

Combo Starter

Build 1

%

SD Desem & Rye Sour

30

3.01%

Bulgar

20

2.56%

Dark Rye

20

2.56%

Kamut

20

2.56%

Buckwheat

20

2.56%

Spelt

20

2.56%

Whole Wheat

20

2.56%

Yeast Water

60

7.69%

Ground Flax

20

2.56%

Cake Meal

80

10.26%

Water

140

17.95%

Total Starter

450

39.74%


Starter Totals


Hydration

97.25%


Levain % of Total

17.88%


Dough Flour


%

Whole Spelt

25

3.21%

Dark Rye

25

3.21%

Whole Wheat

25

3.21%

Whole Kamut

25

3.21%

Bulgar

25

3.21%

Buckwheat

25

3.21%

Cake Meal

50

3.21%

Oats

20

2.56%

Instant Potato Flakes

20

2.56%

Bread Flour

245

31.41%

AP

245

31.41%

Dough Flour

730

93.59%


Whey 125 and Water

610

78.21%

Dough Hydration

83.56%


Total Flour

998


Total Water & Whey Water

822


T. Dough Hydration

82.36%


Whole Grain %

43.19%


Hydration w/ Adds

78.94%


Total Weight

2,517


Add - Ins


%

Red Multi-grain Malt

3

0.38%

Barley Malt

20

2.56%

White Multi-grain Malt

3

0.38%

Total

26

3.33%


Multigrain Sprouts


%

WW

25

3.21%

Rye

25

3.21%

Quinoa

25

3.21%

Buckwheat

25

3.21%

Millet

25

3.21%

Bulgar

25

3.21%

Spelt

25

3.21%

Total Sprouts

175

22.44%


Toasted Bits


%

Toasted Germ, Oat Bran & Extraction

50

6.41%

  10 g each of instant coffee and cocoa went into the dark side only.

dabrownman's picture
dabrownman

We decided to take our 1% SD starter experiment to the dark side by using much more whole grains; mainly rye and add some yeast water into the mix to try to open the crumb.  Our previous YW experiments show that YW can open the crumb dramatically more than what SD seed can do on its own when it comes to high percent whole grain breads.


With Thanksgiving less than 2 weeks away we decided to make a small cocktail loaf of rye bread flavored with cocoa, coffee and caraway.  To bolster the flavor and texture of the medium rye bread further we added some scalded rye chops to the 82.5 % hydration mix.


Like Phil says - When it cracks it is ready to go in the oven.  In this case the bran flakes worked perfectly. 

We have no experience to go on using low amounts of SD and YW seeds and long counter top fermentation when using higher amounts of home milled grains.  So we made a wild guess at how long the process should take.  We decided to knock 5 hours off the total 24 hour time and to not add the 5 g YW to the mix until 5 hours after the fermentation started.

It was ready to pan up in 16 hours and it proofed, nearly doubling and cracking the bran sprinkled on top in 4 hours  We baked it with 2 of Sylvia's steaming cups in the mini oven at 450 F for 15 minute. The steam was removed and the temperature was turned down to 350 F and baked for another 10 minutes before being de-panned and baked for another 5 minutes after turning the bread 180 degrees on the oven rack. 

It was left in the off oven, door ajar for 10 minutes to continue to crisp the crust and then removed to he cooling rack.  From the outside the loaf has potential.  It smells beautiful and is quite attractive for a brown lump of a bread covered in bran.  We hope that the crumb is as open as the last rye bake that was 100% whole rye.  We await 24 hours to see if the yeast water worked its magic once again.

24 hours later and this bread turned out open, moist 1/4"slicing is no problem and best of all just plain delicious.  You don't taste the coffee and cocoa and even the caraway is subtle.  It is lovely plain, toasted, buttered and a nice coctail bread for the Holidays.

Formula 

Combo Starter

Build 1

%

SD Desem & Rye Sour

3

1.19%

Yeast Water

5

2.00%

Total Starter

8

3.20%


Starter Totals


Hydration

344.44%


Levain % of Total

1.58%


Dough Flour


%

Whole spelt

25

10.00%

Dark Rye

100

40.00%

Whole Wheat

25

10.00%

AP

100

40.00%

Dough Flour

250

100.00%


Salt

5

2.00%

Water

200

80.00%

Dough Hydration

80.00%


Total Flour

251.8


Total Water

206.2


T. Dough Hydration

81.89%


Whole Grain %

61.76%


Hydration w/ Adds

82.56%


Total Weight

505


Add - Ins


%

Red Multi-grain Malt

2

0.80%

Barley Malt

10

4.00%

White Multi-grain Malt

2

0.80%

Total

14

5.60%


Scald


%

Rye Chops

20

8.00%


1 tsp Caraway Seeds


1 tsp Instant Coffee


1 tsp of Cocoa


Isand66's picture
Isand66

If you live in New York like me you are spoiled as there is little doubt we have more bagel shops than anywhere in the country and most of them are very good.  I have tried bagels in other cities and usually they taste like a dense tasteless ball of dough.  Since I usually can get great bagels in my town I usually don't make them myself but I figured I would give it a go with a twist of course.

I decided to use my apple/blueberry yeast water to make a durum and high gluten flour starter.  I built this as usual in 2 steps as outlined below and I used King Arthur's Sir Lancelot high gluten flour along with some more durum flour in the final dough.

To shape the bagels I used the technique outlined in the excellent book "Inside the Jewish Bakery" which instructs you to form the dough into ropes and after cutting off the correct size piece to adjoin the rope together and roll out to seal.

I must admit I need more practice with this technique as some of my bagels ended up looking like a blind man-made them.

The end result was satisfactory.  The durum combined with the yeast water provided a nice slightly nutty flavor with a nice moist crumb.  I don't think I'm ready to open up my own bagel shop yet, but overall they made a nice toasted bagel with cream cheese.

Directions for Yeast Water Levain

Yeast Water Starter Build 1

60 grams Sir Lancelot High Gluten Flour (KAF)

60 grams Durum Flour (KAF)

120 grams Yeast Water Starter

Mix the flour and Yeast Water in a bowl until thoroughly combined.  Cover the bowl and let it sit at room temperature for around 4 hours.  The starter should almost double when ready to proceed to build 2.

Build 2

Add ingredients below to starter from above and mix until incorporated.  Cover with plastic wrap and let sit at room temperature for 4 hours.

50 grams Sir Lancelot High Gluten Flour (KAF)

50 grams Durum Flour (KAF)

100 grams Yeast Water Starter

Main Dough Ingredients

400 grams Yeast Water Levain from above

450 grams Sir Lancelot High Gluten Flour (KAF)

100 grams Durum Flour

38 grams Vegetable Oil

25 grams Malt Barley Syrup

14 grams Seas Salt or Table Salt

170 grams Water at Room Temperature

Procedure

Mix the levain with the water to break it up in your mixer or by hand.  Next mix the rest of the ingredients in your mixer or by hand for 2 minutes on speed #1.  Change to speed #2 for 4 minutes and then place on your work surface and knead by hand for about 2 minutes.  You should not have to add any flour as the dough should be tacky  but pretty stiff and easy to knead.

Place the dough in a lightly oiled bowl and cover it.  Let it rest in the bowl for 3 hours.  After 3 hours turn the dough out onto your unfloured work surface and form the dough into a log shape.  Cut it into 2 pieces and roll each piece into a 2" diameter rope.  Let it rest covered for about 20 minutes to relax the dough.  Roll one of the ends of the rope into a strand about 8 to 10 inches long and wrap it around your knuckles and break it off with your thumbnail or a bench scraper.  Roll the overlapping ends against your work surface to seal the bagel.  You may need to spray some water on the surface to help roll and seal the bagels.

Place the bagels on a parchment lined baking sheet and cover with oil sprayed plastic wrap.  Place the bagels in your refrigerator overnight to develop the maximum flavor.

The next morning heat your oven to 460 degrees F. while at the same time prepare a large pot of water and bring to a rolling boil.  Add another 25 grams of malt syrup to the boiling water (note this is not listed in the total ingredients).  Next add 2-3 bagels at a time in the boiling water and remove them once they start to float.

Place the bagels on a cooling rack and immediately add your toppings of choice.  I used toasted onions, poppy seeds, toasted garlic mix and parmesan cheese mix.

Once the oven has come up to temperature, place the bagels on your baking sheet again and bake for 15 to 20 minutes until they are nice a brown.

Remove them from the oven when done and let cool on a rack for about 20 minutes or longer before diving in.


Cosmo Waiting Patiently for a Bagel

Isand66's picture
Isand66

The storm is upon us as I try to write this post before losing power.  Hurricane Sandy is set to touch down in a few hours but already the wind is howling and the water is starting to rise over the docks on Long Island.

I baked this rye bread yesterday in preparation for possibly not having any bread or water for a while. Fortunately it came out as good as I could hope with the addition of a corn slurry added which added some nice moisture to the overall bread.

I built up a yeast water starter using white rye and pumpernickel flour in two builds and also used some of my existing AP sourdough starter as well.

Directions for Yeast Water Levain

Yeast Water Starter Build 1

40 grams White Rye Flour (KAF)

40 grams Pumpernickel Flour (KAF)

80 grams Yeast Water Starter

Mix the flour and Yeast Water in a bowl until thoroughly combined.  Cover the bowl and let it sit at room temperature for around 4 hours.  The starter should almost double when ready to proceed to build 2.

Build 2

Add ingredients below to starter from above and mix until incorporated.  Cover with plastic wrap and let sit at room temperature for 4 hours.

100 grams Pumpernickel Flour

100 grams Yeast Water Starter

Main Dough Ingredients

345 grams Rye Starter from above

80 grams AP Sourdough Levain Refreshed (65% Hydration)

305 grams First Clear Flour (KAF)

75 grams Potato Flour (Bob's Red Mill)

100 grams Pumpernickel Flour (KAF)

85 grams Corn Flour (Bob's Red Mill)

50 grams Rye Chops

141 grams Corn Slurry (1 small can of corn put in food processor for about 30 seconds, water drained before processing)

22 grams Pistachio Oil (You can sub Olive Oil or Vegetable Oil or any nut oil)

18 grams Seas Salt or Table Salt

350 grams Water at Room Temperature

Procedure

Mix the starters (levains) with the water to break them up in your mixer or by hand.  Next mix the flours, and rye chops with the starters in your mixer or by hand for 1 minute. Let it rest covered in your bowl for 20-30  minutes.   Next  add the oil, salt, and the corn slurry mix for 4 minute to incorporate all the ingredients. I mixed on speed #1 for 3 minutes and speed #2 for 1 minutes.   The dough should have come together in a ball and will be pretty sticky from the high percentage of rye flour.

Next take the dough out of the bowl and place it an oiled bowl or container.  Do a stretch and fold and rest the dough for 30 minutes.  After the rest do another stretch and fold and cover the dough and let it rest for 30 minutes.  Do one more stretch and fold and let it sit at room temperature covered for 2 hours.  After 2 hours you can put the dough into the refrigerator for 24 hours or up to 2 days before baking.  Feel free to do some additional S & F's if you feel it is necessary.  I baked the bread about 24 hours later.

The next day (or when ready to bake) let the dough sit out at room temperature for 2  hours.

Next, form the dough into your desired shape and put them in floured bannetons, bowls or on a baking sheet and let them rise covered for 2 hours or until they pass the poke test.  I used my baker's couche to let the batards rise.  Just make sure to not let them over-rise.  Note this dough is going to be very sticky so resist the urge to use too much flour just use enough to prevent sticking.

Score the loaves as desired and prepare your oven for baking with steam.

Set your oven for 500 degrees F. at least 30 minutes before ready to bake.  When ready to bake place the loaves into your on  your oven stone with steam and lower the temperature immediately to 450 degrees.    When both loaves are golden brown and reached an internal temperature of 200 degrees F. you can remove them from the oven.

Let the loaves cool down for at least an 3 hours or so before eating as desired.

dabrownman's picture
dabrownman

These rolls are SD / YW, caramelized onion, sun dried tomato, bacon, parmesan cheese Emperor Rolls with Seeds so they are pretty much not Kaiser rolls or semmels any more.  We forgot to put in the basil but left it in the formula.


We were reading a post on another unmentioned site on how to make your own sun dried tomatoes.  Tomatoe are 25 cents a pound for Roma ones this week so no time like the present  to dry them.  Sun dried tomatoes have become increasingly more expensive in the store and are very easy to make at home.  I prefer mine roasted slowly with a little salt and Herbs de Provence packed in olive oil so that you get flavored oil too.


After finishing the tomato drying project we were looking around for a new way to use them besides in our standard pizza dough.  We also needed some hamburger buns for our monthly hamburger dinner.


We usually make these no fancy do shaped buns, with parmesan cheese, basil and apple wood smoked bacon but thought that a few minced sun dried tomatoes wouldn’t hurt them any – unlike what FedEx might do to your next package.


This time the apprentice thought we might give Emperor Roll shaping a try for these rolls and stick some; white and black poppy, white and black sesame, basil and nigella seeds on them with egg.  The (2) multi-seeded ones also had kosher salt and chia seeds in the mix.  We recently found some oregano seeds but forgot to use them on purpose - just to be consistent in forgetting stuff we would have liked to put in our recipes .


We also wanted to enrich our last dough for rolls with an egg to go along with the butter, NF milk and olive oil.  They ended up being 75% hydration our recent norm for white breads.


Kaiser rolls are always plain instead of having seeds on them and oddly they have nothing to do with the Kaiser either.  Odd how things get named isn’t it?  Kaiser rolls originate from Vienna, Austria and were supposedly named after the Emperor Franz Joseph but they are never called Emperor rolls.  So we ended up naming these Franz Joeseph's Emperor Rolls with Seeds.  We can understand how Empress Ying would have every right to be miffed bout this.


We shaped the rolls like they do here:

http://www.kingarthurflour.com/blog/2008/02/28/all-tied-up-shaping-kaiser-rolls/


And not the way Norm does here:

http://www.bing.com/videos/search?q=kaiser+roll+shaping&mid=B286163E82FA4DA942DEB286163E82FA4DA942DE&view=detail&FORM=VIRE5


Had we known it was Norm at the time, we would have shaped them the authentic way.  Next time for sure.


These Emperor Rolls with Seeds came out nicely brown and went soft as summer rolls tend to do in AZ.   Kaiser Rolls should be crusty and hard for NY authentic ones.


Method

We built the YW and SD levains separately over a 6 hour build with equal amounts of flour for each and 69% hydration.   The dough flours were autolysed with the milk for 4 hours.   When the levains and the dough flours came together we added the egg, oil softened butter, salt and malts and squeezed the dough through our fingers until incorporated.

After the dough had rested for 15 minutes, we did the first of (4) sets of S&F’s on 30 minute intervals.  The first one was (16) ¼ turns reducing by 4 turns each successive set.  The dough rested in a plastic covered oiled bowl in between sets.  After the last set the dough was retarded for 12 hours in the 38 F fridge in the oiled plastic covered bowl.

After the retard was complete we let the dough sit out for 1 hour on the counter to warm up.  We then weighed out (10) 112 g pieces and shaped them into balls.  After a 10 minute rest under plastic on the counter, we rolled out the balls into 14”ropes.

After another 10 minute rest they were shaped into Kaiser rolls and placed on parchment paper on cookie sheets to final proof covered in a plastic trash can liner for 2 hours.  The tops wee brushed with egg wash and sprinkled with the seeds.

Big Betsy was fired up to 450 F with (2) of Sylvia’s steaming bread pans with wet towels in them.  After 45minutes the rolls were ready to bake with additional steam provided by the ½ C of water we tossed into the bottom of the oven.

After 2 minutes the temperature was turned down to 425 F and then down to 375 F when the steam came out at the 10 minute mark. The rolls were rotated 180 degrees every 5 minutes after the steam was removed to ensure even browning.  They were removed from the oven when they reached 205 F internal temperature about 25 minutes including the steam.  We didn’t brush the tops with milk to keep them soft when they came out of the oven like we normally do since we thought they would go oft enough on their own

Formula

YW / SD Combo Starter

Build 1

%

SD Rye and Desem Starter

20

3.56%

Yeast Water

50

12.44%

AP

150

17.41%

Water

50

12.44%

Total Starter

270

34.83%


Starter


Hydration

68.75%


Levain % of Total

25.94%


Dough Flour


%

AP

350

87.06%

WWW

52

12.94%

Dough Flour

402

100.00%


Salt

8

1.99%

Non Fat Milk

262

65.17%

Dough Hydration

65.17%


Total Flour

562


Milk and Water

372


T. Dough Hydration

66.19%


Whole Grain %

11.39%


Hydration w/ Adds

74.53%


Total Weight

1,041


Add - Ins


%

Butter

28

6.97%

Egg

57

14.18%

Red Rye Malt

1

0.25%

White Rye Malt

1

0.25%

Olive Oil

12

2.99%

Total

99

24.63%


3 Thick Apple Wood Smoked Bacon Strips

2 T Chopped basil


4 T Caramelized onion.


1/4 C Grated Parmesan


2 T Sun Dried Tomato


Isand66's picture
Isand66

I have wanted to try my hand at a Challah made with a Yeast Water starter for a while so I decided to give it a try this weekend.  Naturally I needed to change it up a bit more and added some shredded coconut and used coconut water in place of the liquid.

I figured since today really finally feels like Fall it warranted using a nice fall themed cake pan for this bread.  This is the first time I successfully used a cake pan/bundt pan for a bread.  I was planning on removing the dough from the pan before baking, but the dough was very moist so I was afraid I would ruin it if I tried to un-mold it before baking.

I was very happy with the way this bread turned out.  It has nice sweet flavor from the honey and coconut and the mold worked perfectly as the bread easily popped out after it was finished baking.

Procedure

I used a combination of my white sourdough starter which I keep at 66% hydration and did a 3 stage build with my fruit flavored yeast water starter.

Yeast Water Starter Build 1

60 grams AP Flour (KAF)

60 grams Yeast Water Starter

Mix the flour and Yeast Water in a bowl until thoroughly combined.  Cover the bowl and let it sit at room temperature for around 4 hours.  The starter should almost double when ready to proceed to build 2.

Build 2

Add ingredients below to starter from above and mix until incorporated.  Cover with plastic wrap and let sit at room temperature for 4 hours.

60 grams AP Flour (KAF)

60 grams Yeast Water Starter

Main Dough Ingredients

240 grams  Yeast Water Starter (all of the starter from above)

844 grams European Style Flour (KAF)  (You can substitute Bread Flour with a little White Whole Wheat)

35 Grams Shredded Coconut

170 grams Egg Yolks

71 grams Vegetable Oil

21 grams Pure Vanilla Extract

19 grams Salt (Sea Salt or Table Salt)

66 grams Honey

390 grams Coconut Water at Room Temperature

Procedure

Mix the flour with the egg yolks, starter,  and 340 grams of the coconut water for about 1 minute.   Let the dough autolyse for 30 minutes to an hour in your bowl covered with a cloth or plastic wrap.  Next add in the salt, oil and honey, rest of the coconut water and mix on speed #1 for 3 minutes and #2 for 2 minutes or by hand.  This dough is very wet but it should start to come together after mixing but will still be very wet.

Next take the dough out of the bowl and place it on your work surface.  Do a stretch and fold and rest the dough uncovered for 10 minutes.  Place the dough in an oiled bowl after the rest and do another stretch and fold and cover the dough in the bowl and let it rest for 10 minutes.  Do one more stretch and fold and put the dough into a lightly oiled bowl and let it sit at room temperature covered for 2 hours.  (If the dough is still too lose, you can do several more stretch and folds until you are ready to put in the refrigerator). After 2 hours you can put the dough into the refrigerator for 24 hours or up to 2 days before baking.  (Note: this dough is very moist and you may want to add more flour, but try to resist or you will make it too dry.  It will firm up while in the refrigerator overnight.)

The next day (or when ready to bake) let the dough sit out at room temperature for 2 hours.  After 2 hours form the dough into your desired shape and put them in floured bannetons, bowls or you can braid and make a traditional style Challah.  I decided to use a cake pan which I sprayed heavily with baking spray and after forming the dough into a rough oval I placed the dough in the pan and covered it with a moist towel.

Set your oven for 450 degrees F. at least 30 minutes before ready to bake.  When ready to bake place the loaves into your on  your oven stone with steam and lower the temperature immediately to 350 degrees.  Bake until the loaf reaches an internal temperature of 200 degrees F. which in this case took about 1 hour and 10 minutes.  If you make it as a free-from loaf it will probably take  a lot less time.

Let the loaves cool down for at least an hour or so before eating as desired.

Please visit my other blog at www.mookielovesbread.wordpress.com for all of my recipes.

dabrownman's picture
dabrownman

We ran out of English muffins and once again used a variation fop the one at KAF.  We use YW in conjunction with a SD Desem starter to make EM;s that are very similar to Wofferman’s but 16% whole wheat.  They are light, fluffy, airy and just plain delicious.  We make them all the time and never want to run out of them in the freezer


After 8 hours the dough had more than doubled and stuck to the plastic cover to reveal the airy structure beneath. 

The method is simple enough.  Build the SD and YW levains over 6 hours in one stage each.  After the levains have doubled, mix everything except the salt, sugar and baking soda together and let sit out overnight or for 8 hours on the counter.  Make sure the bowl is covered in plastic and well oiled and at least 3 times the size of the dough ball.


See the 2 free form ones made after cutting out 7 on the first pass?

After the overnight proofing add the remaining salt, sugar and BP and knead on a floured work surface for 4-5 minutes.  Let rest for 10 minutes and then press out into a circle that is ¾ “ thick.  No need for a rolling pin.  Use a cutter to make 3”-4” rounds – I used a plastic drinking cup.  Move to a corn meal or semolina sprinkled parchment paper covered cookie sheet and cover with plastic to final proof 45 minutes on the counter.


We managed 9 large ones but you could get a dozen smaller ones.  Dry fry in a seasoned cast iron skillet on medium low heat about 4-5 minutes per side until golden brown.  Move to a cooling rack.  Eat while warm with butter and jam.  Yummy!


SD YW English Muffins - 16% Whole Wheat


Mixed Starter

Build 1

Total

%

SD Starter

10

10

2.46%

Yeast Water

31

31

9.39%

WW

31

31

9.39%

AP

41

41

12.42%

Water

41

41

12.42%

Total Starter

154

154

46.67%


Sd YW Starter Totals


Hydration

100.00%


Levain % of Total

21.12%


Dough Flour


%


Whole Wheat

30

9.09%


AP

300

90.91%


Dough Flour

330

100.00%


Salt

7

2.12%


Milk

238

72.12%


Dough Hydration

72.12%


Total Flour

407


Milk & Water

315


T. Dough Hydration

77.40%


Whole Grain %

16.22%


Total Weight

729


Additional Ingredients


1 T Sugar


1 tsp Baking Soda


Isand66's picture
Isand66

Over the last few weeks I have been experimenting with making different styles and recipes for baguettes.  A couple of weeks ago I tried TxFarmer's 36 hour sourdough version but I had some issues transferring the rested baguettes to my oven and the results were less than stellar.  This time I decided to concentrate on a recipe from Dave Snyder for his "Rustic Sourdough Baguettes after Phillipe Gosselin".  This recipe is also similar to Peter Reinhart's formula for Pain a l' Ancienne from The Bread Bakers Apprentice where he uses yeast and no starter.

I wanted to give Dave's recipe a try using Yeast Water instead of a sourdough starter and I also wanted to incorporate some Durum flour into the mix.  I created a Durum Yeast Water starter over 3 builds and also used some KAF French Style flour in the final dough which is medium protein, high ash flour which is supposed to mimic the flour used in France for their world-famous baguettes.

The only mistake I made on this recipe was the forming of the baguettes.  I knew I should have re-read the directions from TBBA but I was too lazy and paid the price.  I didn't use nearly enough flour to control the extremely wet 75% dough and had a difficult time forming them into baguettes without man-handling them.  The final result turned out pretty good with a nice open crumb and sweet nutty flavor.  Keep in mind this dough is very wet and is not meant to form the baguettes in the normal fashion.  You basically just pat the dough out into a rough rectangle and cut 3-4 strip and carefully stretch them out to form a baguette.

Procedure

Yeast Water Starter Build 1

60 grams Durum  Flour (KAF)

60 grams Yeast Water Starter

Mix the flour and Yeast Water in a bowl until thoroughly combined.  Cover the bowl and let it sit at room temperature for around 4 hours.  The starter should almost double when ready to proceed to build 2.

Build 2

Add ingredients below to starter from above and mix until incorporated.  Cover with plastic wrap and let sit at room temperature for 4 hours.

100 grams Durum Flour

100 grams Yeast Water

Build 3

Add flour to starter from above and mix until incorporated.  Cover with plastic wrap and let sit at room temperature for 4 hours or until bubbly and either use immediately or put in the refrigerator for the next day.

60 grams Durum Flour

60 grams Yeast Water

(Note: I made extra starter since I wanted to use this for another bake.  You can cut the amounts down to make the 200 grams needed in the recipe)

Main Dough Ingredients

100 grams Durum Flour

300 grams French Style Flour (You can use AP flour to substitute)

200 grams  Yeast Water Durum Levain from above

275  grams Ice Water

8.75 grams Sea Salt or Table Salt

Procedure

Build your Yeast Water levain the day before you are ready to bake or start in the morning the day before you want to bake the actual baguettes.

The evening before you want to bake, mix the mature levain with the flours and 225 grams of the ice water.  (I measured the water and added a few ice cubes for a minute and then removed the cubes and measured again).  Immediately put the flour mixture in the refrigerator in a covered greased bowl.  (Note: you can follow Dave's original recipe and substitute your 100% hydration sourdough starter for the Yeast Water starter).

The next morning, (Due to my schedule as we took a ride out east to buy some pumpkins and taste some wine I didn't prepare the dough until about 8 PM),  add the salt and 50 grams of ice water to the dough and mix using your hands until all the water is absorbed into the flour.  You will have to squish the dough and the water together for a few minutes until all the water is absorbed.  I did this in the same bowl the dough was resting in the refrigerator in, but you can transfer to a clean oiled bowl if desired.

Cover the bowl with the dough and ferment at room temperature until the dough has doubled in volume which should take around 3 hours.  Every 30 minutes for the first 2 hours do a stretch and fold in the bowl.

About one hour before ready to bake, set your oven for 500 degrees F.and make sure you prepare it for steam.  I have a baking stone on the top shelf and the bottom and use a heavy-duty rimmed baking pan that I pour 1 cup of boiling water into right as I put the loaves into the oven.

After 3 hours or when the dough has doubled, transfer the dough to your well floured work surface (use about 1/2 cup of flour).  Sprinkle more flour onto the top of the  dough if necessary and using a wet dough scraper and wet hands pat the dough out into an oblong .  Be careful not to degas the dough or you will lose all of the nice big open holes you are looking for.  Cut the dough using your metal dough scraper into 4 strips and transfer them with floured hands to a piece of parchment paper on the back of a baking sheet.  Gently coax the dough until it is about 12-14 inches long.  You may need to let it rest for 5 minutes to relax before doing this step.  Score the dough as best as you can.  You may have to dip the blade in ice water between each cut.

When ready to bake place the loaves into your on  your oven stone with steam and lower the temperature immediately to 460 degrees.  It should take around 20 minutes to bake  until the baguettes  are golden brown and reached an internal temperature of 200 - 205 degrees F.

Let the loaves cool down for at least an 20 minutes or so before eating as desired.

The results were pretty good with a nice open crumb and light but crispy crust.  I will certainly try this one again and hopefully follow my own directions about shaping this time!

Pages

Subscribe to RSS - yeast water