The Fresh Loaf

A Community of Amateur Bakers and Artisan Bread Enthusiasts.

yeast water

dabrownman's picture
dabrownman

There is no question my apprentice likes to retard her pizza dough overnight but, sometimes you just don’t have that much time when the pizza urge hits you.  No worries!  We managed a very nice pizza in 8 hours starting at 10 AM yesterday.


We started the combo YW and Desem WW levain build and cut the 3 stage build from 3 to 2.  Two hours for the first stage and 3 hours for the second.  It had doubled in 5 hours.  For the last 3 hours of the levain build we autolysed the flour, dried rosemary, olive oil, Moho de Ajo, (2) malts, sun dried tomato oil, salt and the dough water.


We always try to have around 30% whole grains in our formulas if possible and this time it was a mix of whole wheat and soft white wheat that we ground at home.  So Desem WW starter was in order and we wanted the boost that YW gives to speed things along some due to the shot amount of time we had to get this dough ready.


5 hours in; 3 PM, we mixed the autolyse and the levains in the KA for 6 min on KA 2 and 2 minutes on KA 3.  Then we let it rest for 10 minutes.  We then did 3 sets of S & F’s, 10 minutes apart on a lightly oiled counter, starting with 20 stretches and ¼ turns and reducing the stretches by 5 each set – a total of 45 stretches.

The dough was ready to go after 2 hours and 15 minutes of resting and fermenting in a plastic covered oiled bowl.  At 5:15 PM we fired Old Betsy; Big GE oven too 500 F no steam.  These 2 pizzas were fully peel size and there was no way these were going to fit in the mini oven without some serious magic or ‘Honey I shrunk the pizza’ going on.

We also had the baking stone in there too since we never take it out of the oven except to move it to the grill for pizza there - like last time. Thankfully, after yesterday’s torrential rain it never got over 92 F so a little more heat in the house was not a big deal if you are used to 115 F for the last who knows how long.

After dividing the dough in half, we hand stretched it out to peel size, brushed a layer of some more Mojo de Ajo on, docked it  and put it in the oven to par bake for 3 minutes.  Then we removed it and then piled on the toppings of our choice, kalamata olives, hatch green chilies, red peppers, caramelized onions, re-hydrated dried shitake mushrooms, home made Italian sausage, pepperoni; parmesan, Colby and mozzarella cheeses  and some fresh basil for a garnish after it came out of the oven.

Then back into the oven for another 7 minutes or so to get nice and brown  - since, as Anne Burrell says “brown food tastes good’ and Brownmen agree with her.


Friday night grilled shrimp kabobs with Mexican Green Dirty Rice.  We are thinking beer can chicken for tonight.

The crust came out picture perfect thin and crisp, nicely browned on the bottom and tasted good.  After cutting, the slices were flat out rigid when held up, even with all the toppings and didn’t go limp, like NY Pizza, until the left over slices were being wrapped for freezing.

Sorry the photos are so bad this time but at night with indoor lighting it is the best my apprentice could manage.  They are still better then the ones my phone takes!  Formula follows at the end.

Soft White Wheat, WWSD YW Combo Pizza Dough


Starter Build

Build 1

Build 2

Total

%

Desem  Starter

10

0

10

2.75%

Yeast Water

10

0

10

2.75%

Soft White

0

25

25

6.89%

WW

25

0

25

6.89%

AP

0

50

50

13.77%

Water

20

50

70

19.28%

Total

65

125

190

52.34%


Combo YW SD Starter


%


Flour

105

28.93%


Water

85

23.42%


Starter Hydration

80.95%


Levain % of Total


29.01%


Dough Flour


%


Soft White Wheat

58

15.98%


WW

0

0.00%


Bread Flour

100

27.55%


AP

100

27.55%


Total Dough Flour

258

71.07%


Salt

7

1.93%


Water

170

46.83%


Dough Hydration

65.89%


Add - Ins


%


Dried Rosemary

1

0.28%


Red Rye Malt

2

0.55%


White Rye Malt

2

0.55%


EVOO 10, SD Tom. 10, MdA 5

25

6.89%


Total

30

8.26%


Total Flour w/ Starter

363


Total Water w/ Starter

255


Tot. Hydration  w/ Starter

70.25%


Hydration w/ Adds

69.29%


Total Weight

655


% Whole Grain

30.71%


Isand66's picture
Isand66

Last weekend I baked some of the best rolls I've made to date using instant yeast instead of my usual sourdough or yeast water.  I didn't have time to refresh my starter which is why I had used the instant yeast.  I wanted to try a similar formula using a combo of sourdough starter and yeast water levain.  I decided to leave out the cream and the eggs for this version since I didn't want the bread to be quite as soft as the rolls even though with the oil, potatoes and polenta the final bread ended up pretty soft anyway.

The final bread tasted great with a nice sour tang but not too overpowering with a slight hint of sweetness from the honey.  The crumb was nice and open and moist and the crust per above was soft.  The dough did spread out more than I would have liked but overall this ended up being a nice tasty loaf.  If I were to make it again, I might reduce the moisture content slightly but other than that this one is a keeper.

Procedure

I used a combination of my white sourdough starter which I keep at 66% hydration and did a 3 stage build with my fruit flavored yeast water starter.

Yeast Water Starter Build 1

50 grams Bread Flour (KAF)

50 grams Yeast Water Starter

Mix the flour and Yeast Water in a bowl until thoroughly combined.  Cover the bowl and let it sit at room temperature for around 4 hours.  The starter should almost double when ready to proceed to build 2.

Build 2

Add ingredients below to starter from above and mix until incorporated.  Cover with plastic wrap and let sit at room temperature for 4 hours.

100 grams Bread Flour

100 grams Yeast Water

Build 3

Add flour to starter from above and mix until incorporated.  Cover with plastic wrap and let sit at room temperature for 4 hours or until bubbly and either use immediately or put in the refrigerator for the next day.

75 grams Bread Flour

Main Dough Ingredients

170 grams Refreshed AP Starter (65% hydration)

255 grams  Yeast Water Starter (you may have some extra from above)

400 grams Bread Flour (KAF)

100 grams Spelt Flour

160 grams Mashed Potatoes (I like to mash them with the skins on and used red potatoes)

50 grams Olive Oil

180 grams Cooked Polenta (I used some butter and parmesan cheese in mine)

16 grams Salt (Sea Salt or Table Salt)

40 grams Honey

397 grams Water (80 to 90 degrees F.)

Procedure

Mix the starters with the water and stir to break it up and make sure to hold back about 50 grams of water.  Next mix in the flours into the starter mixture and mix for 2 minutes with your mixer or by hand.    Let the dough autolyse for 30 minutes to an hour in your bowl covered with a cloth or plastic wrap.  Next add in the salt, mashed potatoes, polenta and oil and mix on speed #1 for 3 minutes and #2 for 2 minutes or by hand.  This dough is very wet but it should start to come together after mixing but will still be very wet.

Next take the dough out of the bowl and place it on your work surface.  Do a stretch and fold and rest the dough uncovered for 10 minutes.  Place the dough in an oiled bowl after the rest and do another stretch and fold and cover the dough in the bowl and let it rest for 10 minutes.  Do one more stretch and fold and put the dough into a lightly oiled bowl and let it sit at room temperature covered for 2 hours.  (If the dough is still too lose, you can do several more stretch and folds until you are ready to put in the refrigerator). After 2 hours you can put the dough into the refrigerator for 24 hours or up to 2 days before baking.

The next day (or when ready to bake) let the dough sit out at room temperature for 2 hours.  After 2 hours form the dough into your desired shape and put them in floured bannetons, bowls or on a baking sheet and let them rise covered for 2 hours.

Score the loaves as desired and prepare your oven for baking with steam.

Set your oven for 500 degrees F. at least 30 minutes before ready to bake.  When ready to bake place the loaves into your on  your oven stone with steam and lower the temperature immediately to 450 degrees. (I made a large Miche so I ended up lowering the temperature half way through to 435 degrees).  It should take around 20 - 30 minutes to bake  until both loaves are golden brown and reached an internal temperature of 200 - 210 degrees F.

Let the loaves cool down for at least an hour or so before eating as desired.

Crumb Close-up
Boris the Guardian of the Sandman Residence. Natasha keeps watch in the back of our house.


Epsilon's picture

Cherry Yeast Water - question on activity

August 26, 2012 - 7:42pm -- Epsilon

I've got a batch of cherry yeast water I've been brewing since 2 days ago. I recently put it in a bigger home, fed it a little snack of brown sugar (just a few sprinkles since I thinned it out when I transferred it,) and it's already developing bubbles. In fact, it's got enough bubbles developing on it that when I gave it a shake to mix it, the top popped off (since I've got the top on loosely to let out some CO2.)

Am I looking at bacterial activity, or is this just a really quickly-developing yeast? Or is this typical?

dabrownman's picture
dabrownman


My wife ran out of her Oroweat Whole Wheat bread yesterday so she asked for two pieces of bread for her bag lunch.  So I found some frozen Duram Atta SD for her we baked Mastaba Style here:

http://www.thefreshloaf.com/node/29145/sourdough-duram-atta-bread-%E2%80%93-pharaoh%E2%80%99s-mastaba-style


She said she really liked it when she got home and asked for the same thing for her lunch sammy the next day.  Sadly, that was the last of it and the last of any white or nearly white SD breads on hand in the freezer.  So she had to settle for 67% Rye Whole Wheat SD with seeds and sprouts we called Twisted Sisters Chacon that we baked here

http://www.thefreshloaf.com/node/29172/twisted-sisters-chacon-67-whole-rye-wheat-sprouts-seeds


We also wanted to make a near white bread with seeds and soaker on the lines of our last bake - Ian’s Mocha Disaster Chacon.  Instead of using mocha coffee for the liquid we wanted to use a just as deep adn dark chicken stock since we were making that at the same time anyway.  Our stock is made from roasted bones and clinging meat, no skin and saved suitable veggie ends and pieces of all kinds that are frozen for this purpose.  It is totally de-fatted and unsalted.


After posting on the forum and checking the TFL search, only a few folks have used chicken stock for the liquid in bread with Glenn Snyder and Shaio-Ping among them. HeidiH did too but considers it one of her failures due to its poor and unusual after taste they did not like.   We wanted to lighten the load a little to reflect the whiter flours used, so only 30% whole grains this time and by reducing the seeds and soaker by 2/3rds to a measly 45%.


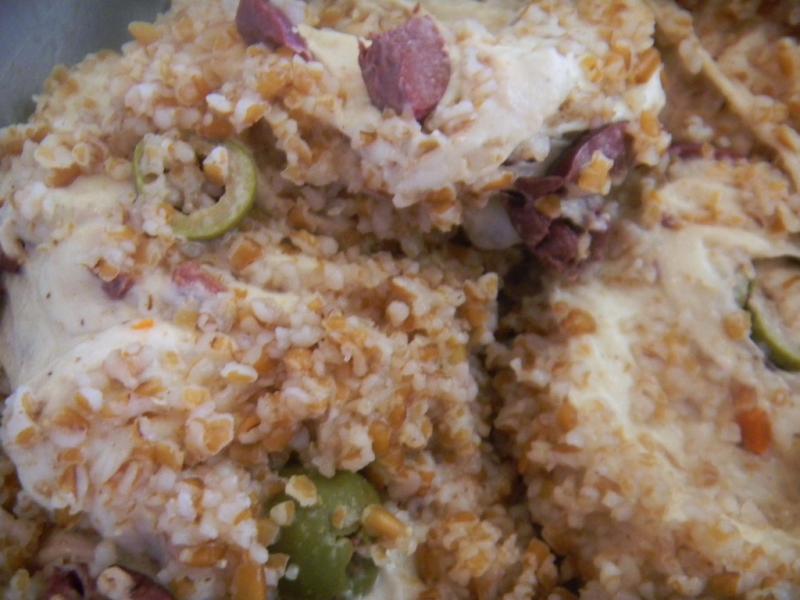
The flours picked for this loaf were; dark rye, spelt, WW, quinoa, steel cut oats and flax seeds all ground at hole in the little Krups coffee mill and AP.  No potatoes this time because we forgot to add the flakes.  The soaker consisted of; rye, red winter wheat and spelt berries with cracked barley and bulgar.  The seeds included; sunflower, pumpkin, chia, hemp and millet.


We also wanted to bake this in the mini oven (MO) and use our new heavy aluminum Goodwill 4 ½ qt  DO’s as a cloche.  We made the largest boule which experience to date says will still fit in the MO.  It doubled in volume while chilling out in the fridge for 12 hours.

Finally the sun came out after 4 days of rain - half a year's worth at my house.

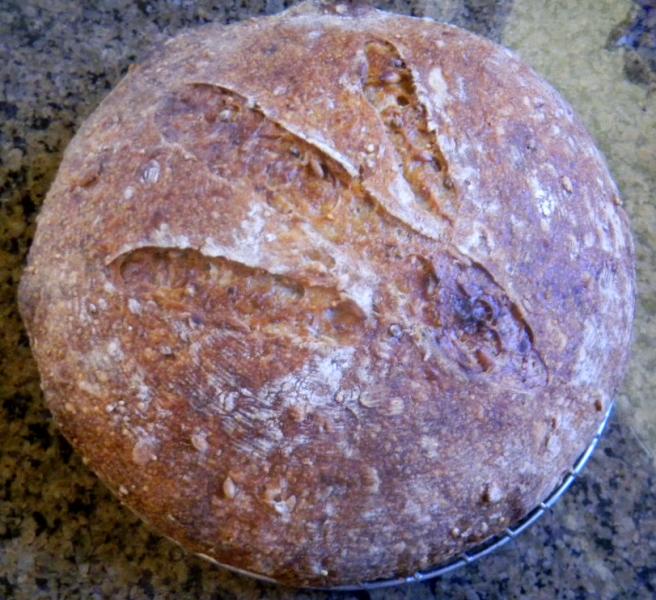
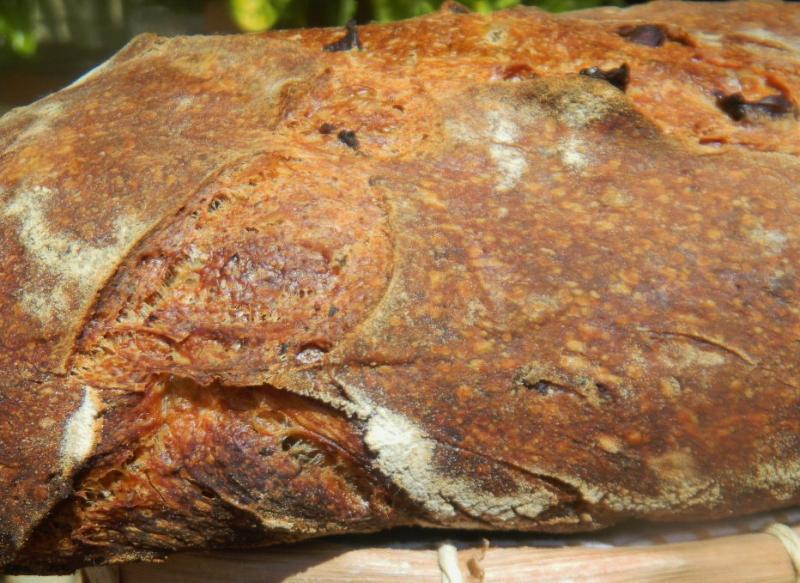
Ian's T-Rex claw poorly slashed this time.

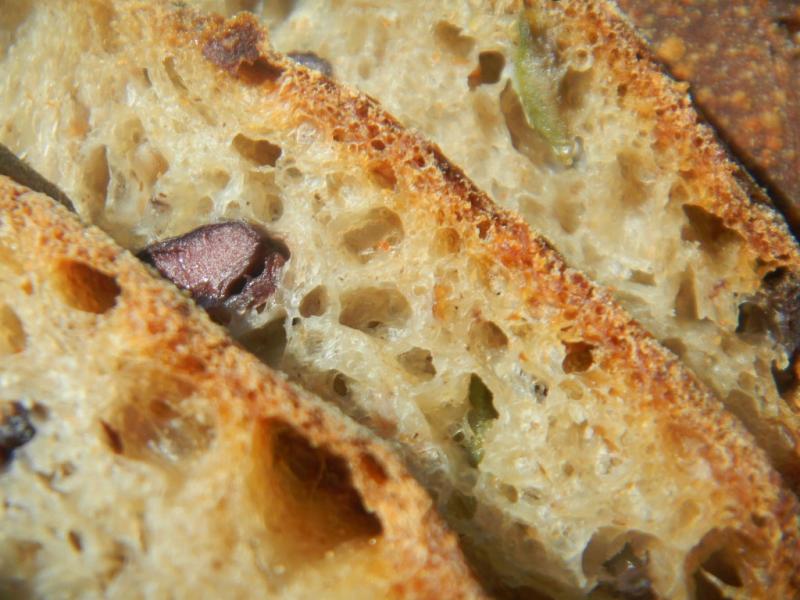
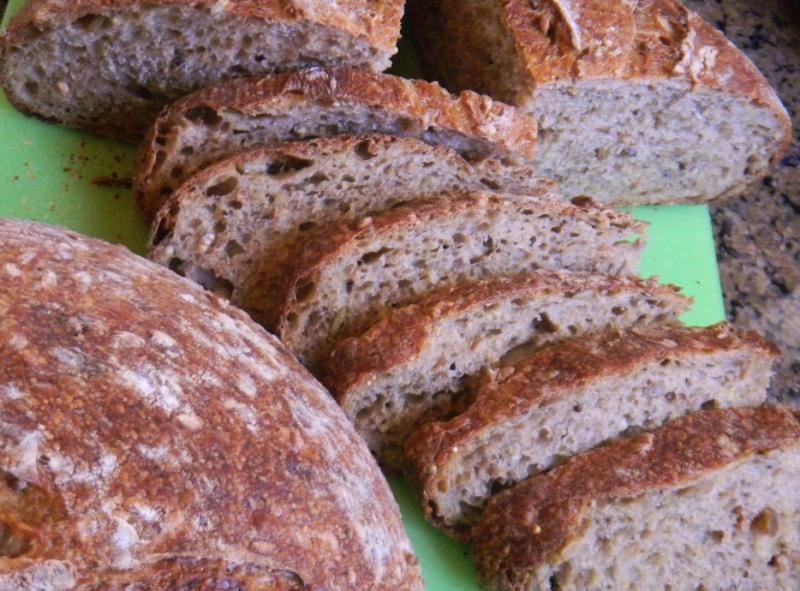
The bread slashed nicely, T-Rex style.  The crust baked up deep brown, blistered and crunchy with the thick crust going soft and chewy as it cooled.  We didn’t expect the crumb to be wildly open due to the 30% whole grains and 45% soaker and seeds but we were happy with the fairly open crumb that was very moist as usual - the YW trademark.


Thanks to Hanseata, my favorite hemp seed roae to the top.  Blisters, blisters adn more blisters thanks to MO and the DO.

It sliced well, tasted nutty, meaty and healthy with the quite a bit of seeds and soaker.   These add in’s really made the chew of this bread exceptional – its hallmark.  Hope the wife likes this for her work day sandwiches or we will have to bake up one of our white SD favorites, David Snyder’s Pulgiesi Capriosso or San Joaquin.  But we will have to see how she handles the subtle chicken stock taste which I found perfectly OK - probably because there was no fat or salt in the stock.


This bread is more moist and soft than any we have baked before.  The chicken stock comes through in good way and the blistered, chewy MO crust is back!   This is another bread unlike any other.  Just delicious, any way you want it or need it.

Breakfast of this fine bread with dragon fruit and prickly pear cactus tuna, sausage, egg, colby jack cheese and home made English muffin.  The lunch also features this bread with 1/2 ea. peach, mango and plum, cantaloupe chunks, black grapes, cherries, lettuce with feta cheese, brie cheese slices, carrot sticks and a strawberry.  The sandwich bread is spread with home made dijon mustard, then lettuce, tomato, grilled chicken slices, colby jack and brie cheese are piled on.

Method

We used a combo YW and SD starter with 10 g SD seeds taken from the rye sour, desem and multi-grain starters.  We used AP flour for each of the (2) 3 hour and (1) 2 hour levain builds and we built the YW and SD communally, instead of separately, this time.

The soaker was made and set aside for 6 hours by covering the grains with water and microwaving them until the water boiled.  The flours, honey, malts, VWG and salt were autolysed with the chicken stock for 2 ½ hours.  We no longer leave the salt out of the autolyse.

With autolyse complete we mixed it with the levain and kneaded it with the dough hook for 8 minutes on KA 2 until the dough pulled away from the sides of the bowl.  The dough was allowed to rest for 20 minutes covered with plastic.

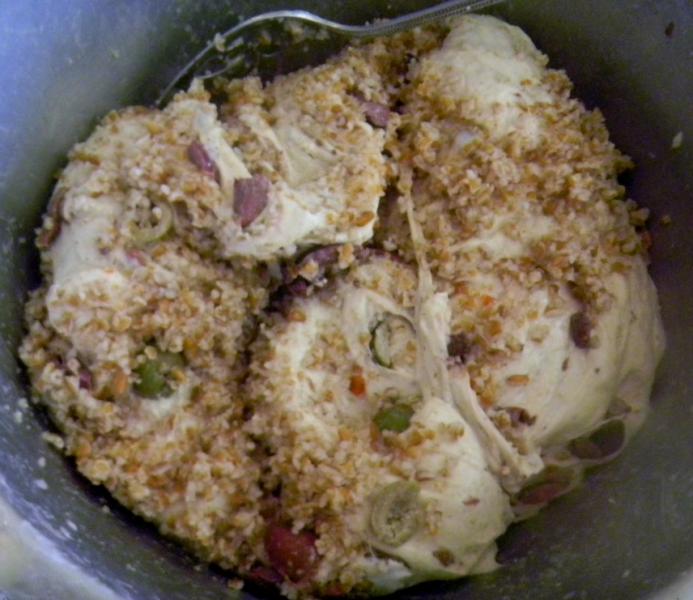
After resting the first of (3) S & F’s was performed 15 minutes apart on a well oiled surface.  On the 2nd S & F the soaker was drained and dried with a paper towel and incorporated into the dough.  A little bench four was required to get the dough back in shape.  The dough was rested in an oiled, plastic covered bowl.  On the 3rd S & F the seeds were incorporated. 

The dough was then allowed to develop and ferment for 90 minutes before being pre-shaped and then shaped into a boule stretching the skin tight as we piulled ot across the un-floured surface.  The dough ball was placed seam side up in our favorite, larger sized, rice floured basket.  The basket was placed into a tall kitchen trash can liner and retarded in the fridge for 12 hours.

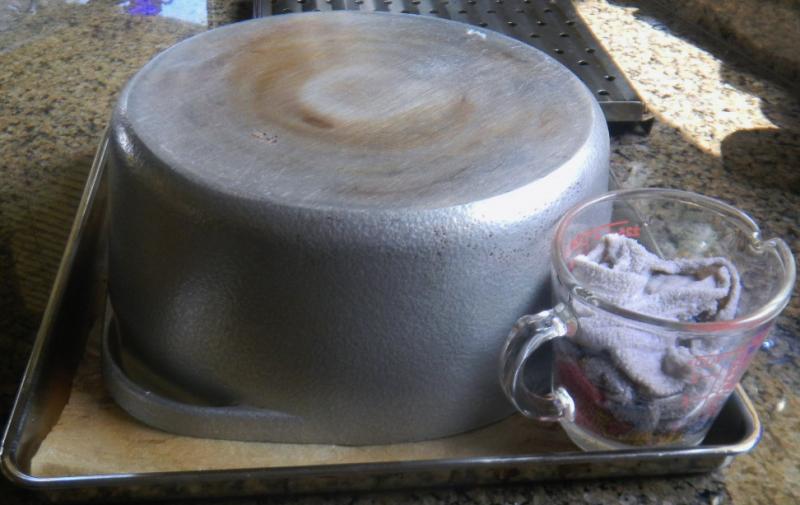
The MO was preheated to 500 F and (1) of Sylvia’s steaming towels in a half water filled Pyrex measuring cup was heated to boiling in the microwave.   We decided to bake the bread on parchment on the unheated, solid, lower portion of the MO’s broiling pan and cover it with the unheated aluminum DO bottom. 

The dough was removed from the fridge and tipped out onto a parchment covered peel, slashed in Ian’s T-Rex Style and slid onto the broiler pan bottom leaving room to cover it with the DO bottom while still leaving room for Sylvia’s steam in the back corner.

The whole cold apparatus, with cold contents, was placed into the MO and a half cup of water was tossed into the bottom of the MO when the door was closed.  When the MO beeped that is was back up to 500 F, about 5 minutes, the temperature was turned down to 450 F and the bread was allowed to steam covered for 20 minutes. When the steam was removed, the bread uncovered and the temperature turned down to 425 F, convection this time.  The bread was moved to the vented top of the broiler pan.

The bread was rotated 180 degrees every 5 minutes until it reached 205 F on the inside – About 15 minutes and 40 minutes total.   The MO was turned off but the boule was left inside it with the door ajar for 10 minutes to further crisp the crust.  It was then moved to a cooling rack for 1 hour until cool.

The formula follows the pix’s as usual.


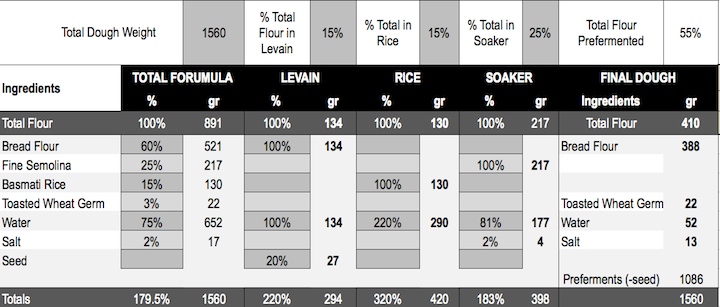
Multi-Grain Sourdough & Yeast Water Combo with Chicken Stock, Soaker & Seeds     
      
Mixed StarterBuild 1Build 2 Build 3Total%
Multi-grain SD Starter **3000305.57%
Yeast Water50005013.74%
AP90403016043.96%
Water40403011030.22%
Total Starter210806035096.15%
** 10 g each Rye Sour, Desem and Multi-Grain Starter  
      
Starter     
Hydration100.00%    
Levain % of Total31.06%    
      
Dough Flour %   
Non - Diastatic Malt20.55%   
Wheat Germ102.75%   
WW256.87%   
Steel Cut Oats102.75%   
Whole Quinoa102.75%   
Spelt 256.87%   
Ground Flax Seed51.37%   
AP25068.68%   
Diastatic Malt20.55%   
Dark Rye256.87%   
Dough Flour364100.00%   
      
Salt71.92%   
Chicken Stock22561.81%   
Dough Hydration61.81%    
      
Total Flour539    
Chicken Stock & Water400    
T. Dough Hydration74.21%    
Whole Grain %31.35%    
      
Hydration w/ Adds74.31%    
Total Weight1,127    
      
Seeds & Adders          %   
VW Gluten6        1.65%   
Honey10        2.75%   
Pumpkin, Sunflower -  20 ea40       10.99%   
Millet, Chia, Hemp Seeds - 15 ea 45      12.36%   
Total101      27.75%   
      
Soaker          %   
WW205.49%   
Rye205.49%   
Cracked Bulgar102.75%   
Cracked Barley102.75%   
Spelt205.49%   
Total Soaker8021.98%   
      
Soaker and Seeds Total45.33%    


Isand66's picture
Isand66

Last Friday I finally returned from my latest trip to China and was eager to try my hand at a rye bread after reading about some interesting ones on The Fresh Loaf.  I wanted to make one utilizing a Yeast Water starter per my baking friend DA Brownman who recently baked a master piece using a combination of a Yeast Water starter and traditional SD starter.

Since I have been having some fairly successful bakes using coffee in place of the water in my multi-grain bakes I decided to try again and used a simple dark roast coffee for the soaker and for the final dough.  I made a soaker using rye berries and cracked wheat.  I mixed the hot coffee with the dry ingredients and let sit for 24 hours covered at room temperature.

For the Yeast Water starter I wanted to develop a Pumpernickel starter so I built up the starter in 3 stages.  The first stage was left for 4 hours at room temperature and the second stage was left overnight for about 8 hours at room temperature.  The final build was left for around 5 hours at room temperature.  I tried to make exactly 425 grams of starter, but be sure to weigh your final starter and adjust as needed.

Make sure you drain the grains from the soaker, but be aware that they will absorb a great deal of the liquid.  Even though the hydration of this dough is only 70%, it is really much higher when you take the soaker into consideration.

Soaker

485 grams Hot Coffee

100 grams Cracked Wheat

150 grams Malted Rye Berries

Mix coffee in a bowl with other ingredients and let sit covered at room temperature for 24 hours.

Yeast Water Starter Build 1

60 grams Yeast Water

60 grams Pumpernickel Flour

Mix ingredients in a bowl and cover.  Let sit at room temperature for 4 hours or until you see some activity and your starter is almost doubled.

Yeast Water Starter Build 2

100 grams Yeast Water

100 grams Pumpernickel Flour

Mix above into starter from Step 1 and let sit covered for 8-10 hours or until the starter has almost doubled.

Yeast Water Starter Build 3

15 grams Yeast Water

100 grams Pumpernickel Flour

Mix above into starter from Step 2 and let sit covered for 4-5 hours or until starter has almost doubled.  You can also put in the refrigerator and leave for up to 1 day if necessary until you are ready to bake.

Main Dough

Ingredients

425 grams Starter from above

150 grams Graham Flour (I used Bob's Red Mill)

200 grams White Rye Flour

100 grams Pumpernickel Flour or Dark Rye Flour (I used KAF)

70 grams Roasted Wheat Germ (adds a nice nutty flavor)

370 grams Dark Roast Coffee (90 degrees F.)

14 grams Sea Salt (or table salt)

10 grams Walnut Oil (substitute any oil desired)

Procedure

I mixed  the flours together with all the coffee except for 50 grams and let them autolyes for 30 minutes.   I then added the Yeast Water Pumpernickel levain, oil and the soaker and the rest of the coffee with the salt and mixed on speed #1 for 1 minute and #2 for 4 minutes.  I then did a stretch and fold, rested the dough uncovered for 10 minutes.  Note that since this dough was extremely sticky it was not very easy to do a stretch and fold.   I then did another stretch and fold, covered the dough and let it rest for 10 minutes.  I did one more stretch and fold and put it in a lightly oiled bowl for 2 hours.  I then put it in the fridge overnight.

The next day I let the dough sit out at room temperature for 2 hours.  I had planned to make 2 boules but since this dough was so moist and did not come together like a bread made with white flour I decided to form it into a large Miche.  Alternatively I could have formed it into loaves and baked in a bread or Pullman pan.

Cover the dough in your pans or basket and let it sit at room temperature for 2 hours or until you notice some lift to the dough and it can pass the poke test.

Score the loaves as desired and prepare your oven for baking with steam.

I then baked on my oven stone with steam at 450 degrees until the loaf was golden brown and reached an internal temperature of 200 - 210 degrees F.

I had to bake this bread for almost 50 minutes since it was so moist and the final dough came out with an excellent crust and moist crumb but a little denser than I would have preferred.  It is an excellent bread for some sharp cheese and/or a nice grilled cheese sandwich.

This bread has been submitted to Yeast Spotting here at http://www.wildyeastblog.com/

Our Crumb's picture
Our Crumb

I'd been thinking that the sweet fragrance of basmati rice surely earns it some upward mobility out of its lowly caste, buried under the curry, and up into the brahmin bread basket.  A golden crumb seemed appropriate to its elevated status, so semolina was recruited.  I kept the durum to bog-standard Bob's Red Mill Fine Semolina, so as not to put the formula as out of reach as proper fine durum is (i.e., mailorder only).  Golden Temple Atta Durum would probably have been more appropriate (see below) and somewhat more accessible than the pukka mailorder product, but a soaker of BRM fine worked well.  I'm getting in the habit of adding 3% toasted wheat germ to mostly-whiteflour breads, following David Snyder's report on the SFBI miche.  So in that went.  Finally, developing the formula coincided with the recent spike in RYW chatter @TFL and the concomitant successional climax of my little mason jar crabapple/PinkLady/raisin/honey ecosystem, so RYW was fated to be the levain.  The results were surprisingly satisfying.

Formula

Process

1. Day before baking,

  • In morning, feed RYW with equal weight of Rubaud flour mix (100% hydration: 30 g RYW + 30 g flour).  Incubate at 77˚F until evening, then make up levain and incubate that overnight (9h) at 77˚F.
  • Bring 3 c unsalted water to boil.  Stir in 2 c white basmati rice (I used Lundberg Organic).  Return to boil and reduce flame to lowest setting.  Cover and cook for 20'.  White basmati rice weighs 142 g/c.  2 c dry came to 909 g cooked = 284 g rice + 625 g water; therefore each g of dry rice contributes ~2.2 g water when cooked.  This is more rice than needed.  Adjust accordingly if you don't want to have leftover rice.
  • In evening: Mix semolina soaker and leave at 77˚F (or whatever room temp is) overnight.                                         

2. Baking day, reduce cooked rice to a grainless mush via food processor and/or Foley food mill (I used the latter -- worked well).  Weigh out 420 g of mush.

3. Combine levain and all final dough ingredients (bread flour was KA Organic) except salt into shaggy mass. Adjust hydration if necessary.  Autolyse 30 min.

4. Add salt and french fold 5' / rest 5'/ french fold 5'.  Transfer to fermentation vessel (I use plastic boxes).

5. Bulk ferment 2.25 h with stretch and folds (in box) at 30', 60' and 100'.

6. Bench rest 25'.

7. Shape into a miche or 2 boules/batards.  Proof in rice+wheat floured banneton(s) for 2 h at 77˚F.

8. Bake on preheated stone in 500˚F oven turned down to 450˚F at start, for 20' with steam.  Remove steam apparatus, reduce oven temperature to 440˚F, and bake for an additional 20' with convection.    

9. Turn off oven, open door slightly, leave loaf on stone for 10'.

10. Remove and cool on rack.  Internal loaf temperature 210˚F.  Wait until fully cooled (preferably 24h) to slice.

Baking definitely diminishes the basmati flavor and fragrance.  Whereas the air was intoxicatingly perfumed with every slap of the french folding, in the finished loaf its presence is more evenly balanced with the wheat flavors.  Perhaps those more learned in the arts of gluten-free baking have tricks that would allow increasing the rice percentage in the formula.  The crust is sweet and chewy.  The crumb is angelfood-cakey soft and creamy yellow-white, slightly sticky on the bread knife but far less so 24h out of the oven than when just cooled.  RYW left no SD tang whatsoever, as advertised.  Toasts up exquisitely, best with butter.  The better the butter the better.  Fairly irresistible, truth be told.  I'll definitely be baking this again.  Maybe next week :-)

One feature of RYW that I'd failed to grok from posts by akiko, dabrownman et al. is the explosive leavening power of these potions.  From pilot builds beforehand, I knew my little homebrew could double a 100% hydration Rubaud flour mix in 6 hrs at 77˚F.  But that didn't prepare me for its Usain Boltian performance in a dough.  This juice could raise the dead.  What's up with that?  Just different bugs?  High titers?  Epigenetic adaptation to anaerobic conditions?  My baking routine this summer has been to start a SD batch and, while its fermentation proceeds at its normal stately pace, I can mix, ferment and bake a CY'd preparation (lately Reinhart's 100% WW sandwich loaf).  But bloody hell.  The CY loaf could hardly play through this time with the RYW dough hollering Fore! from the banneton.  It was nip and tuck, with the WW getting a bit overproofed (bogie?) while the RYW loaf holed out.

Finally, this bake and its score honors the victims of the tragedy in Oak Creek, WI.

Voila.  Blogo ergo sum.

Happy baking y'all,

Tom

dabrownman's picture
dabrownman

We, counting my fine apprentice,  have wanted for some time to make an olive bread that was loosely based on Nancy Silverman’s fine loaf that she did with Julia Child on Baking With The Masters.  But, since the girls at home despise olives except for olive oil, this want has gone unfulfilled for what seems like forever.


But, today the evil veil of olive hatred was lifted just enough, to allow an olive loaf to breathe a breath of yeasty CO2 without being killed outright by evil doers before the scald, add ins and olives could be incorporated.


We wanted a bread that had 20% whole grains and some rosemary that pairs so well with olives.  We also wanted some cracked bulgar berries that were scalded.  No sprouts this time - using them to make white diastatic malt instead.  The bread would possibly have been better with sprouts and seeds or nuts – maybe next time.


A mixture of 95% kalamata and 5% green martini olives were used.  The salt was kept down a bit since the olive brought plenty of their own.  The total hydration was around 70% which is a little low for us but the scald and olives brought some extra liquid that was un accounted for in the formula.  The dough felt like it was around 72% hydration but it is harder to tell with all the olives.


The diamond scoring pattern was helped along by refrigerating the large 3.7 pound batard for 3 hours after it had final proofed to 95% or so.  We wanted a huge loaf since no one could  know when we would be allowed to make another one - with olives in it.

There was no way this was going to fit in the mini oven.  With it only being 106 F today, a full 10 degrees less than last few days, we felt it was a real cold spell that we should take advantage of - so Betsy was fired up to 500 F with steamers and stone in place.  The batard baked up deeply brown and very crispy in the Big GE oven using (2) of Sylvia’s steam pans with towels.

The crust was thick and the extra drying with the oven door ajar kept the crust crispy even after it cooled.  The crumb was light, moist, a little glossy and fairly open with all the bran, whole grains and add ins.   Best of all this bread tastes wonderful.  It was just what we were looking for - with the exception of the sprouts, 50 g more olives and some pistachio nuts that we will add next time to gild the lily and turn this into just the kind of bread my apprentice drools over.  It is super just as it is though.

Method

The YW and multi-grain SD starters were built separately over (2) 3 hour builds and then combined.  The water, flour and salt were autolysed for 2 hours,.  All the rest of the ingredients were then added except the bulgar scald and chopped olives.

The dough was kneaded for 4 minutes and then placed into an oiled bowl to rest.  (4) sets of S & F’s, 15 minutes apart, were done on and oiled counter with the scald and olives incorporated in the 3rd set.  They were well incorporated by the 4th set.  The dough was allowed to ferment and develop on the counter for 90 minutes. 

It was then pre-shaped into a large batard, rested for 10 minutes, final shaped and placed into a rice floured and cloth lined basket, placed in a tall kitchen plastic trash bag to proof.  It was immediately refrigerated for 14 hours. 

The dough increased in volume 57.3 % in the fridge overnight.  It was allowed to come to room temperature and proof an additional 2 hours total getting to the 92.6% proof mark before refrigerating again for 3 hours.  This extra retardation would not normally be required but the intracacies of life come first.  Not really but it sounds so right and good.

The oven was preheated to 500 F with steam for 45 minutes before the dough was removed from the fridge, un-molded from the basket onto parchment and a peel, slashed and placed on the stone for baking.  The oven was immediately turned down to 450 F and steamed for 15 minutes.   The steam was removed and the temperature turned down to 425 F convection this time.  The batard was rotated 180 degrees every 5 minutes for another 30 minutes until it tested 205 F in the center.

The oven was turned off and the bread was allowed to crisp on the stone with the oven door ajar for 12 minutes before being removed to a cooling rack.  The batard rose to 209 F while crisping on the stone.

The formula follows the pix's

Combo Starter Olive Bread with Rosemary and Bulgar Scald    
     
Mixed StarterBuild 1Build 2Total%
SD Starter250252.86%
Durum atta250253.28%
Steel cut oats010101.31%
6 grain cereal010101.64%
Ground  Flax Seed0550.66%
Bran0550.66%
AP400405.25%
Oat bran0550.66%
Yeast Water400405.25%
Water2535607.87%
Total Starter1557022529.53%
     
Starter    
Hydration100.00%   
Levain % of Total Weight13.42%   
     
Dough Flour %  
Diastatic Malt30.39%  
Durum Atta253.28%  
6 Grain Cereal445.77%  
White WW354.59%  
Bread Flour30039.37%  
AP35546.59%  
Dough Flour762100.00%  
     
Salt131.71%  
Water49765.22%  
Dough Hydration65.22%   
     
Total Flour874.5   
Water609.5   
T. Dough Hydration69.70%   
Whole Grain %19.95%   
     
Hydration w/ Adds69.70%   
Total Weight1,676   
     
Add - Ins %  
Kalamata Olives10213.39%  
Dried Rosemary20.26%  
Total10413.65%  
     
Scald %  
Cracked Bulgar303.94%  
     
If we would have put in Sprouts %  
WW151.97%  
Rye151.97%  
Spelt151.97%  
Total Sprouts455.91%  
dabrownman's picture
dabrownman

We had some yeast water and SD Desem starter left over from our 'Bun Experiment' yesterday where we compared YW with SD in buns.  We were going to use them up with a combo starter to make the same buns but we have too many buns after yesterday.

From left: poppy and not your usual; nigella and basil seeds.

What we did not have was bagels so we used them up on some 15% WW bagels.  Our last bagel bake was a much higher percent whole grain SD bagel with sprouts.  They were delicious.  This bagel recipe was still based on Stan Ginsberg’s recipe he published on TFL and is more traditional in grains with the whole wheat being in the combo yeast water and SD Desem starters only.

These bagels are by far and away the best ones we have ever produced.  If you want NY Jewish Bakery Bagels - these are the ones you want to bake - thanks Stan.  The crust was nicely browned and blistered.  They came out of the oven crisp and went to chewy as it cooled.  The crumb was open and moist yet had just the right bite a bagel should have.  The taste was very good with a slight SD tang.  They were delicious, just cooled, un-toasted with cream cheese.  No toasting necessary at all.

Method

We built the YW and SD Desem starters separately over (2) 3 hour and (1) 2 hour  build and then refrigerated them both for 48 hours.  Home ground whole wheat berries were used for both starters and accounted for all the WW in the final dough.

The water was mixed with the 2 starters to liquefy them.  The rest of the ingredients were added and mixed by hand to incorporate.  The dough was kneaded for 10 minutes by hand and then allowed to rest, ferment and develop for 2 hours covered with plastic wrap on the counter.  The dough doubled over that time.

The dough was them divided into (10) 128 g, folded into balls and then into 12” tapered, from middle to end, ropes.  The ropes were rested for 10 minutes and then formed into bagels by the ‘over the knuckles’ method where the ends were rolled on the counter to seal them together. 

The bagels were placed onto a parchment covered and semolina sprinkled cookie sheet, covered in plastic wrap and refrigerated for 20 hours.

After removing the bagels from the fridge, they were immediately simmered for 30 seconds a side in 1 gallon of water with 1 T of barley malt syrup and 1 tsp of baking soda.  The wet bagel bottoms were placed on a kitchen towel for 5 seconds after coming out of the water and then placed on parchment paper sprinkled with semolina which was on the top cover of the mini ovens broiler.

The mini oven was preheated to 500 F with the rack on the bottom.  A 1 cup Pyrex measuring cup with a rolled up dish rag, half full of water, was micro waved until the water boiled.  Sylvia’s steaming method was then placed in the middle of the parchment paper between (4) bagels at the corners.

The bagels were steamed for 8 minutes with the heat being turned down to 450  after 2 minutes at 500 F.  At the 8 minute mark the steam was removed, the bagels turned upside down, the rack rotated 180 degrees and placed in the upper position.  The Mini Oven was turned down to 425 F convection at this time.   After 4 minutes the bagels were turned right side up again, the rack was rotated 180 degrees and placed back in the lower position for an additional 4 minutes

At 16 minutes total baking time the bagels were deemed done.  They were nicely browned top and bottom and sounded like a drum when tapped on the bottom.  They were moved to wire cooling racks until cooled.

Dabrownman's 15% Whole Wheat  Bagels     
      
Desem StarterBuild 1Build 2 Build 3Total%
SD Desem Starter1400142.06%
WW152020558.09%
Water15208436.32%
Total Starter44402811216.47%
      
YW StarterBuild 1Build 2 Build 3Total%
Yeast Water25160412.06%
WW25206518.09%
Total Starter503669213.53%
      
Starter     
Hydration80.65%    
Levain % of Total15.94%    
      
Dough Flour %   
Bread Flour34050.00%   
AP34050.00%   
Dough Flour680100.00%   
      
Salt121.76%   
Water36253.24%   
Dough Hydration53.24%    
      
Total Flour788    
Total Water453    
T. Dough Hydration57.49%    
Whole Grain %14.34%    
      
Hydration w/ Adds58.86%    
Total Weight1,280128 g each for (10) bagels
      
Add - Ins %   
Barley Malt202.94%   
Diastatic White Malt20.29%   
Total223.24%   


Isand66's picture
Isand66

I wanted to make some good soft tasty rolls using my Cherry Yeast Water starter.   I figured since I can't drink the starter I should use some organic cherry lemonade in place of the water.  In order to get the rolls to be nice and soft and rich I decided to add some cream cheese and butter and used some Durum flour in the levain as well as the final dough.

As I have mentioned in previous posts I have found that the best way to use the Yeast Water starter is to build up the levain in 2-3 stages.  For this bake I did a 3 stage build detailed below.  If you want to know more about starting your own WYW starter let me know and I will be glad to help you.  It is really easy to start and maintain and WYW does not have nearly as much of a sour tang as sourdough starters.

Procedure

Wild Yeast Water Starter Build 1

50 grams AP Flour

50 grams WYW

Mix the flour and the WYW in a bowl and leave covered at room temperature for 4-5 hours. You can refrigerate it after 4-5 hours if you don't have time to go to step 3.

Wild Yeast Water Starter Build 2

100 grams Durum Flour

100 grams WYW

Mix the flour and the WYW in a bowl and leave covered at room temperature for 4-5 hours.  You can refrigerate it after 4-5 hours if you don't have time to go to step 3.

Wild Yeast Water Starter Build 3

100 grams Durum Flour

150 grams Water

Mix the flour and the WYW in a bowl and leave covered at room temperature for 4-5 hours.  You can now proceed to the main dough or refrigerate overnight and use the next day.

Mix additional ingredients into Build 1 and use your hands to make sure all the ingredients are incorporated.  You should have a fairly firm 65% starter.  Leave covered for 4-5 hours at room temperature and then either proceed to main dough or refrigerate over night.

Main Dough

375 grams WYW Levain from Above

512 grams Bread Flour (KAF)

88  grams Durum Flour (KAF)

393 grams Organic Cherry Lemonade (I bought it at Whole Foods and it has about 23 grams of sugar per serving)

16 grams Salt (Seas Salt or Table Salt)

102 grams Cream Cheese Softened

49 grams Unsalted Butter Softened

Add all the Cherry Lemonade except 50 grams to the starter to break it up in your mixing bowl.  Next add all of the flours and mix on low for 2 minutes.  Let the dough autolyse for around 15 - 20 minutes up to an hour. This will help the dough absorb the flour.  Next add the salt, remaining Cherry Lemonade, cream cheese and the butter and mix for 4 minutes on speed number 1.   You should have a nice smooth dough which is still tacky.  Move the dough onto your work surface and dust lightly with flour if necessary or spray some cooking spray instead.  Most of the time if the dough is not a high hydration I will not use anything on my wood board.

Do 4  stretch and folds and form the dough into a ball and leave uncovered for 10 minutes.  After the first rest do another stretch and fold and cover the dough.  Let it rest for another 10 minutes and then do another stretch and fold.  You can now put the dough into a lightly oiled container or bowl and cover it.  Let it sit at room temperature for 2 additional hours or less if it is warm in your kitchen.  After 2 hours place the covered bowl in the refrigerator for 1 - 3 days until ready to bake.

When you are ready to make your rolls take the dough out of the refrigerator and keep it in its bowl at room temperature for 1.5 -  2 hours.  After its rest it is time to shape the rolls.  Depending on how big you want the rolls, first cut the dough in half and then roll half the dough into a log.  Next cut off the desired size piece you want and roll it into a tight ball.  Place rolls on cookie sheet and cover the rolls with a clean lint free towel sprayed with water or a piece of plastic wrap lightly sprayed with cooking spray.  Let the rolls rest at room temperature for 2 hours or until they are at least 1.5 the size.

Around 30 minutes before baking the rolls, prepare your oven and pre-heat at 450 degrees.  I used my usual set-up for steam and added 1 cup of boiling water to a pan on the bottom shelf but for rolls you could omit this step and you will get softer rolls if that is what you desire.  After adding the steam lower the oven to 425 degrees and continue baking.

It should take around 20-25 minutes to bake the rolls and they should be nice and brown on the bottom and top.  When done, let them cool on a wire rack and enjoy.

The rolls ended up nice and soft with a chewy and nice open crumb.

This post has been submitted to the Yeast Spotting Site here: http://www.wildyeastblog.com/category/yeastspotting/.

Isand66's picture
Isand66

My wife bought a bottle of Chocolate Stout about a month ago with the intentions of making some kind of chocolate cake.  This would have been a very good use for this stout, but since she never had a chance to put it to good use I decided it was time to give it a try in a bread.  I recently purchased another new flour which I have since found out is a very old flour called Amaranth.  I decided to combine this with some sprouted wheat flour, KAF European style flour along with a Yeast Water starter and my stock AP starter.  I used some Italian style 00 flour in the Yeast Water build which I built up in 2 stages.  If I made this again I would probably increase the hydration since it is only around 68% and I think the crumb would have been more open with a higher hydration.

Yeast Water Starter Build 1

100 grams Italian Style 00 Flour (KAF)

100 grams Yeast Water Starter

Mix the flour and Yeast Water in a bowl until thoroughly combined.  Cover the bowl and let it sit at room temperature for around 4 hours.  The starter should almost double when ready to proceed to build 2.

Build 2

Add ingredients below to starter from above and mix until incorporated.  Cover with plastic wrap and let sit at room temperature for 4 hours.

100 grams Italian Style 00 Flour

35 grams Yeast Water

Main Dough Ingredients

107 grams Refreshed AP Starter (65% hydration)

318 grams Italian  Yeast Water Starter (all of starter from above)

200 grams Sprouted Whole Wheat Flour or Whole Wheat Flour

150 grams Amaranth Flour

405 grams European Style Flour (KAF) or Bread Flour

161 grams Mashed Potatoes (I like to mash them with the skins on and used red potatoes)

503 grams Chocolate Stout at room temperature

16 grams Raspberry Champagne Vinegar

16 grams Salt (Sea Salt or Table Salt)

Procedure

Mix the starters with the stout but save 50 grams for later (no... don't drink it!) and stir to break it up.  Next mix in the flours into the starter mixture and mix for 2 minutes with your mixer or by hand.    Let the dough autolyse for 20-30 minutes to an hour in your bowl covered with a cloth or plastic wrap.  Next add in the salt, balance of Stout and vinegar and mix on speed #2 for 4 minutes or by hand.  The dough should have come together in a ball and be tacky but not too sticky.

Next take the dough out of the bowl and place it on your work surface.  Do a stretch and fold and rest the dough uncovered for 10 minutes.  After the rest do another stretch and fold and cover the dough and let it rest for 10 minutes.  Do one more stretch and fold and put the dough into a lightly oiled bowl and let it sit at room temperature covered for 2 hours.  After 2 hours you can put the dough into the refrigerator for 24 hours or up to 2 days before baking.  Feel free to do some additional S & F's if you feel it is necessary.

The next day (or when ready to bake) let the dough sit out at room temperature for 1.5 - 2  hours.  Next, form the dough into your desired shape and put them in floured bannetons, bowls or on a baking sheet and let them rise covered for 2 hours or until they pass the poke test.  Score the loaves as desired and prepare your oven for baking with steam.

Set your oven for 500 degrees F. at least 30 minutes before ready to bake.  When ready to bake place the loaves into your on  your oven stone with steam and lower the temperature immediately to 450 degrees.  It should take around 20 - 30 minutes to bake  until both loaves are golden brown and reached an internal temperature of 200 - 210 degrees F.

Let the loaves cool down for at least an hour or so before eating as desired.


Balloon Flower

Pages

Subscribe to RSS - yeast water