The Fresh Loaf

A Community of Amateur Bakers and Artisan Bread Enthusiasts.

wild yeast

dirider's picture
dirider

No Knead Rye

2012-04-17 I mixed a batch of No Knead Rye at 2030 hrs with flours amounts as indicated (organic AP & RM dark rye), 200 water, 222 Kona Golden Ale, 137g wild yeast (orange juice starter, first use) in place of the ½ tsp yeast called out in the recipe, and 1 heaping Tblspn caraway.

Next morning, 0615 hrs, its bloomed quite nicely (2 ½ times)! Hmm…

So, I did several stretch and folds with a big bowl scraper and turned the dough out into an oil sprayed white French ceramic baker, covered with shower cap and let it proof while I went to work. Returning home at 1730 hrs, I found a big growth, drooping over the edges of the baker! I carefully removed the shower cap releasing the dough gently and preheated the oven to 400deg. Baked 45 min, slashing top after 10, no cover. Removed from oven and turned out onto rack, egg washed and let cool. No oven spring, but that’s probably due to over proofing. Going to work gets in the way of my baking! LOL

Pics are a bit gold in hue. Camera setting?


Couldn’t wait much longer for a taste. After a 20 minute cool, I sliced. Oh la la, so good. Mr. Stanley asked if I had any brisket for a sandwich (corned beef).

dirider's picture
dirider

I've been fooling around with the No Knead Method, first following the classic procedure to good result. In the past 2 weeks, I've baked a loaf with my wild yeast starter. Week One, I followed the traditional bake in covered heavy cooker. Today, I ventured out and did the second proof in an oil sprayed glass loaf pan. I like the way it turned out.

2012-04-14 1300hrs-Started a proof with 140g of my wild yeast, 198g hi gluten flour (bin stock), 100g AP (KAF), 58g semolina (Red Mill), 6oz Blue Moon, 4oz Crystal Geyser, 1 tsp sea salt.

Overnight proof until 0830 hrs next morning, then several gentle stretch and fold with silicone bowlscraper and into a oiled loaf pan. I sprinkled with poppy seeds, then covered and proofed until 1445hrs.

Into a preheated 375deg gas convection for 35 minutes, turning halfway through.


 It's good! I will add about 30g more AP on the next loaf for a little stiffer dough which I hope will produce a rounder loaf top. This dough was quite soft and (during proof) wanted to wrap around the pan edges. The flavour is quite nice. I have a good sour starter. I am pleased with the result.

TastefulLee's picture

Need a Child's Guide to Sourdough Starter Development and Use

January 6, 2012 - 7:57am -- TastefulLee

Hi, all. I’m having such a great time learning and reading on this website. As a very new baker of things containing yeast, there is certainly much to learn and I’m grateful to all who have contributed in expanding the knowledge of others.

Angelo's picture

Wild Yeast Discoloration

August 24, 2011 - 5:19pm -- Angelo

My barm has been rocking for months, fed regularly every week (8 ounces of barm to 16 ounces of bread flour and 16 ounces of water). Then a few weeks ago I notice a SLIGHT red/orange discoloration. I shrug and ignore it. Every week since there's been more. Now it's practically across the entire surface when I go to feed it!


What is that!?


JimmyChoCho's picture

What happened to my starter? Help!

July 30, 2011 - 11:51am -- JimmyChoCho

I've been baking for just under a year using the starter from Tartine Bread. I've always used water from my Brita pitcher and have had no problems until recently. One day I noticed that the bottom of my pitcher was a little green, looking up online a lot of people seem to be having problems with algae growing in their brita pitchers. The day prior to realizing this, I fed my starter using this water and ever since that day my starter looks like this about a day after I feed it:

sortachef's picture
sortachef

If you’re anything like me, you’ve got a few sourdough starters lurking in your fridge. One I made from organic California grapes lovingly teased into fruition over 10 days some years ago. Another from rye flour that naturally ferments. And last fall’s brainchild, made from mountain berries plucked at 3600 feet. That last one yielded 6 lovely loaves and then promptly went into a funk.

But I’m going to be honest here: I don’t use any of my starters in this recipe. Every one of those starters is finicky and unpredictable at best, and when it comes to making bread, reliability is the key. So I’ve come up with a method that yields great sourdough loaves in a 3-day process. Very little attention is necessary until the third day, and the results are amazing. If you don’t have a woodfired oven, instructions on baking in a conventional oven are included as well. Go on, relax and make some sourdough!


Woodfired Sourdough Bread


Make 3 loaves, 23 ounces each


For the Starter:

2/3 cup rye flour

2/3 cup unbleached all-purpose flour

¾ cup cold water

1 teaspoon active dry yeast

Mix these together in a large bread bowl with the handle of a wooden spoon, scraping the sides clean as you go. Cover with a clean dish cloth or a loose-fitting lid and let rise in a cool place (55-60° environment) for 12-14 hours until frothy. I do this step in the early evening and let it go overnight.


First replenishment:

½ cup rye flour

½ cup unbleached all-purpose flour

3/8 cup cold water

Add these to your starter to ‘feed’ it in the morning. Scrape the sides again, put on a loose-fitting lid or a piece of plastic wrap and let it sit in a cool place for another 10-12 hours.


Second replenishment:

1 cup unbleached all-purpose flour

½ cup cold water

Feed the starter again, this time with wheat flour only. Let sit covered in a cool place for 10 hours or overnight.


Make the dough:  By morning, the starter should be bubbly and somewhat risen. It will also smell sour, which is the smell of active lactobacillus fermenting in the mix. This is good. Now add to the starter

2 cups of water at 105°

½ teaspoon of active dry yeast

4 cups of unbleached white bread flour (I use Pendleton Mills ‘Morbread’ with 12% gluten)

3 teaspoons of salt

2 Tablespoons of flaxseed meal (optional)

Mix the dough well, scraping the sides of the bowl to incorporate all the ingredients, and then knead for 10 minutes on a lightly floured surface. Return the dough to a clean bread bowl, cover and let rise for 5 hours at room temperature (68-70°).

Deflate the dough, turning it over as best you can and leave to rest for a further 1 to 1½ hours before shaping into loaves.

For Baking in a Woodfired Oven: For best results, bake this bread in an oven that has been heated for 2½ hours by a medium-sized active fire. In the last hour, move the fire from side to side to allow even heating of the floor tiles. After this time, move the active but non-flaming coals to the back, throw on a fistful of hardwood twigs and sweep the floor clean of ashes. Once the twigs have finished burning, you’re ready to bake the bread.

For Baking in a conventional oven: Line the center rack with quarry tiles or a pizza stone and preheat at 450° for at least half an hour. When the loaves are ready for baking, drop the heat to 400°.

Form the loaves / final rise: Turn the dough out onto a lightly floured counter and divide the dough into 3 equal pieces. (note: if using a conventional oven, you can only bake 2 at a time; put one of the pieces back into the bread bowl for another hour.) Form a ball with each piece by stretching the longest skin of dough across the surface and tucking it underneath.

Line 3 baskets with cloth napkins or dish cloths, and sprinkle generously with flour. Plop the dough balls into these, toss on a bit more flour, cover with the corners of the cloth and let rise for 1¼ hours in a warm place.

Once risen, turn the unbaked loaves onto either a wooden peel or the back of a cookie sheet sprinkled with cornmeal. Brush loaves lightly with an eggwhite mixed with 1 Tablespoon of water and slash as desired.

For Baking in a Woodfired Oven: Slip the unbaked loaves into the oven in a semi-circle about 12” away from the coals. Close the door all the way and bake for 1 hour, turning several times to bake evenly. Loaves are ready when the crust is medium brown.

For Baking in a conventional oven: Slip loaves 2 at a time directly onto the tiles or pizza stone. Bake for 20 minutes at 400°, lower the heat to 350°, and bake for another 40 minutes, turning the loaves as necessary to ensure even baking. Loaves are ready when the crust is medium brown.

See original publication and more photos at http://www.woodfiredkitchen.com/?p=2289

Copyright 2011 by Don Hogeland 

RonRay's picture
RonRay

Apricot Yeast Water Test Loaf  [Update:110530-1000] 

   If you are unfamilar with Yeast Waters, and wild yeast, you may wish to view

Yeast Water & Other Wee Beastie Bubbles (No Math)

http://www.thefreshloaf.com/node/23441/yeast-water-amp-other-wee-beastie-bubbles-no-math

This was my first chance to test Apricot Yeast Water. I have intend to for a while, but wanted to wait for fresh fruit to be available. I did find some this week and started a culture with 3 of the small fresh apricots, jump-started the culture with a bit of my Apple YW.

I have heard that the dark dried apricots make a very strong levain – the more common dried fruit that are a yellowish orange have been treated with sulfur-containing compounds to keep their color (and kill the WBBs). So, the only dried apricots to use are the dark brown unsulfured fruit. Not wishing to waste time and effort, I wanted fresh, organic apricots, which start being available May through August in the northern hemisphere.

I was impressed with how fast the culture became active, and equally surprised how fast the activity ended. I tasted the YW to see if, somehow , it had gotten too alcoholic so fast. All I detected was no noticeable sweetness, and decided it must be a lack of sugar. I dropped in a sugar cube and within a very short time it became very active – so much so, that I feared the foamy head might fill the remaining air space in the glass container. It did not take long before the activity decreased nearly as fast as it had restarted.


It only took a few trials to conclude the apricot WBBs have a real thing about sugars. So, I decided to do a test of the leavening strength of the new culture. I took a small quantity of just the water, about 20g and mixed it with an equal amount of AP flour. I set this up with a clock beside it, and in front of a time lapse digital video recorded. You can see the results on YouTube, Link:

http://www.thefreshloaf.com/node/23719/time-lapse-video-apricot-yw-levain


The result was a doubling in about 2 hours. Certainly a good showing for a brand new YW culture. So, a test loaf seemed quite justified.


I started the Apricot Yeast Water Levain (AYWL) builds. Details of my standard test loaf can be found here:

http://www.thefreshloaf.com/node/23694/standard-kiss-loaf-or-keep-it-simple-smiley


Details of this loaf are in the table below:


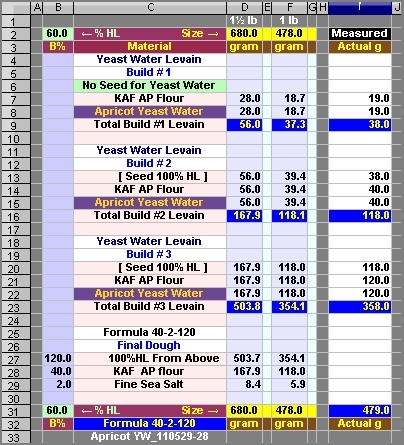
A copy of my personal test log can be found at Google Doc Link:

https://docs.google.com/viewer?a=v&pid=explorer&chrome=true&srcid=0B_MScoZfDZkwMTIyM2E1ZjQtYWFlMi00Y2I5LWFiYTktMWI5ZGMzYTgzMzgw&hl=en_US


I had some surprises in store, however. I generally, hold each of my chosen 3-build levain developments to a 24 hour period. Instead, a late afternoon to early evening completed Builds-#1, and #2 with #3 started and placed in retard at 40ºF/4.4ºC for an overnight. Details can be found in the log.


The next morning, I did the shaping that basically matches the pan bread version detailed by txframer here:

http://www.thefreshloaf.com/node/20669/sourdough-pan-de-mie-how-make-quotshreddablyquot-soft-bread

The dough pan was covered with food cap and place in the proof box at 82ºF/27.8ºC. Most loaves that I do, which are similar to these conditions, will need a 6 hour final proof. I was rather shocked when at 4½ hours I found it was as high as any “normal” fully proofed dough. I did a rapid catch-up and dough was in the DO, with the cup of boiling water, and into the oven, within a 5 minute period. Again, details can be found in the PDF log.

From a cold oven start and oven set to max (450ºF/232ºC) in the DO it was steamed for 20 minutes. Lid removed at 20 minutes and the temperature dropped to 400ºF/204ºC with a total of 45 minutes for the baking.

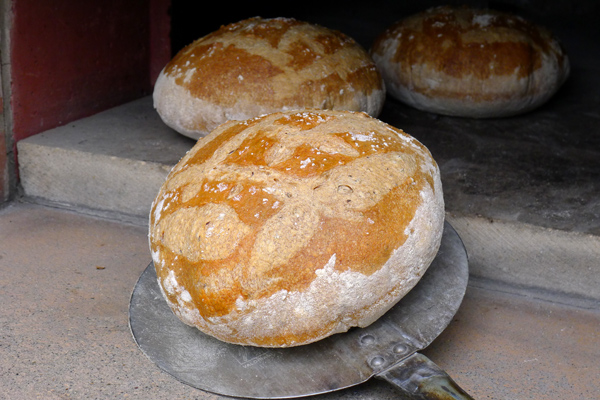
The finished loaf had an internal 207.7ºF/97.6ºC and a hot weight of 437g – down 8% during the baking. The loaf was cooled on wire for over an hour, before cutting.


The loaf had a very nice aroma, but neither taste, nor smell indicated the apricot components in the loaf. The crumb color was softly off-white in the orange-brown range, but only in a small degree. Texture was moist and softer than my general SD loaves. A pleasantly fruity, slightly sweetish flavor. The top crust portion was chewier than I would have expected, but quite acceptable.

   I should, also mention, I could detect no tang at all. I had expected a bit from the apricot flavor itself. But, any tang vanished along with any apricot specific flavor.


The crumb was exactly as expected, given the 60% HL (hydration level) and the highly developed windowpane test it was kneaded to.


Based upon this single test loaf, apricot WBBs develop much stronger levain than any I have seen before. The Apricot YW rise times are somewhere between 25% faster, or if you are one of  the half empty glass types, the other Yeast Waters are 33% slower ;-)

Update:110530-1000I have just had a couple additional slices of this Apricot YW loaf. In the 23 hours since baking, there has been a flavor change. It is still quite pleasant, but definitely less sweetness. The change is hard to describe, but while it is NOT "astringent", that is the closest word I can think of to describe the very slight difference in flavor. My initial reaction was 'use a bit less than 2% salt, next time'.

Ron


winestem's picture

Tartine bread baking attempts

December 11, 2010 - 10:53pm -- winestem

Help, help, help, help! I'm ready to throw in the tea-towel! I've got a wonderful smelling and behaving wild yeast culture going and I've followed the procedures in Chad Robertson's Tartine Bread to what I think is a perfect "T". The problem is that I'm getting almost no rise from the dough once it goes into the oven. I do the autolyse for 45 minutes, I get a magnificent smooth and silky fermentation, but in the end, I get dense, good-tasting, but too dense loaves! Any suggestions as to what I can try and/or am doing wrong?

sastalnaker's picture
sastalnaker

A lurker finally comes out. I just baked my first loaves from my "new" (about 5 days old) wild yeast starter. They came out great. I used Shiao Ping's version of Chad Robertson's Country Sourdough. I tweaked the schedule a bit to fit my personal commitment, but generally followed her schedule and formula. I did replace about 20% of the total flour with King Arthur Traditional Whole Wheat Flour.

The loaves turned out beautifully. I was completely surprised by the amount of oven spring. I baked the first two loaves and the slashes were obliterated by the amount of spring that occurred. On the second set I slashed even deeper, but they were almost completely filled in. I know I should have waited to slice them, but I was curious about the crumb and so cut one loaf as soon as it was cool to the touch. Very pleasantly surprised by the openness of the crumb, and the crust seems nice and crisp with a bit of tooth to it. I think the "fresh" flavor was quite nice, especially for a new starter. It will be interesting to see how the flavor develops as the bread ages a bit.


Pre and Post bake

This is a comparison of the proofed loaves to the baked ones.

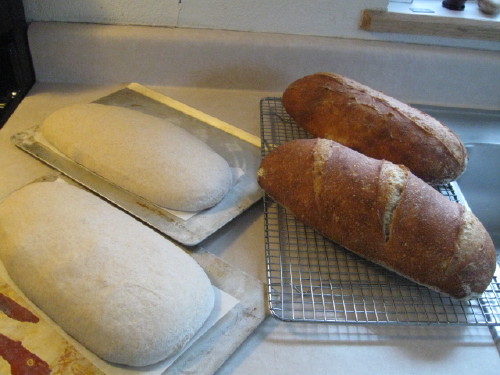
This is the second set of loaves and even though I made a concerted effort to cut deeper the slashes still filled in a lot.

Crumg
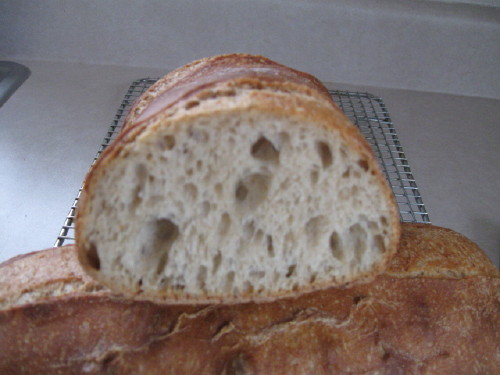
And finally the crumb. (Sorry for the poor focus).

So there it is. My first loaves and my first blog post. I'd like to express my appreciation to the folks who make and maintain TFL website. It is truly an approachable and yet impressive resource for bread bakers everywhere. Thanks for the amazing array of expertise, the encouragement, and the inspiration.

Cheers everyone,

Scott


flour-girl's picture

Susan (Wild Yeast's) yummy oatmeal bread

April 26, 2009 - 12:38pm -- flour-girl
Forums: 

I just baked Mamie's Oat Meal Bread from Wild Yeast (with a few small adaptations) and wanted to report that it's great. If you're looking for a perfect sandwich loaf, with a beautiful texture and flavor, I urge you to give it a try.

Photos and recipe are at Flour Girl and, of course, at Wild Yeast.

Happy baking!

Flour Girl

Pages

Subscribe to RSS - wild yeast