The Fresh Loaf

A Community of Amateur Bakers and Artisan Bread Enthusiasts.

White bread

Juergen Krauss's picture
Juergen Krauss

I wanted to make some bread according to the Quarter Sponge Method as outlined by Elizabeth David / Walter Banfield ever since I came across it more than a year ago.

The details are intriguing: A standard metod used to make "Batch Bread" in Scotland well into the thirties, it uses a long fermentation process and a minimal amount of yeast. A sachet of yeast will make about 30Kg of bread!

The result of my first bake: As close to shop bought sandwich bread as one can get - just with flour, water, salt, yeast and a 16 hour fermentation!

Here some pictures; details follow.

The overall appearance of my 1kg loaf:

The crust in more detail:

And the crumb:

The loaf looks very appealing; the crumb is dense and regular, but fluffy. And the walls of the small bubbles have the translucency of well fermented dough.

The taste is ... neutral. Just plain neutral, but in a pleasant way. Great with cream cheese and salmon, or salami, or marmalade. 

Quite a surprise.

The formula is given by David in industrial amounts (200Kg batch size). I haven't got the proofing space, so I decided to scale it down.

Here the original formula:

Quarter Sponge Process after Elizabeth David / Walter Banfield 


Total IngredientsOriginal
g convertedBakers %
Flour280lb125,440.00100.000
Yeast6oz168.000.134
salt7lb3,136.002.500
water15.5gal70,463.0056.173
malt extract8oz224.000.179
Yield

199,431.00158.985


Initial Sponge14 hours at DT 21C


Flour (strong)64lb28,672.0022.857
yeast6oz168.000.134
salt8oz224.000.179
water3.75gal17,047.5013.590


46,111.5036.760
Second Stage Sponge1 hour at DT 27C"batter sponge"

Flour (strong)100lb44,800.0035.714
Water11gal50,006.0039.864
Salt1.75lb784.000.625
Malt extract8oz224.000.179
Initial sponge from above

46,111.5036.760


141,925.50113.142
Third stage sponge1 hour at DT 26C


Flour (soft)116lb51,968.0041.429
Water0.75gal3,409.502.718
Salt4.75lb2,128.001.696
Batter sponge from above

141,925.50113.142


199,431.00158.985
Then ready for kneading, dividing and moulding


1lb448g
1gal4546g
1oz28g


I adjusted overall salt to 2% and estimated the modern yeast to be a lot stronger, the formula I used was:

Quarter Sponge Process after Elizabeth David / Walter BanfieldExpected Yield1,000.0
Factor6.3
Total IngredientsBakers %Weight
Flour100.00631.2
Water56.17354.6
Malt Extract0.181.1
Yeast (fresh)0.080.5
Salt2.0012.6
Yield158.431,000.0


Initial Sponge; ferment 14 hours at 21C
Flour22.86144.3
water13.5985.8
yeast (instant)0.030.2
salt0.181.1

36.65231.3
Second Stage Sponge; ferment 1 hour at 26C, "Batter Sponge"
Flour35.71225.4
Water39.86251.6
Salt0.633.9
Malt extract0.181.1
Initial sponge from above36.65231.3

113.03713.5
Third stage sponge; ferment 1.5 hours at 26C
Flour41.43261.5
Water2.7217.2
Salt1.207.6
Batter sponge from above113.03713.5

158.38999.7


After the Third Stage Sponge (Final Dough) had rested, I kneaded, divided and shaped, followed by another 1.5 hours rest.

The dough was very pleasant to work with, despite the low hydration (using Bacheldre organic stoneground bakers white flour).

Baked with steam in a falling oven to 210C for 45 minutes. 

An interesting experience.

Happy Baking,

Juergen


breaducation's picture
breaducation

One of my very favorite snacks is a good old fashion peanut butter and jelly sandwich. I can't get enough of these things. Usually I use a whole grain sandwich bread, like a sprouted wheat loaf, as the base because I prefer a more hearty bread and the health benefits whole grain provides. But every now and then I get the urge to make a totally classic peanut butter and jelly, white bread and all. This was the inspiration behind my latest bake: Sourdough Pan de Mie.

The loaf I decided to make was based off the amazing txfarmer's formula found here. However, this formula calls for retarding the dough overnight and a 6 hour(!) proof time. I definitely did not want to wait that long for my pb&j so I added instant yeast to reduce the bulk to to around 1 hour and the proofing time to 2 1/2 hours. The retarding was skipped all together. This probably cut down on a fair amount of sourness but I was fine with this as I wanted very limited levels of sourness in this bread. I also used whole egg instead of egg whites.

I also altered the way this dough is mixed. Txfarmer did the mixing for her bread in a stand mixer and mixed to a high level of gluten development. I don't have access to a mixer at home so I had to figure out a different way to develop the gluten. I decided to use the method I describe in lesson one  on my site with a couple modifications. 1) I folded the dough multiple times after each five minutes rest until the dough resisted more folding and 2) Even after the initial three folds I continued to fold the dough every ten minutes until the end of bulk. This worked very well as I ended up with nice strength despite the dough being surprisingly wet.

The bread turned out exactly as I had hoped! It is quite moist and mild flavored. It is subtly sweet and slightly rich. It is also surprisingly strong for being so soft. A quality that comes in handy when spreading peanut butter on top. I will definitely be making this again the next time I crave white bread.

For the formula and process visit aBreaducation.

cp3o's picture

Basic White Sandwich Bread

March 21, 2012 - 2:34pm -- cp3o

Hi Chet, I'm new here.  Floyd helped me register as I am sometimes computer-challenged!  Your recipe looks interesting and I'll certainly try it . Experimenting  with a good basic recipe for white sandwich bread is fun.  You might try using canola oil or butter  instead of lard or Crisco. Peter Rinehart uses butter in his basic white bread recipe, and he adds an egg too. It sure is fun to tweak a recipe and have it come out great!  Good luck.                 cp3o


Juergen Krauss's picture

Feeding Ducks ...

January 31, 2012 - 4:23am -- Juergen Krauss
Forums: 

... just got more complicated, at least in East Sussex, UK.

This is the sign put up at the duck pond outside my son's school:
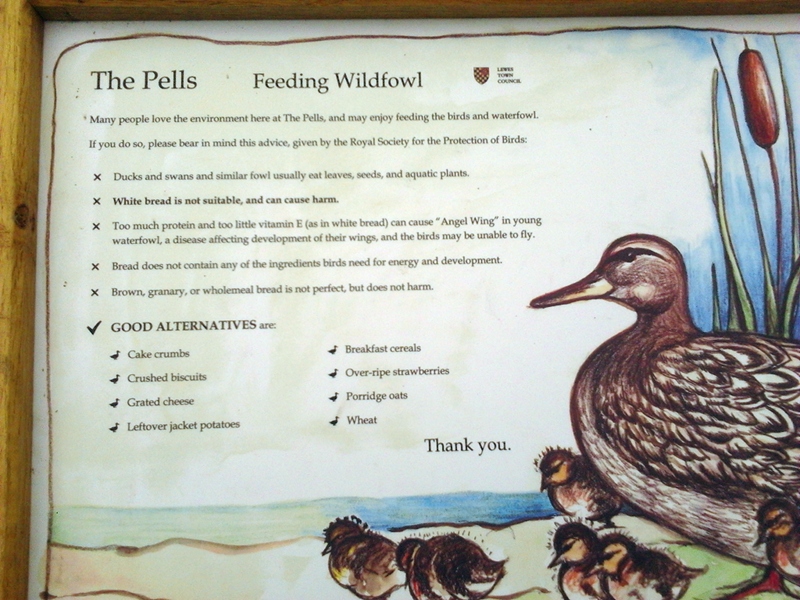
I knew feeding bread wasn't too good for the environment, introducing a lot of nutrients into the environment and essentially helping algae to grow (and I now know that angel wings might be caused by malnutrition), but:

White bread, not ok (the community officers are watching you!) - cake crumbs ok?

Hm, makes me think...

Juergen

jennyloh's picture
jennyloh

Another Simple White Loaf.  I got this from this Japanese website:  http://kneader.jp/recipe/14.  Thanks to Koby.  It was a light,  fluffly bread,  just like those you find in those Japanese Bakery.  I doubled the recipe here.

What I find interesting is the method:  1.  The Biga Mix -  it includes sugar first.  its quite a high content of yeast,  I probably would like to try a little less instant yeast.  This only requires 10 minutes although I extended it to 30 mins because of the temperature here.  2.  The baking -  3 different degrees within the span of 35 mins baking time.  Here's the details in this site:  https://sites.google.com/a/jlohcook.com/jennycook/latest-postings/simplewhiteloaf

What do you think of this method?


Szanter5339's picture
Szanter5339

The creative loaves white bread almost midíg make.
The leaven before baking in a day or two doing it.
All material kneading dough a little harder. When smooth and shiny, it's good. Double the size of ulcer I am lost. Dumps and the board smooths out a bit, then screw the oblong shape. Add to pots and pattern cutter blade on it, or make a thin batter ellapítva sample.
A little bread megvizezem the top of the sample rátapadjon. Let rise for 20 minutes, then lekenem I put the pots with water and cover. 220-degree oven 50 minutes in hot oven.
When you take out of the oven, even lekenem water.
So I bake these lovely loaves. I put some photos up.
I'm glad to be here, but the problem is that I do not understand the language and machine translators. A little heavy.
A lot of my photos here, and especially to show you. I'm glad you like my work and it inspires me in the future.

http://szanter.blogspot.com/2011/03/kenyersutesfazisfotokkal.html

http://kreativkenyerek.wordpress.com/


700 ml of water
6 tablespoons of oil
2 tablespoons vinegar (20%)
6 teaspoons of salt
2 tablespoons powdered sugar
1600 gram flour
40 grams of yeast
In yeast +

Preparation of yeast, 1-2 days before cooking.

yeast:
140 ml of water
150 grams of flour
1 tablespoon oil
½ teaspoon salt
20 grams of yeast

varda's picture
varda


Syd's white sandwich loaf http://www.thefreshloaf.com/node/22464/white-sandwich-loaf has been on my to bake list since it was posted.   But those lists are ever growing and time is ever short and I'm ever distractable, so...  One of the distractions has been the yeast water craze.   As much as I pride myself on being above fashion, the simple fact is I'm not.   So when Daisy suggested that an enriched bread might be a good candidate for yeast water, I decided to kill two birds with one stone and try Syd's loaf with yeast water.   The problem with converting a recipe before trying it first, is one has (I have) no idea what one is (I am) doing, so I had a failure or three.    Then I decided to bake two loaves side by side - one Syd's original formula and the other, his formula converted to yeast water.    The loaf pictured in the first four photos is made with Syd's original formula scaled down by 3/4.   The only deviation is that I did not use ascorbic acid.   


The resulting bread is probably the most feathery light I have ever made.   The taste is mild but delicious.    Unfortunately the pictures can barely capture the wonderful taste and texture of this bread.    My recommendation - if you have any taste at all for white bread, go to Syd's original post and bake it.  

For the second loaf, I converted to yeast water by replacing all of the water in the poolish with yeast water and omitting the yeast.    I also omitted the yeast from the final dough.   Otherwise I followed exactly the same formula, again without the ascorbic acid.   After mixing both batches of dough this morning I had to go out for a few hours, so I refrigerated both bowls.    When I got back, the yeast version had already doubled, while there appeared to be no change to the yeast water one.    I shaped the yeast one and placed in a bread pan to proof, and stretched and folded the yeast water dough and let it bulk ferment on the counter.    Before long (I wasn't watching the clock) the yeast loaf had risen an inch above the pan so I baked it, and then shaped and proofed the yeast water loaf.   By the time the yeast water loaf was ready to go in, it hadn't even cleared the pan top.   But it was softening so I decided to bake it.   In the oven it grew to around 80% of the volume of the yeast version.   

After tasting the original, I was ready to hate the yeast water version, but surprise, surprise, there was nothing to hate.   While the yeast water loaf wasn't as feathery light as the original, and really the taste was completely different, it was every bit as delicious as the first - just a different style of bread.   It's hard to come up with exactly the right words, but the yeast water loaf had a tiny bit of a tang, and a more complex flavor in a somewhat denser (not dense, just denser) bread.   The picture below is of both loaves (yeast water on the bottom) and below that two shots of the yeast water crumb.   I will be hard put to decide which one of these to make next time.   Such dilemmas are fun to have.   Thank you Syd, for posting your fabulous and delicious formula.


MadAboutB8's picture
MadAboutB8


I'm back to basic white bread (well, with a little little tweak). It was the first bread I ever made a little over a year ago, from Peter Reinhart's BBA (my first bread making book). I made this bread again with two motivations, One was that I wanted to experiment with soy flour in bread and it would be better to do it with simple basic recipe. The other was that I wanted to experiment making super soft sandwich bread by implementing intensive kneading as per  txfarmer’s blog on the issue. 

PR recipe produced simple and great tasting bread. I still remember that I thought it was the best bread ever when I first had a bite. Not that I'm a good baker, freshly baked bread will taste great, no matter what. And it was even more so, when it was your first you-made bread, fresh out of the oven. It was an absolute joy and gave such a sense of satisfaction. 

One year past, same recipe with tweaks of sourdough starter, soy flour (5%) and intensive kneading (to produce soft and tender crumb), this time, the bread tasted even better. So much better, in fact. Soy flour added mild sweet nutty flavour and creamier crumbs. Incorporating sourdough starter in the recipe also gave more flavour to the bread. Intensive kneading also delivered super soft crumb. The bread was so soft, flavoursome, sweet, creamy and has fantastic aroma (the aroma from the baking stayed in my house for whole day, I’m not joking). It was so yummy that I could just eat the bread on itself, without any butter or spread. The bread reminded me of the soft bread from our local bakery, that I had when I was a kid living in Bangkok.

The bread also worked well with the pea and ham soup for our Winter night (it has been really cold in Melbourne, Australia this week. It is the coldest June in years). 

Full post and recipe is here

Sue

http://youcandoitathome.blogspot.com

abovethelau's picture

First Time Baking Bread :) Quick Question!

April 28, 2011 - 8:08am -- abovethelau
Forums: 

So I have been baking all my life, but have never ventured into the land of bread (other than sweet breads, doughnuts etc.) and yesterday I decided to make the plunge and bake my first loaf of white bread.

My recipe made enough dough for two loaves, so I baked one loaf and put the rest of the dough into the fridge so I could make it today (after I had tried my first loaf). My first loaf was tasty and gorgeous but sadly super dense, which was okay for a first try but not perfect by any means.

Pages

Subscribe to RSS - White bread